<?xml version="1.0" encoding="utf-8"?>
<feed xmlns="http://www.w3.org/2005/Atom">
    <id>https://nabeelvalley.co.za</id>
    <title>Nabeel Valley</title>
    <updated>2024-02-01T21:06:44.418Z</updated>
    <generator>https://github.com/jpmonette/feed</generator>
    <author>
        <name>Nabeel Valley</name>
        <uri>https://nabeelvalley.co.za</uri>
    </author>
    <link rel="alternate" href="https://nabeelvalley.co.za"/>
    <subtitle>Personal website, blog, and code snippets</subtitle>
    <logo>https://nabeelvalley.co.za/assets/images/home/code.jpg</logo>
    <icon>https://nabeelvalley.co.za/assets/favicon.png</icon>
    <rights>All rights reserved, Nabeel Valley</rights>
    <entry>
        <title type="html"><![CDATA[Education App Design Ideas]]></title>
        <id>/blog/2022/27-09/open-education-app/</id>
        <link href="https://nabeelvalley.co.za/blog/2022/27-09/open-education-app/"/>
        <updated>2022-09-26T22:00:00.000Z</updated>
        <summary type="html"><![CDATA[Some design snips for a learning app]]></summary>
        <content type="html"><![CDATA[<hr>
<h2 id="title%3A-education-app-design-ideassubtitle%3A-27-september-2022description%3A-some-design-snips-for-a-learning-appimage%3A-content%2Fblog%2F2022%2F27-09%2Fimage1.pngpublished%3A-true" tabindex="-1">title: Education App Design Ideas
subtitle: 27 September 2022
description: Some design snips for a learning app
image: content/blog/2022/27-09/image1.png
published: true</h2>
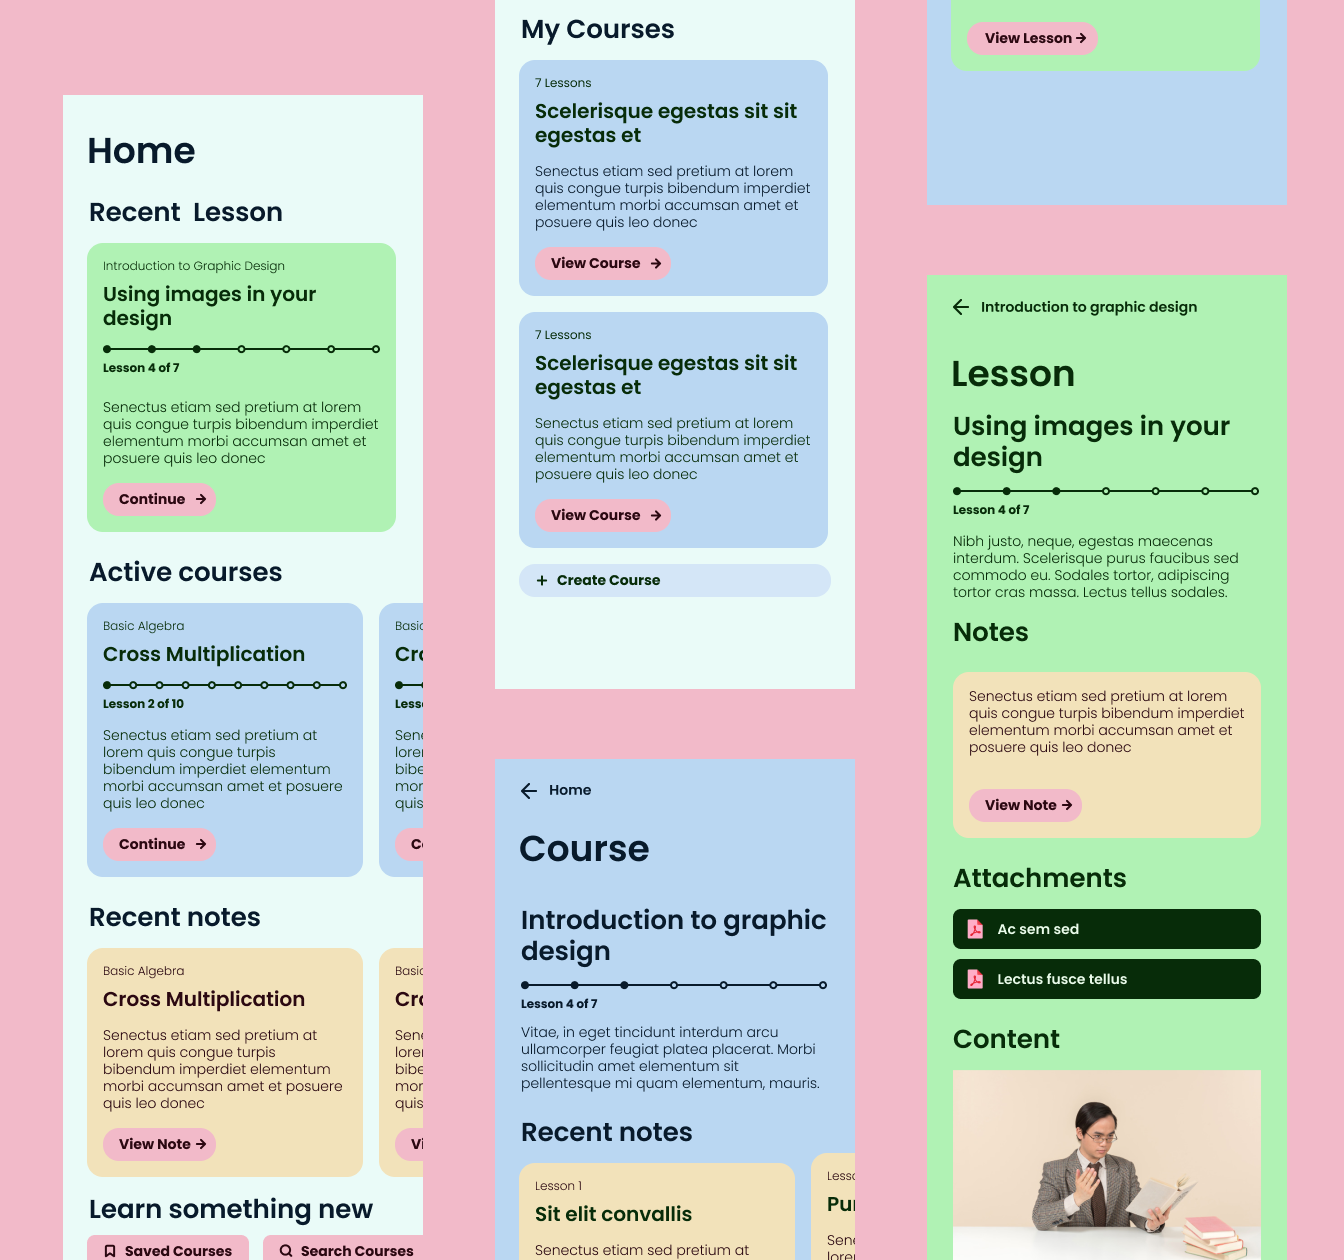
<h1 id="general-app-overview" tabindex="-1">General App Overview</h1>
<p><img src="/blog/2022/27-09/image1.png" alt=""></p>
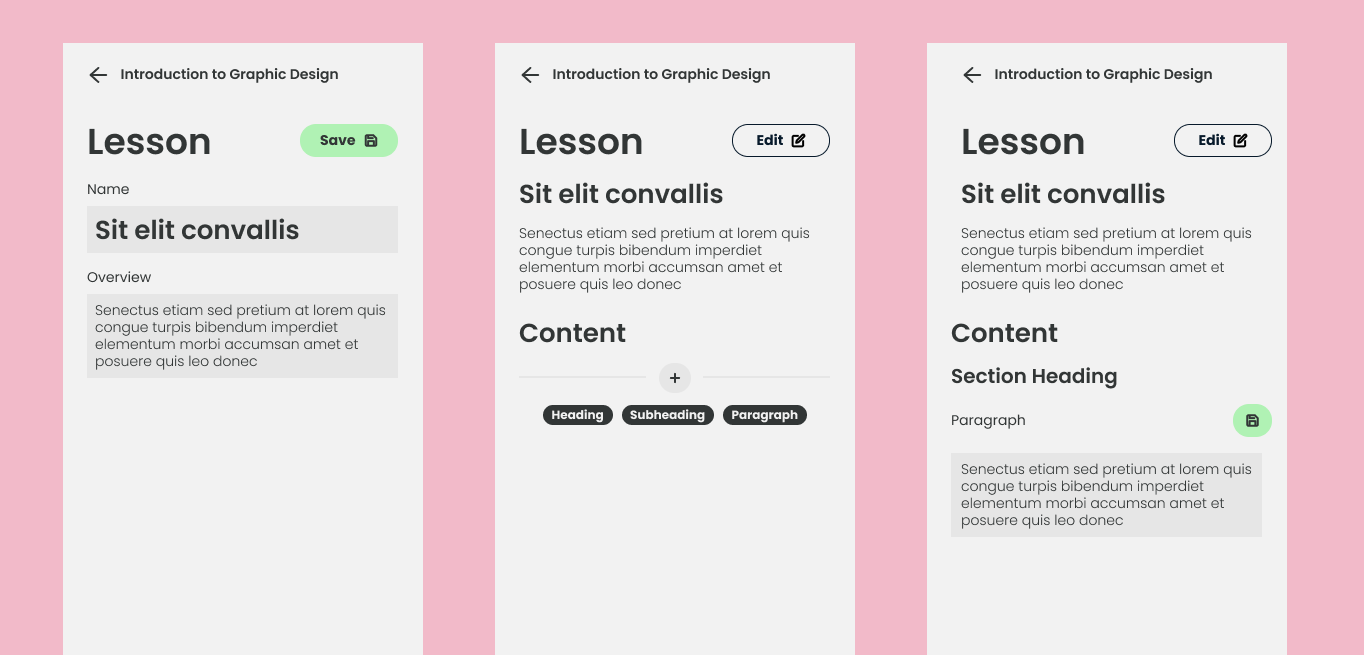
<h1 id="content-creation-and-editing-experience" tabindex="-1">Content Creation and Editing Experience</h1>
<p><img src="/blog/2022/27-09/image3.png" alt=""></p>
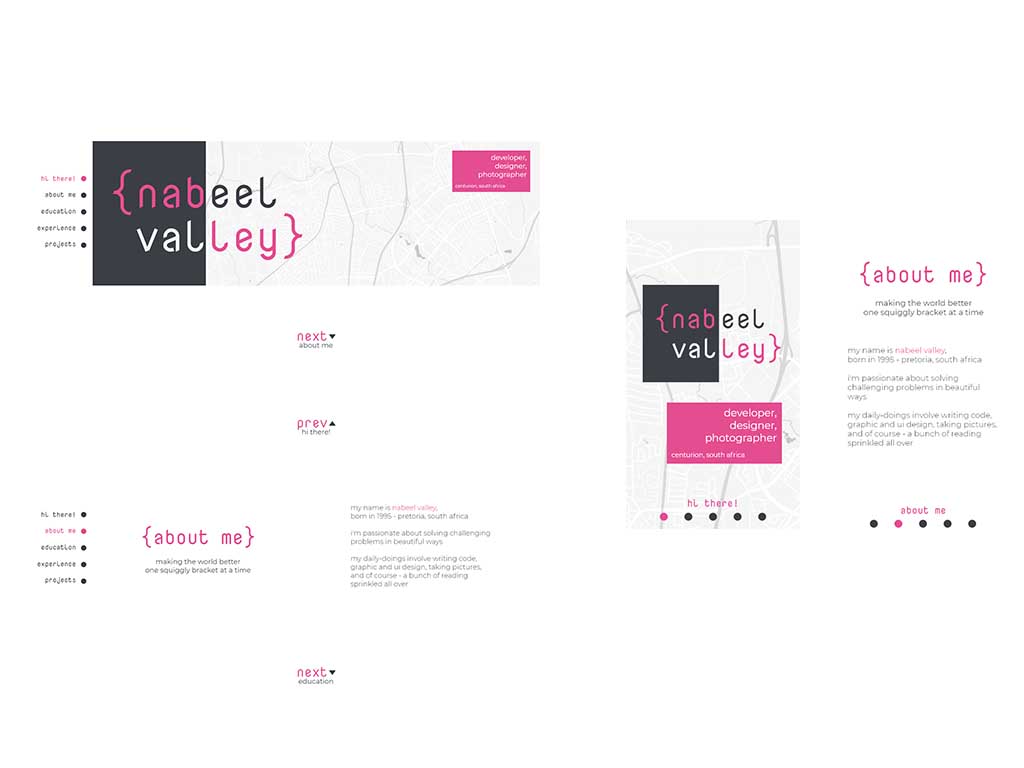
<h1 id="alternate-themes" tabindex="-1">Alternate Themes</h1>
<p><img src="/blog/2022/27-09/image2.png" alt=""></p>
]]></content>
        <author>
            <name>Nabeel Valley</name>
            <uri>https://nabeelvalley.co.za</uri>
        </author>
    </entry>
    <entry>
        <title type="html"><![CDATA[Read Metadata from Images using Rust]]></title>
        <id>/blog/2022/25-08/read-image-metadata/</id>
        <link href="https://nabeelvalley.co.za/blog/2022/25-08/read-image-metadata/"/>
        <updated>2022-08-24T22:00:00.000Z</updated>
        <summary type="html"><![CDATA[Using Rust to parse EXIF metadata from image files]]></summary>
        <content type="html"><![CDATA[<hr>
<h2 id="title%3A-read-metadata-from-images-using-rustsubtitle%3A-25-august-2022description%3A-using-rust-to-parse-exif-metadata-from-image-filespublished%3A-true" tabindex="-1">title: Read Metadata from Images using Rust
subtitle: 25 August 2022
description: Using Rust to parse EXIF metadata from image files
published: true</h2>
<p><div class="table-of-contents"><details><summary>Contents</summary><ul><li><ul><li><a href="#title%3A-read-metadata-from-images-using-rustsubtitle%3A-25-august-2022description%3A-using-rust-to-parse-exif-metadata-from-image-filespublished%3A-true">title: Read Metadata from Images using Rustsubtitle: 25 August 2022description: Using Rust to parse EXIF metadata from image filespublished: true</a></li></ul></li><li><a href="#introduction">Introduction</a></li><li><a href="#the-rust-programming-language">The Rust Programming Language</a></li><li><a href="#the-exchangeable-image-file-format-(exif)">The Exchangeable Image File Format (EXIF)</a></li><li><a href="#reading-exif-data">Reading EXIF Data</a><ul><li><a href="#under-the-hood-of-an-image-file">Under the Hood of an Image File</a></li><li><a href="#reading-a-file-as-bytes">Reading a File as Bytes</a></li><li><a href="#finding-the-exif-starting-point">Finding the EXIF Starting Point</a></li><li><a href="#getting-the-byte-order">Getting the Byte Order</a></li><li><a href="#getting-the-ifd-data-start-location-and-count">Getting the IFD Data Start Location and Count</a></li><li><a href="#reading-entries-in-the-ifd">Reading Entries in the IFD</a><ul><li><a href="#tag-id">Tag ID</a></li><li><a href="#data-format">Data Format</a></li><li><a href="#component-length">Component Length</a></li><li><a href="#data">Data</a></li><li><a href="#reading-additional-entries">Reading Additional Entries</a></li></ul></li></ul></li><li><a href="#conclusion">Conclusion</a></li><li><a href="#references">References</a></li></ul></details></div></p>
<blockquote>
<p>The complete Rust code discussed in this post can be found in the <a href="https://github.com/nabeelvalley/exiflib">exiflib GitHub repo</a></p>
</blockquote>
<h1 id="introduction" tabindex="-1">Introduction</h1>
<p>Image files, such as JPEG, PNG, and RAW formats from digital cameras and software, contain metadata about the image. This metadata can contain information ranging from the make and model of the camera used to the specific shooting conditions under which a picture was taken</p>
<p>Reading this data depends on the image format used. This post looks at specifically reading metadata from images that use the Exchangeable Image File Format (EXIF) for storing metadata</p>
<h1 id="the-rust-programming-language" tabindex="-1">The Rust Programming Language</h1>
<p>The <a href="https://www.rust-lang.org/">Rust programming language</a> is used to read and process the image files. Rust is a general-purpose programming language with an emphasis on performance and type safety</p>
<p>While this post doesn't cover the specifics of programming in Rust, any code samples are accompanied by a description of what the code does but it's useful to have a basic understanding of programming for understanding exactly what the code is doing</p>
<p>It's also worth noting that this post covers a lot of bit-level processing of image files, to get a basic understanding of binary data works take a look at the previous post on <a href="../20-08/understanding-binary-files">Understanding Binary File Formats</a></p>
<h1 id="the-exchangeable-image-file-format-(exif)" tabindex="-1">The Exchangeable Image File Format (EXIF)</h1>
<p>The Exchangeable Image File Format (EXIF) is based on the Tag Image File Format (TIFF) specification for storing metadata. This data is organised into Image File Directories (IFDs) within an image file</p>
<p>The EXIF section in an image file is structured as follows:</p>
<table>
<thead>
<tr>
<th>Section</th>
<th>Subsection</th>
<th>Number of Bytes</th>
</tr>
</thead>
<tbody>
<tr>
<td>Header</td>
<td></td>
<td></td>
</tr>
<tr>
<td></td>
<td>EXIF Marker (Exif00)</td>
<td>6 bytes</td>
</tr>
<tr>
<td>IFD</td>
<td></td>
<td></td>
</tr>
<tr>
<td></td>
<td>Byte Order (II or MM)</td>
<td>2 bytes</td>
</tr>
<tr>
<td></td>
<td>Magic Number (42)</td>
<td>2 bytes</td>
</tr>
<tr>
<td></td>
<td>Data Start Location</td>
<td>4 bytes</td>
</tr>
<tr>
<td></td>
<td>Data Count</td>
<td>2 bytes</td>
</tr>
<tr>
<td></td>
<td>Data Entries</td>
<td>Data Count x 12 bytes/entry</td>
</tr>
<tr>
<td>Additional Data Section</td>
<td></td>
<td></td>
</tr>
</tbody>
</table>
<h1 id="reading-exif-data" tabindex="-1">Reading EXIF Data</h1>
<p>Reading EXIF data is done by reading the bytes in the file. The following examples will use a JPEG from a Fujifilm X-T200 as a reference, though the same concepts can be applied to understanding data from any file format that stores metadata using the EXIF structure</p>
<h2 id="under-the-hood-of-an-image-file" tabindex="-1">Under the Hood of an Image File</h2>
<p>Below is a snippet of the Hex data for a JPEG file alongside the bytes decoded as text:</p>
<pre><code class="hljs"><span class="hljs-attribute">Hex</span> Data                                           Decoded Text                       Approximate EXIF Subsections

<span class="hljs-attribute">FF</span> D8 FF E1 <span class="hljs-number">57</span> FE <span class="hljs-number">45</span> <span class="hljs-number">78</span> <span class="hljs-number">69</span> <span class="hljs-number">66</span> <span class="hljs-number">00</span> <span class="hljs-number">00</span> <span class="hljs-number">49</span> <span class="hljs-number">49</span> <span class="hljs-number">2</span>A <span class="hljs-number">00</span>    . . . . W . E x i f . . I I * .    Header, Byte Order, Magic Number
<span class="hljs-attribute">08</span> <span class="hljs-number">00</span> <span class="hljs-number">00</span> <span class="hljs-number">00</span> <span class="hljs-number">0</span>C <span class="hljs-number">00</span> <span class="hljs-number">0</span>F <span class="hljs-number">01</span> <span class="hljs-number">02</span> <span class="hljs-number">00</span> <span class="hljs-number">09</span> <span class="hljs-number">00</span> <span class="hljs-number">00</span> <span class="hljs-number">00</span> <span class="hljs-number">9</span>E <span class="hljs-number">00</span>    . . . . . . . . . . . . . . . .    Data Count, Data Start Location
<span class="hljs-attribute">00</span> <span class="hljs-number">00</span> <span class="hljs-number">10</span> <span class="hljs-number">01</span> <span class="hljs-number">02</span> <span class="hljs-number">00</span> <span class="hljs-number">07</span> <span class="hljs-number">00</span> <span class="hljs-number">00</span> <span class="hljs-number">00</span> A8 <span class="hljs-number">00</span> <span class="hljs-number">00</span> <span class="hljs-number">00</span> <span class="hljs-number">12</span> <span class="hljs-number">01</span>    . . . . . . . . . . . . . . . .    |
<span class="hljs-attribute">03</span> <span class="hljs-number">00</span> <span class="hljs-number">01</span> <span class="hljs-number">00</span> <span class="hljs-number">00</span> <span class="hljs-number">00</span> <span class="hljs-number">01</span> <span class="hljs-number">00</span> <span class="hljs-number">00</span> <span class="hljs-number">00</span> <span class="hljs-number">1</span>A <span class="hljs-number">01</span> <span class="hljs-number">05</span> <span class="hljs-number">00</span> <span class="hljs-number">01</span> <span class="hljs-number">00</span>    . . . . . . . . . . . . . . . .    |
<span class="hljs-attribute">00</span> <span class="hljs-number">00</span> B0 <span class="hljs-number">00</span> <span class="hljs-number">00</span> <span class="hljs-number">00</span> <span class="hljs-number">1</span>B <span class="hljs-number">01</span> <span class="hljs-number">05</span> <span class="hljs-number">00</span> <span class="hljs-number">01</span> <span class="hljs-number">00</span> <span class="hljs-number">00</span> <span class="hljs-number">00</span> B8 <span class="hljs-number">00</span>    . . . . . . . . . . . . . . . .    | Data Entries
<span class="hljs-attribute">00</span> <span class="hljs-number">00</span> <span class="hljs-number">28</span> <span class="hljs-number">01</span> <span class="hljs-number">03</span> <span class="hljs-number">00</span> <span class="hljs-number">01</span> <span class="hljs-number">00</span> <span class="hljs-number">00</span> <span class="hljs-number">00</span> <span class="hljs-number">02</span> <span class="hljs-number">00</span> <span class="hljs-number">00</span> <span class="hljs-number">00</span> <span class="hljs-number">31</span> <span class="hljs-number">01</span>    . . ( . . . . . . . . . . . <span class="hljs-number">1</span> .    | 
<span class="hljs-attribute">02</span> <span class="hljs-number">00</span> <span class="hljs-number">1</span>E <span class="hljs-number">00</span> <span class="hljs-number">00</span> <span class="hljs-number">00</span> C0 <span class="hljs-number">00</span> <span class="hljs-number">00</span> <span class="hljs-number">00</span> <span class="hljs-number">32</span> <span class="hljs-number">01</span> <span class="hljs-number">02</span> <span class="hljs-number">00</span> <span class="hljs-number">14</span> <span class="hljs-number">00</span>    . . . . . . . . . . <span class="hljs-number">2</span> . . . . .    |_ 
<span class="hljs-attribute">00</span> <span class="hljs-number">00</span> DE <span class="hljs-number">00</span> <span class="hljs-number">00</span> <span class="hljs-number">00</span> <span class="hljs-number">13</span> <span class="hljs-number">02</span> <span class="hljs-number">03</span> <span class="hljs-number">00</span> <span class="hljs-number">01</span> <span class="hljs-number">00</span> <span class="hljs-number">00</span> <span class="hljs-number">00</span> <span class="hljs-number">02</span> <span class="hljs-number">00</span>    . . . . . . . . . . . . . . . .    | 
<span class="hljs-attribute">00</span> <span class="hljs-number">00</span> <span class="hljs-number">98</span> <span class="hljs-number">82</span> <span class="hljs-number">02</span> <span class="hljs-number">00</span> <span class="hljs-number">05</span> <span class="hljs-number">00</span> <span class="hljs-number">00</span> <span class="hljs-number">00</span> F2 <span class="hljs-number">00</span> <span class="hljs-number">00</span> <span class="hljs-number">00</span> <span class="hljs-number">69</span> <span class="hljs-number">87</span>    . . . . . . . . . . . . . . i .    |
<span class="hljs-attribute">04</span> <span class="hljs-number">00</span> <span class="hljs-number">01</span> <span class="hljs-number">00</span> <span class="hljs-number">00</span> <span class="hljs-number">00</span> <span class="hljs-number">14</span> <span class="hljs-number">01</span> <span class="hljs-number">00</span> <span class="hljs-number">00</span> A5 C4 <span class="hljs-number">07</span> <span class="hljs-number">00</span> <span class="hljs-number">1</span>C <span class="hljs-number">00</span>    . . . . . . . . . . . . . . . .    | Additional Data Section
<span class="hljs-attribute">00</span> <span class="hljs-number">00</span> F8 <span class="hljs-number">00</span> <span class="hljs-number">00</span> <span class="hljs-number">00</span> EC <span class="hljs-number">29</span> <span class="hljs-number">00</span> <span class="hljs-number">00</span> <span class="hljs-number">46</span> <span class="hljs-number">55</span> <span class="hljs-number">4</span>A <span class="hljs-number">49</span> <span class="hljs-number">46</span> <span class="hljs-number">49</span>    . . . . . . . ) . . F U J I F I    |
<span class="hljs-attribute">4C</span> <span class="hljs-number">4</span>D <span class="hljs-number">00</span> <span class="hljs-number">00</span> <span class="hljs-number">58</span> <span class="hljs-number">2</span>D <span class="hljs-number">54</span> <span class="hljs-number">32</span> <span class="hljs-number">30</span> <span class="hljs-number">30</span> <span class="hljs-number">00</span> <span class="hljs-number">00</span> <span class="hljs-number">48</span> <span class="hljs-number">00</span> <span class="hljs-number">00</span> <span class="hljs-number">00</span>    L M . . X - T <span class="hljs-number">2</span> <span class="hljs-number">0</span> <span class="hljs-number">0</span> . . H . . .    |
<span class="hljs-attribute">01</span> <span class="hljs-number">00</span> <span class="hljs-number">00</span> <span class="hljs-number">00</span> <span class="hljs-number">48</span> <span class="hljs-number">00</span> <span class="hljs-number">00</span> <span class="hljs-number">00</span> <span class="hljs-number">01</span> <span class="hljs-number">00</span> <span class="hljs-number">00</span> <span class="hljs-number">00</span> <span class="hljs-number">44</span> <span class="hljs-number">69</span> <span class="hljs-number">67</span> <span class="hljs-number">69</span>    . . . . H . . . . . . . D i g i    |
</code></pre>
<p>The above snippet shows the hex data, in here the EXIF marker can be found on the first line - <code>45 78 69 66 00 00</code> which decodes to <code>EXIF\0\</code>, followed by the byte order <code>49 49</code> - <code>II</code> which means that the byte order for the file is Little Endian - which means that the smallest value in a sequence is the first byte - this can be used to decode <code>2A 00</code> to <code>42</code> if the byte order was Big endian the bytes representing <code>42</code> would be flipped</p>
<p>The byte order section is the most important thing to note on this first line as it tells an application how to read the data in the IFD as well as it is what any byte offsets should be calculated relative to</p>
<p>Additionally, the data entries section and the additional data section are broadly marked off, to understand where data is located in this file</p>
<h2 id="reading-a-file-as-bytes" tabindex="-1">Reading a File as Bytes</h2>
<p>Rust provides a method for reading a file in the standard library is <code>fs::read</code> which can be used by providing it with a path to the file to read, the code for this looks like so:</p>
<pre><code class="hljs language-rs"><span class="hljs-keyword">let</span> <span class="hljs-variable">file</span> = fs::<span class="hljs-title function_ invoke__">read</span>(<span class="hljs-string">&quot;./sample.jpg&quot;</span>).<span class="hljs-title function_ invoke__">unwrap</span>();
</code></pre>
<p>The <code>.unwrap()</code> at the end tells rust to either get the file data or exit the program with an error if it could not read the file</p>
<p>The result of this is a <code>Vec[u8]</code> which means a vector (or list) of bytes - the bytes in the list are represented as integer values between 0 and 255, these are equivalent to the hex values in the snippet above</p>
<p>The <code>file</code> is what is used to read the bytes from and will be the data source for reading the EXIF data</p>
<h2 id="finding-the-exif-starting-point" tabindex="-1">Finding the EXIF Starting Point</h2>
<p>To find the starting point of the EXIF data we can scan through the file until we find the <code>Exif\0\0</code> pattern, a function can be defined for searching for a pattern in a list of bytes:</p>
<pre><code class="hljs language-rs"><span class="hljs-keyword">pub</span> <span class="hljs-keyword">fn</span> <span class="hljs-title function_">get_sequence_range</span>(bytes: &amp;[<span class="hljs-type">u8</span>], pattern: &amp;[<span class="hljs-type">u8</span>]) <span class="hljs-punctuation">-&gt;</span> <span class="hljs-type">Option</span>&lt;Range&lt;<span class="hljs-type">usize</span>&gt;&gt; {
    <span class="hljs-keyword">let</span> <span class="hljs-variable">start</span> = bytes
        .<span class="hljs-title function_ invoke__">windows</span>(pattern.<span class="hljs-title function_ invoke__">len</span>())
        .<span class="hljs-title function_ invoke__">position</span>(|window| window == pattern)?;

    <span class="hljs-keyword">let</span> <span class="hljs-variable">end</span> = start + pattern.<span class="hljs-title function_ invoke__">len</span>();

    <span class="hljs-title function_ invoke__">Some</span>(start..end)
}
</code></pre>
<p>The function above called <code>get_sequence_range</code> searches the <code>bytes</code> for a <code>pattern</code>. This uses the <code>windows</code> function in rust which creates a bunch of smaller lists and finds the <code>position</code> where the <code>window</code>, which is a section of bytes that's the same length as the search <code>pattern</code> and checks if the value is equal to the <code>pattern</code></p>
<p>If the pattern can be found, then the function will return a range (basically, a start and end point) that goes from the <code>start</code> of the found pattern until the <code>end</code> of the pattern, which is simply the <code>start</code> value plus the length of the pattern</p>
<p>The <code>Option</code> indicates that the function returns either a value if it finds one (denoted by <code>Some</code>) or will return nothing if no value is found, denoted by <code>None</code>. The above function uses the shorthand for the <code>None</code> case which is done by placing a <code>?</code> at the end of the check for the pattern - which will cause the function to end early if it could not find the pattern</p>
<p>The above function for finding the starting point can be used by passing it the file's bytes like so:</p>
<pre><code class="hljs language-rs"><span class="hljs-keyword">const</span> EXIF_MARKER: &amp;[<span class="hljs-type">u8</span>] = <span class="hljs-string">&quot;Exif\0\0&quot;</span>.<span class="hljs-title function_ invoke__">as_bytes</span>();

<span class="hljs-keyword">let</span> <span class="hljs-variable">exif_range</span> = <span class="hljs-title function_ invoke__">get_sequence_range</span>(file, EXIF_MARKER)?;
</code></pre>
<p>Note that in the above function the <code>EXIF_MARKER</code> is defined as the <code>Exif\0\0</code> text converted to bytes, this is passed as the search pattern to the <code>get_sequence_range</code> function. This gets the EXIF header location which is used to find the Byte order (Endian) marker</p>
<h2 id="getting-the-byte-order" tabindex="-1">Getting the Byte Order</h2>
<p>Once we know the location of the EXIF marker, the byte order values go from the 6th and 7th byte after the start of the marker. Since this is done using a range, this means that the range goes from 6 to 8, since the end value is not included in the range, this can be see defined below:</p>
<pre><code class="hljs language-rs"><span class="hljs-keyword">const</span> ENDIAN_RANGE_FROM_EXIF_MARKER: Range&lt;<span class="hljs-type">usize</span>&gt; = <span class="hljs-number">6</span>..<span class="hljs-number">8</span>;
</code></pre>
<p>The bytes for the endian value can be found relative to the <code>exif_range</code> like so:</p>
<pre><code class="hljs language-rs"><span class="hljs-keyword">let</span> <span class="hljs-variable">start</span> = exif_range.start + ENDIAN_RANGE_FROM_EXIF_MARKER.start;

<span class="hljs-keyword">let</span> <span class="hljs-variable">bytes</span> = file.<span class="hljs-title function_ invoke__">get</span>(start..)?;
<span class="hljs-keyword">let</span> <span class="hljs-variable">endian_bytes</span> = bytes.<span class="hljs-title function_ invoke__">get</span>(<span class="hljs-number">0</span>..<span class="hljs-number">2</span>)?;
<span class="hljs-keyword">let</span> <span class="hljs-variable">endian</span> = <span class="hljs-title function_ invoke__">get_endian</span>(endian_bytes)?;
</code></pre>
<p>The above makes use of a <code>get_endian</code> function to get the byte order which can be defined as follows:</p>
<pre><code class="hljs language-rs"><span class="hljs-keyword">fn</span> <span class="hljs-title function_">get_endian</span>(endian_bytes: &amp;[<span class="hljs-type">u8</span>]) <span class="hljs-punctuation">-&gt;</span> <span class="hljs-type">Option</span>&lt;Endian&gt; {
    <span class="hljs-keyword">let</span> <span class="hljs-variable">endian</span> = parsing::<span class="hljs-title function_ invoke__">full_bytes_string</span>(endian_bytes)?;

    <span class="hljs-keyword">match</span> endian.<span class="hljs-title function_ invoke__">as_str</span>() {
        <span class="hljs-string">&quot;MM&quot;</span> =&gt; <span class="hljs-title function_ invoke__">Some</span>(Endian::Big),
        <span class="hljs-string">&quot;II&quot;</span> =&gt; <span class="hljs-title function_ invoke__">Some</span>(Endian::Little),
        _ =&gt; <span class="hljs-literal">None</span>,
    }
}
</code></pre>
<p>The above function takes the bytes which start at the endian location and converts them to a string (text) value</p>
<p>These values are then compared using a <code>match</code>. If it is <code>II</code> or <code>MM</code> the function returns Big Endian (<code>Endian::Big</code>) or Little Endian (<code>Endian::Little</code>) respectively. If no matching value is found, then <code>None</code> is returned instead</p>
<p>The code above also finds the <code>bytes</code>, which defines the file's bytes but trims off all the bytes that are before the endian marker - this is important since any data in the IFD needs to be read relative to the this location</p>
<p>Following the Endian bytes are 2 bytes which specify the Magic Number (42) as mentioned above - this can also be checked to verify the byte order of the file but is not covered in this post</p>
<h2 id="getting-the-ifd-data-start-location-and-count" tabindex="-1">Getting the IFD Data Start Location and Count</h2>
<p>Immediately after the Magic Number is four bytes that specify where the IFD data starts, in the snippet above, these bytes are <code>08 00 00 00</code> which convert to the value of <code>8</code>, this informs us that the IFD data starts from 8 bytes from the Endian marker</p>
<p>By following the offset value, the number of entries in the IFD can be found at the 8 bytes from the Endian marker, in this case, bytes <code>0C 00</code> which convert to the value of <code>12</code>, which indicates that there are 12 entries in the IFD</p>
<p>The code applying the above logic can be seen below:</p>
<pre><code class="hljs language-rs"><span class="hljs-keyword">let</span> <span class="hljs-variable">ifd0_offset</span> = <span class="hljs-title function_ invoke__">get_ifd_offset</span>(&amp;endian, ifd)? <span class="hljs-keyword">as</span> <span class="hljs-type">usize</span>;
<span class="hljs-keyword">let</span> <span class="hljs-variable">ifd0_entry_offset</span> = ifd0_offset + <span class="hljs-number">2</span>;

<span class="hljs-keyword">let</span> <span class="hljs-variable">ifd0_count</span> = u16::<span class="hljs-title function_ invoke__">from_offset_endian_bytes</span>(&amp;endian, ifd, ifd0_offset)?;
</code></pre>
<p>The function which gets the <code>ifd0_offset</code> does the lookup of bytes from the range 4 to 8, relative to the Endian marker</p>
<h2 id="reading-entries-in-the-ifd" tabindex="-1">Reading Entries in the IFD</h2>
<p>As a reference example, the bytes for the first entry in the IFD above will be used to understand the data and how it's stored</p>
<p>After the bytes indicate the count, the next section consists of the entries. Each entry consists of 12 bytes and is structured like so:</p>
<table>
<thead>
<tr>
<th>Tag</th>
<th>Data Format</th>
<th>Component Length</th>
<th>Data</th>
</tr>
</thead>
<tbody>
<tr>
<td>2 bytes</td>
<td>2 Bytes</td>
<td>4 Bytes</td>
<td>4 Bytes</td>
</tr>
<tr>
<td><code>0F 01</code></td>
<td><code>02 00</code></td>
<td><code>09 00 00 00</code></td>
<td><code>9E 00 00 00</code></td>
</tr>
</tbody>
</table>
<ul>
<li>The Tag is an identifier that specifies what the value of the entry represents</li>
<li>The Data format states how the data should be read</li>
<li>The Component Length states how many bytes the data for the entry consists of</li>
<li>The data can either be the actual data, or a value that gives the offset to the data, depending on the Component Lenght</li>
</ul>
<h3 id="tag-id" tabindex="-1">Tag ID</h3>
<p>Reading the Tag is done by parsing the first two bytes of an entry - This converts the value into a 16-bit unsigned integer (a positive integer)</p>
<p>The TagID is read like so:</p>
<pre><code class="hljs language-rs"><span class="hljs-keyword">let</span> <span class="hljs-variable">tag</span> = u16::<span class="hljs-title function_ invoke__">from_endian_bytes</span>(endian, entry)?;
</code></pre>
<p>The value of the tag is a 16-bit unsigned integer, but it's more commonly represented as Hex value in the tag lookup tables, a lookup table for these can be found at the <a href="https://exiftool.org/TagNames/EXIF.html">EXIF Tool Tag Names Doc</a></p>
<p>The value of the tag above <code>0F 01</code>  can be converted to hex for the Little Endian notation resulting in <code>0x010F</code>, the lookup table states that this tag identifies the <code>Make</code> property in the Exif data</p>
<h3 id="data-format" tabindex="-1">Data Format</h3>
<p>The data stored in an entry can be of 12 different formats, each of these associated with a format value - the format value can be read by reading from byte index 2 in the entry, like so:</p>
<pre><code class="hljs language-rs"><span class="hljs-keyword">let</span> <span class="hljs-variable">format_value</span> = u16::<span class="hljs-title function_ invoke__">from_offset_endian_bytes</span>(endian, entry, <span class="hljs-number">2</span>)?;
</code></pre>
<p>The format value is a 16-bit unsigned integer, the same as the Tag, though this is used as an integer value and not hex. Each integer value maps to a specific format type, as seen in the below table:</p>
<table>
<thead>
<tr>
<th>Format Value</th>
<th>Format</th>
<th>Bytes per Component</th>
<th>Data Type</th>
<th>Description</th>
</tr>
</thead>
<tbody>
<tr>
<td>1</td>
<td>Unsigned Byte</td>
<td>1</td>
<td>u8</td>
<td>8-bit positive integer</td>
</tr>
<tr>
<td>2</td>
<td>ASCII String</td>
<td>1</td>
<td>String</td>
<td>Text/String value</td>
</tr>
<tr>
<td>3</td>
<td>Unsigned Short</td>
<td>2</td>
<td>u16</td>
<td>16-bit positive integer</td>
</tr>
<tr>
<td>4</td>
<td>Unsigned Long</td>
<td>4</td>
<td>u32</td>
<td>32-bit positive integer</td>
</tr>
<tr>
<td>5</td>
<td>Unsigned Rational</td>
<td>8</td>
<td>u32, u32</td>
<td>positive fraction - numerator and denominator</td>
</tr>
<tr>
<td>6</td>
<td>Signed Byte</td>
<td>1</td>
<td>i8</td>
<td>8-bit integer</td>
</tr>
<tr>
<td>7</td>
<td>Undefined</td>
<td>1</td>
<td>[u8]</td>
<td>list of bytes</td>
</tr>
<tr>
<td>8</td>
<td>Signed Short</td>
<td>2</td>
<td>i16</td>
<td>16-bit integer</td>
</tr>
<tr>
<td>9</td>
<td>Signed Long</td>
<td>4</td>
<td>i32</td>
<td>32-bit integer</td>
</tr>
<tr>
<td>10</td>
<td>Signed Rational</td>
<td>8</td>
<td>i32, i32</td>
<td>fraction value - numerator and denominator</td>
</tr>
<tr>
<td>11</td>
<td>Single Float</td>
<td>4</td>
<td>f32</td>
<td>floating point/decimal</td>
</tr>
<tr>
<td>12</td>
<td>Double Float</td>
<td>8</td>
<td>f64</td>
<td>double precision floating point</td>
</tr>
</tbody>
</table>
<p>The above table is implemented in code by first defining a type that states all the possible format types:</p>
<pre><code class="hljs language-rs"><span class="hljs-keyword">pub</span> <span class="hljs-keyword">enum</span> <span class="hljs-title class_">TagFormat</span> {
    UnsignedByte,
    AsciiString,
    UnsignedShort,
    UnsignedLong,
    UnsignedRational,
    SignedByte,
    Undefined,
    SignedShort,
    SignedLong,
    SignedRational,
    SingleFloat,
    DoubleFloat,
}
</code></pre>
<p>Each type of value can also be described in terms of the data type it stores as follows:</p>
<pre><code class="hljs language-rs"><span class="hljs-keyword">pub</span> <span class="hljs-keyword">enum</span> <span class="hljs-title class_">ExifValue</span>&lt;<span class="hljs-symbol">&#x27;a</span>&gt; {
    <span class="hljs-title function_ invoke__">UnsignedByte</span>(<span class="hljs-type">u8</span>),
    <span class="hljs-title function_ invoke__">AsciiString</span>(<span class="hljs-type">String</span>),
    <span class="hljs-title function_ invoke__">UnsignedShort</span>(<span class="hljs-type">u16</span>),
    <span class="hljs-title function_ invoke__">UnsignedLong</span>(<span class="hljs-type">u32</span>),
    <span class="hljs-title function_ invoke__">UnsignedRational</span>(<span class="hljs-type">u32</span>, <span class="hljs-type">u32</span>),
    <span class="hljs-title function_ invoke__">SignedByte</span>(<span class="hljs-type">i8</span>),
    <span class="hljs-title function_ invoke__">Undefined</span>(&amp;<span class="hljs-symbol">&#x27;a</span> [<span class="hljs-type">u8</span>]),
    <span class="hljs-title function_ invoke__">SignedShort</span>(<span class="hljs-type">i16</span>),
    <span class="hljs-title function_ invoke__">SignedLong</span>(<span class="hljs-type">i32</span>),
    <span class="hljs-title function_ invoke__">SignedRational</span>(<span class="hljs-type">i32</span>, <span class="hljs-type">i32</span>),
    <span class="hljs-title function_ invoke__">SingleFloat</span>(<span class="hljs-type">f32</span>),
    <span class="hljs-title function_ invoke__">DoubleFloat</span>(<span class="hljs-type">f64</span>),
}
</code></pre>
<p>Thereafter, a function to go from the given Format Value to the type of the tag being used:</p>
<pre><code class="hljs language-rs"><span class="hljs-keyword">fn</span> <span class="hljs-title function_">get_tag_format</span>(value: &amp;<span class="hljs-type">u16</span>) <span class="hljs-punctuation">-&gt;</span> <span class="hljs-type">Option</span>&lt;TagFormat&gt; {
    <span class="hljs-keyword">match</span> value {
        <span class="hljs-number">1</span> =&gt; <span class="hljs-title function_ invoke__">Some</span>(TagFormat::UnsignedByte),
        <span class="hljs-number">2</span> =&gt; <span class="hljs-title function_ invoke__">Some</span>(TagFormat::AsciiString),
        <span class="hljs-number">3</span> =&gt; <span class="hljs-title function_ invoke__">Some</span>(TagFormat::UnsignedShort),
        <span class="hljs-number">4</span> =&gt; <span class="hljs-title function_ invoke__">Some</span>(TagFormat::UnsignedLong),
        <span class="hljs-number">5</span> =&gt; <span class="hljs-title function_ invoke__">Some</span>(TagFormat::UnsignedRational),
        <span class="hljs-number">6</span> =&gt; <span class="hljs-title function_ invoke__">Some</span>(TagFormat::SignedByte),
        <span class="hljs-number">7</span> =&gt; <span class="hljs-title function_ invoke__">Some</span>(TagFormat::Undefined),
        <span class="hljs-number">8</span> =&gt; <span class="hljs-title function_ invoke__">Some</span>(TagFormat::SignedShort),
        <span class="hljs-number">9</span> =&gt; <span class="hljs-title function_ invoke__">Some</span>(TagFormat::SignedLong),
        <span class="hljs-number">10</span> =&gt; <span class="hljs-title function_ invoke__">Some</span>(TagFormat::SignedRational),
        <span class="hljs-number">11</span> =&gt; <span class="hljs-title function_ invoke__">Some</span>(TagFormat::SingleFloat),
        <span class="hljs-number">12</span> =&gt; <span class="hljs-title function_ invoke__">Some</span>(TagFormat::DoubleFloat),
        _ =&gt; <span class="hljs-literal">None</span>,
    }
}
</code></pre>
<p>As done previously, if the correct value can't be found, the function returns <code>None</code></p>
<p>So, adding to the above code, the code for reading the tag value is:</p>
<pre><code class="hljs language-rs"><span class="hljs-keyword">let</span> <span class="hljs-variable">format_value</span> = u16::<span class="hljs-title function_ invoke__">from_offset_endian_bytes</span>(endian, entry, <span class="hljs-number">2</span>)?;
<span class="hljs-keyword">let</span> <span class="hljs-variable">format</span> = <span class="hljs-title function_ invoke__">get_tag_format</span>(&amp;format_value)?;
</code></pre>
<h3 id="component-length" tabindex="-1">Component Length</h3>
<p>The Component length specifies the number of components for the tag format being read - for most tag formats this will be 1, however, for specific values like <code>AsciiString</code> or <code>Undefined</code>, this may be different in which case it specifies the length of the string or how many bytes are required respectively</p>
<p>The value for the component length can be found by reading the relevant bytes in the entry and converting them to a 32-bit unsigned integer, starting from byte index 4, like so:</p>
<pre><code class="hljs language-rs"><span class="hljs-keyword">let</span> <span class="hljs-variable">component_length</span> = u32::<span class="hljs-title function_ invoke__">from_offset_endian_bytes</span>(endian, entry, <span class="hljs-number">4</span>)?;
</code></pre>
<h3 id="data" tabindex="-1">Data</h3>
<p>Once the component length is known, getting the total length of the data to be read is done by multiplying the component length by the bytes per component - since different components need different amounts of data</p>
<p>A function that gets the bytes per component for a given tag format can be seen below:</p>
<pre><code class="hljs language-rs"><span class="hljs-keyword">fn</span> <span class="hljs-title function_">get_bytes_per_component</span>(format: &amp;TagFormat) <span class="hljs-punctuation">-&gt;</span> <span class="hljs-type">u32</span> {
    <span class="hljs-keyword">match</span> format {
        TagFormat::UnsignedByte =&gt; <span class="hljs-number">1</span>,
        TagFormat::AsciiString =&gt; <span class="hljs-number">1</span>,
        TagFormat::UnsignedShort =&gt; <span class="hljs-number">2</span>,
        TagFormat::UnsignedLong =&gt; <span class="hljs-number">4</span>,
        TagFormat::UnsignedRational =&gt; <span class="hljs-number">8</span>,
        TagFormat::SignedByte =&gt; <span class="hljs-number">1</span>,
        TagFormat::Undefined =&gt; <span class="hljs-number">1</span>,
        TagFormat::SignedShort =&gt; <span class="hljs-number">2</span>,
        TagFormat::SignedLong =&gt; <span class="hljs-number">4</span>,
        TagFormat::SignedRational =&gt; <span class="hljs-number">8</span>,
        TagFormat::SingleFloat =&gt; <span class="hljs-number">4</span>,
        TagFormat::DoubleFloat =&gt; <span class="hljs-number">8</span>,
    }
}
</code></pre>
<p>This is based on the table shown previously on component formats</p>
<p>Next, the total length can be defined as the component length multiplied by the bytes per component which can be seen in the code below:</p>
<pre><code class="hljs language-rs"><span class="hljs-keyword">let</span> <span class="hljs-variable">component_length</span> = u32::<span class="hljs-title function_ invoke__">from_offset_endian_bytes</span>(endian, entry, <span class="hljs-number">4</span>)?;

<span class="hljs-keyword">let</span> <span class="hljs-variable">bytes_per_component</span> = <span class="hljs-title function_ invoke__">get_bytes_per_component</span>(&amp;format);

<span class="hljs-keyword">let</span> <span class="hljs-variable">total_length</span> = component_length * bytes_per_component;
</code></pre>
<p>The data can be read from the data bytes, which start at index 8 of the entry</p>
<pre><code class="hljs language-rs"><span class="hljs-keyword">let</span> <span class="hljs-variable">data</span> = entry.<span class="hljs-title function_ invoke__">get</span>(<span class="hljs-number">8</span>..<span class="hljs-number">12</span>)?;
</code></pre>
<p>The data value must be the raw bytes because depending on the resulting length it needs to be processed differently</p>
<p>If the <code>total_length</code> is less than or equal to 4, the data can be read directly from the data bytes, this can be done using a function that converts a <code>TagFormat</code> and <code>data</code> to the relevant value as defined in the table:</p>
<pre><code class="hljs language-rs"><span class="hljs-keyword">fn</span> <span class="hljs-title function_">parse_tag_value</span>&lt;<span class="hljs-symbol">&#x27;a</span>&gt;(
    format: &amp;TagFormat,
    endian: &amp;<span class="hljs-symbol">&#x27;a</span> Endian,
    bytes: &amp;<span class="hljs-symbol">&#x27;a</span> [<span class="hljs-type">u8</span>],
) <span class="hljs-punctuation">-&gt;</span> <span class="hljs-type">Option</span>&lt;ExifValue&lt;<span class="hljs-symbol">&#x27;a</span>&gt;&gt; {
    <span class="hljs-keyword">match</span> format {
        TagFormat::UnsignedByte =&gt; parsing::<span class="hljs-title function_ invoke__">bytes_to_unsigned_byte</span>(endian, bytes),
        TagFormat::AsciiString =&gt; parsing::<span class="hljs-title function_ invoke__">bytes_to_ascii_string</span>(bytes),
        TagFormat::UnsignedShort =&gt; parsing::<span class="hljs-title function_ invoke__">bytes_to_unsigned_short</span>(endian, bytes),
        TagFormat::UnsignedLong =&gt; parsing::<span class="hljs-title function_ invoke__">bytes_to_unsigned_long</span>(endian, bytes),
        TagFormat::UnsignedRational =&gt; parsing::<span class="hljs-title function_ invoke__">bytes_to_unsigned_rational</span>(endian, bytes),
        TagFormat::SignedByte =&gt; parsing::<span class="hljs-title function_ invoke__">bytes_to_signed_byte</span>(endian, bytes),
        TagFormat::Undefined =&gt; parsing::<span class="hljs-title function_ invoke__">bytes_to_undefined</span>(bytes),
        TagFormat::SignedShort =&gt; parsing::<span class="hljs-title function_ invoke__">bytes_to_signed_short</span>(endian, bytes),
        TagFormat::SignedLong =&gt; parsing::<span class="hljs-title function_ invoke__">bytes_to_signed_long</span>(endian, bytes),
        TagFormat::SignedRational =&gt; parsing::<span class="hljs-title function_ invoke__">bytes_to_signed_rational</span>(endian, bytes),
        TagFormat::SingleFloat =&gt; parsing::<span class="hljs-title function_ invoke__">bytes_to_single_float</span>(endian, bytes),
        TagFormat::DoubleFloat =&gt; parsing::<span class="hljs-title function_ invoke__">bytes_to_double_float</span>(endian, bytes),
    }
}
</code></pre>
<p>And the data value can be obtained using the function above like so:</p>
<pre><code class="hljs language-rs"><span class="hljs-keyword">let</span> <span class="hljs-variable">value</span> = <span class="hljs-title function_ invoke__">parse_tag_value</span>(&amp;format, endian, data)
</code></pre>
<p>However, if the <code>total_length</code> is greater than 4, the data value needs to be read as an offset from the IFD which is then converted, again, using the <code>parse_tag_value</code> function above</p>
<pre><code class="hljs language-rs"><span class="hljs-comment">// the value needs to be checked at the offset and used from there</span>
<span class="hljs-keyword">let</span> <span class="hljs-variable">offset</span> = u32::<span class="hljs-title function_ invoke__">from_endian_bytes</span>(endian, data)?;

<span class="hljs-keyword">let</span> <span class="hljs-variable">start</span> = (offset) <span class="hljs-keyword">as</span> <span class="hljs-type">usize</span>;
<span class="hljs-keyword">let</span> <span class="hljs-variable">end</span> = start + (length) <span class="hljs-keyword">as</span> <span class="hljs-type">usize</span>;

<span class="hljs-keyword">let</span> <span class="hljs-variable">range</span> = start..end;

<span class="hljs-keyword">let</span> <span class="hljs-variable">value_bytes</span> = bytes.<span class="hljs-title function_ invoke__">get</span>(range)?;

<span class="hljs-keyword">let</span> <span class="hljs-variable">result</span> = <span class="hljs-title function_ invoke__">parse_tag_value</span>(&amp;format, endian, value_bytes)
</code></pre>
<p>Putting all the above together, reading the tag above will give:</p>
<table>
<thead>
<tr>
<th>Tag</th>
<th>Data Format</th>
<th>Component Length</th>
<th>Data</th>
</tr>
</thead>
<tbody>
<tr>
<td>2 bytes</td>
<td>2 Bytes</td>
<td>4 Bytes</td>
<td>4 Bytes</td>
</tr>
<tr>
<td><code>0F 01</code></td>
<td><code>02 00</code></td>
<td><code>09 00 00 00</code></td>
<td><code>9E 00 00 00</code></td>
</tr>
<tr>
<td><code>0x010f</code></td>
<td>ASCII String</td>
<td>9</td>
<td>FUJIFILM\0</td>
</tr>
</tbody>
</table>
<h3 id="reading-additional-entries" tabindex="-1">Reading Additional Entries</h3>
<p>Once a single entry can be read - reading additional entries follows the same pattern. Since the bytes per entry is fixed - always 12 - and the number of entries is known from the IFD count, each entry can be iterated over by going 12 bytes at a time and reading their data individually. A more detailed implementation of this as well as the rest of the code can be found on the <a href="https://github.com/nabeelvalley/exiflib">exiflib GitHub repo</a></p>
<h1 id="conclusion" tabindex="-1">Conclusion</h1>
<p>This post provides a basic outline on reading EXIF data from an image, as well as covers the byte structure for reading EXIF entries from an image file. There's a lot more to reading EXIF data from images, but at a high level the parsing covered here should form a basic grounding in how reading this data works</p>
<p>For further reference and inspiration take a look a the reference list at the end of this post as well as the <a href="https://github.com/nabeelvalley/exiflib">exiflib GitHub repo</a> mentioned previously</p>
<h1 id="references" tabindex="-1">References</h1>
<p>Implementation details and guidance for reading metadata from:</p>
<ul>
<li><a href="https://exiftool.org/TagNames/EXIF.html">EXIF Tool Tag Names</a></li>
<li><a href="http://exif-viewer.com/">EXIF Viewer</a></li>
<li><a href="https://greybeard.org.uk/exif3/">Fujifilm EXIF Viewer</a></li>
<li><a href="https://people.cs.umass.edu/~liberato/courses/2018-spring-compsci365+590f/lecture-notes/05-bit-twiddling-file-formats-parsing-exif/">COMPSCI 365/590F - Bit Twiddling File Formats, Parsing EXIF</a></li>
<li><a href="https://www.media.mit.edu/pia/Research/deepview/exif.html">Description of Exif file format (MIT Media)</a></li>
<li><a href="http://gvsoft.no-ip.org/exif/exif-explanation.html#ExifIFDTags">Exif Explanation</a></li>
<li><a href="http://web.archive.org/web/20131019050323/http://www.exif.org/specifications.html">Exif Specification</a></li>
<li><a href="https://web.archive.org/web/20190624045241if_/http://www.cipa.jp:80/std/documents/e/DC-008-Translation-2019-E.pdf">TIFF Specification</a></li>
</ul>
<p>Some reference implementations and libraries:</p>
<ul>
<li><a href="https://docs.rs/rawloader/latest/rawloader/index.html">rawloader docs</a></li>
<li><a href="https://libopenraw.freedesktop.org/">libopenraw</a></li>
<li><a href="https://docs.rs/image/0.5.4/image/index.html">rust image</a></li>
</ul>
]]></content>
        <author>
            <name>Nabeel Valley</name>
            <uri>https://nabeelvalley.co.za</uri>
        </author>
    </entry>
    <entry>
        <title type="html"><![CDATA[Binary Data and File Formats]]></title>
        <id>/blog/2022/20-08/understanding-binary-files/</id>
        <link href="https://nabeelvalley.co.za/blog/2022/20-08/understanding-binary-files/"/>
        <updated>2022-08-19T22:00:00.000Z</updated>
        <summary type="html"><![CDATA[An introduction to bits, bytes, and binary file formats]]></summary>
        <content type="html"><![CDATA[<hr>
<h2 id="title%3A-binary-data-and-file-formatssubtitle%3A-20-august-2022description%3A-an-introduction-to-bits%2C-bytes%2C-and-binary-file-formatspublished%3A-true" tabindex="-1">title: Binary Data and File Formats
subtitle: 20 August 2022
description: An introduction to bits, bytes, and binary file formats
published: true</h2>
<p><div class="table-of-contents"><details><summary>Contents</summary><ul><li><ul><li><a href="#title%3A-binary-data-and-file-formatssubtitle%3A-20-august-2022description%3A-an-introduction-to-bits%2C-bytes%2C-and-binary-file-formatspublished%3A-true">title: Binary Data and File Formatssubtitle: 20 August 2022description: An introduction to bits, bytes, and binary file formatspublished: true</a></li></ul></li><li><a href="#introduction">Introduction</a></li><li><a href="#bits-and-bytes%2C-and-binary">Bits and Bytes, and Binary</a></li><li><a href="#hexadecimal-(hex)">Hexadecimal (Hex)</a><ul><li><a href="#binary-files">Binary Files</a></li></ul></li><li><a href="#text-files">Text Files</a></li><li><a href="#conclusion">Conclusion</a></li><li><a href="#references">References</a></li></ul></details></div></p>
<h1 id="introduction" tabindex="-1">Introduction</h1>
<p>Computers work with data stored in binary formats. Reading and interpreting binary data is an important part of understanding file formats so their data can be read and interpreted</p>
<h1 id="bits-and-bytes%2C-and-binary" tabindex="-1">Bits and Bytes, and Binary</h1>
<p>Binary files store data using bits</p>
<p>A bit can be either a 1 or 0. When working with bit-data, it's useful to group them into sets of 8, known as bytes</p>
<p>A byte is a sequence of 8-bits which can contain a value ranging from <code>0</code> to <code>255</code> - these are referred to as the decimal representation</p>
<p>Bytes consist of 8-bit, with each position representing a power of 2 from 2^0 to 2^7, as seen below:</p>
<pre><code class="hljs">0 0 0 0 0 0 0 0
|<span class="hljs-string"> </span>|<span class="hljs-string"> </span>|<span class="hljs-string"> </span>|<span class="hljs-string"> </span>|<span class="hljs-string"> </span>|<span class="hljs-string"> </span>|<span class="hljs-string"> </span>|<span class="hljs-string">  
</span>|<span class="hljs-string"> </span>|<span class="hljs-string"> </span>|<span class="hljs-string"> </span>|<span class="hljs-string"> </span>|<span class="hljs-string"> </span>|<span class="hljs-string"> </span>|<span class="hljs-string"> </span>|<span class="hljs-string">__ 2^0 - 0 or 1
</span>|<span class="hljs-string"> </span>|<span class="hljs-string"> </span>|<span class="hljs-string"> </span>|<span class="hljs-string"> </span>|<span class="hljs-string"> </span>|<span class="hljs-string"> </span>|<span class="hljs-string">____ 2^1 - 0 or 2
</span>|<span class="hljs-string"> </span>|<span class="hljs-string"> </span>|<span class="hljs-string"> </span>|<span class="hljs-string"> </span>|<span class="hljs-string"> </span>|<span class="hljs-string">______ 2^2 - 0 or 4
</span>|<span class="hljs-string"> </span>|<span class="hljs-string"> </span>|<span class="hljs-string"> </span>|<span class="hljs-string"> </span>|<span class="hljs-string">________ 2^3 - 0 or 8
</span>|<span class="hljs-string"> </span>|<span class="hljs-string"> </span>|<span class="hljs-string"> </span>|<span class="hljs-string">__________ 2^4 - 0 or 16
</span>|<span class="hljs-string"> </span>|<span class="hljs-string"> </span>|<span class="hljs-string">____________ 2^5 - 0 or 32
</span>|<span class="hljs-string"> </span>|<span class="hljs-string">______________ 2^6 - 0 or 64
</span>|<span class="hljs-string">________________ 2^7 - 0 or 128

total:                  0 to 255
</span></code></pre>
<p>The byte above represents the value for 0, this is because all the bits have a value of 0</p>
<p>Using the above explanation, the number 1 is represented using the following:</p>
<pre><code class="hljs">0 0 0 0 0 0 0 1
|<span class="hljs-string"> </span>|<span class="hljs-string"> </span>|<span class="hljs-string"> </span>|<span class="hljs-string"> </span>|<span class="hljs-string"> </span>|<span class="hljs-string"> </span>|<span class="hljs-string"> </span>|<span class="hljs-string">  
</span>|<span class="hljs-string"> </span>|<span class="hljs-string"> </span>|<span class="hljs-string"> </span>|<span class="hljs-string"> </span>|<span class="hljs-string"> </span>|<span class="hljs-string"> </span>|<span class="hljs-string"> </span>|<span class="hljs-string">__ 2^0 - 1
</span>|<span class="hljs-string"> </span>|<span class="hljs-string"> </span>|<span class="hljs-string"> </span>|<span class="hljs-string"> </span>|<span class="hljs-string"> </span>|<span class="hljs-string"> </span>|<span class="hljs-string">____ 2^1 - 0
</span>|<span class="hljs-string"> </span>|<span class="hljs-string"> </span>|<span class="hljs-string"> </span>|<span class="hljs-string"> </span>|<span class="hljs-string"> </span>|<span class="hljs-string">______ 2^2 - 0
</span>|<span class="hljs-string"> </span>|<span class="hljs-string"> </span>|<span class="hljs-string"> </span>|<span class="hljs-string"> </span>|<span class="hljs-string">________ 2^3 - 0
</span>|<span class="hljs-string"> </span>|<span class="hljs-string"> </span>|<span class="hljs-string"> </span>|<span class="hljs-string">__________ 2^4 - 0
</span>|<span class="hljs-string"> </span>|<span class="hljs-string"> </span>|<span class="hljs-string">____________ 2^5 - 0
</span>|<span class="hljs-string"> </span>|<span class="hljs-string">______________ 2^6 - 0
</span>|<span class="hljs-string">________________ 2^7 - 0

total:                  1
</span></code></pre>
<p>Where the position for 2^0 is the only bit with a value (1)</p>
<p>Similarly, 2 is represented as:</p>
<pre><code class="hljs">0 0 0 0 0 0 2 0
|<span class="hljs-string"> </span>|<span class="hljs-string"> </span>|<span class="hljs-string"> </span>|<span class="hljs-string"> </span>|<span class="hljs-string"> </span>|<span class="hljs-string"> </span>|<span class="hljs-string"> </span>|<span class="hljs-string">  
</span>|<span class="hljs-string"> </span>|<span class="hljs-string"> </span>|<span class="hljs-string"> </span>|<span class="hljs-string"> </span>|<span class="hljs-string"> </span>|<span class="hljs-string"> </span>|<span class="hljs-string"> </span>|<span class="hljs-string">__ 2^0 - 0
</span>|<span class="hljs-string"> </span>|<span class="hljs-string"> </span>|<span class="hljs-string"> </span>|<span class="hljs-string"> </span>|<span class="hljs-string"> </span>|<span class="hljs-string"> </span>|<span class="hljs-string">____ 2^1 - 2
</span>|<span class="hljs-string"> </span>|<span class="hljs-string"> </span>|<span class="hljs-string"> </span>|<span class="hljs-string"> </span>|<span class="hljs-string"> </span>|<span class="hljs-string">______ 2^2 - 0
</span>|<span class="hljs-string"> </span>|<span class="hljs-string"> </span>|<span class="hljs-string"> </span>|<span class="hljs-string"> </span>|<span class="hljs-string">________ 2^3 - 0
</span>|<span class="hljs-string"> </span>|<span class="hljs-string"> </span>|<span class="hljs-string"> </span>|<span class="hljs-string">__________ 2^4 - 0
</span>|<span class="hljs-string"> </span>|<span class="hljs-string"> </span>|<span class="hljs-string">____________ 2^5 - 0
</span>|<span class="hljs-string"> </span>|<span class="hljs-string">______________ 2^6 - 0
</span>|<span class="hljs-string">________________ 2^7 - 0

total:                  2
</span></code></pre>
<p>Where the bit for 2^1 has a value</p>
<p>Or the number 5 with bits 2^0 and 2^2 having a value:</p>
<pre><code class="hljs">0 0 0 0 0 1 0 1
|<span class="hljs-string"> </span>|<span class="hljs-string"> </span>|<span class="hljs-string"> </span>|<span class="hljs-string"> </span>|<span class="hljs-string"> </span>|<span class="hljs-string"> </span>|<span class="hljs-string"> </span>|<span class="hljs-string">  
</span>|<span class="hljs-string"> </span>|<span class="hljs-string"> </span>|<span class="hljs-string"> </span>|<span class="hljs-string"> </span>|<span class="hljs-string"> </span>|<span class="hljs-string"> </span>|<span class="hljs-string"> </span>|<span class="hljs-string">__ 2^0 - 1
</span>|<span class="hljs-string"> </span>|<span class="hljs-string"> </span>|<span class="hljs-string"> </span>|<span class="hljs-string"> </span>|<span class="hljs-string"> </span>|<span class="hljs-string"> </span>|<span class="hljs-string">____ 2^1 - 0
</span>|<span class="hljs-string"> </span>|<span class="hljs-string"> </span>|<span class="hljs-string"> </span>|<span class="hljs-string"> </span>|<span class="hljs-string"> </span>|<span class="hljs-string">______ 2^2 - 4
</span>|<span class="hljs-string"> </span>|<span class="hljs-string"> </span>|<span class="hljs-string"> </span>|<span class="hljs-string"> </span>|<span class="hljs-string">________ 2^3 - 0
</span>|<span class="hljs-string"> </span>|<span class="hljs-string"> </span>|<span class="hljs-string"> </span>|<span class="hljs-string">__________ 2^4 - 0
</span>|<span class="hljs-string"> </span>|<span class="hljs-string"> </span>|<span class="hljs-string">____________ 2^5 - 0
</span>|<span class="hljs-string"> </span>|<span class="hljs-string">______________ 2^6 - 0
</span>|<span class="hljs-string">________________ 2^7 - 0

total:                  5
</span></code></pre>
<p>Which is calculated by adding 2^0 + 2^2 = 1 + 4 = 5</p>
<p>A larger number, like 234 is:</p>
<pre><code class="hljs">1 1 1 0 1 0 1 0
|<span class="hljs-string"> </span>|<span class="hljs-string"> </span>|<span class="hljs-string"> </span>|<span class="hljs-string"> </span>|<span class="hljs-string"> </span>|<span class="hljs-string"> </span>|<span class="hljs-string"> </span>|<span class="hljs-string">  
</span>|<span class="hljs-string"> </span>|<span class="hljs-string"> </span>|<span class="hljs-string"> </span>|<span class="hljs-string"> </span>|<span class="hljs-string"> </span>|<span class="hljs-string"> </span>|<span class="hljs-string"> </span>|<span class="hljs-string">__ 2^0 - 0
</span>|<span class="hljs-string"> </span>|<span class="hljs-string"> </span>|<span class="hljs-string"> </span>|<span class="hljs-string"> </span>|<span class="hljs-string"> </span>|<span class="hljs-string"> </span>|<span class="hljs-string">____ 2^1 - 2
</span>|<span class="hljs-string"> </span>|<span class="hljs-string"> </span>|<span class="hljs-string"> </span>|<span class="hljs-string"> </span>|<span class="hljs-string"> </span>|<span class="hljs-string">______ 2^2 - 0
</span>|<span class="hljs-string"> </span>|<span class="hljs-string"> </span>|<span class="hljs-string"> </span>|<span class="hljs-string"> </span>|<span class="hljs-string">________ 2^3 - 8
</span>|<span class="hljs-string"> </span>|<span class="hljs-string"> </span>|<span class="hljs-string"> </span>|<span class="hljs-string">__________ 2^4 - 0
</span>|<span class="hljs-string"> </span>|<span class="hljs-string"> </span>|<span class="hljs-string">____________ 2^5 - 32
</span>|<span class="hljs-string"> </span>|<span class="hljs-string">______________ 2^6 - 64
</span>|<span class="hljs-string">________________ 2^7 - 128

total:                  234
</span></code></pre>
<p>The calculation for the above value is:</p>
<pre><code class="hljs"><span class="hljs-attribute">2</span>^<span class="hljs-number">1</span> + <span class="hljs-number">2</span>^<span class="hljs-number">3</span> + <span class="hljs-number">2</span>^<span class="hljs-number">5</span> + <span class="hljs-number">2</span>^<span class="hljs-number">6</span> + <span class="hljs-number">2</span>^<span class="hljs-number">7</span> = total = <span class="hljs-number">234</span>
</code></pre>
<p>When substituting the powers of 2:</p>
<pre><code class="hljs"><span class="hljs-symbol">2 </span>+ <span class="hljs-number">8</span> + <span class="hljs-number">32</span> + <span class="hljs-number">64</span> + <span class="hljs-number">128</span> = total = <span class="hljs-number">234</span>
</code></pre>
<p>The numbers discussed above are all 1-byte (8-bit) numbers, which have a range between 0 and 255, adding bits to the value will allow the representation of bigger numbers, for example, a 2-byte (16-bit) number can have a value from 0 to 65,535</p>
<h1 id="hexadecimal-(hex)" tabindex="-1">Hexadecimal (Hex)</h1>
<p>In the above example, numbers are represented in binary format (e.g. <code>000000020</code>), or decimal format (e.g. 2)</p>
<p>When looking at binary data, it can be a bit easier to navigate around by representing data in hexadecimal (hex) format - which represents every 4 bits as a value ranging from 0-15, so, similar to the byte example above, but instead using 4-bits:</p>
<pre><code class="hljs">0 0 0 0
|<span class="hljs-string"> </span>|<span class="hljs-string"> </span>|<span class="hljs-string"> </span>|<span class="hljs-string">  
</span>|<span class="hljs-string"> </span>|<span class="hljs-string"> </span>|<span class="hljs-string"> </span>|<span class="hljs-string">__ 2^0 - 0 or 1
</span>|<span class="hljs-string"> </span>|<span class="hljs-string"> </span>|<span class="hljs-string">____ 2^1 - 0 or 2
</span>|<span class="hljs-string"> </span>|<span class="hljs-string">______ 2^2 - 0 or 4
</span>|<span class="hljs-string">________ 2^3 - 0 or 8
</span></code></pre>
<p>Using what's already been discussed, the number 12 can be represented in bits as <code>1100</code>,</p>
<p>Hex numbers additionally convert each of these values into a value from 0-9 or A-F, as seen in the following table:</p>
<table>
<thead>
<tr>
<th>Decimal</th>
<th>Bits</th>
<th>Hex</th>
</tr>
</thead>
<tbody>
<tr>
<td>0</td>
<td><code>0000</code></td>
<td><code>0</code></td>
</tr>
<tr>
<td>1</td>
<td><code>0001</code></td>
<td><code>1</code></td>
</tr>
<tr>
<td>2</td>
<td><code>0010</code></td>
<td><code>2</code></td>
</tr>
<tr>
<td>3</td>
<td><code>0011</code></td>
<td><code>3</code></td>
</tr>
<tr>
<td>4</td>
<td><code>0100</code></td>
<td><code>4</code></td>
</tr>
<tr>
<td>5</td>
<td><code>0101</code></td>
<td><code>5</code></td>
</tr>
<tr>
<td>6</td>
<td><code>0110</code></td>
<td><code>6</code></td>
</tr>
<tr>
<td>7</td>
<td><code>0111</code></td>
<td><code>7</code></td>
</tr>
<tr>
<td>8</td>
<td><code>1000</code></td>
<td><code>8</code></td>
</tr>
<tr>
<td>9</td>
<td><code>1001</code></td>
<td><code>9</code></td>
</tr>
<tr>
<td>10</td>
<td><code>1010</code></td>
<td><code>A</code></td>
</tr>
<tr>
<td>11</td>
<td><code>1011</code></td>
<td><code>B</code></td>
</tr>
<tr>
<td>12</td>
<td><code>1100</code></td>
<td><code>C</code></td>
</tr>
<tr>
<td>13</td>
<td><code>1101</code></td>
<td><code>D</code></td>
</tr>
<tr>
<td>14</td>
<td><code>1110</code></td>
<td><code>E</code></td>
</tr>
<tr>
<td>15</td>
<td><code>1111</code></td>
<td><code>F</code></td>
</tr>
</tbody>
</table>
<p>Using the binary representation, a byte can be represented using 2 Hex values which are taken by using the first 4-bits as the first hex value, and the second 4-bits as the second hex value</p>
<p>For example, the value for 234, represented as bits: <code>11101010</code> can be split into 2 sets of 4-bits <code>1110 1010</code>, using the table above, this becomes <code>EA</code> in hex</p>
<h2 id="binary-files" tabindex="-1">Binary Files</h2>
<p>Binary files encode data using bits, when viewing them, it's convenient to view the data in them using bytes represented as hex values as was shown above</p>
<p>Binary files usually require some knowledge of how their data is structured to correctly interpret the information. This is usually described in the specification for the file format</p>
<h1 id="text-files" tabindex="-1">Text Files</h1>
<p>Plain text files are usually in the UTF-8 or UTF-16 format - this means that they use 8-bits or 16-bits to represent each character, but there are lots of other formats that a text file can use</p>
<p>UTF-8 data can be read by converting the binary data to text data using a table which maps the byte/hex value to the character -for the UTF-8 format, the character &quot;A&quot; is encoded in hex as <code>41</code> and &quot;z&quot; is <code>7a</code></p>
<p>The Hexadecimal representation for a text file that contains the following UTF-8 data:</p>
<pre><code class="hljs">Hello World!
</code></pre>
<p>Would be stored as a binary file which contains:</p>
<pre><code class="hljs"><span class="hljs-attribute">48</span> <span class="hljs-number">65</span> <span class="hljs-number">6</span>C <span class="hljs-number">6</span>C <span class="hljs-number">6</span>F <span class="hljs-number">20</span> <span class="hljs-number">57</span> <span class="hljs-number">6</span>F <span class="hljs-number">72</span> <span class="hljs-number">6</span>C <span class="hljs-number">64</span> <span class="hljs-number">21</span>
</code></pre>
<p>Putting the hex below the text content, the hex to character mapping can be seen:</p>
<pre><code class="hljs"><span class="hljs-attribute">H</span>  e  l  l  o     W  o  r  l  d  !
<span class="hljs-attribute">48</span> <span class="hljs-number">65</span> <span class="hljs-number">6</span>C <span class="hljs-number">6</span>C <span class="hljs-number">6</span>F <span class="hljs-number">20</span> <span class="hljs-number">57</span> <span class="hljs-number">6</span>F <span class="hljs-number">72</span> <span class="hljs-number">6</span>C <span class="hljs-number">64</span> <span class="hljs-number">21</span>
</code></pre>
<p>Binary files can be viewed in a hex editor to see the raw binary data, but interpreting these files depends on the format used and will differ between file formats</p>
<h1 id="conclusion" tabindex="-1">Conclusion</h1>
<p>Computers store data using bits. Bits can be structured into sets of 8-bits, called a byte</p>
<p>Data can be represented using bits, bytes, decimal values, or hexadecimal values</p>
<p>Files store data using binary. Binary data can be represented as decimal or hex depending and can be viewed as whichever is appropriate</p>
<h1 id="references" tabindex="-1">References</h1>
<ul>
<li><a href="https://www.utf8-chartable.de/unicode-utf8-table.pl?utf8=bin">UTF-8 Character Table</a></li>
<li><a href="https://hexed.it/">HexEdit</a></li>
<li><a href="https://www.cs.cmu.edu/~fgandon/documents/lecture/uk1999/binary/HandOut.pdf">Bits, Bytes, and Binary Summary</a></li>
</ul>
]]></content>
        <author>
            <name>Nabeel Valley</name>
            <uri>https://nabeelvalley.co.za</uri>
        </author>
    </entry>
    <entry>
        <title type="html"><![CDATA[Using React.memo for Controlling Component Rendering]]></title>
        <id>/blog/2022/16-08/react-memo-top-level-api/</id>
        <link href="https://nabeelvalley.co.za/blog/2022/16-08/react-memo-top-level-api/"/>
        <updated>2022-08-15T22:00:00.000Z</updated>
        <summary type="html"><![CDATA[Using the react top-level API for debouncing and selectively rendering a component for better performance]]></summary>
        <content type="html"><![CDATA[<hr>
<h2 id="title%3A-using-react.memo-for-controlling-component-renderingsubtitle%3A-16-august-2022description%3A-using-the-react-top-level-api-for-debouncing-and-selectively-rendering-a-component-for-better-performancepublished%3A-true" tabindex="-1">title: Using React.memo for Controlling Component Rendering
subtitle: 16 August 2022
description: Using the react top-level API for debouncing and selectively rendering a component for better performance
published: true</h2>
<p><div class="table-of-contents"><details><summary>Contents</summary><ul><li><ul><li><a href="#title%3A-using-react.memo-for-controlling-component-renderingsubtitle%3A-16-august-2022description%3A-using-the-react-top-level-api-for-debouncing-and-selectively-rendering-a-component-for-better-performancepublished%3A-true">title: Using React.memo for Controlling Component Renderingsubtitle: 16 August 2022description: Using the react top-level API for debouncing and selectively rendering a component for better performancepublished: true</a></li></ul></li><li><a href="#react-top-level-api">React Top Level API</a></li><li><a href="#component-rendering">Component Rendering</a></li><li><a href="#api-definition">API Definition</a></li><li><a href="#rendering-on-a-specific-type-of-change">Rendering On a Specific Type of Change</a></li><li><a href="#conclusion">Conclusion</a></li><li><a href="#repl">REPL</a></li><li><a href="#references">References</a></li></ul></details></div></p>
<h1 id="react-top-level-api" tabindex="-1">React Top Level API</h1>
<p>The React library contains some functions at it's top level scope. Amongst these are the built-in hooks (like <code>useState</code>, <code>useCallback</code>, etc.) as well as some other functions for manipulating React Elements directly - which I've covered in a previous post on <a href="../01-03/react-top-level-api.md">The React Top Level API</a></p>
<h1 id="component-rendering" tabindex="-1">Component Rendering</h1>
<p>By default, React will trigger a component render whenever there is a change to its <code>state</code> or <code>props</code>. <code>React.memo</code> allows us to take control of the <code>props</code> triggered render by giving us a way to look into the prop-change process</p>
<p><code>React.memo</code> is a higher order component (HOC) that allows us to wrap a component and control whether or not it is updated/re-rendered by defining a function that tells react whether or not it's props are different - and effectively whether this should trigger a new render</p>
<p>Doing the above is useful for complex components that don't necessarily need to be rendered every time their props are changed</p>
<h1 id="api-definition" tabindex="-1">API Definition</h1>
<p><a href="https://reactjs.org/docs/react-api.html#reactmemo">The React Docs</a> give us the following example for the <code>React.memo</code> HOC:</p>
<pre><code class="hljs language-jsx"><span class="hljs-keyword">const</span> <span class="hljs-title function_">MyComponent</span> = (<span class="hljs-params">props</span>) =&gt; {
  <span class="hljs-comment">/* render using props */</span>
}

<span class="hljs-keyword">const</span> <span class="hljs-title function_">areEqual</span> = (<span class="hljs-params">prevProps, nextProps</span>) =&gt; {
  <span class="hljs-comment">/*
  return true if passing nextProps to render would return
  the same result as passing prevProps to render,
  otherwise return false
  */</span>
}

<span class="hljs-keyword">const</span> <span class="hljs-title class_">MyComponentMemo</span> = <span class="hljs-title class_">React</span>.<span class="hljs-title function_">memo</span>(<span class="hljs-title class_">MyComponent</span>, areEqual);
</code></pre>
<p>The component <code>MyComponent</code> will be rendered whenever props are changed, however, using <code>React.memo</code> lets us define a function called <code>areEqual</code> that we can can use to tell <code>React.memo</code> whether or not the new props would render a different result to the old props</p>
<p>We can then use <code>MyComponentMemo</code> in place of <code>MyComponent</code> to take control of when the component is rendered</p>
<h1 id="rendering-on-a-specific-type-of-change" tabindex="-1">Rendering On a Specific Type of Change</h1>
<p>Say we have the specific component <code>TimeDisplay</code> which shows the time that's being passed into it from <code>App</code>:</p>
<pre><code class="hljs language-tsx"><span class="hljs-keyword">import</span> <span class="hljs-string">&#x27;./App.css&#x27;</span>
<span class="hljs-keyword">import</span> <span class="hljs-title class_">React</span>, { useState, useEffect } <span class="hljs-keyword">from</span> <span class="hljs-string">&#x27;react&#x27;</span>

<span class="hljs-keyword">interface</span> <span class="hljs-title class_">TimeDisplayProps</span> {
  <span class="hljs-attr">time</span>: <span class="hljs-built_in">number</span>
}

<span class="hljs-keyword">const</span> <span class="hljs-title class_">TimeDisplay</span>: <span class="hljs-title class_">React</span>.<span class="hljs-property">FC</span>&lt;<span class="hljs-title class_">TimeDisplayProps</span>&gt; = <span class="hljs-function">(<span class="hljs-params">{ time }</span>) =&gt;</span> {
  <span class="hljs-keyword">const</span> display = <span class="hljs-keyword">new</span> <span class="hljs-title class_">Date</span>(time).<span class="hljs-title function_">toString</span>()

  <span class="hljs-keyword">return</span> <span class="language-xml"><span class="hljs-tag">&lt;<span class="hljs-name">h1</span>&gt;</span>{display}<span class="hljs-tag">&lt;/<span class="hljs-name">h1</span>&gt;</span></span>
}

<span class="hljs-keyword">export</span> <span class="hljs-keyword">default</span> <span class="hljs-keyword">function</span> <span class="hljs-title function_">App</span>(<span class="hljs-params"></span>) {
  <span class="hljs-keyword">const</span> [time, setTime] = <span class="hljs-title function_">useState</span>(<span class="hljs-title class_">Date</span>.<span class="hljs-title function_">now</span>())

  <span class="hljs-title function_">useEffect</span>(<span class="hljs-function">() =&gt;</span> {
    <span class="hljs-keyword">const</span> handle = <span class="hljs-built_in">setInterval</span>(<span class="hljs-function">() =&gt;</span> {
      <span class="hljs-title function_">setTime</span>(<span class="hljs-title class_">Date</span>.<span class="hljs-title function_">now</span>())
    }, <span class="hljs-number">100</span>)

    <span class="hljs-keyword">return</span> <span class="hljs-function">() =&gt;</span> {
      <span class="hljs-built_in">clearInterval</span>(handle)
    }
  }, [])

  <span class="hljs-keyword">return</span> (
    <span class="language-xml"><span class="hljs-tag">&lt;<span class="hljs-name">main</span>&gt;</span>
      <span class="hljs-tag">&lt;<span class="hljs-name">TimeDisplay</span> <span class="hljs-attr">time</span>=<span class="hljs-string">{time}</span> /&gt;</span>
    <span class="hljs-tag">&lt;/<span class="hljs-name">main</span>&gt;</span></span>
  )
}
</code></pre>
<p>The <code>TimeDisplay</code> component in our case only displays time to the second, so any millisecond-level changes don't matter to the component and so we can save on those renders by checking if the difference in <code>time</code> is similar to the previous render's <code>time</code></p>
<p>Let's assume for our purpose that it's acceptable for the time to be delayed by about 5 seconds, we then can define a function called <code>areTimesWithinOneSecond</code> which compares the next render's props with the previous and returns if they are within 5 seconds of each other:</p>
<pre><code class="hljs language-tsx"><span class="hljs-keyword">const</span> areTimesWithinFiveSeconds = (<span class="hljs-attr">prev</span>: <span class="hljs-title class_">TimeDisplayProps</span>, <span class="hljs-attr">next</span>: <span class="hljs-title class_">TimeDisplayProps</span>): <span class="hljs-function"><span class="hljs-params">boolean</span> =&gt;</span> {
  <span class="hljs-keyword">const</span> diff = next.<span class="hljs-property">time</span> - prev.<span class="hljs-property">time</span>

  <span class="hljs-keyword">return</span> diff &lt; <span class="hljs-number">5000</span>
}
</code></pre>
<p>We can use the above function in a <code>React.memo</code> to define a version of the <code>TimeDisplay</code> component which will prevent unnecessary renders:</p>
<pre><code class="hljs language-tsx"><span class="hljs-keyword">const</span> <span class="hljs-title class_">TimeDisplayMemo</span> = <span class="hljs-title class_">React</span>.<span class="hljs-title function_">memo</span>(<span class="hljs-title class_">TimeDisplay</span>, areTimesWithinFiveSeconds)
</code></pre>
<p>And it can then be used as a drop-in replacement for the <code>TimeDisplay</code> component:</p>
<pre><code class="hljs language-tsx">
<span class="hljs-keyword">export</span> <span class="hljs-keyword">default</span> <span class="hljs-keyword">function</span> <span class="hljs-title function_">App</span>(<span class="hljs-params"></span>) {
  <span class="hljs-keyword">const</span> [time, setTime] = <span class="hljs-title function_">useState</span>(<span class="hljs-title class_">Date</span>.<span class="hljs-title function_">now</span>())

  <span class="hljs-title function_">useEffect</span>(<span class="hljs-function">() =&gt;</span> {
    <span class="hljs-keyword">const</span> handle = <span class="hljs-built_in">setInterval</span>(<span class="hljs-function">() =&gt;</span> {
      <span class="hljs-title function_">setTime</span>(<span class="hljs-title class_">Date</span>.<span class="hljs-title function_">now</span>())
    }, <span class="hljs-number">100</span>)

    <span class="hljs-keyword">return</span> <span class="hljs-function">() =&gt;</span> {
      <span class="hljs-built_in">clearInterval</span>(handle)
    }
  }, [])

  <span class="hljs-keyword">return</span> (
    <span class="language-xml"><span class="hljs-tag">&lt;<span class="hljs-name">main</span>&gt;</span>
      <span class="hljs-tag">&lt;<span class="hljs-name">TimeDisplayMemo</span> <span class="hljs-attr">time</span>=<span class="hljs-string">{time}</span> /&gt;</span>
    <span class="hljs-tag">&lt;/<span class="hljs-name">main</span>&gt;</span></span>
  )
}
</code></pre>
<h1 id="conclusion" tabindex="-1">Conclusion</h1>
<p>From the above implementation we can see that it's possible to delay rendering of a component using <code>React.memo</code> if the component doesn't need to be re-rendered, hence improving performance by decreasing the number of renders react needs to carry out</p>
<h1 id="repl" tabindex="-1">REPL</h1>
<p>The REPL with the example above can seen below:</p>
<iframe height="700px" width="100%" src="https://replit.com/@nabeelvalley/react-memo-demo?lite=true" scrolling="no" frameborder="no" allowtransparency="true" allowfullscreen="true" sandbox="allow-forms allow-pointer-lock allow-popups allow-same-origin allow-scripts allow-modals"></iframe>
<h1 id="references" tabindex="-1">References</h1>
<ul>
<li><a href="https://reactjs.org/docs/react-api.html#reactmemo">The React Docs</a></li>
</ul>
]]></content>
        <author>
            <name>Nabeel Valley</name>
            <uri>https://nabeelvalley.co.za</uri>
        </author>
    </entry>
    <entry>
        <title type="html"><![CDATA[Dev Tools Update]]></title>
        <id>/blog/2022/03-08/dev-tools-update/</id>
        <link href="https://nabeelvalley.co.za/blog/2022/03-08/dev-tools-update/"/>
        <updated>2022-08-02T22:00:00.000Z</updated>
        <summary type="html"><![CDATA[Software development tools and languages I'm using at the moment]]></summary>
        <content type="html"><![CDATA[<hr>
<h2 id="title%3A-dev-tools-updatesubtitle%3A-03-august-2022description%3A-software-development-tools-and-languages-i'm-using-at-the-momentpublished%3A-true" tabindex="-1">title: Dev Tools Update
subtitle: 03 August 2022
description: Software development tools and languages I'm using at the moment
published: true</h2>
<h1 id="programming-languages" tabindex="-1">Programming Languages</h1>
<p>I've primarily switched over to Typescript as my language for building applications, but I've also been learning Rust for the purpose of building some low-level libraries</p>
<p>For Typescript, something I've been finding to be really informative is the <a href="https://github.com/type-challenges/type-challenges">Type Challenges Repository</a> which has a lot of challenges along with solutions for modeling and solving complex problems using Typescript's type system</p>
<p>For Rust, the <a href="https://doc.rust-lang.org/book/">Rust Book</a> along with the <a href="https://www.youtube.com/c/NoBoilerplate">No Boilerplate YouTube Channel</a> have been really informative</p>
<h1 id="frameworks" tabindex="-1">Frameworks</h1>
<p>The current version of my website is built using <a href="https://www.11ty.dev">11ty</a> which is a static site generator which uses Javascript and templates for generating HTML from a variety of data sources - in my case just JSON and Markdown files</p>
<p>A lot of the professional work I do revolves around the React and React-Native ecosystem, but I've made some changes to my stack for personal projects due to the overhead that comes with using React</p>
<p>For now I'm using 11ty for my website as well as <a href="https://gohugo.io/">Hugo</a> for some smaller projects</p>
<p>I've moved on from Gatsby for my site due to the slow build times as a static site builder - and the unnecessary complexity of graphql for this purpose along with the overall burden of node modules that comes with it</p>
<p>For other projects I'd like to give the <a href="https://remix.run">Remix Framework</a> a shot for full stack apps. Remix is a full stack framework for building React applications with a pretty cool looking data fetching and project structure</p>
<p>I've also been playing around with <a href="https://tauri.app/">Tauri</a> for building desktop applications. Tauri uses a Rust backend with a bring-your-own client approach and pretty much uses any client side javascript framework - I'm looking towards <a href="https://svelte.dev/">Svelte</a> for this since it keeps things a lot more vanilla which is a good break from working with the other major frameworks</p>
<h1 id="code-editor" tabindex="-1">Code Editor</h1>
<p>I'm back to VSCode after a short stint with <a href="http://neovim.io">NeoVim</a>.</p>
<p>My reasons for leaving NeoVim were mostly due to the amount of setup when switching devices as well as the issues I experienced on Windows where configuration management was a bit inconsistent as well as the dependency management for some plugins became a lot of admin. Even preconfigured solutions like <a href="https://github.com/LunarVim/LunarVim">LunarVim</a> and <a href="https://github.com/AstroNvim/AstroNvim">AstroNvim</a> didn't work well due to lots of compat issues on Windows</p>
<p>As far as VSCode is concerned, some things I've been using are:</p>
<ul>
<li><a href="https://github.dev/">The GitHub Online Editor</a></li>
<li>The GitHub Colorblind Theme (GitHub.github-vscode-theme)</li>
<li>Code Spell Checker Extension (streetsidesoftware.code-spell-checker)</li>
<li>GitLens Extension (eamodio.gitlens)</li>
<li>Hex Editor (ms-vscode.hexeditor)</li>
<li>Rust Analyzer Extension (rust-lang.rust-analyzer)</li>
<li>Fix Extension (withfig.fig)</li>
</ul>
<h1 id="terminal" tabindex="-1">Terminal</h1>
<p>Some terminal tools I've been enjoying recently are:</p>
<ul>
<li><a href="https://hyper.is">Hyper</a> - An alternative terminal that's so far been less sluggish and more customizable than the Windows Terminal application</li>
<li><a href="https://fig.io">Fig</a> - Provides autocomplete for commands and integrates with loads of CLI tools to provide detailed suggestions and documentations</li>
<li><a href="http://nushell.sh">NuShell</a> - A shell that works with the idea of command output as data that can be manipulated and transformed which adds a lot of cool data processing functionality on top of your normal shell comands</li>
</ul>
]]></content>
        <author>
            <name>Nabeel Valley</name>
            <uri>https://nabeelvalley.co.za</uri>
        </author>
    </entry>
    <entry>
        <title type="html"><![CDATA[A Simple JSON Backed Database in Typescript]]></title>
        <id>/blog/2022/06-07/typescript-json-database/</id>
        <link href="https://nabeelvalley.co.za/blog/2022/06-07/typescript-json-database/"/>
        <updated>2022-07-06T22:00:00.000Z</updated>
        <summary type="html"><![CDATA[Create a simple database that's backed to a JSON file using Typescript and Node.js]]></summary>
        <content type="html"><![CDATA[<h1 id="define-the-database" tabindex="-1">Define the database</h1>
<p>The database is defined as a class which has an in-memory store <code>data</code> and a <code>persist</code> method that allows for persisting the database to a file as well as  content when an instance is created from an existing JSON file</p>
<p>The code for the database can be seen below:</p>
<pre><code class="hljs language-ts"><span class="hljs-keyword">import</span> { existsSync, readFileSync, writeFileSync } <span class="hljs-keyword">from</span> <span class="hljs-string">&quot;fs&quot;</span>;

<span class="hljs-keyword">export</span> <span class="hljs-keyword">class</span> <span class="hljs-title class_">Database</span>&lt;<span class="hljs-title class_">TData</span>&gt; {
  <span class="hljs-keyword">public</span> <span class="hljs-attr">data</span>: <span class="hljs-title class_">TData</span>;

  <span class="hljs-title function_">constructor</span>(<span class="hljs-params"><span class="hljs-keyword">private</span> <span class="hljs-keyword">readonly</span> dbPath: <span class="hljs-built_in">string</span>, initial: TData</span>) {
    <span class="hljs-variable language_">this</span>.<span class="hljs-property">data</span> = <span class="hljs-variable language_">this</span>.<span class="hljs-title function_">load</span>(initial);
  }

  <span class="hljs-keyword">public</span> update = <span class="hljs-function">(<span class="hljs-params">data: Partial&lt;TData&gt;</span>) =&gt;</span> <span class="hljs-variable language_">this</span>.<span class="hljs-property">data</span> = {...<span class="hljs-variable language_">this</span>.<span class="hljs-property">data</span>, ...data}

  <span class="hljs-keyword">public</span> commit = <span class="hljs-function">() =&gt;</span> <span class="hljs-variable language_">this</span>.<span class="hljs-title function_">persist</span>(<span class="hljs-variable language_">this</span>.<span class="hljs-property">data</span>);

  <span class="hljs-keyword">private</span> persist = <span class="hljs-function">(<span class="hljs-params">data: TData</span>) =&gt;</span>
    <span class="hljs-title function_">writeFileSync</span>(<span class="hljs-variable language_">this</span>.<span class="hljs-property">dbPath</span>, <span class="hljs-title class_">JSON</span>.<span class="hljs-title function_">stringify</span>(data));

  <span class="hljs-keyword">private</span> read = (): <span class="hljs-function"><span class="hljs-params">TData</span> =&gt;</span>
    <span class="hljs-title class_">JSON</span>.<span class="hljs-title function_">parse</span>(<span class="hljs-title function_">readFileSync</span>(<span class="hljs-variable language_">this</span>.<span class="hljs-property">dbPath</span>).<span class="hljs-title function_">toString</span>()) <span class="hljs-keyword">as</span> <span class="hljs-title class_">TData</span>;

  <span class="hljs-keyword">private</span> load = (<span class="hljs-attr">initial</span>: <span class="hljs-title class_">TData</span>): <span class="hljs-function"><span class="hljs-params">TData</span> =&gt;</span> {
    <span class="hljs-keyword">if</span> (!<span class="hljs-title function_">existsSync</span>(<span class="hljs-variable language_">this</span>.<span class="hljs-property">dbPath</span>)) {
      <span class="hljs-variable language_">this</span>.<span class="hljs-title function_">persist</span>(initial);
    }

    <span class="hljs-keyword">const</span> current = <span class="hljs-variable language_">this</span>.<span class="hljs-title function_">read</span>();

    <span class="hljs-keyword">return</span> {
      ...initial,
      ...current,
    };
  };
}
</code></pre>
<h2 id="usage" tabindex="-1">Usage</h2>
<p>The database can be used by creating an instance and modifying the data in it by using the <code>update</code> method, and can be written to a file using the <code>commit</code> method:</p>
<pre><code class="hljs language-ts"><span class="hljs-keyword">import</span> {<span class="hljs-title class_">Database</span>}<span class="hljs-keyword">from</span> <span class="hljs-string">&#x27;./db&#x27;</span>

<span class="hljs-keyword">interface</span> <span class="hljs-title class_">User</span> {
  <span class="hljs-attr">name</span>: <span class="hljs-built_in">string</span>;
  <span class="hljs-attr">age</span>: <span class="hljs-built_in">number</span>;
}

<span class="hljs-keyword">interface</span> DB {
  <span class="hljs-attr">users</span>: <span class="hljs-title class_">User</span>[]
}

<span class="hljs-keyword">const</span> <span class="hljs-attr">initial</span>: <span class="hljs-variable constant_">DB</span> = {
  <span class="hljs-attr">users</span>: []
}

<span class="hljs-keyword">const</span> db = <span class="hljs-keyword">new</span> <span class="hljs-title class_">Database</span>&lt;<span class="hljs-variable constant_">DB</span>&gt;(<span class="hljs-string">&#x27;./data.json&#x27;</span>, initial)

db.<span class="hljs-title function_">update</span>({
  <span class="hljs-attr">users</span>: [{
    <span class="hljs-attr">name</span>: <span class="hljs-string">&#x27;Test&#x27;</span>,
    <span class="hljs-attr">age</span>: <span class="hljs-number">20</span>,
  }]
})

db.<span class="hljs-title function_">commit</span>()
</code></pre>
<h2 id="functional-example" tabindex="-1">Functional Example</h2>
<p>The above code is found in the below REPL as a runnable example:</p>
<iframe height="700px" width="100%" src="https://replit.com/@nabeelvalley/SimpleJSONDB?lite=true" scrolling="no" frameborder="no" allowtransparency="true" allowfullscreen="true" sandbox="allow-forms allow-pointer-lock allow-popups allow-same-origin allow-scripts allow-modals"></iframe>]]></content>
        <author>
            <name>Nabeel Valley</name>
            <uri>https://nabeelvalley.co.za</uri>
        </author>
    </entry>
    <entry>
        <title type="html"><![CDATA[A type for getting properties common in all objects from a union]]></title>
        <id>/blog/2022/08-07/common-object-type/</id>
        <link href="https://nabeelvalley.co.za/blog/2022/08-07/common-object-type/"/>
        <updated>2022-06-07T22:00:00.000Z</updated>
        <summary type="html"><![CDATA[Using typescript type conditions and Exclude to get keys commmon in parts of a union and an object with only common keys from that union]]></summary>
        <content type="html"><![CDATA[<p><div class="table-of-contents"><details><summary>Contents</summary><ul><li><a href="#overview">Overview</a></li><li><a href="#a-type-for-common-object-keys">A Type for Common Object Keys</a></li><li><a href="#a-type-for-common-object">A Type for Common Object</a></li><li><a href="#final-solution">Final Solution</a></li></ul></details></div></p>
<h1 id="overview" tabindex="-1">Overview</h1>
<p>Something that may come up in practice is a use for a type that allows us to enforce that an object has only the common properties for a given object</p>
<p>For example, given the two objects below:</p>
<pre><code class="hljs language-ts"><span class="hljs-keyword">type</span> <span class="hljs-title class_">AThing</span> = {
  <span class="hljs-attr">name</span>: <span class="hljs-built_in">string</span>;
  <span class="hljs-attr">age</span>: <span class="hljs-built_in">number</span>;
  <span class="hljs-attr">email</span>: <span class="hljs-built_in">string</span>;
  <span class="hljs-attr">phone</span>: <span class="hljs-built_in">number</span>;
};

<span class="hljs-keyword">type</span> <span class="hljs-title class_">BThing</span> = {
  <span class="hljs-attr">businessName</span>: <span class="hljs-built_in">string</span>[];
  <span class="hljs-attr">email</span>: <span class="hljs-built_in">string</span>;
  <span class="hljs-attr">phone</span>: <span class="hljs-built_in">string</span>;
};
</code></pre>
<p>I would like a type that contains only the things that these objects have in common, namely <code>phone</code> and <code>email</code></p>
<h1 id="a-type-for-common-object-keys" tabindex="-1">A Type for Common Object Keys</h1>
<p>This isn't something that typescript has out-of-the-box, however it can be implemented by using some type juggling</p>
<p>First, we define a type called <code>CommonKeys</code> which gets us all the keys which are common in the two objects</p>
<pre><code class="hljs language-ts"><span class="hljs-keyword">type</span> <span class="hljs-title class_">CommonKeys</span>&lt;T, R = {}&gt; = R <span class="hljs-keyword">extends</span> T ? keyof T &amp; <span class="hljs-title class_">CommonKeys</span>&lt;<span class="hljs-title class_">Exclude</span>&lt;T, R&gt;&gt; : keyof T;
</code></pre>
<p>The <code>CommonKeys</code> type makes use of a condition to check if <code>R</code> which is the recursive type extends <code>T</code> which is the input type. Based on this, we cut down <code>T</code> one type at a time until there is no more object that can extend <code>R</code>, then for an input type <code>T</code> which is the same as <code>R</code> (an empty object) the result of <code>CommonKeys&lt;{}&gt;</code> will be <code>never</code> since <code>{}</code> has no keys, and will end the recursion</p>
<p>Applying this to the above types, we get:</p>
<pre><code class="hljs language-ts"><span class="hljs-keyword">type</span> <span class="hljs-title class_">ABCommonKeys</span> = <span class="hljs-title class_">CommonKeys</span>&lt;<span class="hljs-title class_">AThing</span> | <span class="hljs-title class_">BThing</span>&gt;;
<span class="hljs-comment">// type ABCommonKeys = &quot;email&quot; | &quot;phone&quot;</span>
</code></pre>
<p>And as a sanity check, we can also apply this to <code>{}</code>:</p>
<pre><code class="hljs language-ts"><span class="hljs-keyword">type</span> <span class="hljs-title class_">Basic</span> = <span class="hljs-title class_">CommonKeys</span>&lt;{}&gt;;
<span class="hljs-comment">// type Basic = never</span>
</code></pre>
<h1 id="a-type-for-common-object" tabindex="-1">A Type for Common Object</h1>
<p>Next, we can use the <code>CommonKeys</code> type defined above to create a <code>Common</code> type which wne used with the intersection will result in a type that has all the keys common in all types from the intersection</p>
<pre><code class="hljs language-ts"><span class="hljs-keyword">type</span> <span class="hljs-title class_">Common</span>&lt;T&gt; = <span class="hljs-title class_">Pick</span>&lt;T, <span class="hljs-title class_">CommonKeys</span>&lt;T&gt;&gt;;
</code></pre>
<p>We can apply this now to a type of <code>AThing | BThing</code> like so:</p>
<pre><code class="hljs language-ts"><span class="hljs-keyword">type</span> <span class="hljs-title class_">ABCommonObject</span> = <span class="hljs-title class_">Common</span>&lt;<span class="hljs-title class_">AThing</span> | <span class="hljs-title class_">BThing</span>&gt;;
<span class="hljs-comment">// type ABCommonObject = {</span>
<span class="hljs-comment">//   email: string;</span>
<span class="hljs-comment">//   phone: string | number;</span>
<span class="hljs-comment">// }</span>
</code></pre>
<p>And we can see that we have the desired result which is an object with the properties that are common between both input object types</p>
<h1 id="final-solution" tabindex="-1">Final Solution</h1>
<p>We can put the code from above together into the final solution which is just the two above types:</p>
<pre><code class="hljs language-ts"><span class="hljs-comment">/** Gets the keys common to any type/union of `T` */</span>
<span class="hljs-keyword">type</span> <span class="hljs-title class_">CommonKeys</span>&lt;T, R = {}&gt; = R <span class="hljs-keyword">extends</span> T ? keyof T &amp; <span class="hljs-title class_">CommonKeys</span>&lt;<span class="hljs-title class_">Exclude</span>&lt;T, R&gt;&gt; : keyof T;

<span class="hljs-comment">/** Gets an object type containing all keys that exist within a type/union `T` */</span>
<span class="hljs-keyword">type</span> <span class="hljs-title class_">Common</span>&lt;T&gt; = <span class="hljs-title class_">Pick</span>&lt;T, <span class="hljs-title class_">CommonKeys</span>&lt;T&gt;&gt;;
</code></pre>
]]></content>
        <author>
            <name>Nabeel Valley</name>
            <uri>https://nabeelvalley.co.za</uri>
        </author>
    </entry>
    <entry>
        <title type="html"><![CDATA[Type Guards and Narrowing in Typescript]]></title>
        <id>/blog/2022/31-05/type-guards/</id>
        <link href="https://nabeelvalley.co.za/blog/2022/31-05/type-guards/"/>
        <updated>2022-05-30T22:00:00.000Z</updated>
        <summary type="html"><![CDATA[Using Type Guards and Narrowing for better handling of dynamic variables in typescript]]></summary>
        <content type="html"><![CDATA[<p>Type guards (also known as Narrowing) allow us create conditions under which an object of one type can be used as if it is of another type. We usually use this in conjunction with union types to allow us to specify different handling of the types based on the resulting value</p>
<p><div class="table-of-contents"><details><summary>Contents</summary><ul><li><a href="#using-typeof">Using typeof</a></li><li><a href="#using-in">Using in</a></li><li><a href="#using-is">Using is</a></li><li><a href="#references">References</a></li></ul></details></div></p>
<h2 id="using-typeof" tabindex="-1">Using <code>typeof</code></h2>
<p>We can use the <code>typeof</code> keyword in javascript to find out whether what type an object is. This is useful if we have an object that can take on different structures, for example</p>
<pre><code class="hljs language-ts"><span class="hljs-keyword">type</span> <span class="hljs-title class_">Data</span> = <span class="hljs-built_in">string</span>[]
<span class="hljs-keyword">type</span> <span class="hljs-title class_">GetData</span> = <span class="hljs-title class_">Data</span> | (<span class="hljs-function">() =&gt;</span> <span class="hljs-title class_">Data</span>)
</code></pre>
<p>In the above example, we have a type called <code>GetData</code> which can be either some data or a function to get data. Using this, we can can create a function which fetches data like so:</p>
<pre><code class="hljs language-ts"><span class="hljs-keyword">const</span> fetchData = (<span class="hljs-attr">getData</span>: <span class="hljs-title class_">GetData</span>): <span class="hljs-function"><span class="hljs-params">Data</span> =&gt;</span> {
  <span class="hljs-keyword">if</span> (<span class="hljs-keyword">typeof</span> getData === <span class="hljs-string">&#x27;function&#x27;</span>) {
    <span class="hljs-keyword">return</span> <span class="hljs-title function_">getData</span>()
  }

  <span class="hljs-keyword">return</span> getData
}
</code></pre>
<h2 id="using-in" tabindex="-1">Using <code>in</code></h2>
<p>Javascript also has the <code>in</code> operator which can be used to infer types by us checking a property of an object</p>
<pre><code class="hljs language-ts"><span class="hljs-keyword">type</span> <span class="hljs-title class_">SimpleData</span> = { 
  <span class="hljs-attr">name</span>:<span class="hljs-built_in">string</span>;
}

<span class="hljs-keyword">type</span> <span class="hljs-title class_">ComplexData</span> = {
  <span class="hljs-attr">name</span>: {
    <span class="hljs-attr">first</span>: <span class="hljs-built_in">string</span>;
    <span class="hljs-attr">last</span>: <span class="hljs-built_in">string</span>;
  }
  <span class="hljs-attr">isComplex</span>: <span class="hljs-literal">true</span>;  
}

<span class="hljs-keyword">type</span> <span class="hljs-title class_">AnyData</span> = <span class="hljs-title class_">SimpleData</span> | <span class="hljs-title class_">ComplexData</span>
</code></pre>
<p>We can then use the <code>in</code> operator to check the existence of a property of an object by using it along with a key that we expect to be in one object but not another</p>
<pre><code class="hljs language-ts"><span class="hljs-keyword">const</span> getComplexName = (<span class="hljs-attr">data</span>: <span class="hljs-title class_">AnyData</span>): <span class="hljs-function"><span class="hljs-params">string</span> =&gt;</span> {
  <span class="hljs-comment">// isComplex is the name of the key that we expect in `ComplexData` but not `SimpleData`</span>
  <span class="hljs-keyword">if</span> (<span class="hljs-string">&#x27;isComplex&#x27;</span> <span class="hljs-keyword">in</span> data) {
    <span class="hljs-keyword">return</span> [data.<span class="hljs-property">name</span>.<span class="hljs-property">first</span>, data.<span class="hljs-property">name</span>.<span class="hljs-property">last</span>].<span class="hljs-title function_">join</span>(<span class="hljs-string">&#x27; &#x27;</span>)
  }

  <span class="hljs-keyword">return</span> data.<span class="hljs-property">name</span>
}
</code></pre>
<h2 id="using-is" tabindex="-1">Using <code>is</code></h2>
<p>We can use the typescript <code>is</code> keyword to specify that the return of a boolean means that a variable satisfies a specific condition</p>
<p>For example,  we can create a function that basically does what the <code>in</code> operator in the above function does:</p>
<pre><code class="hljs language-ts"><span class="hljs-keyword">const</span> isComplex = (<span class="hljs-attr">data</span>: <span class="hljs-title class_">AnyData</span>): data is <span class="hljs-title class_">ComplexData</span> =&gt; {
  <span class="hljs-keyword">return</span> (data <span class="hljs-keyword">as</span> <span class="hljs-title class_">ComplexData</span>).<span class="hljs-property">isComplex</span>
}
</code></pre>
<p>This can be used in place of the <code>in</code> check in the above example like so:</p>
<pre><code class="hljs language-ts"><span class="hljs-keyword">const</span> getComplexName2 = (<span class="hljs-attr">data</span>: <span class="hljs-title class_">AnyData</span>): <span class="hljs-function"><span class="hljs-params">string</span> =&gt;</span> {
  <span class="hljs-comment">// isComplex is the name of the key that we expect in `ComplexData` but not `SimpleData`</span>
  <span class="hljs-keyword">if</span> (<span class="hljs-title function_">isComplex</span>(data)) {
    <span class="hljs-keyword">return</span> [data.<span class="hljs-property">name</span>.<span class="hljs-property">first</span>, data.<span class="hljs-property">name</span>.<span class="hljs-property">last</span>].<span class="hljs-title function_">join</span>(<span class="hljs-string">&#x27; &#x27;</span>)
  }

  <span class="hljs-keyword">return</span> data.<span class="hljs-property">name</span>
}
</code></pre>
<h2 id="references" tabindex="-1">References</h2>
<ul>
<li><a href="../../../docs/javascript/typescript-basics">My TS Notes</a></li>
<li><a href="https://developer.mozilla.org/en-US/docs/Web/JavaScript/Reference/Operators/in">MDN The <code>in</code> operator</a></li>
<li><a href="https://developer.mozilla.org/en-US/docs/Web/JavaScript/Reference/Operators/typeof">MDN The <code>typeof</code> operator</a></li>
<li><a href="https://www.typescriptlang.org/docs/handbook/2/narrowing.html">TS Docs on Narrowing</a></li>
</ul>
]]></content>
        <author>
            <name>Nabeel Valley</name>
            <uri>https://nabeelvalley.co.za</uri>
        </author>
    </entry>
    <entry>
        <title type="html"><![CDATA[Localhost HTTP Proxy with Node.js]]></title>
        <id>/blog/2022/08-03/http-proxy-node-js/</id>
        <link href="https://nabeelvalley.co.za/blog/2022/08-03/http-proxy-node-js/"/>
        <updated>2022-03-07T23:00:00.000Z</updated>
        <content type="html"><![CDATA[<p><div class="table-of-contents"><details><summary>Contents</summary><ul></ul></details></div></p>
<p>An localhost HTTP proxy is useful for debugging and can be easily defined using Node.js by installing <code>http-proxy</code></p>
<pre><code class="hljs language-sh">yarn add http-proxy
</code></pre>
<p>And then adding the following to an <code>index.js</code> file:</p>
<p><code>index.js</code></p>
<pre><code class="hljs language-js"><span class="hljs-keyword">const</span> httpProxy = <span class="hljs-built_in">require</span>(<span class="hljs-string">&#x27;http-proxy&#x27;</span>)

<span class="hljs-keyword">const</span> target = <span class="hljs-string">&#x27;http://my-target-website.com:1234&#x27;</span>

httpProxy.<span class="hljs-title function_">createProxyServer</span>({ target }).<span class="hljs-title function_">listen</span>(<span class="hljs-number">8080</span>)
</code></pre>
<p>Which will create a server that listens on <code>8080</code> and will proxy requests to the target</p>
]]></content>
        <author>
            <name>Nabeel Valley</name>
            <uri>https://nabeelvalley.co.za</uri>
        </author>
    </entry>
    <entry>
        <title type="html"><![CDATA[React Top Level API]]></title>
        <id>/blog/2022/01-03/react-top-level-api/</id>
        <link href="https://nabeelvalley.co.za/blog/2022/01-03/react-top-level-api/"/>
        <updated>2022-02-28T23:00:00.000Z</updated>
        <summary type="html"><![CDATA[Building complex react components using the React top-level API and TypeScript]]></summary>
        <content type="html"><![CDATA[<blockquote>
<p>For a reference on the React Top-Level API you can take a look at <a href="https://reactjs.org/docs/react-api.html">the React Docs</a></p>
</blockquote>
<p><div class="table-of-contents"><details><summary>Contents</summary><ul><li><a href="#introduction">Introduction</a></li><li><a href="#our-goal">Our Goal</a></li><li><a href="#using-react.children-to-work-with-a-component's-children">Using React.Children to work with a component's children</a><ul><li><a href="#use-react.children.count-to-get-the-count">Use React.Children.count to get the count</a></li><li><a href="#use-react.children.map-to-wrap-each-child">Use React.Children.map to wrap each child</a></li></ul></li><li><a href="#use-react.cloneelement-to-change-child-props">Use React.cloneElement to change child props</a></li><li><a href="#use-react.isvalidelement">Use React.isValidElement</a></li><li><a href="#the-result">The Result</a></li></ul></details></div></p>
<h1 id="introduction" tabindex="-1">Introduction</h1>
<p>React allows us to do lots of different things using concepts like composition and higher order components. Most of the time these methods are good enough for us to do what we want, however there are some cases where these methods can prove to be insufficient such as when building complex library components or components that need to allow for dynamic composition or do runtime modification of things like child component props, etc.</p>
<p>For the above purposes we can make use of the React Top-Level API. For the purpose of this writeup I'll be making use of the parts of this API that allow us to modify a component's children and modify their props as well as how they're rendered</p>
<h1 id="our-goal" tabindex="-1">Our Goal</h1>
<p>For the purpose of this doc I'll be using the React API to get to do the following:</p>
<ol>
<li>Show the count of children (<code>Items</code>) passed to a component (<code>Wrapper</code>)</li>
<li>Render each child in a sub-wrapper <code>ItemWrapper</code></li>
<li>Modify the props of the children by adding a <code>position</code> prop</li>
</ol>
<p>When this is done, we want to render a component that results in the following markup:</p>
<pre><code class="hljs language-tsx">&lt;<span class="hljs-title class_">Wrapper</span>&gt;
  <span class="language-xml"><span class="hljs-tag">&lt;<span class="hljs-name">Count</span> /&gt;</span></span>
  <span class="language-xml"><span class="hljs-tag">&lt;<span class="hljs-name">ItemWrapper</span>&gt;</span>
    <span class="hljs-tag">&lt;<span class="hljs-name">Item</span> <span class="hljs-attr">name</span>=<span class="hljs-string">&quot;&quot;</span> <span class="hljs-attr">position</span>=<span class="hljs-string">&quot;&quot;</span>/&gt;</span>
  <span class="hljs-tag">&lt;/<span class="hljs-name">ItemWrapper</span>&gt;</span></span>
  <span class="language-xml"><span class="hljs-tag">&lt;<span class="hljs-name">ItemWrapper</span>&gt;</span>
    <span class="hljs-tag">&lt;<span class="hljs-name">Item</span> <span class="hljs-attr">name</span>=<span class="hljs-string">&quot;&quot;</span> <span class="hljs-attr">position</span>=<span class="hljs-string">&quot;&quot;</span>/&gt;</span>
  <span class="hljs-tag">&lt;/<span class="hljs-name">ItemWrapper</span>&gt;</span></span>
  <span class="language-xml"><span class="hljs-tag">&lt;<span class="hljs-name">ItemWrapper</span>&gt;</span>
    <span class="hljs-tag">&lt;<span class="hljs-name">Item</span> <span class="hljs-attr">name</span>=<span class="hljs-string">&quot;&quot;</span> <span class="hljs-attr">position</span>=<span class="hljs-string">&quot;&quot;</span>/&gt;</span>
  <span class="hljs-tag">&lt;/<span class="hljs-name">ItemWrapper</span>&gt;</span></span>
&lt;/<span class="hljs-title class_">Wrapper</span>&gt;
</code></pre>
<p>But a consumer can be used like:</p>
<pre><code class="hljs language-tsx">&lt;<span class="hljs-title class_">Wrapper</span>&gt;
  &lt;Item name=&quot;&quot;&gt;
  &lt;Item name=&quot;&quot;&gt;
  &lt;Item name=&quot;&quot;&gt;
&lt;/Wrapper&gt;
</code></pre>
<h1 id="using-react.children-to-work-with-a-component's-children" tabindex="-1">Using <code>React.Children</code> to work with a component's <code>children</code></h1>
<p>The <code>React.Children</code> API (see <a href="https://reactjs.org/docs/react-api.html#reactchildren">docs</a>) provides us with some utilities for traversing the children passed to a component</p>
<p>Before we can do any of the following, we need to define the structure of an item. Our <code>Item</code> component is defined as follows:</p>
<pre><code class="hljs language-tsx"><span class="hljs-keyword">interface</span> <span class="hljs-title class_">ItemProps</span> { <span class="hljs-attr">name</span>: <span class="hljs-built_in">string</span>; position?: <span class="hljs-built_in">number</span>; }

<span class="hljs-keyword">const</span> <span class="hljs-title class_">Item</span>: <span class="hljs-title class_">React</span>.<span class="hljs-property">FC</span>&lt;<span class="hljs-title class_">ItemProps</span>&gt; = <span class="hljs-function">(<span class="hljs-params">{ name, position }</span>) =&gt;</span> 
  <span class="language-xml"><span class="hljs-tag">&lt;<span class="hljs-name">div</span>&gt;</span>{name}, {position}<span class="hljs-tag">&lt;/<span class="hljs-name">div</span>&gt;</span></span>
</code></pre>
<h2 id="use-react.children.count-to-get-the-count" tabindex="-1">Use <code>React.Children.count</code> to get the count</h2>
<p>The <code>React.Children.count</code> function counts the number of child nodes passed to a React component,
we can use it like so:</p>
<pre><code class="hljs language-tsx"><span class="hljs-keyword">const</span> count = <span class="hljs-title class_">React</span>.<span class="hljs-property">Children</span>.<span class="hljs-title function_">count</span>(children)
</code></pre>
<p>For our example, let's start off by creating a <code>Count</code> component that simply takes a <code>count</code> prop and displays some text:</p>
<pre><code class="hljs language-tsx"><span class="hljs-keyword">interface</span> <span class="hljs-title class_">CountProps</span> { <span class="hljs-attr">count</span>: <span class="hljs-built_in">number</span>; }

<span class="hljs-keyword">const</span> <span class="hljs-title class_">Count</span>: <span class="hljs-title class_">React</span>.<span class="hljs-property">FC</span>&lt;<span class="hljs-title class_">CountProps</span>&gt; = <span class="hljs-function">(<span class="hljs-params">{ count }</span>) =&gt;</span> <span class="language-xml"><span class="hljs-tag">&lt;<span class="hljs-name">p</span>&gt;</span>Total: {count}<span class="hljs-tag">&lt;/<span class="hljs-name">p</span>&gt;</span></span>
</code></pre>
<p>Next, we can define our <code>Wrapper</code> which will take <code>children</code> and pass the <code>count</code> to our <code>Count</code> component:</p>
<pre><code class="hljs language-tsx"><span class="hljs-keyword">const</span> <span class="hljs-title class_">Wrapper</span>: <span class="hljs-title class_">React</span>.<span class="hljs-property">FC</span> = <span class="hljs-function">(<span class="hljs-params">{ children }</span>) =&gt;</span> {
  <span class="hljs-keyword">const</span> count = <span class="hljs-title class_">React</span>.<span class="hljs-property">Children</span>.<span class="hljs-title function_">count</span>(children)

  <span class="hljs-keyword">return</span> <span class="language-xml"><span class="hljs-tag">&lt;<span class="hljs-name">div</span>&gt;</span>
    <span class="hljs-tag">&lt;<span class="hljs-name">Count</span> <span class="hljs-attr">count</span>=<span class="hljs-string">{count}</span>  /&gt;</span>
  <span class="hljs-tag">&lt;/<span class="hljs-name">div</span>&gt;</span></span>
}
</code></pre>
<h2 id="use-react.children.map-to-wrap-each-child" tabindex="-1">Use <code>React.Children.map</code> to wrap each child</h2>
<p>Next, the <code>React.Children.map</code> function allows us to map over the children of an element and do stuff with it, for example:</p>
<pre><code class="hljs language-tsx"><span class="hljs-keyword">const</span> items = <span class="hljs-title class_">React</span>.<span class="hljs-property">Children</span>.<span class="hljs-title function_">map</span>(children, <span class="hljs-function">(<span class="hljs-params">child</span>) =&gt;</span> {
  <span class="hljs-keyword">return</span> <span class="language-xml"><span class="hljs-tag">&lt;<span class="hljs-name">ItemWrapper</span>&gt;</span>{child}<span class="hljs-tag">&lt;/<span class="hljs-name">ItemWrapper</span>&gt;</span></span>
})
</code></pre>
<p>Based on the above, we can define an <code>ItemWrapper</code> as so:</p>
<pre><code class="hljs language-tsx"><span class="hljs-keyword">const</span> <span class="hljs-title class_">ItemWrapper</span>: <span class="hljs-title class_">React</span>.<span class="hljs-property">FC</span> = <span class="hljs-function">(<span class="hljs-params">{ children }</span>) =&gt;</span> 
  <span class="language-xml"><span class="hljs-tag">&lt;<span class="hljs-name">li</span> <span class="hljs-attr">style</span>=<span class="hljs-string">{{</span>
    <span class="hljs-attr">backgroundColor:</span> &#x27;<span class="hljs-attr">lightgrey</span>&#x27;,
    <span class="hljs-attr">padding:</span> &#x27;<span class="hljs-attr">10px</span>&#x27;,
    <span class="hljs-attr">margin:</span> &#x27;<span class="hljs-attr">20px</span>&#x27;
  }} &gt;</span>{children}<span class="hljs-tag">&lt;/<span class="hljs-name">li</span>&gt;</span></span>
</code></pre>
<p>And we can update the <code>Wrapper</code> to make use of <code>React.children.map</code>:</p>
<pre><code class="hljs language-tsx"><span class="hljs-keyword">const</span> <span class="hljs-title class_">Wrapper</span>: <span class="hljs-title class_">React</span>.<span class="hljs-property">FC</span> = <span class="hljs-function">(<span class="hljs-params">{ children }</span>) =&gt;</span> {
  <span class="hljs-keyword">const</span> count = <span class="hljs-title class_">React</span>.<span class="hljs-property">Children</span>.<span class="hljs-title function_">count</span>(children)

  <span class="hljs-keyword">const</span> items = <span class="hljs-title class_">React</span>.<span class="hljs-property">Children</span>.<span class="hljs-title function_">map</span>(children, <span class="hljs-function">(<span class="hljs-params">child</span>) =&gt;</span> {
    <span class="hljs-keyword">return</span> <span class="language-xml"><span class="hljs-tag">&lt;<span class="hljs-name">ItemWrapper</span>&gt;</span>{child}<span class="hljs-tag">&lt;/<span class="hljs-name">ItemWrapper</span>&gt;</span></span>
  })

  <span class="hljs-keyword">return</span> <span class="language-xml"><span class="hljs-tag">&lt;<span class="hljs-name">div</span>&gt;</span>
    <span class="hljs-tag">&lt;<span class="hljs-name">Count</span> <span class="hljs-attr">count</span>=<span class="hljs-string">{count}</span>  /&gt;</span>
    <span class="hljs-tag">&lt;<span class="hljs-name">ul</span>&gt;</span>{items}<span class="hljs-tag">&lt;/<span class="hljs-name">ul</span>&gt;</span>
  <span class="hljs-tag">&lt;/<span class="hljs-name">div</span>&gt;</span></span>
}
</code></pre>
<h1 id="use-react.cloneelement-to-change-child-props" tabindex="-1">Use <code>React.cloneElement</code> to change child props</h1>
<p>Lastly, we want to append a <code>position</code> prop to the <code>Item</code>. To do this we can make use of the <code>React.cloneElement</code> function which allows us to clone an element and modify the props of it. Using this function looks like so:</p>
<pre><code class="hljs language-tsx"><span class="hljs-keyword">const</span> childProps = child.<span class="hljs-property">props</span>
<span class="hljs-keyword">const</span> newProps = {...child.<span class="hljs-property">props</span>, <span class="hljs-attr">position</span>: index}

<span class="hljs-keyword">const</span> newChild = <span class="hljs-title class_">React</span>.<span class="hljs-title function_">cloneElement</span>(child, newProps)
</code></pre>
<p>Integrating this into the <code>React.Children.map</code> function above will result in our <code>Wrapper</code> looking like so:</p>
<pre><code class="hljs language-tsx"><span class="hljs-keyword">const</span> <span class="hljs-title class_">Wrapper</span>: <span class="hljs-title class_">React</span>.<span class="hljs-property">FC</span> = <span class="hljs-function">(<span class="hljs-params">{ children }</span>) =&gt;</span> {
  <span class="hljs-keyword">const</span> count = <span class="hljs-title class_">React</span>.<span class="hljs-property">Children</span>.<span class="hljs-title function_">count</span>(children)

  <span class="hljs-keyword">const</span> items = <span class="hljs-title class_">React</span>.<span class="hljs-property">Children</span>.<span class="hljs-title function_">map</span>(children, <span class="hljs-function">(<span class="hljs-params">child, index</span>) =&gt;</span> {
    <span class="hljs-keyword">const</span> childProps = child.<span class="hljs-property">props</span>
    <span class="hljs-keyword">const</span> newProps = {...child.<span class="hljs-property">props</span>, <span class="hljs-attr">position</span>: index}
    
    <span class="hljs-keyword">const</span> newChild = <span class="hljs-title class_">React</span>.<span class="hljs-title function_">cloneElement</span>(child, newProps)
    
    <span class="hljs-keyword">return</span> <span class="language-xml"><span class="hljs-tag">&lt;<span class="hljs-name">ItemWrapper</span>&gt;</span>{newChild}<span class="hljs-tag">&lt;/<span class="hljs-name">ItemWrapper</span>&gt;</span></span>
  })

  <span class="hljs-keyword">return</span> <span class="language-xml"><span class="hljs-tag">&lt;<span class="hljs-name">div</span>&gt;</span>
    <span class="hljs-tag">&lt;<span class="hljs-name">Count</span> <span class="hljs-attr">count</span>=<span class="hljs-string">{count}</span>  /&gt;</span>
    <span class="hljs-tag">&lt;<span class="hljs-name">ul</span>&gt;</span>{items}<span class="hljs-tag">&lt;/<span class="hljs-name">ul</span>&gt;</span>
  <span class="hljs-tag">&lt;/<span class="hljs-name">div</span>&gt;</span></span>
}
</code></pre>
<h1 id="use-react.isvalidelement" tabindex="-1">Use <code>React.isValidElement</code></h1>
<p>We've completed most of what's needed, however if for some reason our <code>child</code> is not a valid react element our component may still crash. To get around this we can use the <code>React.isValidElement</code> function</p>
<p>We can update our <code>map</code> function above to return <code>null</code> if the element is not value:</p>
<pre><code class="hljs language-tsx"><span class="hljs-keyword">const</span> items = <span class="hljs-title class_">React</span>.<span class="hljs-property">Children</span>.<span class="hljs-title function_">map</span>(children, <span class="hljs-function">(<span class="hljs-params">child, index</span>) =&gt;</span> {
  <span class="hljs-keyword">if</span> (!<span class="hljs-title class_">React</span>.<span class="hljs-title function_">isValidElement</span>(child)) <span class="hljs-keyword">return</span> <span class="hljs-literal">null</span>

  <span class="hljs-keyword">const</span> childProps = child.<span class="hljs-property">props</span>
  <span class="hljs-keyword">const</span> newProps = {...child.<span class="hljs-property">props</span>, <span class="hljs-attr">position</span>: index}
  
  <span class="hljs-keyword">const</span> newChild = <span class="hljs-title class_">React</span>.<span class="hljs-title function_">cloneElement</span>(child, newProps)
  
  <span class="hljs-keyword">return</span> <span class="language-xml"><span class="hljs-tag">&lt;<span class="hljs-name">ItemWrapper</span>&gt;</span>{newChild}<span class="hljs-tag">&lt;/<span class="hljs-name">ItemWrapper</span>&gt;</span></span>
})
</code></pre>
<p>Which results in our <code>Wrapper</code> now being:</p>
<pre><code class="hljs language-tsx"><span class="hljs-keyword">const</span> <span class="hljs-title class_">Wrapper</span>: <span class="hljs-title class_">React</span>.<span class="hljs-property">FC</span> = <span class="hljs-function">(<span class="hljs-params">{ children }</span>) =&gt;</span> {
  <span class="hljs-keyword">const</span> count = <span class="hljs-title class_">React</span>.<span class="hljs-property">Children</span>.<span class="hljs-title function_">count</span>(children)
  <span class="hljs-keyword">const</span> items = <span class="hljs-title class_">React</span>.<span class="hljs-property">Children</span>.<span class="hljs-title function_">map</span>(children, <span class="hljs-function">(<span class="hljs-params">child, index</span>) =&gt;</span> {
    <span class="hljs-keyword">if</span> (!<span class="hljs-title class_">React</span>.<span class="hljs-title function_">isValidElement</span>(child)) <span class="hljs-keyword">return</span> <span class="hljs-literal">null</span>
    
    <span class="hljs-keyword">const</span> childProps = child.<span class="hljs-property">props</span>
    <span class="hljs-keyword">const</span> newProps = {...child.<span class="hljs-property">props</span>, <span class="hljs-attr">position</span>: index}
    
    <span class="hljs-keyword">const</span> newChild = <span class="hljs-title class_">React</span>.<span class="hljs-title function_">cloneElement</span>(child, newProps)
    
    <span class="hljs-keyword">return</span> <span class="language-xml"><span class="hljs-tag">&lt;<span class="hljs-name">ItemWrapper</span>&gt;</span>{newChild}<span class="hljs-tag">&lt;/<span class="hljs-name">ItemWrapper</span>&gt;</span></span>
  })

  <span class="hljs-keyword">return</span> <span class="language-xml"><span class="hljs-tag">&lt;<span class="hljs-name">div</span>&gt;</span>
    <span class="hljs-tag">&lt;<span class="hljs-name">Count</span> <span class="hljs-attr">count</span>=<span class="hljs-string">{count}</span>  /&gt;</span>
    <span class="hljs-tag">&lt;<span class="hljs-name">ul</span>&gt;</span>{items}<span class="hljs-tag">&lt;/<span class="hljs-name">ul</span>&gt;</span>
  <span class="hljs-tag">&lt;/<span class="hljs-name">div</span>&gt;</span></span>
}
</code></pre>
<h1 id="the-result" tabindex="-1">The Result</h1>
<p>Lastly, we'll render the above using the <code>App</code> component, the API for the above components should be composable as we outlined initially. The <code>App</code> component will now look like so:</p>
<pre><code class="hljs language-tsx"><span class="hljs-keyword">const</span> <span class="hljs-title class_">App</span>: <span class="hljs-title class_">React</span>.<span class="hljs-property">FC</span> = <span class="hljs-function">() =&gt;</span> {
  <span class="hljs-keyword">return</span> (
    <span class="language-xml"><span class="hljs-tag">&lt;<span class="hljs-name">Wrapper</span>&gt;</span>
      <span class="hljs-tag">&lt;<span class="hljs-name">Item</span> <span class="hljs-attr">name</span>=<span class="hljs-string">&quot;Apple&quot;</span> /&gt;</span>
      <span class="hljs-tag">&lt;<span class="hljs-name">Item</span> <span class="hljs-attr">name</span>=<span class="hljs-string">&quot;Banana&quot;</span> /&gt;</span>
      <span class="hljs-tag">&lt;<span class="hljs-name">Item</span> <span class="hljs-attr">name</span>=<span class="hljs-string">&quot;Chocolate&quot;</span> /&gt;</span>
    <span class="hljs-tag">&lt;/<span class="hljs-name">Wrapper</span>&gt;</span></span>
  )
}
</code></pre>
<p>And the rendered HTML:</p>
<pre><code class="hljs language-html"><span class="hljs-tag">&lt;<span class="hljs-name">div</span>&gt;</span>
  <span class="hljs-tag">&lt;<span class="hljs-name">p</span>&gt;</span>Total: 3<span class="hljs-tag">&lt;/<span class="hljs-name">p</span>&gt;</span>
  <span class="hljs-tag">&lt;<span class="hljs-name">ul</span>&gt;</span>
    <span class="hljs-tag">&lt;<span class="hljs-name">li</span> <span class="hljs-attr">style</span>=<span class="hljs-string">&quot;background-color: lightgrey; padding: 10px; margin: 20px;&quot;</span>&gt;</span>
      <span class="hljs-tag">&lt;<span class="hljs-name">div</span>&gt;</span>Apple, 0<span class="hljs-tag">&lt;/<span class="hljs-name">div</span>&gt;</span>
    <span class="hljs-tag">&lt;/<span class="hljs-name">li</span>&gt;</span>
    <span class="hljs-tag">&lt;<span class="hljs-name">li</span> <span class="hljs-attr">style</span>=<span class="hljs-string">&quot;background-color: lightgrey; padding: 10px; margin: 20px;&quot;</span>&gt;</span>
      <span class="hljs-tag">&lt;<span class="hljs-name">div</span>&gt;</span>Banana, 1<span class="hljs-tag">&lt;/<span class="hljs-name">div</span>&gt;</span>
    <span class="hljs-tag">&lt;/<span class="hljs-name">li</span>&gt;</span>
    <span class="hljs-tag">&lt;<span class="hljs-name">li</span> <span class="hljs-attr">style</span>=<span class="hljs-string">&quot;background-color: lightgrey; padding: 10px; margin: 20px;&quot;</span>&gt;</span>
      <span class="hljs-tag">&lt;<span class="hljs-name">div</span>&gt;</span>Chocolate, 2<span class="hljs-tag">&lt;/<span class="hljs-name">div</span>&gt;</span>
    <span class="hljs-tag">&lt;/<span class="hljs-name">li</span>&gt;</span>
  <span class="hljs-tag">&lt;/<span class="hljs-name">ul</span>&gt;</span>
<span class="hljs-tag">&lt;/<span class="hljs-name">div</span>&gt;</span>
</code></pre>
<div>
  <p>Total: 3</p>
  <ul>
    <li style="background-color: lightgrey; padding: 10px; margin: 20px;">
      <div>Apple, 0</div>
    </li>
    <li style="background-color: lightgrey; padding: 10px; margin: 20px;">
      <div>Banana, 1</div>
    </li>
    <li style="background-color: lightgrey; padding: 10px; margin: 20px;">
      <div>Chocolate, 2</div>
    </li>
  </ul>
</div>
<p>And lastly, if you'd like to interact with the code from this sample you can see it in <a href="https://replit.com/@nabeelvalley/ReactTopLevelAPIExample#src/App.tsx">this Repl</a></p>
<iframe height="700px" width="100%" src="https://replit.com/@nabeelvalley/ReactTopLevelAPIExample?lite=true#src/App.tsx" scrolling="no" frameborder="no" allowtransparency="true" allowfullscreen="true" sandbox="allow-forms allow-pointer-lock allow-popups allow-same-origin allow-scripts allow-modals"></iframe>]]></content>
        <author>
            <name>Nabeel Valley</name>
            <uri>https://nabeelvalley.co.za</uri>
        </author>
    </entry>
    <entry>
        <title type="html"><![CDATA[Visualizations with React]]></title>
        <id>/blog/2022/11-02/d3-with-react/</id>
        <link href="https://nabeelvalley.co.za/blog/2022/11-02/d3-with-react/"/>
        <updated>2022-02-10T23:00:00.000Z</updated>
        <summary type="html"><![CDATA[Create SVG Graphs and Visualizations in React using D3]]></summary>
        <content type="html"><![CDATA[<p><div class="table-of-contents"><details><summary>Contents</summary><ul><li><a href="#data-visualization-with-d3-and-react">Data Visualization with D3 and React</a><ul><li><a href="#getting-stared">Getting Stared</a></li><li><a href="#scales-(d3-scale)">Scales (d3-scale)</a><ul><li><a href="#continuous-scales">Continuous Scales</a><ul><li><a href="#linear">Linear</a></li></ul></li><li><a href="#sequential-color">Sequential Color</a></li><li><a href="#ordinal-scales">Ordinal Scales</a><ul><li><a href="#band-scale">Band Scale</a></li></ul></li></ul></li><li><a href="#building-a-bar-graph">Building a Bar Graph</a><ul><li><a href="#the-svg-root">The SVG Root</a></li><li><a href="#bars">Bars</a></li><li><a href="#y-labels">Y Labels</a></li><li><a href="#x-labels">X Labels</a></li><li><a href="#final-result">Final Result</a></li><li><a href="#ticks-and-grid-lines">Ticks and Grid Lines</a></li></ul></li><li><a href="#building-a-line-graph">Building a Line Graph</a><ul><li><a href="#working-with-domains">Working with Domains</a></li><li><a href="#create-a-line">Create a Line</a></li><li><a href="#formatting">Formatting</a></li><li><a href="#grid-lines">Grid Lines</a></li><li><a href="#final-result-1">Final result</a></li></ul></li></ul></li></ul></details></div></p>
<h1 id="data-visualization-with-d3-and-react" tabindex="-1">Data Visualization with D3 and React</h1>
<p>React is a library for building reactive user interfaces using JavaScript (or Typescript) and D3 (short for <em>Data-Driven Documents</em>) is a set of libraries for working with visualizations based on data</p>
<p>Before getting started, I would recommend familiarity with SVG, React, and D3</p>
<p>Some good references for SVG are on the <a href="https://developer.mozilla.org/en-US/docs/Web/SVG/Tutorial">MDN SVG Docs</a></p>
<p>A good place to start for React would be the <a href="https://reactjs.org/">React Docs</a> or <a href="/docs/react/complete-react.md">my React Notes</a></p>
<p>And lastly, the <a href="https://github.com/d3/d3/wiki">D3 Docs</a></p>
<h2 id="getting-stared" tabindex="-1">Getting Stared</h2>
<p>To follow along, you will need to install <a href="https://nodejs.org/en/">Node.js</a> and be comfortable using the terminal</p>
<p>I'm going to be using a React App with TypeScript initialized with Vite as follows:</p>
<pre><code class="hljs language-sh">yarn create vite
</code></pre>
<p>And then selecting the <code>react-ts</code> option when prompted. Next, install <code>d3</code> from the project root with:</p>
<pre><code class="hljs language-sh">yarn add d3
yarn add --dev @types/d3
</code></pre>
<p>Now that we've got a basic project setup, we can start talking about D3</p>
<h2 id="scales-(d3-scale)" tabindex="-1">Scales (<code>d3-scale</code>)</h2>
<blockquote>
<p><a href="https://github.com/d3/d3-scale"><code>d3-scale</code> Documentation</a></p>
</blockquote>
<p>Broadly, scales allow us to map from one set of values to another set of values,</p>
<p>Scales in D3 are a set of tools which map a dimension of data to a visual variable. They help us go from something like <code>count</code> in our data to something like <code>width</code> in our rendered SVG</p>
<p>We can create scales for a sample dataset like so:</p>
<pre><code class="hljs language-ts"><span class="hljs-keyword">type</span> <span class="hljs-title class_">Datum</span> = {
  <span class="hljs-attr">name</span>: <span class="hljs-built_in">string</span>
  <span class="hljs-attr">count</span>: <span class="hljs-built_in">number</span>
}

<span class="hljs-keyword">export</span> <span class="hljs-keyword">const</span> <span class="hljs-attr">data</span>: <span class="hljs-title class_">Datum</span>[] = [
  { <span class="hljs-attr">name</span>: <span class="hljs-string">&quot;🍊&quot;</span>, <span class="hljs-attr">count</span>: <span class="hljs-number">21</span> },
  { <span class="hljs-attr">name</span>: <span class="hljs-string">&quot;🍇&quot;</span>, <span class="hljs-attr">count</span>: <span class="hljs-number">13</span> },
  { <span class="hljs-attr">name</span>: <span class="hljs-string">&quot;🍏&quot;</span>, <span class="hljs-attr">count</span>: <span class="hljs-number">8</span> },
  { <span class="hljs-attr">name</span>: <span class="hljs-string">&quot;🍌&quot;</span>, <span class="hljs-attr">count</span>: <span class="hljs-number">5</span> },
  { <span class="hljs-attr">name</span>: <span class="hljs-string">&quot;🍐&quot;</span>, <span class="hljs-attr">count</span>: <span class="hljs-number">3</span> },
  { <span class="hljs-attr">name</span>: <span class="hljs-string">&quot;🍋&quot;</span>, <span class="hljs-attr">count</span>: <span class="hljs-number">2</span> },
  { <span class="hljs-attr">name</span>: <span class="hljs-string">&quot;🍎&quot;</span>, <span class="hljs-attr">count</span>: <span class="hljs-number">1</span> },
  { <span class="hljs-attr">name</span>: <span class="hljs-string">&quot;🍉&quot;</span>, <span class="hljs-attr">count</span>: <span class="hljs-number">1</span> },
]
</code></pre>
<blockquote>
<p>Also, a common thing to do when working with scales is to define margins around out image, this is done simply as an object like so:</p>
<pre><code class="hljs language-ts"><span class="hljs-keyword">const</span> margin = {
  <span class="hljs-attr">top</span>: <span class="hljs-number">20</span>,
  <span class="hljs-attr">right</span>: <span class="hljs-number">20</span>,
  <span class="hljs-attr">bottom</span>: <span class="hljs-number">20</span>,
  <span class="hljs-attr">left</span>: <span class="hljs-number">35</span>,
};
</code></pre>
<p>This just helps us simplify some position/layout things down the line</p>
</blockquote>
<p>Scales work by taking a value from the <code>domain</code> (data space) and returning a value from <code>range</code> (visual space):</p>
<pre><code class="hljs language-ts"><span class="hljs-keyword">const</span> width = <span class="hljs-number">600</span>;
<span class="hljs-keyword">const</span> height = <span class="hljs-number">400</span>;

<span class="hljs-keyword">const</span> x = d3
  .<span class="hljs-title function_">scaleLinear</span>()
  .<span class="hljs-title function_">domain</span>([<span class="hljs-number">0</span>, <span class="hljs-number">10</span>])    <span class="hljs-comment">// values of the data space</span>
  .<span class="hljs-title function_">range</span>([<span class="hljs-number">0</span>, width])  <span class="hljs-comment">// values of the visual space</span>

<span class="hljs-keyword">const</span> position = <span class="hljs-title function_">x</span>(<span class="hljs-number">3</span>) <span class="hljs-comment">// position = scale(value)</span>
</code></pre>
<p>Additionally, there's also the <code>invert</code> method which goes the other way - from <code>range</code> to <code>domain</code></p>
<pre><code class="hljs language-ts"><span class="hljs-keyword">const</span> position = <span class="hljs-title function_">x</span>(<span class="hljs-number">3</span>)      <span class="hljs-comment">// position === 30</span>
<span class="hljs-keyword">const</span> value = x.<span class="hljs-title function_">invert</span>(<span class="hljs-number">30</span>) <span class="hljs-comment">// value === 3</span>
</code></pre>
<blockquote>
<p>The <code>invert</code> method is useful for things like calculating a <code>value</code> from a mouse <code>position</code></p>
</blockquote>
<p>D3 has different Scale types:</p>
<ul>
<li>Continuous (Linear, Power, Log, Identity, Time, Radial)</li>
<li>Sequential</li>
<li>Diverging</li>
<li>Quantize</li>
<li>Quantile</li>
<li>Threshold</li>
<li>Ordinal (Band, Point)</li>
</ul>
<h3 id="continuous-scales" tabindex="-1">Continuous Scales</h3>
<p>These scales map continuous data to other continuous data</p>
<p>D3 has a few different continuous scale types:</p>
<ul>
<li>Linear</li>
<li>Power</li>
<li>Log</li>
<li>Identity</li>
<li>Radial</li>
<li>Time</li>
<li>Sequential Color</li>
</ul>
<p>For my purposes at the moment I'm going to be looking at the methods for Linear and Sequential Color scales, but the documentation explains all of the above very thoroughly and is worth a read for additional information on their usage</p>
<h4 id="linear" tabindex="-1">Linear</h4>
<p>We can use a <code>linear</code> scale in the fruit example for mapping count to an x width:</p>
<pre><code class="hljs language-ts"><span class="hljs-keyword">const</span> maxX = d3.<span class="hljs-title function_">max</span>(data, <span class="hljs-function">(<span class="hljs-params">d</span>) =&gt;</span> d.<span class="hljs-property">count</span>) <span class="hljs-keyword">as</span> <span class="hljs-built_in">number</span>;

<span class="hljs-keyword">const</span> x = d3
  .<span class="hljs-property">scaleLinear</span>&lt;<span class="hljs-built_in">number</span>&gt;()
  .<span class="hljs-title function_">domain</span>([<span class="hljs-number">0</span>, maxX])
  .<span class="hljs-title function_">range</span>([margin.<span class="hljs-property">left</span>, width - margin.<span class="hljs-property">right</span>]);
</code></pre>
<p>If we don't want the custom <code>domain</code> to <code>range</code> interpolation we can create a custom <code>interpolator</code>. An <code>interpolator</code> is a function that takes a value from the <code>domain</code> and returns the resulting <code>range</code> value</p>
<p>D3 has a few different <code>interpolators</code> included for tasks such as interpolating colors or rounding values</p>
<p>We can create a custom color domain to interpolate over and use the <code>interpolateHsl</code> or <code>interpolateRgb</code> functions:</p>
<pre><code class="hljs language-ts"><span class="hljs-keyword">const</span> color = d3
  .<span class="hljs-property">scaleLinear</span>&lt;<span class="hljs-built_in">string</span>&gt;()
  .<span class="hljs-title function_">domain</span>([<span class="hljs-number">0</span>, maxX])
  .<span class="hljs-title function_">range</span>([<span class="hljs-string">&quot;pink&quot;</span>, <span class="hljs-string">&quot;lightgreen&quot;</span>])
  .<span class="hljs-title function_">interpolate</span>(d3.<span class="hljs-property">interpolateHsl</span>);
</code></pre>
<h3 id="sequential-color" tabindex="-1">Sequential Color</h3>
<p>If for some reason we want to use the pre-included color scales</p>
<p>The <code>scaleSequential</code> scale is a method that allows us to map to a <code>color</code> range using an <code>interpolator</code>.</p>
<p>D3 has a few different interpolators we can use with this function like <code>d3.interpolatePurples</code>, <code>d3.interpolateRainbow</code> or <code>d3.interpolateCool</code> among others which look quite nice</p>
<p>We can create a color scale using the <code>d3.interpolatePurples</code> which will map the data to a scale of purples:</p>
<pre><code class="hljs language-ts"><span class="hljs-keyword">const</span> color = d3
  .<span class="hljs-title function_">scaleSequential</span>()
  .<span class="hljs-title function_">domain</span>([<span class="hljs-number">0</span>, maxX])
  .<span class="hljs-title function_">interpolator</span>(d3.<span class="hljs-property">interpolatePurples</span>);
</code></pre>
<p>These can be used instead of the <code>scaleLinear</code> with <code>interpolateHsl</code> for example above but to provide a pre-calibrated color scale</p>
<h3 id="ordinal-scales" tabindex="-1">Ordinal Scales</h3>
<p>Ordinal scales have a discrete domain and range and are used for the mapping of discrete data. These are a good fit for mapping a scale with categorical data. D3 offers us the following scales:</p>
<ul>
<li>Band Scale</li>
<li>Point Scale</li>
</ul>
<h4 id="band-scale" tabindex="-1">Band Scale</h4>
<p>A Band Scale is a type of Ordinal Scale where the output <code>range</code> is continuous and numeric</p>
<p>We can create a mapping for where each of our labels should be positioned with <code>scaleBand</code>:</p>
<pre><code class="hljs language-ts"><span class="hljs-keyword">const</span> names = data.<span class="hljs-title function_">map</span>(<span class="hljs-function">(<span class="hljs-params">d</span>) =&gt;</span> d.<span class="hljs-property">name</span>);

<span class="hljs-keyword">const</span> y = d3
  .<span class="hljs-title function_">scaleBand</span>()
  .<span class="hljs-title function_">domain</span>(names)
  .<span class="hljs-title function_">range</span>([margin.<span class="hljs-property">top</span>, height - margin.<span class="hljs-property">bottom</span>])
  .<span class="hljs-title function_">padding</span>(<span class="hljs-number">0.1</span>);
</code></pre>
<blockquote>
<p>The domain can be any size array, unlike in the case of continuous scales where the are usually start and end values</p>
</blockquote>
<h2 id="building-a-bar-graph" tabindex="-1">Building a Bar Graph</h2>
<p>When creating visuals with D3 there are a few different ways we can output to SVG data. D3 provides us with some methods for creating shapes and elements programmatically via a builder pattern - similar to how we create scales.</p>
<p>However, there are also cases where we would want to define out SVG elements manually, such as when working with React so that the react renderer can handle the rendering of the SVG elements and we can manage our DOM structure in a way that's a bit more representative of the way we work in React</p>
<h3 id="the-svg-root" tabindex="-1">The SVG Root</h3>
<p>Every SVG image has to have an <code>svg</code> root element. To help ensure that this root scales correctly we also use it with a <code>viewBox</code> attribute which specifies which portion of the SVG is visible since the contents can go outside of the bounds of the View Box and we may not want to display this overflow content by default</p>
<p>Using the definitions for <code>margin</code>, <code>width</code> and <code>height</code> from before we can get the <code>viewBox</code> for the SVG we're trying to render like so:</p>
<pre><code class="hljs language-ts"><span class="hljs-keyword">const</span> viewBox = <span class="hljs-string">`0 <span class="hljs-subst">${margin.top}</span> <span class="hljs-subst">${width}</span> <span class="hljs-subst">${height - margin.top}</span>`</span>;
</code></pre>
<p>And then, using that value in the <code>svg</code> element:</p>
<pre><code class="hljs language-tsx"><span class="hljs-keyword">return</span> (
  <span class="language-xml"><span class="hljs-tag">&lt;<span class="hljs-name">svg</span> <span class="hljs-attr">viewBox</span>=<span class="hljs-string">{viewBox}</span>&gt;</span>
    {/* we will render the graph in here */}
  <span class="hljs-tag">&lt;/<span class="hljs-name">svg</span>&gt;</span></span>
)
</code></pre>
<p>At this point we don't really have anything in the SVG, next up we'll do the following:</p>
<ol>
<li>Add Bars to the SVG</li>
<li>Add Y Labels to the SVG</li>
<li>Add X Labels to the SVG</li>
</ol>
<h3 id="bars" tabindex="-1">Bars</h3>
<p>We can create Bars using the following:</p>
<pre><code class="hljs language-tsx"><span class="hljs-keyword">const</span> bars = data.<span class="hljs-title function_">map</span>(<span class="hljs-function">(<span class="hljs-params">d</span>) =&gt;</span> (
  <span class="language-xml"><span class="hljs-tag">&lt;<span class="hljs-name">rect</span>
    <span class="hljs-attr">key</span>=<span class="hljs-string">{y(d.name)}</span>
    <span class="hljs-attr">fill</span>=<span class="hljs-string">{color(d.count)}</span>
    <span class="hljs-attr">y</span>=<span class="hljs-string">{y(d.name)}</span>
    <span class="hljs-attr">x</span>=<span class="hljs-string">{x(0)}</span>
    <span class="hljs-attr">width</span>=<span class="hljs-string">{x(d.count)</span> <span class="hljs-attr">-</span> <span class="hljs-attr">x</span>(<span class="hljs-attr">0</span>)}
    <span class="hljs-attr">height</span>=<span class="hljs-string">{y.bandwidth()}</span>
  /&gt;</span></span>
));
</code></pre>
<p>We make use of the <code>x</code> and <code>y</code> functions which help us get the positions for the <code>rect</code> as well as <code>y.bandWidth()</code> and <code>x(d.count)</code> to <code>height</code> and <code>width</code> for the element</p>
<p>We can then add that into the SVG using:</p>
<pre><code class="hljs language-tsx"><span class="hljs-keyword">return</span> (
  <span class="language-xml"><span class="hljs-tag">&lt;<span class="hljs-name">svg</span> <span class="hljs-attr">viewBox</span>=<span class="hljs-string">{viewBox}</span>&gt;</span>
    <span class="hljs-tag">&lt;<span class="hljs-name">g</span>&gt;</span>{bars}<span class="hljs-tag">&lt;/<span class="hljs-name">g</span>&gt;</span>
  <span class="hljs-tag">&lt;/<span class="hljs-name">svg</span>&gt;</span></span>
);
</code></pre>
<p>At this point, the resulting SVG will look like this:</p>
<svg viewBox="0 20 600 380">
  <g>
    <rect fill="rgb(38, 165, 219)" y="26" x="35" width="208" height="40"></rect>
    <rect fill="rgb(68, 121, 223)" y="70" x="35" width="130" height="40"></rect>
    <rect fill="rgb(175, 240, 91)" y="114" x="35" width="545" height="40"></rect>
    <rect fill="rgb(97, 83, 199)" y="158" x="35" width="52" height="40"></rect>
    <rect fill="rgb(32, 226, 157)" y="202" x="35" width="337" height="40"></rect>
    <rect fill="rgb(104, 73, 185)" y="246" x="35" width="26" height="40"></rect>
    <rect fill="rgb(104, 73, 185)" y="290" x="35" width="26" height="40"></rect>
    <rect fill="rgb(88, 95, 210)" y="334" x="35" width="78" height="40"></rect>
  </g>
</svg>
<h3 id="y-labels" tabindex="-1">Y Labels</h3>
<p>Next, using similar concepts as above, we can add the Y Labels:</p>
<pre><code class="hljs language-tsx"><span class="hljs-keyword">const</span> yLabels = data.<span class="hljs-title function_">map</span>(<span class="hljs-function">(<span class="hljs-params">d</span>) =&gt;</span> (
  <span class="language-xml"><span class="hljs-tag">&lt;<span class="hljs-name">text</span> <span class="hljs-attr">key</span>=<span class="hljs-string">{y(d.name)}</span> <span class="hljs-attr">y</span>=<span class="hljs-string">{y(d.name)}</span> <span class="hljs-attr">x</span>=<span class="hljs-string">{0}</span> <span class="hljs-attr">dy</span>=<span class="hljs-string">&quot;0.35em&quot;</span>&gt;</span>
    {d.name}
  <span class="hljs-tag">&lt;/<span class="hljs-name">text</span>&gt;</span></span>
));
</code></pre>
<p>Next, we can add this into the SVG, and also wrapping the element in a <code>g</code> with a some basic text alignment and translation for positioning it correctly:</p>
<pre><code class="hljs language-tsx"><span class="hljs-keyword">return</span> (
  <span class="language-xml"><span class="hljs-tag">&lt;<span class="hljs-name">svg</span> <span class="hljs-attr">viewBox</span>=<span class="hljs-string">{viewBox}</span>&gt;</span>
    <span class="hljs-tag">&lt;<span class="hljs-name">g</span>
      <span class="hljs-attr">fill</span>=<span class="hljs-string">&quot;steelblue&quot;</span>
      <span class="hljs-attr">textAnchor</span>=<span class="hljs-string">&quot;end&quot;</span>
      <span class="hljs-attr">transform</span>=<span class="hljs-string">{</span>`<span class="hljs-attr">translate</span>(${<span class="hljs-attr">margin.left</span> <span class="hljs-attr">-</span> <span class="hljs-attr">5</span>}, ${<span class="hljs-attr">y.bandwidth</span>() / <span class="hljs-attr">2</span>})`}
    &gt;</span>
      {yLabels}
    <span class="hljs-tag">&lt;/<span class="hljs-name">g</span>&gt;</span>
    <span class="hljs-tag">&lt;<span class="hljs-name">g</span>&gt;</span>{bars}<span class="hljs-tag">&lt;/<span class="hljs-name">g</span>&gt;</span>
  <span class="hljs-tag">&lt;/<span class="hljs-name">svg</span>&gt;</span></span>
);
</code></pre>
<p>The state of the SVG at this point is:</p>
<svg viewBox="0 20 600 380">
  <g fill="steelblue" text-anchor="end" transform="translate(30, 20)">
    <text y="26" x="0" dy="0.35em">🍏</text>
    <text y="70" x="0" dy="0.35em">🍌</text>
    <text y="114" x="0" dy="0.35em">🍊</text>
    <text y="158" x="0" dy="0.35em">🍋</text>
    <text y="202" x="0" dy="0.35em">🍇</text>
    <text y="246" x="0" dy="0.35em">🍎</text>
    <text y="290" x="0" dy="0.35em">🍉</text>
    <text y="334" x="0" dy="0.35em">🍐</text>
  </g>
  <g>
    <rect fill="rgb(38, 165, 219)" y="26" x="35" width="208" height="40"></rect>
    <rect fill="rgb(68, 121, 223)" y="70" x="35" width="130" height="40"></rect>
    <rect
      fill="rgb(175, 240, 91)"
      y="114"
      x="35"
      width="545"
      height="40"
    ></rect>
    <rect fill="rgb(97, 83, 199)" y="158" x="35" width="52" height="40"></rect>
    <rect
      fill="rgb(32, 226, 157)"
      y="202"
      x="35"
      width="337"
      height="40"
    ></rect>
    <rect fill="rgb(104, 73, 185)" y="246" x="35" width="26" height="40"></rect>
    <rect fill="rgb(104, 73, 185)" y="290" x="35" width="26" height="40"></rect>
    <rect fill="rgb(88, 95, 210)" y="334" x="35" width="78" height="40"></rect>
  </g>
</svg>
<h3 id="x-labels" tabindex="-1">X Labels</h3>
<p>Next, we can add the X Labels over each <code>rect</code> using:</p>
<pre><code class="hljs language-tsx"><span class="hljs-keyword">const</span> xLabels = data.<span class="hljs-title function_">map</span>(<span class="hljs-function">(<span class="hljs-params">d</span>) =&gt;</span> (
  <span class="language-xml"><span class="hljs-tag">&lt;<span class="hljs-name">text</span> <span class="hljs-attr">key</span>=<span class="hljs-string">{y(d.name)}</span> <span class="hljs-attr">y</span>=<span class="hljs-string">{y(d.name)}</span> <span class="hljs-attr">x</span>=<span class="hljs-string">{x(d.count)}</span> <span class="hljs-attr">dy</span>=<span class="hljs-string">&quot;0.35em&quot;</span>&gt;</span>
    {d.count}
  <span class="hljs-tag">&lt;/<span class="hljs-name">text</span>&gt;</span></span>
));
</code></pre>
<p>And the resulting code looks like this:</p>
<pre><code class="hljs language-tsx"><span class="hljs-keyword">return</span> (
  <span class="language-xml"><span class="hljs-tag">&lt;<span class="hljs-name">svg</span> <span class="hljs-attr">viewBox</span>=<span class="hljs-string">{viewBox}</span>&gt;</span>
    <span class="hljs-tag">&lt;<span class="hljs-name">g</span>
      <span class="hljs-attr">fill</span>=<span class="hljs-string">&quot;steelblue&quot;</span>
      <span class="hljs-attr">textAnchor</span>=<span class="hljs-string">&quot;end&quot;</span>
      <span class="hljs-attr">transform</span>=<span class="hljs-string">{</span>`<span class="hljs-attr">translate</span>(${<span class="hljs-attr">margin.left</span> <span class="hljs-attr">-</span> <span class="hljs-attr">5</span>}, ${<span class="hljs-attr">y.bandwidth</span>() / <span class="hljs-attr">2</span>})`}
    &gt;</span>
      {yLabels}
    <span class="hljs-tag">&lt;/<span class="hljs-name">g</span>&gt;</span>
    <span class="hljs-tag">&lt;<span class="hljs-name">g</span>&gt;</span>{bars}<span class="hljs-tag">&lt;/<span class="hljs-name">g</span>&gt;</span>
    <span class="hljs-tag">&lt;<span class="hljs-name">g</span>
      <span class="hljs-attr">fill</span>=<span class="hljs-string">&quot;white&quot;</span>
      <span class="hljs-attr">textAnchor</span>=<span class="hljs-string">&quot;end&quot;</span>
      <span class="hljs-attr">transform</span>=<span class="hljs-string">{</span>`<span class="hljs-attr">translate</span>(<span class="hljs-attr">-6</span>, ${<span class="hljs-attr">y.bandwidth</span>() / <span class="hljs-attr">2</span>})`}
    &gt;</span>
      {xLabels}
    <span class="hljs-tag">&lt;/<span class="hljs-name">g</span>&gt;</span>
  <span class="hljs-tag">&lt;/<span class="hljs-name">svg</span>&gt;</span></span>
);
</code></pre>
<p>And the final SVG:</p>
<svg viewBox="0 20 600 380">
  <g fill="steelblue" text-anchor="end" transform="translate(30, 20)">
    <text y="26" x="0" dy="0.35em">🍏</text>
    <text y="70" x="0" dy="0.35em">🍌</text>
    <text y="114" x="0" dy="0.35em">🍊</text>
    <text y="158" x="0" dy="0.35em">🍋</text>
    <text y="202" x="0" dy="0.35em">🍇</text>
    <text y="246" x="0" dy="0.35em">🍎</text>
    <text y="290" x="0" dy="0.35em">🍉</text>
    <text y="334" x="0" dy="0.35em">🍐</text>
  </g>
  <g>
    <rect fill="rgb(38, 165, 219)" y="26" x="35" width="208" height="40"></rect>
    <rect fill="rgb(68, 121, 223)" y="70" x="35" width="130" height="40"></rect>
    <rect
      fill="rgb(175, 240, 91)"
      y="114"
      x="35"
      width="545"
      height="40"
    ></rect>
    <rect fill="rgb(97, 83, 199)" y="158" x="35" width="52" height="40"></rect>
    <rect
      fill="rgb(32, 226, 157)"
      y="202"
      x="35"
      width="337"
      height="40"
    ></rect>
    <rect fill="rgb(104, 73, 185)" y="246" x="35" width="26" height="40"></rect>
    <rect fill="rgb(104, 73, 185)" y="290" x="35" width="26" height="40"></rect>
    <rect fill="rgb(88, 95, 210)" y="334" x="35" width="78" height="40"></rect>
  </g>
  <g fill="white" text-anchor="end" transform="translate(-6, 20)">
    <text y="26" x="243" dy="0.35em">8</text>
    <text y="70" x="165" dy="0.35em">5</text>
    <text y="114" x="580" dy="0.35em">21</text>
    <text y="158" x="87" dy="0.35em">2</text>
    <text y="202" x="372" dy="0.35em">13</text>
    <text y="246" x="61" dy="0.35em">1</text>
    <text y="290" x="61" dy="0.35em">1</text>
    <text y="334" x="113" dy="0.35em">3</text>
  </g>
</svg>
<h3 id="final-result" tabindex="-1">Final Result</h3>
<p>The code for the entire file/graph can be seen below:</p>
<details>
<summary>Fruit.tsx</summary>
<pre><code class="hljs language-tsx"><span class="hljs-keyword">import</span> <span class="hljs-title class_">React</span> <span class="hljs-keyword">from</span> <span class="hljs-string">&quot;react&quot;</span>;
<span class="hljs-keyword">import</span> * <span class="hljs-keyword">as</span> d3 <span class="hljs-keyword">from</span> <span class="hljs-string">&quot;d3&quot;</span>;
<span class="hljs-keyword">import</span> { data } <span class="hljs-keyword">from</span> <span class="hljs-string">&quot;../data/fruit&quot;</span>;

<span class="hljs-keyword">const</span> width = <span class="hljs-number">600</span>;
<span class="hljs-keyword">const</span> height = <span class="hljs-number">400</span>;

<span class="hljs-keyword">const</span> margin = {
  <span class="hljs-attr">top</span>: <span class="hljs-number">20</span>,
  <span class="hljs-attr">right</span>: <span class="hljs-number">20</span>,
  <span class="hljs-attr">bottom</span>: <span class="hljs-number">20</span>,
  <span class="hljs-attr">left</span>: <span class="hljs-number">35</span>,
};

<span class="hljs-keyword">const</span> maxX = d3.<span class="hljs-title function_">max</span>(data, <span class="hljs-function">(<span class="hljs-params">d</span>) =&gt;</span> d.<span class="hljs-property">count</span>) <span class="hljs-keyword">as</span> <span class="hljs-built_in">number</span>;

<span class="hljs-keyword">const</span> x = d3
  .<span class="hljs-property">scaleLinear</span>&lt;<span class="hljs-built_in">number</span>&gt;()
  .<span class="hljs-title function_">domain</span>([<span class="hljs-number">0</span>, maxX])
  .<span class="hljs-title function_">range</span>([margin.<span class="hljs-property">left</span>, width - margin.<span class="hljs-property">right</span>])
  .<span class="hljs-title function_">interpolate</span>(d3.<span class="hljs-property">interpolateRound</span>);

<span class="hljs-keyword">const</span> names = data.<span class="hljs-title function_">map</span>(<span class="hljs-function">(<span class="hljs-params">d</span>) =&gt;</span> d.<span class="hljs-property">name</span>);

<span class="hljs-keyword">const</span> y = d3
  .<span class="hljs-title function_">scaleBand</span>()
  .<span class="hljs-title function_">domain</span>(names)
  .<span class="hljs-title function_">range</span>([margin.<span class="hljs-property">top</span>, height - margin.<span class="hljs-property">bottom</span>])
  .<span class="hljs-title function_">padding</span>(<span class="hljs-number">0.1</span>)
  .<span class="hljs-title function_">round</span>(<span class="hljs-literal">true</span>);

<span class="hljs-keyword">const</span> color = d3
  .<span class="hljs-title function_">scaleSequential</span>()
  .<span class="hljs-title function_">domain</span>([<span class="hljs-number">0</span>, maxX])
  .<span class="hljs-title function_">interpolator</span>(d3.<span class="hljs-property">interpolateCool</span>);

<span class="hljs-keyword">export</span> <span class="hljs-keyword">const</span> <span class="hljs-title class_">Fruit</span>: <span class="hljs-title class_">React</span>.<span class="hljs-property">FC</span> = <span class="hljs-function">(<span class="hljs-params">{}</span>) =&gt;</span> {
  <span class="hljs-keyword">const</span> viewBox = <span class="hljs-string">`0 <span class="hljs-subst">${margin.top}</span> <span class="hljs-subst">${width}</span> <span class="hljs-subst">${height - margin.top}</span>`</span>;

  <span class="hljs-keyword">const</span> yLabels = data.<span class="hljs-title function_">map</span>(<span class="hljs-function">(<span class="hljs-params">d</span>) =&gt;</span> (
    <span class="language-xml"><span class="hljs-tag">&lt;<span class="hljs-name">text</span> <span class="hljs-attr">key</span>=<span class="hljs-string">{y(d.name)}</span> <span class="hljs-attr">y</span>=<span class="hljs-string">{y(d.name)}</span> <span class="hljs-attr">x</span>=<span class="hljs-string">{0}</span> <span class="hljs-attr">dy</span>=<span class="hljs-string">&quot;0.35em&quot;</span>&gt;</span>
      {d.name}
    <span class="hljs-tag">&lt;/<span class="hljs-name">text</span>&gt;</span></span>
  ));

  <span class="hljs-keyword">const</span> bars = data.<span class="hljs-title function_">map</span>(<span class="hljs-function">(<span class="hljs-params">d</span>) =&gt;</span> (
    <span class="language-xml"><span class="hljs-tag">&lt;<span class="hljs-name">rect</span>
      <span class="hljs-attr">key</span>=<span class="hljs-string">{y(d.name)}</span>
      <span class="hljs-attr">fill</span>=<span class="hljs-string">{color(d.count)}</span>
      <span class="hljs-attr">y</span>=<span class="hljs-string">{y(d.name)}</span>
      <span class="hljs-attr">x</span>=<span class="hljs-string">{x(0)}</span>
      <span class="hljs-attr">width</span>=<span class="hljs-string">{x(d.count)</span> <span class="hljs-attr">-</span> <span class="hljs-attr">x</span>(<span class="hljs-attr">0</span>)}
      <span class="hljs-attr">height</span>=<span class="hljs-string">{y.bandwidth()}</span>
    /&gt;</span></span>
  ));

  <span class="hljs-keyword">const</span> xLabels = data.<span class="hljs-title function_">map</span>(<span class="hljs-function">(<span class="hljs-params">d</span>) =&gt;</span> (
    <span class="language-xml"><span class="hljs-tag">&lt;<span class="hljs-name">text</span> <span class="hljs-attr">key</span>=<span class="hljs-string">{y(d.name)}</span> <span class="hljs-attr">y</span>=<span class="hljs-string">{y(d.name)}</span> <span class="hljs-attr">x</span>=<span class="hljs-string">{x(d.count)}</span> <span class="hljs-attr">dy</span>=<span class="hljs-string">&quot;0.35em&quot;</span>&gt;</span>
      {d.count}
    <span class="hljs-tag">&lt;/<span class="hljs-name">text</span>&gt;</span></span>
  ));

  <span class="hljs-keyword">return</span> (
    <span class="language-xml"><span class="hljs-tag">&lt;<span class="hljs-name">svg</span> <span class="hljs-attr">viewBox</span>=<span class="hljs-string">{viewBox}</span>&gt;</span>
      <span class="hljs-tag">&lt;<span class="hljs-name">g</span>
        <span class="hljs-attr">fill</span>=<span class="hljs-string">&quot;steelblue&quot;</span>
        <span class="hljs-attr">textAnchor</span>=<span class="hljs-string">&quot;end&quot;</span>
        <span class="hljs-attr">transform</span>=<span class="hljs-string">{</span>`<span class="hljs-attr">translate</span>(${<span class="hljs-attr">margin.left</span> <span class="hljs-attr">-</span> <span class="hljs-attr">5</span>}, ${<span class="hljs-attr">y.bandwidth</span>() / <span class="hljs-attr">2</span>})`}
      &gt;</span>
        {yLabels}
      <span class="hljs-tag">&lt;/<span class="hljs-name">g</span>&gt;</span>
      <span class="hljs-tag">&lt;<span class="hljs-name">g</span>&gt;</span>{bars}<span class="hljs-tag">&lt;/<span class="hljs-name">g</span>&gt;</span>
      <span class="hljs-tag">&lt;<span class="hljs-name">g</span>
        <span class="hljs-attr">fill</span>=<span class="hljs-string">&quot;white&quot;</span>
        <span class="hljs-attr">textAnchor</span>=<span class="hljs-string">&quot;end&quot;</span>
        <span class="hljs-attr">transform</span>=<span class="hljs-string">{</span>`<span class="hljs-attr">translate</span>(<span class="hljs-attr">-6</span>, ${<span class="hljs-attr">y.bandwidth</span>() / <span class="hljs-attr">2</span>})`}
      &gt;</span>
        {xLabels}
      <span class="hljs-tag">&lt;/<span class="hljs-name">g</span>&gt;</span>
    <span class="hljs-tag">&lt;/<span class="hljs-name">svg</span>&gt;</span></span>
  );
};
</code></pre>
</details>
<h3 id="ticks-and-grid-lines" tabindex="-1">Ticks and Grid Lines</h3>
<blockquote>
<p>Note that D3 includes a <code>d3-axis</code> package but that doesn't quite work given that we're manually creating the SVG using React and not D3's string-based rendering</p>
</blockquote>
<p>We may want to add Ticks and Grid Lines on the X-Axis, we can do this using the scale's <code>ticks</code> method like so:</p>
<pre><code class="hljs language-tsx"><span class="hljs-keyword">const</span> xGrid = x.<span class="hljs-title function_">ticks</span>().<span class="hljs-title function_">map</span>(<span class="hljs-function">(<span class="hljs-params">t</span>) =&gt;</span> (
  <span class="language-xml"><span class="hljs-tag">&lt;<span class="hljs-name">g</span> <span class="hljs-attr">key</span>=<span class="hljs-string">{t}</span>&gt;</span>
    <span class="hljs-tag">&lt;<span class="hljs-name">line</span>
      <span class="hljs-attr">stroke</span>=<span class="hljs-string">&quot;lightgrey&quot;</span>
      <span class="hljs-attr">x1</span>=<span class="hljs-string">{x(t)}</span>
      <span class="hljs-attr">y1</span>=<span class="hljs-string">{margin.top}</span>
      <span class="hljs-attr">x2</span>=<span class="hljs-string">{x(t)}</span>
      <span class="hljs-attr">y2</span>=<span class="hljs-string">{height</span> <span class="hljs-attr">-</span> <span class="hljs-attr">margin.bottom</span>}
    /&gt;</span>
    <span class="hljs-tag">&lt;<span class="hljs-name">text</span> <span class="hljs-attr">fill</span>=<span class="hljs-string">&quot;darkgrey&quot;</span> <span class="hljs-attr">textAnchor</span>=<span class="hljs-string">&quot;middle&quot;</span> <span class="hljs-attr">x</span>=<span class="hljs-string">{x(t)}</span> <span class="hljs-attr">y</span>=<span class="hljs-string">{height}</span>&gt;</span>
      {t}
    <span class="hljs-tag">&lt;/<span class="hljs-name">text</span>&gt;</span>
  <span class="hljs-tag">&lt;/<span class="hljs-name">g</span>&gt;</span></span>
));
</code></pre>
<p>And then render this in the <code>svg</code> as:</p>
<pre><code class="hljs language-tsx"><span class="hljs-keyword">return</span> (
<span class="language-xml"><span class="hljs-tag">&lt;<span class="hljs-name">svg</span> <span class="hljs-attr">viewBox</span>=<span class="hljs-string">{viewBox}</span>&gt;</span>
  <span class="hljs-tag">&lt;<span class="hljs-name">g</span>&gt;</span>{xGrid}<span class="hljs-tag">&lt;/<span class="hljs-name">g</span>&gt;</span>
  { /* previous graph content */ }
<span class="hljs-tag">&lt;/<span class="hljs-name">svg</span>&gt;</span></span>
);
</code></pre>
<p>The result will look like this:</p>
<svg viewBox="0 20 600 380">
  <g>
    <g>
      <line stroke="lightgrey" x1="35" y1="20" x2="35" y2="380"></line>
      <text fill="darkgrey" text-anchor="middle" x="35" y="400">0</text>
    </g>
    <g>
      <line stroke="lightgrey" x1="87" y1="20" x2="87" y2="380"></line>
      <text fill="darkgrey" text-anchor="middle" x="87" y="400">2</text>
    </g>
    <g>
      <line stroke="lightgrey" x1="139" y1="20" x2="139" y2="380"></line>
      <text fill="darkgrey" text-anchor="middle" x="139" y="400">4</text>
    </g>
    <g>
      <line stroke="lightgrey" x1="191" y1="20" x2="191" y2="380"></line>
      <text fill="darkgrey" text-anchor="middle" x="191" y="400">6</text>
    </g>
    <g>
      <line stroke="lightgrey" x1="243" y1="20" x2="243" y2="380"></line>
      <text fill="darkgrey" text-anchor="middle" x="243" y="400">8</text>
    </g>
    <g>
      <line stroke="lightgrey" x1="295" y1="20" x2="295" y2="380"></line>
      <text fill="darkgrey" text-anchor="middle" x="295" y="400">10</text>
    </g>
    <g>
      <line stroke="lightgrey" x1="346" y1="20" x2="346" y2="380"></line>
      <text fill="darkgrey" text-anchor="middle" x="346" y="400">12</text>
    </g>
    <g>
      <line stroke="lightgrey" x1="398" y1="20" x2="398" y2="380"></line>
      <text fill="darkgrey" text-anchor="middle" x="398" y="400">14</text>
    </g>
    <g>
      <line stroke="lightgrey" x1="450" y1="20" x2="450" y2="380"></line>
      <text fill="darkgrey" text-anchor="middle" x="450" y="400">16</text>
    </g>
    <g>
      <line stroke="lightgrey" x1="502" y1="20" x2="502" y2="380"></line>
      <text fill="darkgrey" text-anchor="middle" x="502" y="400">18</text>
    </g>
    <g>
      <line stroke="lightgrey" x1="554" y1="20" x2="554" y2="380"></line>
      <text fill="darkgrey" text-anchor="middle" x="554" y="400">20</text>
    </g>
  </g>
  <g fill="steelblue" text-anchor="end" transform="translate(30, 20)">
    <text y="26" x="0" dy="0.35em">🍏</text>
    <text y="70" x="0" dy="0.35em">🍌</text>
    <text y="114" x="0" dy="0.35em">🍊</text>
    <text y="158" x="0" dy="0.35em">🍋</text>
    <text y="202" x="0" dy="0.35em">🍇</text>
    <text y="246" x="0" dy="0.35em">🍎</text>
    <text y="290" x="0" dy="0.35em">🍉</text>
    <text y="334" x="0" dy="0.35em">🍐</text>
  </g>
  <g>
    <rect fill="rgb(38, 165, 219)" y="26" x="35" width="208" height="40"></rect>
    <rect fill="rgb(68, 121, 223)" y="70" x="35" width="130" height="40"></rect>
    <rect
      fill="rgb(175, 240, 91)"
      y="114"
      x="35"
      width="545"
      height="40"
    ></rect>
    <rect fill="rgb(97, 83, 199)" y="158" x="35" width="52" height="40"></rect>
    <rect
      fill="rgb(32, 226, 157)"
      y="202"
      x="35"
      width="337"
      height="40"
    ></rect>
    <rect fill="rgb(104, 73, 185)" y="246" x="35" width="26" height="40"></rect>
    <rect fill="rgb(104, 73, 185)" y="290" x="35" width="26" height="40"></rect>
    <rect fill="rgb(88, 95, 210)" y="334" x="35" width="78" height="40"></rect>
  </g>
  <g fill="white" text-anchor="end" transform="translate(-6, 20)">
    <text y="26" x="243" dy="0.35em">8</text>
    <text y="70" x="165" dy="0.35em">5</text>
    <text y="114" x="580" dy="0.35em">21</text>
    <text y="158" x="87" dy="0.35em">2</text>
    <text y="202" x="372" dy="0.35em">13</text>
    <text y="246" x="61" dy="0.35em">1</text>
    <text y="290" x="61" dy="0.35em">1</text>
    <text y="334" x="113" dy="0.35em">3</text>
  </g>
</svg>
<h2 id="building-a-line-graph" tabindex="-1">Building a Line Graph</h2>
<p>We can apply all the same as in the Bar Graph before to draw a Line Graph. The example I'll be using consists of a <code>Datum</code> as follows:</p>
<pre><code class="hljs language-ts"><span class="hljs-keyword">export</span> <span class="hljs-keyword">type</span> <span class="hljs-title class_">Datum</span> = {
  <span class="hljs-attr">date</span>: <span class="hljs-title class_">Date</span>;
  <span class="hljs-attr">temp</span>: <span class="hljs-built_in">number</span>;
};
</code></pre>
<p>Given that the X-Axis is a <code>DateTime</code> we will need to do some additional conversions as well as formatting</p>
<h3 id="working-with-domains" tabindex="-1">Working with Domains</h3>
<p>In the context of this graph it would also be useful to have an automatically calculated domain instead of a hardcoded one as in the previous example</p>
<p>We can use the <code>d3.extent</code> function to calculate a domain:</p>
<pre><code class="hljs language-ts"><span class="hljs-keyword">const</span> dateDomain = d3.<span class="hljs-title function_">extent</span>(data, <span class="hljs-function">(<span class="hljs-params">d</span>) =&gt;</span> d.<span class="hljs-property">date</span>) <span class="hljs-keyword">as</span> [<span class="hljs-title class_">Date</span>, <span class="hljs-title class_">Date</span>];
<span class="hljs-keyword">const</span> tempDomain = d3.<span class="hljs-title function_">extent</span>(data, <span class="hljs-function">(<span class="hljs-params">d</span>) =&gt;</span> d.<span class="hljs-property">temp</span>).<span class="hljs-title function_">reverse</span>() <span class="hljs-keyword">as</span> [<span class="hljs-built_in">number</span>, <span class="hljs-built_in">number</span>];
</code></pre>
<p>We can then use this domain definitions in a <code>scale</code>:</p>
<pre><code class="hljs language-ts"><span class="hljs-keyword">const</span> tempScale = d3
  .<span class="hljs-property">scaleLinear</span>&lt;<span class="hljs-built_in">number</span>&gt;()
  .<span class="hljs-title function_">domain</span>(tempDomain)
  .<span class="hljs-title function_">range</span>([margin.<span class="hljs-property">top</span>, height - margin.<span class="hljs-property">bottom</span>])
  .<span class="hljs-title function_">interpolate</span>(d3.<span class="hljs-property">interpolateRound</span>);

<span class="hljs-keyword">const</span> dateScale = d3
  .<span class="hljs-title function_">scaleTime</span>()
  .<span class="hljs-title function_">domain</span>(dateDomain)
  .<span class="hljs-title function_">range</span>([margin.<span class="hljs-property">left</span>, width - margin.<span class="hljs-property">right</span>]);
</code></pre>
<h3 id="create-a-line" tabindex="-1">Create a Line</h3>
<p>The <code>d3.line</code> function is useful for creating a <code>d</code> attribute for an SVG <code>path</code> element which defines the line segments</p>
<p>The <code>line</code> function requires <code>x</code> and <code>y</code> mappings. The line for the graph path can be seen as follows:</p>
<pre><code class="hljs language-ts"><span class="hljs-keyword">const</span> line = d3
  .<span class="hljs-property">line</span>&lt;<span class="hljs-title class_">Datum</span>&gt;()
  .<span class="hljs-title function_">x</span>(<span class="hljs-function">(<span class="hljs-params">d</span>) =&gt;</span> <span class="hljs-title function_">dateScale</span>(d.<span class="hljs-property">date</span>))
  .<span class="hljs-title function_">y</span>(<span class="hljs-function">(<span class="hljs-params">d</span>) =&gt;</span> <span class="hljs-title function_">tempScale</span>(d.<span class="hljs-property">temp</span>))(data) <span class="hljs-keyword">as</span> <span class="hljs-built_in">string</span>;
</code></pre>
<p>We also include the <code>Datum</code> type in the above to scope down the type of <code>data</code> allowed in the resulting function</p>
<h3 id="formatting" tabindex="-1">Formatting</h3>
<p>D3 includes functions for formatting <code>DateTime</code>s. We can create a formatter for a <code>DateTime</code> as follows:</p>
<pre><code class="hljs language-ts"><span class="hljs-keyword">const</span> formatter = d3.<span class="hljs-title function_">timeFormat</span>(<span class="hljs-string">&quot;%Y-%m&quot;</span>)
</code></pre>
<p>We can then use the formatter like so:</p>
<pre><code class="hljs language-ts"><span class="hljs-title function_">formatter</span>(dateTime)
</code></pre>
<h3 id="grid-lines" tabindex="-1">Grid Lines</h3>
<p>We can define the X Axis and grid lines similar to how we did it previously:</p>
<pre><code class="hljs language-tsx"><span class="hljs-keyword">const</span> xGrid = dateTicks.<span class="hljs-title function_">map</span>(<span class="hljs-function">(<span class="hljs-params">t</span>) =&gt;</span> (
  <span class="language-xml"><span class="hljs-tag">&lt;<span class="hljs-name">g</span> <span class="hljs-attr">key</span>=<span class="hljs-string">{t.toString()}</span>&gt;</span>
    <span class="hljs-tag">&lt;<span class="hljs-name">line</span>
      <span class="hljs-attr">stroke</span>=<span class="hljs-string">&quot;lightgrey&quot;</span>
      <span class="hljs-attr">x1</span>=<span class="hljs-string">{dateScale(t)}</span>
      <span class="hljs-attr">y1</span>=<span class="hljs-string">{margin.top}</span>
      <span class="hljs-attr">x2</span>=<span class="hljs-string">{dateScale(t)}</span>
      <span class="hljs-attr">y2</span>=<span class="hljs-string">{height</span> <span class="hljs-attr">-</span> <span class="hljs-attr">margin.bottom</span>}
      <span class="hljs-attr">strokeDasharray</span>=<span class="hljs-string">{4}</span>
    /&gt;</span>
    <span class="hljs-tag">&lt;<span class="hljs-name">text</span> <span class="hljs-attr">fill</span>=<span class="hljs-string">&quot;darkgrey&quot;</span> <span class="hljs-attr">textAnchor</span>=<span class="hljs-string">&quot;middle&quot;</span> <span class="hljs-attr">x</span>=<span class="hljs-string">{dateScale(t)}</span> <span class="hljs-attr">y</span>=<span class="hljs-string">{height}</span>&gt;</span>
      {formatter(t)}
    <span class="hljs-tag">&lt;/<span class="hljs-name">text</span>&gt;</span>
  <span class="hljs-tag">&lt;/<span class="hljs-name">g</span>&gt;</span></span>
));
</code></pre>
<p>And the Y Axis grid lines:</p>
<pre><code class="hljs language-tsx"><span class="hljs-keyword">const</span> yGrid = tempTicks.<span class="hljs-title function_">map</span>(<span class="hljs-function">(<span class="hljs-params">t</span>) =&gt;</span> (
  <span class="language-xml"><span class="hljs-tag">&lt;<span class="hljs-name">g</span> <span class="hljs-attr">key</span>=<span class="hljs-string">{t.toString()}</span>&gt;</span>
    <span class="hljs-tag">&lt;<span class="hljs-name">line</span>
      <span class="hljs-attr">stroke</span>=<span class="hljs-string">&quot;lightgrey&quot;</span>
      <span class="hljs-attr">y1</span>=<span class="hljs-string">{tempScale(t)}</span>
      <span class="hljs-attr">x1</span>=<span class="hljs-string">{margin.left}</span>
      <span class="hljs-attr">y2</span>=<span class="hljs-string">{tempScale(t)}</span>
      <span class="hljs-attr">x2</span>=<span class="hljs-string">{width</span> <span class="hljs-attr">-</span> <span class="hljs-attr">margin.right</span>}
      <span class="hljs-attr">strokeDasharray</span>=<span class="hljs-string">{4}</span>
    /&gt;</span>
    <span class="hljs-tag">&lt;<span class="hljs-name">text</span>
      <span class="hljs-attr">fill</span>=<span class="hljs-string">&quot;darkgrey&quot;</span>
      <span class="hljs-attr">textAnchor</span>=<span class="hljs-string">&quot;end&quot;</span>
      <span class="hljs-attr">y</span>=<span class="hljs-string">{tempScale(t)}</span>
      <span class="hljs-attr">x</span>=<span class="hljs-string">{margin.left</span> <span class="hljs-attr">-</span> <span class="hljs-attr">5</span>}
    &gt;</span>
      {t}
    <span class="hljs-tag">&lt;/<span class="hljs-name">text</span>&gt;</span>
  <span class="hljs-tag">&lt;/<span class="hljs-name">g</span>&gt;</span></span>
));
</code></pre>
<h3 id="final-result-1" tabindex="-1">Final result</h3>
<p>Using all the values that have been defined above, we can create the overall graph and grid lines like so:</p>
<pre><code class="hljs language-tsx"><span class="hljs-keyword">return</span> (
  <span class="language-xml"><span class="hljs-tag">&lt;<span class="hljs-name">svg</span> <span class="hljs-attr">viewBox</span>=<span class="hljs-string">{viewBox}</span>&gt;</span>
    <span class="hljs-tag">&lt;<span class="hljs-name">g</span>&gt;</span>{xGrid}<span class="hljs-tag">&lt;/<span class="hljs-name">g</span>&gt;</span>
    <span class="hljs-tag">&lt;<span class="hljs-name">g</span>&gt;</span>{yGrid}<span class="hljs-tag">&lt;/<span class="hljs-name">g</span>&gt;</span>
    <span class="hljs-tag">&lt;<span class="hljs-name">path</span> <span class="hljs-attr">d</span>=<span class="hljs-string">{line}</span> <span class="hljs-attr">stroke</span>=<span class="hljs-string">&quot;steelblue&quot;</span> <span class="hljs-attr">fill</span>=<span class="hljs-string">&quot;none&quot;</span> /&gt;</span>
  <span class="hljs-tag">&lt;/<span class="hljs-name">svg</span>&gt;</span></span>
);
</code></pre>
<p>The final code can be seen below:</p>
<details>
<summary>Temperature.tsx</summary>
<pre><code class="hljs language-tsx"><span class="hljs-keyword">import</span> <span class="hljs-title class_">React</span> <span class="hljs-keyword">from</span> <span class="hljs-string">&quot;react&quot;</span>;
<span class="hljs-keyword">import</span> * <span class="hljs-keyword">as</span> d3 <span class="hljs-keyword">from</span> <span class="hljs-string">&quot;d3&quot;</span>;
<span class="hljs-keyword">import</span> { data, <span class="hljs-title class_">Datum</span> } <span class="hljs-keyword">from</span> <span class="hljs-string">&quot;../data/temperature&quot;</span>;

<span class="hljs-keyword">const</span> width = <span class="hljs-number">600</span>;
<span class="hljs-keyword">const</span> height = <span class="hljs-number">400</span>;

<span class="hljs-keyword">const</span> margin = {
  <span class="hljs-attr">top</span>: <span class="hljs-number">20</span>,
  <span class="hljs-attr">right</span>: <span class="hljs-number">50</span>,
  <span class="hljs-attr">bottom</span>: <span class="hljs-number">20</span>,
  <span class="hljs-attr">left</span>: <span class="hljs-number">50</span>,
};

<span class="hljs-keyword">const</span> tempDomain = d3.<span class="hljs-title function_">extent</span>(data, <span class="hljs-function">(<span class="hljs-params">d</span>) =&gt;</span> d.<span class="hljs-property">temp</span>).<span class="hljs-title function_">reverse</span>() <span class="hljs-keyword">as</span> [<span class="hljs-built_in">number</span>, <span class="hljs-built_in">number</span>];

<span class="hljs-keyword">const</span> tempScale = d3
  .<span class="hljs-property">scaleLinear</span>&lt;<span class="hljs-built_in">number</span>&gt;()
  .<span class="hljs-title function_">domain</span>(tempDomain)
  .<span class="hljs-title function_">range</span>([margin.<span class="hljs-property">top</span>, height - margin.<span class="hljs-property">bottom</span>])
  .<span class="hljs-title function_">interpolate</span>(d3.<span class="hljs-property">interpolateRound</span>);

<span class="hljs-keyword">const</span> tempTicks = tempScale.<span class="hljs-title function_">ticks</span>();

<span class="hljs-keyword">const</span> dateDomain = d3.<span class="hljs-title function_">extent</span>(data, <span class="hljs-function">(<span class="hljs-params">d</span>) =&gt;</span> d.<span class="hljs-property">date</span>) <span class="hljs-keyword">as</span> [<span class="hljs-title class_">Date</span>, <span class="hljs-title class_">Date</span>];

<span class="hljs-keyword">const</span> dateScale = d3
  .<span class="hljs-title function_">scaleTime</span>()
  .<span class="hljs-title function_">domain</span>(dateDomain)
  .<span class="hljs-title function_">range</span>([margin.<span class="hljs-property">left</span>, width - margin.<span class="hljs-property">right</span>]);

<span class="hljs-keyword">const</span> dateTicks = dateScale.<span class="hljs-title function_">ticks</span>(<span class="hljs-number">5</span>).<span class="hljs-title function_">concat</span>(dateScale.<span class="hljs-title function_">domain</span>());

<span class="hljs-keyword">const</span> line = d3
  .<span class="hljs-property">line</span>&lt;<span class="hljs-title class_">Datum</span>&gt;()
  .<span class="hljs-title function_">x</span>(<span class="hljs-function">(<span class="hljs-params">d</span>) =&gt;</span> <span class="hljs-title function_">dateScale</span>(d.<span class="hljs-property">date</span>))
  .<span class="hljs-title function_">y</span>(<span class="hljs-function">(<span class="hljs-params">d</span>) =&gt;</span> <span class="hljs-title function_">tempScale</span>(d.<span class="hljs-property">temp</span>))(data) <span class="hljs-keyword">as</span> <span class="hljs-built_in">string</span>;

<span class="hljs-keyword">const</span> formatter = d3.<span class="hljs-title function_">timeFormat</span>(<span class="hljs-string">&quot;%Y-%m&quot;</span>);

<span class="hljs-keyword">export</span> <span class="hljs-keyword">const</span> <span class="hljs-title class_">Temperature</span>: <span class="hljs-title class_">React</span>.<span class="hljs-property">FC</span> = <span class="hljs-function">(<span class="hljs-params">{}</span>) =&gt;</span> {
  <span class="hljs-keyword">const</span> viewBox = <span class="hljs-string">`0 0 <span class="hljs-subst">${width}</span> <span class="hljs-subst">${height}</span>`</span>;

  <span class="hljs-keyword">const</span> xGrid = dateTicks.<span class="hljs-title function_">map</span>(<span class="hljs-function">(<span class="hljs-params">t</span>) =&gt;</span> (
    <span class="language-xml"><span class="hljs-tag">&lt;<span class="hljs-name">g</span> <span class="hljs-attr">key</span>=<span class="hljs-string">{t.toString()}</span>&gt;</span>
      <span class="hljs-tag">&lt;<span class="hljs-name">line</span>
        <span class="hljs-attr">stroke</span>=<span class="hljs-string">&quot;lightgrey&quot;</span>
        <span class="hljs-attr">x1</span>=<span class="hljs-string">{dateScale(t)}</span>
        <span class="hljs-attr">y1</span>=<span class="hljs-string">{margin.top}</span>
        <span class="hljs-attr">x2</span>=<span class="hljs-string">{dateScale(t)}</span>
        <span class="hljs-attr">y2</span>=<span class="hljs-string">{height</span> <span class="hljs-attr">-</span> <span class="hljs-attr">margin.bottom</span>}
        <span class="hljs-attr">strokeDasharray</span>=<span class="hljs-string">{4}</span>
      /&gt;</span>
      <span class="hljs-tag">&lt;<span class="hljs-name">text</span> <span class="hljs-attr">fill</span>=<span class="hljs-string">&quot;darkgrey&quot;</span> <span class="hljs-attr">textAnchor</span>=<span class="hljs-string">&quot;middle&quot;</span> <span class="hljs-attr">x</span>=<span class="hljs-string">{dateScale(t)}</span> <span class="hljs-attr">y</span>=<span class="hljs-string">{height}</span>&gt;</span>
        {formatter(t)}
      <span class="hljs-tag">&lt;/<span class="hljs-name">text</span>&gt;</span>
    <span class="hljs-tag">&lt;/<span class="hljs-name">g</span>&gt;</span></span>
  ));

  <span class="hljs-keyword">const</span> yGrid = tempTicks.<span class="hljs-title function_">map</span>(<span class="hljs-function">(<span class="hljs-params">t</span>) =&gt;</span> (
    <span class="language-xml"><span class="hljs-tag">&lt;<span class="hljs-name">g</span> <span class="hljs-attr">key</span>=<span class="hljs-string">{t.toString()}</span>&gt;</span>
      <span class="hljs-tag">&lt;<span class="hljs-name">line</span>
        <span class="hljs-attr">stroke</span>=<span class="hljs-string">&quot;lightgrey&quot;</span>
        <span class="hljs-attr">y1</span>=<span class="hljs-string">{tempScale(t)}</span>
        <span class="hljs-attr">x1</span>=<span class="hljs-string">{margin.left}</span>
        <span class="hljs-attr">y2</span>=<span class="hljs-string">{tempScale(t)}</span>
        <span class="hljs-attr">x2</span>=<span class="hljs-string">{width</span> <span class="hljs-attr">-</span> <span class="hljs-attr">margin.right</span>}
        <span class="hljs-attr">strokeDasharray</span>=<span class="hljs-string">{4}</span>
      /&gt;</span>
      <span class="hljs-tag">&lt;<span class="hljs-name">text</span>
        <span class="hljs-attr">fill</span>=<span class="hljs-string">&quot;darkgrey&quot;</span>
        <span class="hljs-attr">textAnchor</span>=<span class="hljs-string">&quot;end&quot;</span>
        <span class="hljs-attr">y</span>=<span class="hljs-string">{tempScale(t)}</span>
        <span class="hljs-attr">x</span>=<span class="hljs-string">{margin.left</span> <span class="hljs-attr">-</span> <span class="hljs-attr">5</span>}
      &gt;</span>
        {t}
      <span class="hljs-tag">&lt;/<span class="hljs-name">text</span>&gt;</span>
    <span class="hljs-tag">&lt;/<span class="hljs-name">g</span>&gt;</span></span>
  ));

  <span class="hljs-keyword">return</span> (
    <span class="language-xml"><span class="hljs-tag">&lt;<span class="hljs-name">svg</span> <span class="hljs-attr">viewBox</span>=<span class="hljs-string">{viewBox}</span>&gt;</span>
      <span class="hljs-tag">&lt;<span class="hljs-name">g</span>&gt;</span>{xGrid}<span class="hljs-tag">&lt;/<span class="hljs-name">g</span>&gt;</span>
      <span class="hljs-tag">&lt;<span class="hljs-name">g</span>&gt;</span>{yGrid}<span class="hljs-tag">&lt;/<span class="hljs-name">g</span>&gt;</span>
      <span class="hljs-tag">&lt;<span class="hljs-name">g</span>&gt;</span>
        <span class="hljs-tag">&lt;<span class="hljs-name">path</span> <span class="hljs-attr">d</span>=<span class="hljs-string">{line}</span> <span class="hljs-attr">stroke</span>=<span class="hljs-string">&quot;steelblue&quot;</span> <span class="hljs-attr">fill</span>=<span class="hljs-string">&quot;none&quot;</span> /&gt;</span>
      <span class="hljs-tag">&lt;/<span class="hljs-name">g</span>&gt;</span>
    <span class="hljs-tag">&lt;/<span class="hljs-name">svg</span>&gt;</span></span>
  );
};

</code></pre>
</details>
<p>And the resulting SVG will then look something like this:</p>
<svg viewBox="0 0 600 400">
  <g>
    <g>
      <line
        stroke="lightgrey"
        x1="156.48148148148147"
        y1="20"
        x2="156.48148148148147"
        y2="380"
        stroke-dasharray="4"
      ></line>
      <text fill="darkgrey" text-anchor="middle" x="156.48148148148147" y="400">
        2011-10
      </text>
    </g>
    <g>
      <line
        stroke="lightgrey"
        x1="267.5925925925926"
        y1="20"
        x2="267.5925925925926"
        y2="380"
        stroke-dasharray="4"
      ></line>
      <text fill="darkgrey" text-anchor="middle" x="267.5925925925926" y="400">
        2011-10
      </text>
    </g>
    <g>
      <line
        stroke="lightgrey"
        x1="378.7037037037037"
        y1="20"
        x2="378.7037037037037"
        y2="380"
        stroke-dasharray="4"
      ></line>
      <text fill="darkgrey" text-anchor="middle" x="378.7037037037037" y="400">
        2011-10
      </text>
    </g>
    <g>
      <line
        stroke="lightgrey"
        x1="489.81481481481484"
        y1="20"
        x2="489.81481481481484"
        y2="380"
        stroke-dasharray="4"
      ></line>
      <text fill="darkgrey" text-anchor="middle" x="489.81481481481484" y="400">
        2011-10
      </text>
    </g>
    <g>
      <line
        stroke="lightgrey"
        x1="50"
        y1="20"
        x2="50"
        y2="380"
        stroke-dasharray="4"
      ></line>
      <text fill="darkgrey" text-anchor="middle" x="50" y="400">2011-10</text>
    </g>
    <g>
      <line
        stroke="lightgrey"
        x1="550"
        y1="20"
        x2="550"
        y2="380"
        stroke-dasharray="4"
      ></line>
      <text fill="darkgrey" text-anchor="middle" x="550" y="400">2011-10</text>
    </g>
  </g>
  <g>
    <g>
      <line
        stroke="lightgrey"
        y1="32"
        x1="50"
        y2="32"
        x2="550"
        stroke-dasharray="4"
      ></line>
      <text fill="darkgrey" text-anchor="end" y="32" x="45">62.5</text>
    </g>
    <g>
      <line
        stroke="lightgrey"
        x1="50"
        y1="62"
        x2="550"
        y2="62"
        stroke-dasharray="4"
      ></line>
      <text fill="darkgrey" text-anchor="end" x="45" y="62">62</text>
    </g>
    <g>
      <line
        stroke="lightgrey"
        y1="92"
        x1="50"
        y2="92"
        x2="550"
        stroke-dasharray="4"
      ></line>
      <text fill="darkgrey" text-anchor="end" y="92" x="45">61.5</text>
    </g>
    <g>
      <line
        stroke="lightgrey"
        y1="122"
        x1="50"
        y2="122"
        x2="550"
        stroke-dasharray="4"
      ></line>
      <text fill="darkgrey" text-anchor="end" y="122" x="45">61</text>
    </g>
    <g>
      <line
        stroke="lightgrey"
        y1="152"
        x1="50"
        y2="152"
        x2="550"
        stroke-dasharray="4"
      ></line>
      <text fill="darkgrey" text-anchor="end" y="152" x="45">60.5</text>
    </g>
    <g>
      <line
        stroke="lightgrey"
        x1="50"
        y1="182"
        x2="550"
        y2="182"
        stroke-dasharray="4"
      ></line>
      <text fill="darkgrey" text-anchor="end" x="45" y="182">60</text>
    </g>
    <g>
      <line
        stroke="lightgrey"
        y1="212"
        x1="50"
        y2="212"
        x2="550"
        stroke-dasharray="4"
      ></line>
      <text fill="darkgrey" text-anchor="end" y="212" x="45">59.5</text>
    </g>
    <g>
      <line
        stroke="lightgrey"
        y1="242"
        x1="50"
        y2="242"
        x2="550"
        stroke-dasharray="4"
      ></line>
      <text fill="darkgrey" text-anchor="end" y="242" x="45">59</text>
    </g>
    <g>
      <line
        stroke="lightgrey"
        y1="272"
        x1="50"
        y2="272"
        x2="550"
        stroke-dasharray="4"
      ></line>
      <text fill="darkgrey" text-anchor="end" y="272" x="45">58.5</text>
    </g>
    <g>
      <line
        stroke="lightgrey"
        x1="50"
        y1="302"
        x2="550"
        y2="302"
        stroke-dasharray="4"
      ></line>
      <text fill="darkgrey" text-anchor="end" x="45" y="302">58</text>
    </g>
    <g>
      <line
        stroke="lightgrey"
        y1="332"
        x1="50"
        y2="332"
        x2="550"
        stroke-dasharray="4"
      ></line>
      <text fill="darkgrey" text-anchor="end" y="332" x="45">57.5</text>
    </g>
    <g>
      <line
        stroke="lightgrey"
        y1="362"
        x1="50"
        y2="362"
        x2="550"
        stroke-dasharray="4"
      ></line>
      <text fill="darkgrey" text-anchor="end" y="362" x="45">57</text>
    </g>
  </g>
  <path
    d="M50,20L105.55555555555554,188L161.11111111111111,236L216.66666666666666,254L272.22222222222223,260L327.77777777777777,362L383.3333333333333,380L438.88888888888886,374L494.4444444444444,380L550,176"
    stroke="steelblue"
    fill="none"
  ></path>
</svg>
]]></content>
        <author>
            <name>Nabeel Valley</name>
            <uri>https://nabeelvalley.co.za</uri>
        </author>
    </entry>
    <entry>
        <title type="html"><![CDATA[Logging Aliases for Javascript]]></title>
        <id>/blog/2021/02-11/javascript-quick-logger/</id>
        <link href="https://nabeelvalley.co.za/blog/2021/02-11/javascript-quick-logger/"/>
        <updated>2021-11-01T23:00:00.000Z</updated>
        <summary type="html"><![CDATA[Console and file-based logging alias for Javascript]]></summary>
        <content type="html"><![CDATA[<p><div class="table-of-contents"><details><summary>Contents</summary><ul></ul></details></div></p>
<p>I often find myself writing a function to <code>JSON.stringify</code> some data to log in either a pretty or flat structure</p>
<p>It's just more of a convenience method, and it's pretty much the same as doing <code>console.log(JSON.stringify(data))</code> and looks like this:</p>
<pre><code class="hljs language-ts"><span class="hljs-keyword">const</span> <span class="hljs-title function_">_</span> = (<span class="hljs-params">data: <span class="hljs-built_in">any</span>, pretty: <span class="hljs-built_in">boolean</span> = <span class="hljs-literal">false</span></span>) =&gt; {
  <span class="hljs-keyword">return</span> <span class="hljs-variable language_">console</span>.<span class="hljs-title function_">log</span>(<span class="hljs-title class_">JSON</span>.<span class="hljs-title function_">stringify</span>(data, <span class="hljs-literal">null</span>, pretty ? <span class="hljs-number">2</span> : <span class="hljs-number">0</span>));
};
</code></pre>
<p>And then, when I need to log something:</p>
<pre><code class="hljs language-ts"><span class="hljs-title function_">_</span>(myData)
</code></pre>
<p>Or, if I want to pretty print the JSON</p>
<pre><code class="hljs language-ts"><span class="hljs-title function_">_</span>(myData, <span class="hljs-literal">true</span>)
</code></pre>
]]></content>
        <author>
            <name>Nabeel Valley</name>
            <uri>https://nabeelvalley.co.za</uri>
        </author>
    </entry>
    <entry>
        <title type="html"><![CDATA[Javascript Range Function]]></title>
        <id>/blog/2021/29-10/javascript-range/</id>
        <link href="https://nabeelvalley.co.za/blog/2021/29-10/javascript-range/"/>
        <updated>2021-10-28T22:00:00.000Z</updated>
        <summary type="html"><![CDATA[Create ranges in Javascript]]></summary>
        <content type="html"><![CDATA[<p><div class="table-of-contents"><details><summary>Contents</summary><ul></ul></details></div></p>
<p>Something i often find myself needing is a way to create a range in javascript, similar to what python has</p>
<p>Here's a basic implementation of something that works like that:</p>
<pre><code class="hljs language-js"><span class="hljs-keyword">const</span> <span class="hljs-title function_">range</span> = (<span class="hljs-params">start, end, count, includeEnd = <span class="hljs-literal">false</span></span>) =&gt; {
  <span class="hljs-keyword">const</span> space = (end - start) / (count - includeEnd)
  <span class="hljs-keyword">return</span> <span class="hljs-keyword">new</span> <span class="hljs-title class_">Array</span>(count).<span class="hljs-title function_">fill</span>(<span class="hljs-number">0</span>).<span class="hljs-title function_">map</span>(<span class="hljs-function">(<span class="hljs-params">_,i</span>) =&gt;</span> start + (i * space))
}
</code></pre>
<p>The above will output something like:</p>
<pre><code class="hljs language-js"><span class="hljs-keyword">const</span> withoutEnd = <span class="hljs-title function_">range</span>(<span class="hljs-number">20</span>, <span class="hljs-number">21</span>, <span class="hljs-number">5</span>)
<span class="hljs-comment">// withoutEnd === [ 20, 20.2, 20.4, 20.6, 20.8 ]</span>

<span class="hljs-keyword">const</span> withEnd = <span class="hljs-title function_">range</span>(<span class="hljs-number">20</span>, <span class="hljs-number">21</span>, <span class="hljs-number">5</span>, <span class="hljs-literal">true</span>)
<span class="hljs-comment">// withEnd === [ 20, 20.25, 20.5, 20.75, 21 ]</span>
</code></pre>
]]></content>
        <author>
            <name>Nabeel Valley</name>
            <uri>https://nabeelvalley.co.za</uri>
        </author>
    </entry>
    <entry>
        <title type="html"><![CDATA[Template Literal Types with Typescript]]></title>
        <id>/blog/2021/16-08/typescript-template-literal-types/</id>
        <link href="https://nabeelvalley.co.za/blog/2021/16-08/typescript-template-literal-types/"/>
        <updated>2021-08-15T22:00:00.000Z</updated>
        <summary type="html"><![CDATA[Defining type combinations using Template Literal types]]></summary>
        <content type="html"><![CDATA[<p><div class="table-of-contents"><details><summary>Contents</summary><ul></ul></details></div></p>
<p>Template literal types provide us a way to combine <code>string types</code> or <code>enums</code> in Typescript.</p>
<p>In the below example, we can make use of a <code>string type</code> called <code>Action</code> and an <code>enum</code> called <code>Resource</code> to define a type which is a combination of an action combined with a resource</p>
<pre><code class="hljs language-ts"><span class="hljs-keyword">type</span> <span class="hljs-title class_">Action</span> = <span class="hljs-string">&#x27;UPDATE&#x27;</span> | <span class="hljs-string">&#x27;CREATE&#x27;</span> | <span class="hljs-string">&#x27;DELETE&#x27;</span>

<span class="hljs-keyword">enum</span> <span class="hljs-title class_">Resource</span> {
  <span class="hljs-title class_">Person</span> = <span class="hljs-string">&#x27;Person&#x27;</span>,
  <span class="hljs-title class_">Product</span> = <span class="hljs-string">&#x27;Product&#x27;</span>,
  <span class="hljs-title class_">Sale</span> = <span class="hljs-string">&#x27;Sale&#x27;</span>
}

<span class="hljs-comment">// the `Lowercase` type concerts all string type options to lowercase</span>
<span class="hljs-keyword">type</span> <span class="hljs-title class_">ResourceAction</span> = <span class="hljs-string">`<span class="hljs-subst">${Resource}</span>.<span class="hljs-subst">${Action}</span>`</span>
</code></pre>
<p>Such that the <code>ResourceAction</code> type is now defined as:</p>
<pre><code class="hljs language-ts">
<span class="hljs-keyword">type</span> <span class="hljs-title class_">ResourceAction</span> = 
  <span class="hljs-string">&quot;Person.UPDATE&quot;</span> 
  | <span class="hljs-string">&quot;Person.CREATE&quot;</span> 
  | <span class="hljs-string">&quot;Person.DELETE&quot;</span> 
  | <span class="hljs-string">&quot;Product.UPDATE&quot;</span> 
  | <span class="hljs-string">&quot;Product.CREATE&quot;</span> 
  | <span class="hljs-string">&quot;Product.DELETE&quot;</span> 
  | <span class="hljs-string">&quot;Sale.UPDATE&quot;</span> 
  | <span class="hljs-string">&quot;Sale.CREATE&quot;</span> 
  | <span class="hljs-string">&quot;Sale.DELETE&quot;</span>
</code></pre>
<p>Now, if you're like me - you probably want your types to be consistent in some way. For this purpose, we can use the <code>Lowercase</code> type as follows:</p>
<pre><code class="hljs language-ts"><span class="hljs-keyword">type</span> <span class="hljs-title class_">ResourceActionLowercase</span> = <span class="hljs-title class_">Lowercase</span>&lt;<span class="hljs-string">`<span class="hljs-subst">${Resource}</span>.<span class="hljs-subst">${Action}</span>`</span>&gt;
</code></pre>
<p>Which results in the following types:</p>
<pre><code class="hljs language-ts"><span class="hljs-keyword">type</span> <span class="hljs-title class_">ResourceActionLowercase</span> = 
  <span class="hljs-string">&quot;person.update&quot;</span> 
  | <span class="hljs-string">&quot;person.create&quot;</span> 
  | <span class="hljs-string">&quot;person.delete&quot;</span> 
  | <span class="hljs-string">&quot;product.update&quot;</span> 
  | <span class="hljs-string">&quot;product.create&quot;</span> 
  | <span class="hljs-string">&quot;product.delete&quot;</span> 
  | <span class="hljs-string">&quot;sale.update&quot;</span> 
  | <span class="hljs-string">&quot;sale.create&quot;</span> 
  | <span class="hljs-string">&quot;sale.delete&quot;</span>
</code></pre>
]]></content>
        <author>
            <name>Nabeel Valley</name>
            <uri>https://nabeelvalley.co.za</uri>
        </author>
    </entry>
    <entry>
        <title type="html"><![CDATA[Building Serverless Apps using the Serverless Stack Framework]]></title>
        <id>/blog/2021/17-06/sst-framework/</id>
        <link href="https://nabeelvalley.co.za/blog/2021/17-06/sst-framework/"/>
        <updated>2021-06-16T22:00:00.000Z</updated>
        <summary type="html"><![CDATA[Build, debug, and deploy serverless applications on AWS using SST and VSCode]]></summary>
        <content type="html"><![CDATA[<p><div class="table-of-contents"><details><summary>Contents</summary><ul><li><a href="#serverless-stack-framework">Serverless Stack Framework</a><ul><li><a href="#init-project">Init Project</a></li><li><a href="#run-the-app">Run the App</a></li><li><a href="#the-files">The Files</a><ul><li><a href="#stack">Stack</a></li></ul></li><li><a href="#add-a-new-endpoint">Add a new Endpoint</a></li><li><a href="#vscode-debugging">VSCode Debugging</a></li><li><a href="#add-a-db">Add a DB</a></li><li><a href="#define-common-structures">Define Common Structures</a></li><li><a href="#access-db">Access DB</a><ul><li><a href="#create">Create</a></li><li><a href="#get">Get</a></li><li><a href="#getall">GetAll</a></li></ul></li><li><a href="#define-lambdas">Define Lambdas</a><ul><li><a href="#create-1">Create</a></li><li><a href="#get-1">Get</a></li><li><a href="#getall-1">GetAll</a></li><li><a href="#testing">Testing</a></li></ul></li><li><a href="#creating-notes-using-a-queue">Creating Notes Using a Queue</a><ul><li><a href="#create-queue">Create Queue</a></li><li><a href="#update-the-create-handler">Update the Create Handler</a></li><li><a href="#add-queue-based-create-handler">Add Queue-Based Create Handler</a></li></ul></li></ul></li><li><a href="#deploy">Deploy</a></li><li><a href="#teardown">Teardown</a></li></ul></details></div></p>
<blockquote>
<p>Prior to doing any of the below you will require your <code>~/.aws/credentials</code> file to be configured with the credentials for your AWS account</p>
</blockquote>
<h1 id="serverless-stack-framework" tabindex="-1">Serverless Stack Framework</h1>
<p>SST Framework is a framework built on top of CDK for working with Lambdas and other CDK constructs</p>
<p>It provides easy CDK setups and a streamlined debug and deploy process and even has integration with the VSCode debugger to debug stacks on AWS</p>
<h2 id="init-project" tabindex="-1">Init Project</h2>
<p>To init a new project use the following command:</p>
<pre><code class="hljs language-sh">npx create-serverless-stack@latest my-sst-app --language typescript
</code></pre>
<p>Which will create a Serverless Stack applocation using TypeScript</p>
<h2 id="run-the-app" tabindex="-1">Run the App</h2>
<p>You can run the created project in using the config defined in the <code>sst.json</code> file:</p>
<pre><code class="hljs language-json"><span class="hljs-punctuation">{</span>
  <span class="hljs-attr">&quot;name&quot;</span><span class="hljs-punctuation">:</span> <span class="hljs-string">&quot;my-sst-app&quot;</span><span class="hljs-punctuation">,</span>
  <span class="hljs-attr">&quot;stage&quot;</span><span class="hljs-punctuation">:</span> <span class="hljs-string">&quot;dev&quot;</span><span class="hljs-punctuation">,</span>
  <span class="hljs-attr">&quot;region&quot;</span><span class="hljs-punctuation">:</span> <span class="hljs-string">&quot;us-east-1&quot;</span><span class="hljs-punctuation">,</span>
  <span class="hljs-attr">&quot;lint&quot;</span><span class="hljs-punctuation">:</span> <span class="hljs-keyword">true</span><span class="hljs-punctuation">,</span>
  <span class="hljs-attr">&quot;typeCheck&quot;</span><span class="hljs-punctuation">:</span> <span class="hljs-keyword">true</span>
<span class="hljs-punctuation">}</span>
</code></pre>
<p>Using the following commands command will build then deploy a dev stack and allow you to interact with it via AWS/browser/Postman/etc.</p>
<pre><code class="hljs language-sh">npm run start
</code></pre>
<p>Additionally, running using the above command will also start the application with hot reloading enabled so when you save files the corresponding AWS resources will be redeployed so you can continue testing</p>
<h2 id="the-files" tabindex="-1">The Files</h2>
<p>The application is structured like a relatively normal Lambda/CDK app with <code>lib</code> which contains the following CDK code:</p>
<h3 id="stack" tabindex="-1">Stack</h3>
<p><code>lib/index.ts</code></p>
<pre><code class="hljs language-ts"><span class="hljs-keyword">import</span> <span class="hljs-title class_">MyStack</span> <span class="hljs-keyword">from</span> <span class="hljs-string">&quot;./MyStack&quot;</span>;
<span class="hljs-keyword">import</span> * <span class="hljs-keyword">as</span> sst <span class="hljs-keyword">from</span> <span class="hljs-string">&quot;@serverless-stack/resources&quot;</span>;

<span class="hljs-keyword">export</span> <span class="hljs-keyword">default</span> <span class="hljs-keyword">function</span> <span class="hljs-title function_">main</span>(<span class="hljs-params">app: sst.App</span>): <span class="hljs-built_in">void</span> {
  <span class="hljs-comment">// Set default runtime for all functions</span>
  app.<span class="hljs-title function_">setDefaultFunctionProps</span>({
  <span class="hljs-attr">runtime</span>: <span class="hljs-string">&quot;nodejs12.x&quot;</span>
  });

  <span class="hljs-keyword">new</span> <span class="hljs-title class_">MyStack</span>(app, <span class="hljs-string">&quot;my-stack&quot;</span>);

  <span class="hljs-comment">// Add more stacks</span>
}
</code></pre>
<p><code>lib/MyStack.ts</code></p>
<pre><code class="hljs language-ts"><span class="hljs-keyword">import</span> * <span class="hljs-keyword">as</span> sst <span class="hljs-keyword">from</span> <span class="hljs-string">&quot;@serverless-stack/resources&quot;</span>;

<span class="hljs-keyword">export</span> <span class="hljs-keyword">default</span> <span class="hljs-keyword">class</span> <span class="hljs-title class_">MyStack</span> <span class="hljs-keyword">extends</span> <span class="hljs-title class_ inherited__">sst.Stack</span> {
  <span class="hljs-title function_">constructor</span>(<span class="hljs-params">scope: sst.App, id: <span class="hljs-built_in">string</span>, props?: sst.StackProps</span>) {
  <span class="hljs-variable language_">super</span>(scope, id, props);

  <span class="hljs-comment">// Create the HTTP API</span>
  <span class="hljs-keyword">const</span> api = <span class="hljs-keyword">new</span> sst.<span class="hljs-title class_">Api</span>(<span class="hljs-variable language_">this</span>, <span class="hljs-string">&quot;Api&quot;</span>, {
    <span class="hljs-attr">routes</span>: {
    <span class="hljs-string">&quot;GET /&quot;</span>: <span class="hljs-string">&quot;src/lambda.handler&quot;</span>    },
  });

  <span class="hljs-comment">// Show API endpoint in output</span>
  <span class="hljs-variable language_">this</span>.<span class="hljs-title function_">addOutputs</span>({
    <span class="hljs-string">&quot;ApiEndpoint&quot;</span>: api.<span class="hljs-property">httpApi</span>.<span class="hljs-property">apiEndpoint</span>,
  });
  }
}
</code></pre>
<p>And <code>src</code> which contains the lambda code:</p>
<p><code>src/lambda.ts</code></p>
<pre><code class="hljs language-ts"><span class="hljs-keyword">import</span> { <span class="hljs-title class_">APIGatewayProxyEventV</span>2, <span class="hljs-title class_">APIGatewayProxyHandlerV</span>2 } <span class="hljs-keyword">from</span> <span class="hljs-string">&quot;aws-lambda&quot;</span>;

<span class="hljs-keyword">export</span> <span class="hljs-keyword">const</span> <span class="hljs-attr">handler</span>: <span class="hljs-title class_">APIGatewayProxyHandlerV</span>2 = <span class="hljs-keyword">async</span> (
  <span class="hljs-attr">event</span>: <span class="hljs-title class_">APIGatewayProxyEventV</span>2
) =&gt; {
  <span class="hljs-keyword">return</span> {
  <span class="hljs-attr">statusCode</span>: <span class="hljs-number">200</span>,
  <span class="hljs-attr">headers</span>: { <span class="hljs-string">&quot;Content-Type&quot;</span>: <span class="hljs-string">&quot;text/plain&quot;</span> },
  <span class="hljs-attr">body</span>: <span class="hljs-string">`Hello, World! Your request was received at <span class="hljs-subst">${event.requestContext.time}</span>.`</span>,
  };
};
</code></pre>
<h2 id="add-a-new-endpoint" tabindex="-1">Add a new Endpoint</h2>
<p>Using the defined constructs it's really easy for us to add an additional endpoint:</p>
<p><code>src/hello.ts</code></p>
<pre><code class="hljs language-ts"><span class="hljs-keyword">import</span> { <span class="hljs-title class_">APIGatewayProxyEventV</span>2, <span class="hljs-title class_">APIGatewayProxyHandlerV</span>2 } <span class="hljs-keyword">from</span> <span class="hljs-string">&quot;aws-lambda&quot;</span>;

<span class="hljs-keyword">export</span> <span class="hljs-keyword">const</span> <span class="hljs-attr">handler</span>: <span class="hljs-title class_">APIGatewayProxyHandlerV</span>2 = <span class="hljs-keyword">async</span> (
  <span class="hljs-attr">event</span>: <span class="hljs-title class_">APIGatewayProxyEventV</span>2
) =&gt; {
  <span class="hljs-keyword">const</span> response = {
    <span class="hljs-attr">data</span>: <span class="hljs-string">&#x27;Hello, World! This is another lambda but with JSON&#x27;</span>
  }

  <span class="hljs-keyword">return</span> {
  <span class="hljs-attr">statusCode</span>: <span class="hljs-number">200</span>,
  <span class="hljs-attr">headers</span>: { <span class="hljs-string">&quot;Content-Type&quot;</span>: <span class="hljs-string">&quot;application/json&quot;</span> },
  <span class="hljs-attr">body</span>: <span class="hljs-title class_">JSON</span>.<span class="hljs-title function_">stringify</span>(response),
  };
};
</code></pre>
<p>And then in the stack we just update the routes:</p>
<p><code>lib/MyStack.ts</code></p>
<pre><code class="hljs language-ts"><span class="hljs-keyword">const</span> api = <span class="hljs-keyword">new</span> sst.<span class="hljs-title class_">Api</span>(<span class="hljs-variable language_">this</span>, <span class="hljs-string">&quot;Api&quot;</span>, {
  <span class="hljs-attr">routes</span>: {
  <span class="hljs-string">&quot;GET /&quot;</span>: <span class="hljs-string">&quot;src/lambda.handler&quot;</span>,
  <span class="hljs-string">&quot;GET /hello&quot;</span>: <span class="hljs-string">&quot;src/hello.handler&quot;</span> <span class="hljs-comment">// new endpoint handler</span>
  },
});
</code></pre>
<p>So that the full stack looks like this:</p>
<p><code>lib/MyStack.ts</code></p>
<pre><code class="hljs language-ts"><span class="hljs-keyword">import</span> * <span class="hljs-keyword">as</span> sst <span class="hljs-keyword">from</span> <span class="hljs-string">&quot;@serverless-stack/resources&quot;</span>;

<span class="hljs-keyword">export</span> <span class="hljs-keyword">default</span> <span class="hljs-keyword">class</span> <span class="hljs-title class_">MyStack</span> <span class="hljs-keyword">extends</span> <span class="hljs-title class_ inherited__">sst.Stack</span> {
  <span class="hljs-title function_">constructor</span>(<span class="hljs-params">scope: sst.App, id: <span class="hljs-built_in">string</span>, props?: sst.StackProps</span>) {
  <span class="hljs-variable language_">super</span>(scope, id, props);

  <span class="hljs-comment">// Create the HTTP API</span>
  <span class="hljs-keyword">const</span> api = <span class="hljs-keyword">new</span> sst.<span class="hljs-title class_">Api</span>(<span class="hljs-variable language_">this</span>, <span class="hljs-string">&quot;Api&quot;</span>, {
    <span class="hljs-attr">routes</span>: {
    <span class="hljs-string">&quot;GET /&quot;</span>: <span class="hljs-string">&quot;src/lambda.handler&quot;</span>,
    <span class="hljs-string">&quot;GET /hello&quot;</span>: <span class="hljs-string">&quot;src/hello.handler&quot;</span>
    },
  });

  <span class="hljs-comment">// Show API endpoint in output</span>
  <span class="hljs-variable language_">this</span>.<span class="hljs-title function_">addOutputs</span>({
    <span class="hljs-string">&quot;ApiEndpoint&quot;</span>: api.<span class="hljs-property">httpApi</span>.<span class="hljs-property">apiEndpoint</span>,
  });
  }
}
</code></pre>
<h2 id="vscode-debugging" tabindex="-1">VSCode Debugging</h2>
<p>SST supports VSCode Debugging, all that's required is for you to create a <code>.vscode/launch.json</code> filw with the following content:</p>
<p><code>.vscode/launch.json</code></p>
<pre><code class="hljs language-json"><span class="hljs-punctuation">{</span>
  <span class="hljs-attr">&quot;version&quot;</span><span class="hljs-punctuation">:</span> <span class="hljs-string">&quot;0.2.0&quot;</span><span class="hljs-punctuation">,</span>
  <span class="hljs-attr">&quot;configurations&quot;</span><span class="hljs-punctuation">:</span> <span class="hljs-punctuation">[</span>
    <span class="hljs-punctuation">{</span>
      <span class="hljs-attr">&quot;name&quot;</span><span class="hljs-punctuation">:</span> <span class="hljs-string">&quot;Debug SST Start&quot;</span><span class="hljs-punctuation">,</span>
      <span class="hljs-attr">&quot;type&quot;</span><span class="hljs-punctuation">:</span> <span class="hljs-string">&quot;node&quot;</span><span class="hljs-punctuation">,</span>
      <span class="hljs-attr">&quot;request&quot;</span><span class="hljs-punctuation">:</span> <span class="hljs-string">&quot;launch&quot;</span><span class="hljs-punctuation">,</span>
      <span class="hljs-attr">&quot;runtimeExecutable&quot;</span><span class="hljs-punctuation">:</span> <span class="hljs-string">&quot;npm&quot;</span><span class="hljs-punctuation">,</span>
      <span class="hljs-attr">&quot;runtimeArgs&quot;</span><span class="hljs-punctuation">:</span> <span class="hljs-punctuation">[</span><span class="hljs-string">&quot;start&quot;</span><span class="hljs-punctuation">]</span><span class="hljs-punctuation">,</span>
      <span class="hljs-attr">&quot;port&quot;</span><span class="hljs-punctuation">:</span> <span class="hljs-number">9229</span><span class="hljs-punctuation">,</span>
      <span class="hljs-attr">&quot;skipFiles&quot;</span><span class="hljs-punctuation">:</span> <span class="hljs-punctuation">[</span><span class="hljs-string">&quot;&lt;node_internals&gt;/**&quot;</span><span class="hljs-punctuation">]</span>
    <span class="hljs-punctuation">}</span><span class="hljs-punctuation">,</span>
    <span class="hljs-punctuation">{</span>
      <span class="hljs-attr">&quot;name&quot;</span><span class="hljs-punctuation">:</span> <span class="hljs-string">&quot;Debug SST Tests&quot;</span><span class="hljs-punctuation">,</span>
      <span class="hljs-attr">&quot;type&quot;</span><span class="hljs-punctuation">:</span> <span class="hljs-string">&quot;node&quot;</span><span class="hljs-punctuation">,</span>
      <span class="hljs-attr">&quot;request&quot;</span><span class="hljs-punctuation">:</span> <span class="hljs-string">&quot;launch&quot;</span><span class="hljs-punctuation">,</span>
      <span class="hljs-attr">&quot;runtimeExecutable&quot;</span><span class="hljs-punctuation">:</span> <span class="hljs-string">&quot;${workspaceRoot}/node_modules/.bin/sst&quot;</span><span class="hljs-punctuation">,</span>
      <span class="hljs-attr">&quot;args&quot;</span><span class="hljs-punctuation">:</span> <span class="hljs-punctuation">[</span><span class="hljs-string">&quot;test&quot;</span><span class="hljs-punctuation">,</span> <span class="hljs-string">&quot;--runInBand&quot;</span><span class="hljs-punctuation">,</span> <span class="hljs-string">&quot;--no-cache&quot;</span><span class="hljs-punctuation">,</span> <span class="hljs-string">&quot;--watchAll=false&quot;</span><span class="hljs-punctuation">]</span><span class="hljs-punctuation">,</span>
      <span class="hljs-attr">&quot;cwd&quot;</span><span class="hljs-punctuation">:</span> <span class="hljs-string">&quot;${workspaceRoot}&quot;</span><span class="hljs-punctuation">,</span>
      <span class="hljs-attr">&quot;protocol&quot;</span><span class="hljs-punctuation">:</span> <span class="hljs-string">&quot;inspector&quot;</span><span class="hljs-punctuation">,</span>
      <span class="hljs-attr">&quot;console&quot;</span><span class="hljs-punctuation">:</span> <span class="hljs-string">&quot;integratedTerminal&quot;</span><span class="hljs-punctuation">,</span>
      <span class="hljs-attr">&quot;internalConsoleOptions&quot;</span><span class="hljs-punctuation">:</span> <span class="hljs-string">&quot;neverOpen&quot;</span><span class="hljs-punctuation">,</span>
      <span class="hljs-attr">&quot;env&quot;</span><span class="hljs-punctuation">:</span> <span class="hljs-punctuation">{</span> <span class="hljs-attr">&quot;CI&quot;</span><span class="hljs-punctuation">:</span> <span class="hljs-string">&quot;true&quot;</span> <span class="hljs-punctuation">}</span><span class="hljs-punctuation">,</span>
      <span class="hljs-attr">&quot;disableOptimisticBPs&quot;</span><span class="hljs-punctuation">:</span> <span class="hljs-keyword">true</span>
    <span class="hljs-punctuation">}</span>
  <span class="hljs-punctuation">]</span>
<span class="hljs-punctuation">}</span> 
</code></pre>
<p>This will then allow you to run <code>Debug SST Start</code> which will configure the AWS resources using the <code>npm start</code> command and connect the debugger to the instance so you can debug your functions locally as well as make use of the automated function deployment</p>
<h2 id="add-a-db" tabindex="-1">Add a DB</h2>
<blockquote>
<p>From <a href="https://serverless-stack.com/examples/how-to-create-a-crud-api-with-serverless-using-dynamodb.html">these docs</a></p>
</blockquote>
<p>We can define our table using the <code>sst.Table</code> class:</p>
<pre><code class="hljs language-ts"><span class="hljs-keyword">const</span> table = <span class="hljs-keyword">new</span> sst.<span class="hljs-title class_">Table</span>(<span class="hljs-variable language_">this</span>, <span class="hljs-string">&quot;Notes&quot;</span>, {
  <span class="hljs-attr">fields</span>: {
  <span class="hljs-attr">userId</span>: sst.<span class="hljs-property">TableFieldType</span>.<span class="hljs-property">STRING</span>,
  <span class="hljs-attr">noteId</span>: sst.<span class="hljs-property">TableFieldType</span>.<span class="hljs-property">NUMBER</span>
  },
  <span class="hljs-attr">primaryIndex</span>: {
  <span class="hljs-attr">partitionKey</span>: <span class="hljs-string">&quot;userId&quot;</span>, <span class="hljs-attr">sortKey</span>: <span class="hljs-string">&quot;noteId&quot;</span>
  }
})
</code></pre>
<p>Next, we can add some endpoint definitions for the functions we'll create as well as access to the table name via the environment:</p>
<pre><code class="hljs language-ts"><span class="hljs-keyword">const</span> api = <span class="hljs-keyword">new</span> sst.<span class="hljs-title class_">Api</span>(<span class="hljs-variable language_">this</span>, <span class="hljs-string">&quot;Api&quot;</span>, {
  <span class="hljs-attr">defaultFunctionProps</span>: {
      <span class="hljs-attr">timeout</span>: <span class="hljs-number">60</span>, <span class="hljs-comment">// increase timeout so we can debug</span>
    <span class="hljs-attr">environment</span>: {
      <span class="hljs-attr">tableName</span>: table.<span class="hljs-property">dynamodbTable</span>.<span class="hljs-property">tableName</span>,
    },
  },
  <span class="hljs-attr">routes</span>: {
  <span class="hljs-comment">// .. other routes</span>
    <span class="hljs-string">&quot;GET  /notes&quot;</span>: <span class="hljs-string">&quot;src/notes/getAll.handler&quot;</span>, <span class="hljs-comment">// userId in query</span>
    <span class="hljs-string">&quot;GET  /notes/{noteId}&quot;</span>: <span class="hljs-string">&quot;src/notes/get.handler&quot;</span>, <span class="hljs-comment">// userId in query</span>
    <span class="hljs-string">&quot;POST /notes&quot;</span>: <span class="hljs-string">&quot;src/notes/create.handler&quot;</span>
  },
});
</code></pre>
<p>And lastly we can grant the permissions to our <code>api</code> to access the <code>table</code></p>
<pre><code class="hljs language-ts">api.<span class="hljs-title function_">attachPermissions</span>([table])
</code></pre>
<p>Adding the above to the <code>MyStack.ts</code> file results in the following:</p>
<pre><code class="hljs language-ts"><span class="hljs-keyword">import</span> * <span class="hljs-keyword">as</span> sst <span class="hljs-keyword">from</span> <span class="hljs-string">&quot;@serverless-stack/resources&quot;</span>;

<span class="hljs-keyword">export</span> <span class="hljs-keyword">default</span> <span class="hljs-keyword">class</span> <span class="hljs-title class_">MyStack</span> <span class="hljs-keyword">extends</span> <span class="hljs-title class_ inherited__">sst.Stack</span> {
  <span class="hljs-title function_">constructor</span>(<span class="hljs-params">scope: sst.App, id: <span class="hljs-built_in">string</span>, props?: sst.StackProps</span>) {
  <span class="hljs-variable language_">super</span>(scope, id, props);

  <span class="hljs-keyword">const</span> table = <span class="hljs-keyword">new</span> sst.<span class="hljs-title class_">Table</span>(<span class="hljs-variable language_">this</span>, <span class="hljs-string">&quot;Notes&quot;</span>, {
    <span class="hljs-attr">fields</span>: {
    <span class="hljs-attr">userId</span>: sst.<span class="hljs-property">TableFieldType</span>.<span class="hljs-property">STRING</span>,
    <span class="hljs-attr">noteId</span>: sst.<span class="hljs-property">TableFieldType</span>.<span class="hljs-property">STRING</span>
    },
    <span class="hljs-attr">primaryIndex</span>: {
    <span class="hljs-attr">partitionKey</span>: <span class="hljs-string">&quot;userId&quot;</span>, <span class="hljs-attr">sortKey</span>: <span class="hljs-string">&quot;noteId&quot;</span>
    }
  })

  <span class="hljs-comment">// Create the HTTP API</span>
  <span class="hljs-keyword">const</span> api = <span class="hljs-keyword">new</span> sst.<span class="hljs-title class_">Api</span>(<span class="hljs-variable language_">this</span>, <span class="hljs-string">&quot;Api&quot;</span>, {
    <span class="hljs-attr">defaultFunctionProps</span>: {
    <span class="hljs-attr">timeout</span>: <span class="hljs-number">60</span>, <span class="hljs-comment">// increase timeout so we can debug</span>
    <span class="hljs-attr">environment</span>: {
      <span class="hljs-attr">tableName</span>: table.<span class="hljs-property">dynamodbTable</span>.<span class="hljs-property">tableName</span>,
    },
    },
    <span class="hljs-attr">routes</span>: {
    <span class="hljs-comment">// .. other routes</span>
    <span class="hljs-string">&quot;GET  /notes&quot;</span>: <span class="hljs-string">&quot;src/notes/getAll.handler&quot;</span>, <span class="hljs-comment">// userId in query</span>
    <span class="hljs-string">&quot;GET  /notes/{noteId}&quot;</span>: <span class="hljs-string">&quot;src/notes/get.handler&quot;</span>, <span class="hljs-comment">// userId in query</span>
    <span class="hljs-string">&quot;POST /notes&quot;</span>: <span class="hljs-string">&quot;src/notes/create.handler&quot;</span>
    },
  });

  api.<span class="hljs-title function_">attachPermissions</span>([table])

  <span class="hljs-comment">// Show API endpoint in output</span>
  <span class="hljs-variable language_">this</span>.<span class="hljs-title function_">addOutputs</span>({
    <span class="hljs-string">&quot;ApiEndpoint&quot;</span>: api.<span class="hljs-property">httpApi</span>.<span class="hljs-property">apiEndpoint</span>,
  });
  }
}
</code></pre>
<p>Before we go any further, we need to install some dependencies in our app, particularly <code>uuid</code> for generating unique id's for notes, we can install a dependency with:</p>
<pre><code class="hljs language-sh">npm install uuid
npm install aws-sdk
</code></pre>
<h2 id="define-common-structures" tabindex="-1">Define Common Structures</h2>
<p>We'll also create some general helper functions for returning responses of different types, you can view the details for their files below but these just wrap the response in a status and header as well as stringify the body</p>
<p><code>src/responses/successResponse.ts</code></p>
<pre><code class="hljs language-ts"><span class="hljs-keyword">const</span> successResponse = &lt;T&gt;<span class="hljs-function">(<span class="hljs-params">item: T</span>) =&gt;</span> {
  <span class="hljs-keyword">return</span> {
  <span class="hljs-attr">statusCode</span>: <span class="hljs-number">200</span>,
  <span class="hljs-attr">headers</span>: { <span class="hljs-string">&quot;Content-Type&quot;</span>: <span class="hljs-string">&quot;application/json&quot;</span> },
  <span class="hljs-attr">body</span>: <span class="hljs-title class_">JSON</span>.<span class="hljs-title function_">stringify</span>(item),
  };
};

<span class="hljs-keyword">export</span> <span class="hljs-keyword">default</span> successResponse;
</code></pre>
<p><code>src/responses/badResuestsResponse.ts</code></p>
<pre><code class="hljs language-ts"><span class="hljs-keyword">const</span> <span class="hljs-title function_">badRequestResponse</span> = (<span class="hljs-params">msg: <span class="hljs-built_in">string</span></span>) =&gt; {
  <span class="hljs-keyword">return</span> {
  <span class="hljs-attr">statusCode</span>: <span class="hljs-number">400</span>,
  <span class="hljs-attr">headers</span>: { <span class="hljs-string">&quot;Content-Type&quot;</span>: <span class="hljs-string">&quot;text/plain&quot;</span> },
  <span class="hljs-attr">body</span>: msg,
  };
}
  

<span class="hljs-keyword">export</span> <span class="hljs-keyword">default</span> badRequestResponse
</code></pre>
<p><code>src/responses/internalErrorResponse.ts</code></p>
<pre><code class="hljs language-ts"><span class="hljs-keyword">const</span> <span class="hljs-title function_">internalErrorResponse</span> = (<span class="hljs-params">msg: <span class="hljs-built_in">string</span></span>) =&gt; {
  <span class="hljs-variable language_">console</span>.<span class="hljs-title function_">error</span>(msg);
  <span class="hljs-keyword">return</span> {
    <span class="hljs-attr">statusCode</span>: <span class="hljs-number">500</span>,
    <span class="hljs-attr">headers</span>: { <span class="hljs-string">&quot;Content-Type&quot;</span>: <span class="hljs-string">&quot;text/plain&quot;</span> },
    <span class="hljs-attr">body</span>: <span class="hljs-string">&quot;internal error&quot;</span>,
  };
  };

<span class="hljs-keyword">export</span> <span class="hljs-keyword">default</span> internalErrorResponse
</code></pre>
<p>And we've also got a <code>Note</code> type which will be the data that gets stored/retreived:</p>
<p><code>src/notes/Note.ts</code></p>
<pre><code class="hljs language-ts"><span class="hljs-keyword">type</span> <span class="hljs-title class_">Note</span> = {
  <span class="hljs-attr">userId</span>: <span class="hljs-built_in">string</span>;
  <span class="hljs-attr">noteId</span>: <span class="hljs-built_in">string</span>;
  content?: <span class="hljs-built_in">string</span>;
  <span class="hljs-attr">createdAt</span>: <span class="hljs-built_in">number</span>;
};

<span class="hljs-keyword">export</span> <span class="hljs-keyword">default</span> <span class="hljs-title class_">Note</span>
</code></pre>
<h2 id="access-db" tabindex="-1">Access DB</h2>
<p>Once we've got a DB table defined as above, we can then access the table to execute different queries</p>
<p>We would create a DB object instance using:</p>
<pre><code class="hljs language-ts"><span class="hljs-keyword">const</span> db = <span class="hljs-keyword">new</span> <span class="hljs-title class_">DynamoDB</span>.<span class="hljs-title class_">DocumentClient</span>();
</code></pre>
<h3 id="create" tabindex="-1">Create</h3>
<p>A <code>create</code> is the simplest one of the database functions for us to implement, this uses the <code>db.put</code> function with the <code>Item</code> to save which is of type <code>Note</code>:</p>
<pre><code class="hljs language-ts"><span class="hljs-keyword">const</span> <span class="hljs-title function_">create</span> = <span class="hljs-keyword">async</span> (<span class="hljs-params">tableName: <span class="hljs-built_in">string</span>, item: Note</span>) =&gt; {
  <span class="hljs-keyword">await</span> db.<span class="hljs-title function_">put</span>({ <span class="hljs-title class_">TableName</span>: tableName, <span class="hljs-title class_">Item</span>: item }).<span class="hljs-title function_">promise</span>();
};
</code></pre>
<h3 id="get" tabindex="-1">Get</h3>
<p>We can implement a <code>getOne</code> function by using <code>db.get</code> and providing the full <code>Key</code> consisting of the <code>userId</code> and <code>noteId</code></p>
<pre><code class="hljs language-ts"><span class="hljs-keyword">const</span> <span class="hljs-title function_">getOne</span> = <span class="hljs-keyword">async</span> (<span class="hljs-params">tableName: <span class="hljs-built_in">string</span>, noteId: <span class="hljs-built_in">string</span>, userId: <span class="hljs-built_in">string</span></span>) =&gt; {
  <span class="hljs-keyword">const</span> result =  <span class="hljs-keyword">await</span> db.<span class="hljs-title function_">get</span>({
    <span class="hljs-title class_">TableName</span>: tableName,
    <span class="hljs-title class_">Key</span>: {
      <span class="hljs-attr">userId</span>: userId,
      <span class="hljs-attr">noteId</span>: noteId
    }
  }).<span class="hljs-title function_">promise</span>();

  <span class="hljs-keyword">return</span> result.<span class="hljs-property">Item</span>
};
</code></pre>
<h3 id="getall" tabindex="-1">GetAll</h3>
<p>We can implement a <code>getByUserId</code> function which will make use of <code>db.query</code> and use the <code>ExpressionAttributeValues</code> to populate the <code>KeyConditionExpression</code> as seen below:</p>
<pre><code class="hljs language-ts"><span class="hljs-keyword">const</span> <span class="hljs-title function_">getByUserId</span> = <span class="hljs-keyword">async</span> (<span class="hljs-params">tableName: <span class="hljs-built_in">string</span>, userId: <span class="hljs-built_in">string</span></span>) =&gt; {
  <span class="hljs-keyword">const</span> result =  <span class="hljs-keyword">await</span> db.<span class="hljs-title function_">query</span>({
    <span class="hljs-title class_">TableName</span>: tableName,
    <span class="hljs-title class_">KeyConditionExpression</span>: <span class="hljs-string">&quot;userId = :userId&quot;</span>,
    <span class="hljs-title class_">ExpressionAttributeValues</span>: {
      <span class="hljs-string">&quot;:userId&quot;</span>: userId,
    },
  }).<span class="hljs-title function_">promise</span>();

  <span class="hljs-keyword">return</span> result.<span class="hljs-property">Items</span>
};
</code></pre>
<h2 id="define-lambdas" tabindex="-1">Define Lambdas</h2>
<p>Now that we know how to write data to Dynamo, we can implement the following files for the endpoints we defined above:</p>
<h3 id="create-1" tabindex="-1">Create</h3>
<p><code>src/notes/create.ts</code></p>
<pre><code class="hljs language-ts"><span class="hljs-keyword">import</span> { <span class="hljs-title class_">APIGatewayProxyEventV</span>2, <span class="hljs-title class_">APIGatewayProxyHandlerV</span>2 } <span class="hljs-keyword">from</span> <span class="hljs-string">&quot;aws-lambda&quot;</span>;
<span class="hljs-keyword">import</span> { <span class="hljs-title class_">DynamoDB</span> } <span class="hljs-keyword">from</span> <span class="hljs-string">&quot;aws-sdk&quot;</span>;
<span class="hljs-keyword">import</span> { v1 } <span class="hljs-keyword">from</span> <span class="hljs-string">&quot;uuid&quot;</span>;
<span class="hljs-keyword">import</span> internalErrorResponse <span class="hljs-keyword">from</span> <span class="hljs-string">&quot;../responses/internalErrorResponse&quot;</span>;
<span class="hljs-keyword">import</span> successResponse <span class="hljs-keyword">from</span> <span class="hljs-string">&quot;../responses/successResponse&quot;</span>;
<span class="hljs-keyword">import</span> badRequestResponse <span class="hljs-keyword">from</span> <span class="hljs-string">&quot;../responses/badRequestResponse&quot;</span>
<span class="hljs-keyword">import</span> <span class="hljs-title class_">Note</span> <span class="hljs-keyword">from</span> <span class="hljs-string">&quot;./Note&quot;</span>;

<span class="hljs-keyword">const</span> db = <span class="hljs-keyword">new</span> <span class="hljs-title class_">DynamoDB</span>.<span class="hljs-title class_">DocumentClient</span>();

<span class="hljs-keyword">const</span> toItem = (<span class="hljs-attr">data</span>: <span class="hljs-built_in">string</span>, <span class="hljs-attr">content</span>: <span class="hljs-built_in">string</span>): <span class="hljs-function"><span class="hljs-params">Note</span> =&gt;</span> {
  <span class="hljs-keyword">return</span> {
    <span class="hljs-attr">userId</span>: data,
    <span class="hljs-attr">noteId</span>: <span class="hljs-title function_">v1</span>(),
    <span class="hljs-attr">content</span>: content,
    <span class="hljs-attr">createdAt</span>: <span class="hljs-title class_">Date</span>.<span class="hljs-title function_">now</span>(),
  };
};

<span class="hljs-keyword">const</span> <span class="hljs-title function_">parseBody</span> = (<span class="hljs-params">event: APIGatewayProxyEventV2</span>) =&gt; {
  <span class="hljs-keyword">const</span> data = <span class="hljs-title class_">JSON</span>.<span class="hljs-title function_">parse</span>(event.<span class="hljs-property">body</span> || <span class="hljs-string">&quot;{}&quot;</span>);

  <span class="hljs-keyword">return</span> {
    <span class="hljs-attr">userId</span>: data.<span class="hljs-property">userId</span>,
    <span class="hljs-attr">content</span>: data.<span class="hljs-property">content</span>,
  };
};

<span class="hljs-keyword">const</span> <span class="hljs-title function_">isValid</span> = (<span class="hljs-params">data: Partial&lt;Note&gt;</span>) =&gt;
  <span class="hljs-keyword">typeof</span> data.<span class="hljs-property">userId</span> !== <span class="hljs-string">&quot;undefined&quot;</span> &amp;&amp; <span class="hljs-keyword">typeof</span> data.<span class="hljs-property">content</span> !== <span class="hljs-string">&quot;undefined&quot;</span>;

<span class="hljs-keyword">const</span> <span class="hljs-title function_">create</span> = <span class="hljs-keyword">async</span> (<span class="hljs-params">tableName: <span class="hljs-built_in">string</span>, item: Note</span>) =&gt; {
  <span class="hljs-keyword">await</span> db.<span class="hljs-title function_">put</span>({ <span class="hljs-title class_">TableName</span>: tableName, <span class="hljs-title class_">Item</span>: item }).<span class="hljs-title function_">promise</span>();
};

<span class="hljs-keyword">export</span> <span class="hljs-keyword">const</span> <span class="hljs-attr">handler</span>: <span class="hljs-title class_">APIGatewayProxyHandlerV</span>2 = <span class="hljs-keyword">async</span> (
  <span class="hljs-attr">event</span>: <span class="hljs-title class_">APIGatewayProxyEventV</span>2
) =&gt; {
  <span class="hljs-keyword">if</span> (<span class="hljs-keyword">typeof</span> process.<span class="hljs-property">env</span>.<span class="hljs-property">tableName</span> === <span class="hljs-string">&quot;undefined&quot;</span>)
    <span class="hljs-keyword">return</span> <span class="hljs-title function_">internalErrorResponse</span>(<span class="hljs-string">&quot;tableName is undefined&quot;</span>);

  <span class="hljs-keyword">const</span> tableName = process.<span class="hljs-property">env</span>.<span class="hljs-property">tableName</span>;
  <span class="hljs-keyword">const</span> data = <span class="hljs-title function_">parseBody</span>(event);

  <span class="hljs-keyword">if</span> (!<span class="hljs-title function_">isValid</span>(data)) <span class="hljs-keyword">return</span> <span class="hljs-title function_">badRequestResponse</span>(<span class="hljs-string">&quot;userId and content are required&quot;</span>);

  <span class="hljs-keyword">const</span> item = <span class="hljs-title function_">toItem</span>(data.<span class="hljs-property">userId</span>, data.<span class="hljs-property">content</span>);
  <span class="hljs-keyword">await</span> <span class="hljs-title function_">create</span>(tableName, item);

  <span class="hljs-keyword">return</span> <span class="hljs-title function_">successResponse</span>(item)
};
</code></pre>
<h3 id="get-1" tabindex="-1">Get</h3>
<p><code>src/notes/get.ts</code></p>
<pre><code class="hljs language-ts"><span class="hljs-keyword">import</span> { <span class="hljs-title class_">APIGatewayProxyEventV</span>2, <span class="hljs-title class_">APIGatewayProxyHandlerV</span>2 } <span class="hljs-keyword">from</span> <span class="hljs-string">&quot;aws-lambda&quot;</span>;
<span class="hljs-keyword">import</span> { <span class="hljs-title class_">DynamoDB</span> } <span class="hljs-keyword">from</span> <span class="hljs-string">&quot;aws-sdk&quot;</span>;
<span class="hljs-keyword">import</span> badRequestResponse <span class="hljs-keyword">from</span> <span class="hljs-string">&quot;../responses/badRequestResponse&quot;</span>;
<span class="hljs-keyword">import</span> internalErrorResponse <span class="hljs-keyword">from</span> <span class="hljs-string">&quot;../responses/internalErrorResponse&quot;</span>;
<span class="hljs-keyword">import</span> successResponse <span class="hljs-keyword">from</span> <span class="hljs-string">&quot;../responses/successResponse&quot;</span>;

<span class="hljs-keyword">type</span> <span class="hljs-title class_">RequestParams</span> = {
  noteId?: <span class="hljs-built_in">string</span>;
  userId?: <span class="hljs-built_in">string</span>
};

<span class="hljs-keyword">const</span> db = <span class="hljs-keyword">new</span> <span class="hljs-title class_">DynamoDB</span>.<span class="hljs-title class_">DocumentClient</span>();

<span class="hljs-keyword">const</span> parseBody = (<span class="hljs-attr">event</span>: <span class="hljs-title class_">APIGatewayProxyEventV</span>2): <span class="hljs-function"><span class="hljs-params">RequestParams</span> =&gt;</span> {
  <span class="hljs-keyword">const</span> pathData = event.<span class="hljs-property">pathParameters</span>;
  <span class="hljs-keyword">const</span> queryData = event.<span class="hljs-property">queryStringParameters</span>;

  <span class="hljs-keyword">return</span> {
    <span class="hljs-attr">noteId</span>: pathData?.<span class="hljs-property">noteId</span>,
    <span class="hljs-attr">userId</span>: queryData?.<span class="hljs-property">userId</span>
  };
};

<span class="hljs-keyword">const</span> <span class="hljs-title function_">isValid</span> = (<span class="hljs-params">data: RequestParams</span>) =&gt; <span class="hljs-keyword">typeof</span> data.<span class="hljs-property">noteId</span> !== <span class="hljs-string">&quot;undefined&quot;</span> &amp;&amp; <span class="hljs-keyword">typeof</span> data.<span class="hljs-property">userId</span> !== <span class="hljs-string">&#x27;undefined&#x27;</span>

<span class="hljs-keyword">const</span> <span class="hljs-title function_">getOne</span> = <span class="hljs-keyword">async</span> (<span class="hljs-params">tableName: <span class="hljs-built_in">string</span>, noteId: <span class="hljs-built_in">string</span>, userId: <span class="hljs-built_in">string</span></span>) =&gt; {
  <span class="hljs-keyword">const</span> result =  <span class="hljs-keyword">await</span> db.<span class="hljs-title function_">get</span>({
    <span class="hljs-title class_">TableName</span>: tableName,
    <span class="hljs-title class_">Key</span>: {
      <span class="hljs-attr">userId</span>: userId,
      <span class="hljs-attr">noteId</span>: noteId
    }
  }).<span class="hljs-title function_">promise</span>();

  <span class="hljs-keyword">return</span> result.<span class="hljs-property">Item</span>
};

<span class="hljs-keyword">export</span> <span class="hljs-keyword">const</span> <span class="hljs-attr">handler</span>: <span class="hljs-title class_">APIGatewayProxyHandlerV</span>2 = <span class="hljs-keyword">async</span> (
  <span class="hljs-attr">event</span>: <span class="hljs-title class_">APIGatewayProxyEventV</span>2
) =&gt; {
  <span class="hljs-keyword">const</span> data = <span class="hljs-title function_">parseBody</span>(event);

  <span class="hljs-keyword">if</span> (<span class="hljs-keyword">typeof</span> process.<span class="hljs-property">env</span>.<span class="hljs-property">tableName</span> === <span class="hljs-string">&quot;undefined&quot;</span>)
    <span class="hljs-keyword">return</span> <span class="hljs-title function_">internalErrorResponse</span>(<span class="hljs-string">&quot;tableName is undefined&quot;</span>);

  <span class="hljs-keyword">const</span> tableName = process.<span class="hljs-property">env</span>.<span class="hljs-property">tableName</span>;

  <span class="hljs-keyword">if</span> (!<span class="hljs-title function_">isValid</span>(data)) <span class="hljs-keyword">return</span> <span class="hljs-title function_">badRequestResponse</span>(<span class="hljs-string">&quot;noteId is required in path, userId is required in query&quot;</span>);

  <span class="hljs-keyword">const</span> items = <span class="hljs-keyword">await</span> <span class="hljs-title function_">getOne</span>(tableName, data.<span class="hljs-property">noteId</span> <span class="hljs-keyword">as</span> <span class="hljs-built_in">string</span>, data.<span class="hljs-property">userId</span> <span class="hljs-keyword">as</span> <span class="hljs-built_in">string</span>);

  <span class="hljs-keyword">return</span> <span class="hljs-title function_">successResponse</span>(items)
};
<span class="hljs-keyword">import</span> { <span class="hljs-title class_">APIGatewayProxyEventV</span>2, <span class="hljs-title class_">APIGatewayProxyHandlerV</span>2 } <span class="hljs-keyword">from</span> <span class="hljs-string">&quot;aws-lambda&quot;</span>;
<span class="hljs-keyword">import</span> { <span class="hljs-title class_">DynamoDB</span> } <span class="hljs-keyword">from</span> <span class="hljs-string">&quot;aws-sdk&quot;</span>;
<span class="hljs-keyword">import</span> badRequestResponse <span class="hljs-keyword">from</span> <span class="hljs-string">&quot;../responses/badRequestResponse&quot;</span>;
<span class="hljs-keyword">import</span> internalErrorResponse <span class="hljs-keyword">from</span> <span class="hljs-string">&quot;../responses/internalErrorResponse&quot;</span>;
<span class="hljs-keyword">import</span> successResponse <span class="hljs-keyword">from</span> <span class="hljs-string">&quot;../responses/successResponse&quot;</span>;

<span class="hljs-keyword">type</span> <span class="hljs-title class_">RequestParams</span> = {
  noteId?: <span class="hljs-built_in">string</span>;
  userId?: <span class="hljs-built_in">string</span>
};

<span class="hljs-keyword">const</span> db = <span class="hljs-keyword">new</span> <span class="hljs-title class_">DynamoDB</span>.<span class="hljs-title class_">DocumentClient</span>();

<span class="hljs-keyword">const</span> parseBody = (<span class="hljs-attr">event</span>: <span class="hljs-title class_">APIGatewayProxyEventV</span>2): <span class="hljs-function"><span class="hljs-params">RequestParams</span> =&gt;</span> {
  <span class="hljs-keyword">const</span> pathData = event.<span class="hljs-property">pathParameters</span>;
  <span class="hljs-keyword">const</span> queryData = event.<span class="hljs-property">queryStringParameters</span>;

  <span class="hljs-keyword">return</span> {
    <span class="hljs-attr">noteId</span>: pathData?.<span class="hljs-property">noteId</span>,
    <span class="hljs-attr">userId</span>: queryData?.<span class="hljs-property">userId</span>
  };
};

<span class="hljs-keyword">const</span> <span class="hljs-title function_">isValid</span> = (<span class="hljs-params">data: RequestParams</span>) =&gt; <span class="hljs-keyword">typeof</span> data.<span class="hljs-property">noteId</span> !== <span class="hljs-string">&quot;undefined&quot;</span> &amp;&amp; <span class="hljs-keyword">typeof</span> data.<span class="hljs-property">userId</span> !== <span class="hljs-string">&#x27;undefined&#x27;</span>

<span class="hljs-keyword">const</span> <span class="hljs-title function_">getOne</span> = <span class="hljs-keyword">async</span> (<span class="hljs-params">tableName: <span class="hljs-built_in">string</span>, noteId: <span class="hljs-built_in">string</span>, userId: <span class="hljs-built_in">string</span></span>) =&gt; {
  <span class="hljs-keyword">const</span> result =  <span class="hljs-keyword">await</span> db.<span class="hljs-title function_">get</span>({
    <span class="hljs-title class_">TableName</span>: tableName,
    <span class="hljs-title class_">Key</span>: {
      <span class="hljs-attr">userId</span>: userId,
      <span class="hljs-attr">noteId</span>: noteId
    }
  }).<span class="hljs-title function_">promise</span>();

  <span class="hljs-keyword">return</span> result.<span class="hljs-property">Item</span>
};

<span class="hljs-keyword">export</span> <span class="hljs-keyword">const</span> <span class="hljs-attr">handler</span>: <span class="hljs-title class_">APIGatewayProxyHandlerV</span>2 = <span class="hljs-keyword">async</span> (
  <span class="hljs-attr">event</span>: <span class="hljs-title class_">APIGatewayProxyEventV</span>2
) =&gt; {
  <span class="hljs-keyword">const</span> data = <span class="hljs-title function_">parseBody</span>(event);

  <span class="hljs-keyword">if</span> (<span class="hljs-keyword">typeof</span> process.<span class="hljs-property">env</span>.<span class="hljs-property">tableName</span> === <span class="hljs-string">&quot;undefined&quot;</span>)
    <span class="hljs-keyword">return</span> <span class="hljs-title function_">internalErrorResponse</span>(<span class="hljs-string">&quot;tableName is undefined&quot;</span>);

  <span class="hljs-keyword">const</span> tableName = process.<span class="hljs-property">env</span>.<span class="hljs-property">tableName</span>;

  <span class="hljs-keyword">if</span> (!<span class="hljs-title function_">isValid</span>(data)) <span class="hljs-keyword">return</span> <span class="hljs-title function_">badRequestResponse</span>(<span class="hljs-string">&quot;noteId is required in path, userId is required in query&quot;</span>);

  <span class="hljs-keyword">const</span> items = <span class="hljs-keyword">await</span> <span class="hljs-title function_">getOne</span>(tableName, data.<span class="hljs-property">noteId</span> <span class="hljs-keyword">as</span> <span class="hljs-built_in">string</span>, data.<span class="hljs-property">userId</span> <span class="hljs-keyword">as</span> <span class="hljs-built_in">string</span>);

  <span class="hljs-keyword">return</span> <span class="hljs-title function_">successResponse</span>(items)
};
</code></pre>
<h3 id="getall-1" tabindex="-1">GetAll</h3>
<p><code>src/notes/getAll.ts</code></p>
<pre><code class="hljs language-ts"><span class="hljs-keyword">import</span> { <span class="hljs-title class_">APIGatewayProxyEventV</span>2, <span class="hljs-title class_">APIGatewayProxyHandlerV</span>2 } <span class="hljs-keyword">from</span> <span class="hljs-string">&quot;aws-lambda&quot;</span>;
<span class="hljs-keyword">import</span> { <span class="hljs-title class_">DynamoDB</span> } <span class="hljs-keyword">from</span> <span class="hljs-string">&quot;aws-sdk&quot;</span>;
<span class="hljs-keyword">import</span> badRequestResponse <span class="hljs-keyword">from</span> <span class="hljs-string">&quot;../responses/badRequestResponse&quot;</span>;
<span class="hljs-keyword">import</span> internalErrorResponse <span class="hljs-keyword">from</span> <span class="hljs-string">&quot;../responses/internalErrorResponse&quot;</span>;
<span class="hljs-keyword">import</span> successResponse <span class="hljs-keyword">from</span> <span class="hljs-string">&quot;../responses/successResponse&quot;</span>;

<span class="hljs-keyword">type</span> <span class="hljs-title class_">PathParams</span> = {
  userId?: <span class="hljs-built_in">string</span>;
};

<span class="hljs-keyword">const</span> db = <span class="hljs-keyword">new</span> <span class="hljs-title class_">DynamoDB</span>.<span class="hljs-title class_">DocumentClient</span>();

<span class="hljs-keyword">const</span> parseBody = (<span class="hljs-attr">event</span>: <span class="hljs-title class_">APIGatewayProxyEventV</span>2): <span class="hljs-function"><span class="hljs-params">PathParams</span> =&gt;</span> {
  <span class="hljs-keyword">const</span> data = event.<span class="hljs-property">queryStringParameters</span>;

  <span class="hljs-keyword">return</span> {
    <span class="hljs-attr">userId</span>: data?.<span class="hljs-property">userId</span>,
  };
};

<span class="hljs-keyword">const</span> <span class="hljs-title function_">isValid</span> = (<span class="hljs-params">data: PathParams</span>) =&gt; <span class="hljs-keyword">typeof</span> data.<span class="hljs-property">userId</span> !== <span class="hljs-string">&quot;undefined&quot;</span>;

<span class="hljs-keyword">const</span> <span class="hljs-title function_">getByUserId</span> = <span class="hljs-keyword">async</span> (<span class="hljs-params">tableName: <span class="hljs-built_in">string</span>, userId: <span class="hljs-built_in">string</span></span>) =&gt; {
  <span class="hljs-keyword">const</span> result =  <span class="hljs-keyword">await</span> db.<span class="hljs-title function_">query</span>({
    <span class="hljs-title class_">TableName</span>: tableName,
    <span class="hljs-title class_">KeyConditionExpression</span>: <span class="hljs-string">&quot;userId = :userId&quot;</span>,
    <span class="hljs-title class_">ExpressionAttributeValues</span>: {
      <span class="hljs-string">&quot;:userId&quot;</span>: userId,
    },
  }).<span class="hljs-title function_">promise</span>();

  <span class="hljs-keyword">return</span> result.<span class="hljs-property">Items</span>
};

<span class="hljs-keyword">export</span> <span class="hljs-keyword">const</span> <span class="hljs-attr">handler</span>: <span class="hljs-title class_">APIGatewayProxyHandlerV</span>2 = <span class="hljs-keyword">async</span> (
  <span class="hljs-attr">event</span>: <span class="hljs-title class_">APIGatewayProxyEventV</span>2
) =&gt; {
  <span class="hljs-keyword">const</span> data = <span class="hljs-title function_">parseBody</span>(event);

  <span class="hljs-keyword">if</span> (<span class="hljs-keyword">typeof</span> process.<span class="hljs-property">env</span>.<span class="hljs-property">tableName</span> === <span class="hljs-string">&quot;undefined&quot;</span>)
    <span class="hljs-keyword">return</span> <span class="hljs-title function_">internalErrorResponse</span>(<span class="hljs-string">&quot;tableName is undefined&quot;</span>);

  <span class="hljs-keyword">const</span> tableName = process.<span class="hljs-property">env</span>.<span class="hljs-property">tableName</span>;

  <span class="hljs-keyword">if</span> (!<span class="hljs-title function_">isValid</span>(data)) <span class="hljs-keyword">return</span> <span class="hljs-title function_">badRequestResponse</span>(<span class="hljs-string">&quot;userId is required in query&quot;</span>);

  <span class="hljs-keyword">const</span> items = <span class="hljs-keyword">await</span> <span class="hljs-title function_">getByUserId</span>(tableName, data.<span class="hljs-property">userId</span> <span class="hljs-keyword">as</span> <span class="hljs-built_in">string</span>);

  <span class="hljs-keyword">return</span> <span class="hljs-title function_">successResponse</span>(items)
};
</code></pre>
<h3 id="testing" tabindex="-1">Testing</h3>
<p>Once we've got all the above completed, we can actually test our endpoints and create and read back data</p>
<p><code>create</code>:</p>
<pre><code class="hljs language-http">POST https://AWS_ENDPOINT_HERE/notes

{
  &quot;userId&quot;: &quot;USER_ID&quot;,
  &quot;content&quot;: &quot;Hello world&quot;
}
</code></pre>
<p>Which responds with:</p>
<pre><code class="hljs language-http">200

{
  &quot;content&quot;: &quot;Hello world&quot;,
  &quot;createdAt&quot;: 1619177078298,
  &quot;noteId&quot;: &quot;NOTE_ID_UUID&quot;,
  &quot;userId&quot;: &quot;USER_ID&quot;
}
</code></pre>
<p><code>get</code>:</p>
<pre><code class="hljs language-http">GET https://AWS_ENDPOINT_HERE/notes/NOTE_ID_UUID?userId=USER_ID
</code></pre>
<pre><code class="hljs language-http">200

{
  &quot;content&quot;: &quot;Hello world&quot;,
  &quot;createdAt&quot;: 1619177078298,
  &quot;noteId&quot;: &quot;NOTE_ID_UUID&quot;,
  &quot;userId&quot;: &quot;USER_ID&quot;
}
</code></pre>
<p><code>getAll</code></p>
<pre><code class="hljs language-http">GET htttps://AWS_ENDPOINT_HERE/notes?userId=USER_ID
</code></pre>
<pre><code class="hljs language-http">200

[
  {
    &quot;content&quot;: &quot;Hello world&quot;,
    &quot;createdAt&quot;: 1619177078298,
    &quot;noteId&quot;: &quot;NOTE_ID_UUID&quot;,
    &quot;userId&quot;: &quot;USER_ID&quot;
  }
]
</code></pre>
<h2 id="creating-notes-using-a-queue" tabindex="-1">Creating Notes Using a Queue</h2>
<p>When working with microservices a common pattern is to use a message queue for any operations that can happen in an asynchronous fashion, we can create an SQS queue which we can use to stage messages and then separately save them at a rate that we're able to process them</p>
<p>In order to make this kind of logic we're going to break up our <code>create</code> data flow - a the moment it's this:</p>
<pre><code class="hljs">lambda -&gt; dynamo
return &lt;-
</code></pre>
<p>We're going to turn it into this:</p>
<pre><code class="hljs"><span class="hljs-function"><span class="hljs-title">lambda1</span> -&gt;</span> sqs
 return &lt;-

          <span class="hljs-function"><span class="hljs-title">sqs</span> -&gt;</span> <span class="hljs-function"><span class="hljs-title">lambda2</span> -&gt;</span> dynamo
</code></pre>
<p>This kind of pattern becomes especially useful if we're doing a lot more stuff with the data other than just the single DB operation and also allows us to retry things like saving to the DB if we have errors, etc.</p>
<p>A more complex data flow could look something like this (not what we're implementing):</p>
<pre><code class="hljs"><span class="hljs-function"><span class="hljs-title">lambda1</span> -&gt;</span> sqs
 return &lt;-

           <span class="hljs-function"><span class="hljs-title">sqs</span> -&gt;</span> <span class="hljs-function"><span class="hljs-title">lambda2</span> -&gt;</span> dynamo <span class="hljs-comment">// save to db</span>
               -&gt; <span class="hljs-function"><span class="hljs-title">lambda3</span> -&gt;</span> s3     <span class="hljs-comment">// generate a report</span>
           sqs &lt;-

           <span class="hljs-function"><span class="hljs-title">sqs</span> -&gt;</span> lambda4           <span class="hljs-comment">// send an email</span>
</code></pre>
<h3 id="create-queue" tabindex="-1">Create Queue</h3>
<p>SST provides us with the <code>sst.Queue</code> class that we can use for this purpose</p>
<p>To create a Queue you can use the following in stack:</p>
<pre><code class="hljs language-ts"><span class="hljs-keyword">const</span> queue = <span class="hljs-keyword">new</span> sst.<span class="hljs-title class_">Queue</span>(<span class="hljs-variable language_">this</span>, <span class="hljs-string">&quot;NotesQueue&quot;</span>, {
  <span class="hljs-attr">consumer</span>: <span class="hljs-string">&quot;src/consumers/createNote.handler&quot;</span>,
});

queue.<span class="hljs-title function_">attachPermissions</span>([table]);
queue.<span class="hljs-property">consumerFunction</span>?.<span class="hljs-title function_">addEnvironment</span>(
  <span class="hljs-string">&quot;tableName&quot;</span>,
  table.<span class="hljs-property">dynamodbTable</span>.<span class="hljs-property">tableName</span>
);
</code></pre>
<p>The above code does the following:</p>
<ol>
<li>Create a <code>queue</code></li>
<li>Give the queue permission to access the <code>table</code></li>
<li>Add the <code>tableName</code> environment variable to the <code>queue</code>'s <code>consumerFunction</code></li>
</ol>
<p>We will also need to grant permissions to the API to access the <code>queue</code> so that our <code>create</code> handler is able to add messages to the <code>queue</code></p>
<pre><code class="hljs language-ts">api.<span class="hljs-title function_">attachPermissions</span>([table, queue]);
</code></pre>
<p>Which means our Stack now looks like this:</p>
<p><code>lib/MyStack.ts</code></p>
<pre><code class="hljs language-ts"><span class="hljs-keyword">import</span> * <span class="hljs-keyword">as</span> sst <span class="hljs-keyword">from</span> <span class="hljs-string">&quot;@serverless-stack/resources&quot;</span>;

<span class="hljs-keyword">export</span> <span class="hljs-keyword">default</span> <span class="hljs-keyword">class</span> <span class="hljs-title class_">MyStack</span> <span class="hljs-keyword">extends</span> <span class="hljs-title class_ inherited__">sst.Stack</span> {
  <span class="hljs-title function_">constructor</span>(<span class="hljs-params">scope: sst.App, id: <span class="hljs-built_in">string</span>, props?: sst.StackProps</span>) {
    <span class="hljs-variable language_">super</span>(scope, id, props);

    <span class="hljs-keyword">const</span> table = <span class="hljs-keyword">new</span> sst.<span class="hljs-title class_">Table</span>(<span class="hljs-variable language_">this</span>, <span class="hljs-string">&quot;Notes&quot;</span>, {
      <span class="hljs-attr">fields</span>: {
        <span class="hljs-attr">userId</span>: sst.<span class="hljs-property">TableFieldType</span>.<span class="hljs-property">STRING</span>,
        <span class="hljs-attr">noteId</span>: sst.<span class="hljs-property">TableFieldType</span>.<span class="hljs-property">STRING</span>,
      },
      <span class="hljs-attr">primaryIndex</span>: {
        <span class="hljs-attr">partitionKey</span>: <span class="hljs-string">&quot;userId&quot;</span>,
        <span class="hljs-attr">sortKey</span>: <span class="hljs-string">&quot;noteId&quot;</span>,
      },
    });

    <span class="hljs-keyword">const</span> queue = <span class="hljs-keyword">new</span> sst.<span class="hljs-title class_">Queue</span>(<span class="hljs-variable language_">this</span>, <span class="hljs-string">&quot;NotesQueue&quot;</span>, {
      <span class="hljs-attr">consumer</span>: <span class="hljs-string">&quot;src/consumers/createNote.handler&quot;</span>,
    });

    queue.<span class="hljs-title function_">attachPermissions</span>([table]);
    queue.<span class="hljs-property">consumerFunction</span>?.<span class="hljs-title function_">addEnvironment</span>(
      <span class="hljs-string">&quot;tableName&quot;</span>,
      table.<span class="hljs-property">dynamodbTable</span>.<span class="hljs-property">tableName</span>
    );

    <span class="hljs-comment">// Create the HTTP API</span>
    <span class="hljs-keyword">const</span> api = <span class="hljs-keyword">new</span> sst.<span class="hljs-title class_">Api</span>(<span class="hljs-variable language_">this</span>, <span class="hljs-string">&quot;Api&quot;</span>, {
      <span class="hljs-attr">defaultFunctionProps</span>: {
        <span class="hljs-attr">timeout</span>: <span class="hljs-number">60</span>, <span class="hljs-comment">// increase timeout so we can debug</span>
        <span class="hljs-attr">environment</span>: {
          <span class="hljs-attr">tableName</span>: table.<span class="hljs-property">dynamodbTable</span>.<span class="hljs-property">tableName</span>,
          <span class="hljs-attr">queueUrl</span>: queue.<span class="hljs-property">sqsQueue</span>.<span class="hljs-property">queueUrl</span>,
        },
      },
      <span class="hljs-attr">routes</span>: {
        <span class="hljs-string">&quot;GET  /&quot;</span>: <span class="hljs-string">&quot;src/lambda.handler&quot;</span>,
        <span class="hljs-string">&quot;GET  /hello&quot;</span>: <span class="hljs-string">&quot;src/hello.handler&quot;</span>,
        <span class="hljs-string">&quot;GET  /notes&quot;</span>: <span class="hljs-string">&quot;src/notes/getAll.handler&quot;</span>,
        <span class="hljs-string">&quot;POST /notes&quot;</span>: <span class="hljs-string">&quot;src/notes/create.handler&quot;</span>,
        <span class="hljs-string">&quot;GET  /notes/{noteId}&quot;</span>: <span class="hljs-string">&quot;src/notes/get.handler&quot;</span>,
      },
    });

    api.<span class="hljs-title function_">attachPermissions</span>([table, queue]);

    <span class="hljs-comment">// Show API endpoint in output</span>
    <span class="hljs-variable language_">this</span>.<span class="hljs-title function_">addOutputs</span>({
      <span class="hljs-title class_">ApiEndpoint</span>: api.<span class="hljs-property">httpApi</span>.<span class="hljs-property">apiEndpoint</span>,
    });
  }
}
</code></pre>
<h3 id="update-the-create-handler" tabindex="-1">Update the Create Handler</h3>
<p>Since we plan to create notes via a queue we will update our <code>create</code> function in the handler to create a new message in the <code>queue</code>, this is done using the <code>SQS</code> class from <code>aws-sdk</code>:</p>
<p><code>src/notes/create.ts</code></p>
<pre><code class="hljs language-ts"><span class="hljs-keyword">import</span> { <span class="hljs-variable constant_">SQS</span> } <span class="hljs-keyword">from</span> <span class="hljs-string">&quot;aws-sdk&quot;</span>;

<span class="hljs-keyword">const</span> queue = <span class="hljs-keyword">new</span> <span class="hljs-title function_">SQS</span>();
</code></pre>
<p>Once we've got our instance, the <code>create</code> function is done by means of the <code>queue.sendMessage</code> function:</p>
<p><code>src/notes/create.ts</code></p>
<pre><code class="hljs language-ts"><span class="hljs-keyword">const</span> <span class="hljs-title function_">create</span> = <span class="hljs-keyword">async</span> (<span class="hljs-params">queueUrl: <span class="hljs-built_in">string</span>, item: Note</span>) =&gt; {
  <span class="hljs-keyword">return</span> <span class="hljs-keyword">await</span> queue
    .<span class="hljs-title function_">sendMessage</span>({
      <span class="hljs-title class_">QueueUrl</span>: queueUrl,
      <span class="hljs-title class_">DelaySeconds</span>: <span class="hljs-number">0</span>,
      <span class="hljs-title class_">MessageBody</span>: <span class="hljs-title class_">JSON</span>.<span class="hljs-title function_">stringify</span>(item),
    })
    .<span class="hljs-title function_">promise</span>();
};
</code></pre>
<p>Lastly, our <code>handler</code> remains mostly the same with the exception of some additional validation to check that we have the <code>queue</code> connection information in the environment:</p>
<p><code>src/notes/create.ts</code></p>
<pre><code class="hljs language-ts"><span class="hljs-keyword">export</span> <span class="hljs-keyword">const</span> <span class="hljs-attr">handler</span>: <span class="hljs-title class_">APIGatewayProxyHandlerV</span>2 = <span class="hljs-keyword">async</span> (
  <span class="hljs-attr">event</span>: <span class="hljs-title class_">APIGatewayProxyEventV</span>2
) =&gt; {
  <span class="hljs-comment">// pre-save validation</span>
  <span class="hljs-keyword">if</span> (<span class="hljs-keyword">typeof</span> process.<span class="hljs-property">env</span>.<span class="hljs-property">queueUrl</span> === <span class="hljs-string">&quot;undefined&quot;</span>)
    <span class="hljs-keyword">return</span> <span class="hljs-title function_">internalErrorResponse</span>(<span class="hljs-string">&quot;queueUrl is undefined&quot;</span>);

  <span class="hljs-keyword">const</span> queueUrl = process.<span class="hljs-property">env</span>.<span class="hljs-property">queueUrl</span>;

  <span class="hljs-keyword">const</span> data = <span class="hljs-title function_">parseBody</span>(event);

  <span class="hljs-keyword">if</span> (!<span class="hljs-title function_">isValid</span>(data))
    <span class="hljs-keyword">return</span> <span class="hljs-title function_">badRequestResponse</span>(<span class="hljs-string">&quot;userId and content are required&quot;</span>);

  <span class="hljs-comment">// save process</span>
  <span class="hljs-keyword">const</span> item = <span class="hljs-title function_">toItem</span>(data.<span class="hljs-property">userId</span>, data.<span class="hljs-property">content</span>);
  <span class="hljs-keyword">const</span> creatresult = <span class="hljs-keyword">await</span> <span class="hljs-title function_">create</span>(queueUrl, item);

  <span class="hljs-keyword">if</span> (!creatresult.<span class="hljs-property">MessageId</span>) <span class="hljs-title function_">internalErrorResponse</span>(<span class="hljs-string">&quot;MessageId is undefined&quot;</span>);

  <span class="hljs-keyword">return</span> <span class="hljs-title function_">successResponse</span>(item);
};
</code></pre>
<p>Implementing the above into the <code>create</code> handler means that our <code>create.ts</code> file now looks like this:</p>
<p><code>src/notes/create.ts</code></p>
<pre><code class="hljs language-ts"><span class="hljs-keyword">import</span> { <span class="hljs-title class_">APIGatewayProxyEventV</span>2, <span class="hljs-title class_">APIGatewayProxyHandlerV</span>2 } <span class="hljs-keyword">from</span> <span class="hljs-string">&quot;aws-lambda&quot;</span>;
<span class="hljs-keyword">import</span> { v1 } <span class="hljs-keyword">from</span> <span class="hljs-string">&quot;uuid&quot;</span>;
<span class="hljs-keyword">import</span> internalErrorResponse <span class="hljs-keyword">from</span> <span class="hljs-string">&quot;../responses/internalErrorResponse&quot;</span>;
<span class="hljs-keyword">import</span> successResponse <span class="hljs-keyword">from</span> <span class="hljs-string">&quot;../responses/successResponse&quot;</span>;
<span class="hljs-keyword">import</span> badRequestResponse <span class="hljs-keyword">from</span> <span class="hljs-string">&quot;../responses/badRequestResponse&quot;</span>;
<span class="hljs-keyword">import</span> <span class="hljs-title class_">Note</span> <span class="hljs-keyword">from</span> <span class="hljs-string">&quot;./Note&quot;</span>;
<span class="hljs-keyword">import</span> { <span class="hljs-variable constant_">SQS</span> } <span class="hljs-keyword">from</span> <span class="hljs-string">&quot;aws-sdk&quot;</span>;

<span class="hljs-keyword">const</span> queue = <span class="hljs-keyword">new</span> <span class="hljs-title function_">SQS</span>();

<span class="hljs-comment">// helper functions start</span>

<span class="hljs-keyword">const</span> toItem = (<span class="hljs-attr">data</span>: <span class="hljs-built_in">string</span>, <span class="hljs-attr">content</span>: <span class="hljs-built_in">string</span>): <span class="hljs-function"><span class="hljs-params">Note</span> =&gt;</span> {
  <span class="hljs-keyword">return</span> {
    <span class="hljs-attr">userId</span>: data,
    <span class="hljs-attr">noteId</span>: <span class="hljs-title function_">v1</span>(),
    <span class="hljs-attr">content</span>: content,
    <span class="hljs-attr">createdAt</span>: <span class="hljs-title class_">Date</span>.<span class="hljs-title function_">now</span>(),
  };
};

<span class="hljs-keyword">const</span> <span class="hljs-title function_">parseBody</span> = (<span class="hljs-params">event: APIGatewayProxyEventV2</span>) =&gt; {
  <span class="hljs-keyword">const</span> data = <span class="hljs-title class_">JSON</span>.<span class="hljs-title function_">parse</span>(event.<span class="hljs-property">body</span> || <span class="hljs-string">&quot;{}&quot;</span>);

  <span class="hljs-keyword">return</span> {
    <span class="hljs-attr">userId</span>: data.<span class="hljs-property">userId</span>,
    <span class="hljs-attr">content</span>: data.<span class="hljs-property">content</span>,
  };
};

<span class="hljs-keyword">const</span> <span class="hljs-title function_">isValid</span> = (<span class="hljs-params">data: Partial&lt;Note&gt;</span>) =&gt;
  <span class="hljs-keyword">typeof</span> data.<span class="hljs-property">userId</span> !== <span class="hljs-string">&quot;undefined&quot;</span> &amp;&amp; <span class="hljs-keyword">typeof</span> data.<span class="hljs-property">content</span> !== <span class="hljs-string">&quot;undefined&quot;</span>;

<span class="hljs-comment">// helper functions end</span>

<span class="hljs-keyword">const</span> <span class="hljs-title function_">create</span> = <span class="hljs-keyword">async</span> (<span class="hljs-params">queueUrl: <span class="hljs-built_in">string</span>, item: Note</span>) =&gt; {
  <span class="hljs-keyword">return</span> <span class="hljs-keyword">await</span> queue
    .<span class="hljs-title function_">sendMessage</span>({
      <span class="hljs-title class_">QueueUrl</span>: queueUrl,
      <span class="hljs-title class_">DelaySeconds</span>: <span class="hljs-number">0</span>,
      <span class="hljs-title class_">MessageBody</span>: <span class="hljs-title class_">JSON</span>.<span class="hljs-title function_">stringify</span>(item),
    })
    .<span class="hljs-title function_">promise</span>();
};

<span class="hljs-keyword">export</span> <span class="hljs-keyword">const</span> <span class="hljs-attr">handler</span>: <span class="hljs-title class_">APIGatewayProxyHandlerV</span>2 = <span class="hljs-keyword">async</span> (
  <span class="hljs-attr">event</span>: <span class="hljs-title class_">APIGatewayProxyEventV</span>2
) =&gt; {
  <span class="hljs-comment">// pre-save validation</span>
  <span class="hljs-keyword">if</span> (<span class="hljs-keyword">typeof</span> process.<span class="hljs-property">env</span>.<span class="hljs-property">queueUrl</span> === <span class="hljs-string">&quot;undefined&quot;</span>)
    <span class="hljs-keyword">return</span> <span class="hljs-title function_">internalErrorResponse</span>(<span class="hljs-string">&quot;queueUrl is undefined&quot;</span>);

  <span class="hljs-keyword">const</span> queueUrl = process.<span class="hljs-property">env</span>.<span class="hljs-property">queueUrl</span>;

  <span class="hljs-keyword">const</span> data = <span class="hljs-title function_">parseBody</span>(event);

  <span class="hljs-keyword">if</span> (!<span class="hljs-title function_">isValid</span>(data))
    <span class="hljs-keyword">return</span> <span class="hljs-title function_">badRequestResponse</span>(<span class="hljs-string">&quot;userId and content are required&quot;</span>);

  <span class="hljs-comment">// save process</span>
  <span class="hljs-keyword">const</span> item = <span class="hljs-title function_">toItem</span>(data.<span class="hljs-property">userId</span>, data.<span class="hljs-property">content</span>);
  <span class="hljs-keyword">const</span> creatresult = <span class="hljs-keyword">await</span> <span class="hljs-title function_">create</span>(queueUrl, item);

  <span class="hljs-keyword">if</span> (!creatresult.<span class="hljs-property">MessageId</span>) <span class="hljs-title function_">internalErrorResponse</span>(<span class="hljs-string">&quot;MessageId is undefined&quot;</span>);

  <span class="hljs-keyword">return</span> <span class="hljs-title function_">successResponse</span>(item);
};
</code></pre>
<h3 id="add-queue-based-create-handler" tabindex="-1">Add Queue-Based Create Handler</h3>
<p>Now that we've updated our logic to save the notes into the <code>queue</code>, we need to add the logic for the <code>src/consumers/createNote.handler</code> consumer function as we specified above, this handler will be sent an <code>SQSEvent</code> and will make use of the DynamoDB Table we gave it permissions to use</p>
<p>First, we take the <code>create</code> function that was previously on the <code>create.ts</code> file for saving to the DB:</p>
<p><code>src/consumers/createNote.ts</code></p>
<pre><code class="hljs language-ts"><span class="hljs-keyword">import</span> { <span class="hljs-title class_">DynamoDB</span> } <span class="hljs-keyword">from</span> <span class="hljs-string">&quot;aws-sdk&quot;</span>;

<span class="hljs-keyword">const</span> db = <span class="hljs-keyword">new</span> <span class="hljs-title class_">DynamoDB</span>.<span class="hljs-title class_">DocumentClient</span>();

<span class="hljs-keyword">const</span> <span class="hljs-title function_">create</span> = <span class="hljs-keyword">async</span> (<span class="hljs-params">tableName: <span class="hljs-built_in">string</span>, item: Note</span>) =&gt; {
  <span class="hljs-keyword">const</span> createResult = <span class="hljs-keyword">await</span> db
    .<span class="hljs-title function_">put</span>({ <span class="hljs-title class_">TableName</span>: tableName, <span class="hljs-title class_">Item</span>: item })
    .<span class="hljs-title function_">promise</span>();
  <span class="hljs-keyword">if</span> (!createResult) <span class="hljs-keyword">throw</span> <span class="hljs-keyword">new</span> <span class="hljs-title class_">Error</span>(<span class="hljs-string">&quot;create failed&quot;</span>);

  <span class="hljs-keyword">return</span> createResult;
};
</code></pre>
<p>We'll also need a function for parsing the <code>SQSRecord</code> object into a <code>Note</code>:</p>
<p><code>src/consumers/createNote.ts</code></p>
<pre><code class="hljs language-ts"><span class="hljs-keyword">const</span> parseBody = (<span class="hljs-attr">record</span>: <span class="hljs-title class_">SQSRecord</span>): <span class="hljs-function"><span class="hljs-params">Note</span> =&gt;</span> {
  <span class="hljs-keyword">const</span> { noteId, userId, content, createdAt } = <span class="hljs-title class_">JSON</span>.<span class="hljs-title function_">parse</span>(
    record.<span class="hljs-property">body</span>
  ) <span class="hljs-keyword">as</span> <span class="hljs-title class_">Note</span>;

  <span class="hljs-comment">// do this to ensure we only extract information we need</span>
  <span class="hljs-keyword">return</span> {
    noteId,
    userId,
    content,
    createdAt,
  };
};
</code></pre>
<p>And finally we consume the above through the <code>handler</code>, you can see in the below code that we are iterating over the <code>event.Records</code> object, this is because the <code>SQSEvent</code> adds each new event into this array, the reason for this is because we can also specify batching into our Queue so that the handler is only triggered after <code>n</code> events instead of each time, and though this isn't happening in our case, we still should handle this for our handler:</p>
<p><code>src/consumers/createNote.ts</code></p>
<pre><code class="hljs language-ts"><span class="hljs-keyword">export</span> <span class="hljs-keyword">const</span> <span class="hljs-attr">handler</span>: <span class="hljs-title class_">SQSHandler</span> = <span class="hljs-keyword">async</span> (event) =&gt; {
  <span class="hljs-comment">// pre-save environment check</span>
  <span class="hljs-keyword">if</span> (<span class="hljs-keyword">typeof</span> process.<span class="hljs-property">env</span>.<span class="hljs-property">tableName</span> === <span class="hljs-string">&quot;undefined&quot;</span>)
    <span class="hljs-keyword">throw</span> <span class="hljs-keyword">new</span> <span class="hljs-title class_">Error</span>(<span class="hljs-string">&quot;tableName is undefined&quot;</span>);

  <span class="hljs-keyword">const</span> tableName = process.<span class="hljs-property">env</span>.<span class="hljs-property">tableName</span>;

  <span class="hljs-keyword">for</span> (<span class="hljs-keyword">let</span> i = <span class="hljs-number">0</span>; i &lt; event.<span class="hljs-property">Records</span>.<span class="hljs-property">length</span>; i++) {
    <span class="hljs-keyword">const</span> r = event.<span class="hljs-property">Records</span>[i];
    <span class="hljs-keyword">const</span> item = <span class="hljs-title function_">parseBody</span>(r);
    <span class="hljs-variable language_">console</span>.<span class="hljs-title function_">log</span>(item);

    <span class="hljs-keyword">const</span> result = <span class="hljs-keyword">await</span> <span class="hljs-title function_">create</span>(tableName, item);
    <span class="hljs-variable language_">console</span>.<span class="hljs-title function_">log</span>(result);
  }
};
</code></pre>
<p>Putting all the above together our <code>createNote.ts</code> file now has the following code:</p>
<pre><code class="hljs language-ts"><span class="hljs-keyword">import</span> { <span class="hljs-title class_">SQSHandler</span>, <span class="hljs-title class_">SQSRecord</span> } <span class="hljs-keyword">from</span> <span class="hljs-string">&quot;aws-lambda&quot;</span>;
<span class="hljs-keyword">import</span> <span class="hljs-title class_">Note</span> <span class="hljs-keyword">from</span> <span class="hljs-string">&quot;../notes/Note&quot;</span>;
<span class="hljs-keyword">import</span> { <span class="hljs-title class_">DynamoDB</span> } <span class="hljs-keyword">from</span> <span class="hljs-string">&quot;aws-sdk&quot;</span>;

<span class="hljs-keyword">const</span> db = <span class="hljs-keyword">new</span> <span class="hljs-title class_">DynamoDB</span>.<span class="hljs-title class_">DocumentClient</span>();

<span class="hljs-keyword">const</span> <span class="hljs-title function_">create</span> = <span class="hljs-keyword">async</span> (<span class="hljs-params">tableName: <span class="hljs-built_in">string</span>, item: Note</span>) =&gt; {
  <span class="hljs-keyword">const</span> createResult = <span class="hljs-keyword">await</span> db
    .<span class="hljs-title function_">put</span>({ <span class="hljs-title class_">TableName</span>: tableName, <span class="hljs-title class_">Item</span>: item })
    .<span class="hljs-title function_">promise</span>();
  <span class="hljs-keyword">if</span> (!createResult) <span class="hljs-keyword">throw</span> <span class="hljs-keyword">new</span> <span class="hljs-title class_">Error</span>(<span class="hljs-string">&quot;create failed&quot;</span>);

  <span class="hljs-keyword">return</span> createResult;
};

<span class="hljs-keyword">const</span> parseBody = (<span class="hljs-attr">record</span>: <span class="hljs-title class_">SQSRecord</span>): <span class="hljs-function"><span class="hljs-params">Note</span> =&gt;</span> {
  <span class="hljs-keyword">const</span> { noteId, userId, content, createdAt } = <span class="hljs-title class_">JSON</span>.<span class="hljs-title function_">parse</span>(
    record.<span class="hljs-property">body</span>
  ) <span class="hljs-keyword">as</span> <span class="hljs-title class_">Note</span>;

  <span class="hljs-comment">// do this to ensure we only extract information we need</span>
  <span class="hljs-keyword">return</span> {
    noteId,
    userId,
    content,
    createdAt,
  };
};

<span class="hljs-keyword">export</span> <span class="hljs-keyword">const</span> <span class="hljs-attr">handler</span>: <span class="hljs-title class_">SQSHandler</span> = <span class="hljs-keyword">async</span> (event) =&gt; {
  <span class="hljs-keyword">if</span> (<span class="hljs-keyword">typeof</span> process.<span class="hljs-property">env</span>.<span class="hljs-property">tableName</span> === <span class="hljs-string">&quot;undefined&quot;</span>)
    <span class="hljs-keyword">throw</span> <span class="hljs-keyword">new</span> <span class="hljs-title class_">Error</span>(<span class="hljs-string">&quot;tableName is undefined&quot;</span>);

  <span class="hljs-keyword">const</span> tableName = process.<span class="hljs-property">env</span>.<span class="hljs-property">tableName</span>;

  <span class="hljs-keyword">for</span> (<span class="hljs-keyword">let</span> i = <span class="hljs-number">0</span>; i &lt; event.<span class="hljs-property">Records</span>.<span class="hljs-property">length</span>; i++) {
    <span class="hljs-keyword">const</span> r = event.<span class="hljs-property">Records</span>[i];
    <span class="hljs-keyword">const</span> item = <span class="hljs-title function_">parseBody</span>(r);
    <span class="hljs-variable language_">console</span>.<span class="hljs-title function_">log</span>(item);

    <span class="hljs-keyword">const</span> result = <span class="hljs-keyword">await</span> <span class="hljs-title function_">create</span>(tableName, item);
    <span class="hljs-variable language_">console</span>.<span class="hljs-title function_">log</span>(result);
  }
};
</code></pre>
<p>This completes the implementation of the asynchronous saving mechanism for notes. As far as a consumer of our API is concerned, nothing has changed and they will still be able to use the API exactly as we had in the <a href="#testing">Testing section above</a></p>
<h1 id="deploy" tabindex="-1">Deploy</h1>
<p>Thus far, we've just been running our API in <code>debug</code> mode via the <code>npm run start</code> command, while useful for testing this adds a lot of code to make debugging possible, and isn't something we'd want in our final deployed code</p>
<p>Deploying using <code>sst</code> is still very easy, all we need to do is run the <code>npm run deploy</code> command and this will update our lambda to use a production build of the code instead:</p>
<pre><code class="hljs language-sh">npm run deploy
</code></pre>
<h1 id="teardown" tabindex="-1">Teardown</h1>
<p>Lastly, the <code>sst</code> CLI also provides us with a function to teardown our <code>start</code>/<code>deploy</code> code. So once you're done playing around you can use this to teardown all your deployed services:</p>
<pre><code class="hljs language-ts">npm run remove
</code></pre>
<blockquote>
<p>Note that running the <code>remove</code> command will not delete the DB tables, you will need to do this manually</p>
</blockquote>
]]></content>
        <author>
            <name>Nabeel Valley</name>
            <uri>https://nabeelvalley.co.za</uri>
        </author>
    </entry>
    <entry>
        <title type="html"><![CDATA[Multi-module Python project using an __init__.py file]]></title>
        <id>/blog/2021/06-05/multi-module-python-projects/</id>
        <link href="https://nabeelvalley.co.za/blog/2021/06-05/multi-module-python-projects/"/>
        <updated>2021-05-05T22:00:00.000Z</updated>
        <summary type="html"><![CDATA[How to work with modules and handle the 'ModuleNotFoundError: No module named ...' error]]></summary>
        <content type="html"><![CDATA[<p><div class="table-of-contents"><details><summary>Contents</summary><ul><li><a href="#the-modules">The Modules</a></li><li><a href="#the-main">The Main</a></li><li><a href="#the-error">The Error</a></li><li><a href="#the-solution">The Solution</a></li></ul></details></div></p>
<p>When creating a multi-module project for Python, especially when coming from another language ecosystem, you may encounter issues importing code from other files, let's take a look at this</p>
<h1 id="the-modules" tabindex="-1">The Modules</h1>
<p>In our project, we've got the following files:</p>
<pre><code class="hljs"><span class="hljs-keyword">package</span><span class="hljs-number">1</span>
  |- <span class="hljs-keyword">module</span><span class="hljs-number">1</span>.py
<span class="hljs-keyword">package</span><span class="hljs-number">2</span>
  |- namespace<span class="hljs-number">2</span>
       |- <span class="hljs-keyword">module</span><span class="hljs-number">2</span>.py
main.py
</code></pre>
<p>Let's say each of our modules export a function, here's the code for them:</p>
<p><code>package1/module1.py</code></p>
<pre><code class="hljs language-py"><span class="hljs-keyword">def</span> <span class="hljs-title function_">hello_p1_m1</span>():
  <span class="hljs-keyword">return</span> <span class="hljs-string">&quot;hello&quot;</span>
</code></pre>
<p><code>package2/subpackage1/module1.py</code></p>
<pre><code class="hljs language-py"><span class="hljs-keyword">def</span> <span class="hljs-title function_">hello_p2_s1_m1</span>():
  <span class="hljs-keyword">return</span> <span class="hljs-string">&quot;hello&quot;</span>
</code></pre>
<h1 id="the-main" tabindex="-1">The Main</h1>
<p>Now that we've got our files with their functions separated, we try using them from the <code>main.py</code> file:</p>
<p><code>main.py</code></p>
<pre><code class="hljs language-py"><span class="hljs-keyword">import</span> package1.module1 <span class="hljs-keyword">as</span> p1m1
<span class="hljs-keyword">import</span> package2.namespace1.module1 <span class="hljs-keyword">as</span> p2s1m1

<span class="hljs-built_in">print</span>(p1m1.hello_p1_m1())
<span class="hljs-built_in">print</span>(p2n1m1.hello_p2_s1_m1())
</code></pre>
<h1 id="the-error" tabindex="-1">The Error</h1>
<p>Now, we try to run this using <code>python</code>:</p>
<pre><code class="hljs language-sh">python main.py
</code></pre>
<p>And we get the following error:</p>
<pre><code class="hljs">Traceback (most recent call last):
  File <span class="hljs-string">&quot;main.py&quot;</span>, line <span class="hljs-number">1</span>, <span class="hljs-keyword">in</span> &lt;<span class="hljs-keyword">module</span>&gt;
    <span class="hljs-keyword">import</span> <span class="hljs-keyword">package</span><span class="hljs-number">1</span>.<span class="hljs-keyword">module</span><span class="hljs-number">1</span> as p<span class="hljs-number">1m</span><span class="hljs-number">1</span>
ImportError: No <span class="hljs-keyword">module</span> named <span class="hljs-keyword">package</span><span class="hljs-number">1</span>.<span class="hljs-keyword">module</span><span class="hljs-number">1</span>
</code></pre>
<h1 id="the-solution" tabindex="-1">The Solution</h1>
<p>Now, this can be pretty annoying, but the solution is very simple. Python identifies a <code>module</code> as a single file, and the assumption that leads to the issue above is that we assume a <code>package</code> has the same convention of just being a directory</p>
<p>However, a <code>packgage</code> requires an <code>__init__.py</code> file to be defined so that they are recognized correctly</p>
<p>So, we need to add two files:</p>
<ul>
<li><code>package1/__init__.py</code></li>
<li><code>package2/subpackage1/__init__.py</code></li>
</ul>
<p>Additionally, these files are completely empty, and only serve as information. Note that we don't need to include a file in <code>package2</code> directly as this directory does not contain any modules within it so is not really a package in itself and is simply a wrapper  <code>subpackage1</code></p>
]]></content>
        <author>
            <name>Nabeel Valley</name>
            <uri>https://nabeelvalley.co.za</uri>
        </author>
    </entry>
    <entry>
        <title type="html"><![CDATA[XUnit with F#]]></title>
        <id>/blog/2021/10-04/xunit-with-fsharp/</id>
        <link href="https://nabeelvalley.co.za/blog/2021/10-04/xunit-with-fsharp/"/>
        <updated>2021-04-09T22:00:00.000Z</updated>
        <summary type="html"><![CDATA[Configuring and Testing F# applications using XUnit and the .NET Core CLI]]></summary>
        <content type="html"><![CDATA[<p>An important part of writing any software is testing. Unit testing is an automated testing method in which we test individual components of our software to verify that their behaviour aligns with our expectations</p>
<p>This post will take a look at the process of setting up a new F# library and two methods of configuring XUnit to test your project's code</p>
<p><div class="table-of-contents"><details><summary>Contents</summary><ul><li><a href="#create-a-project">Create a Project</a></li><li><a href="#adding-tests">Adding Tests</a><ul><li><a href="#method-1%3A-create-tests-in-separate-project">Method 1: Create Tests in Separate Project</a></li><li><a href="#method-2%3A-create-tests-alongside-lib-files">Method 2: Create Tests Alongside Lib Files</a></li></ul></li><li><a href="#test-files">Test Files</a><ul><li><a href="#fact">Fact</a></li><li><a href="#theory">Theory</a></li></ul></li><li><a href="#running-tests">Running Tests</a></li><li><a href="#additional-resources">Additional Resources</a></li></ul></details></div></p>
<h1 id="create-a-project" tabindex="-1">Create a Project</h1>
<p>Before we can start testing we need a project that we can run tests on</p>
<p>First, we're going to create a folder that we can work in:</p>
<pre><code class="hljs language-bash"><span class="hljs-built_in">mkdir</span> MyProject
<span class="hljs-built_in">cd</span> MyProject
</code></pre>
<p>We can use the following command to create a new project in our <code>MyProject</code> directory:</p>
<pre><code class="hljs language-bash">dotnet new classlib -lang=f<span class="hljs-comment"># -o MyProject.Lib</span>
</code></pre>
<p>The project that we created will contain the following <code>Library.ts</code> file, this is the file that we'll write tests for. First, we want to update the <code>hello</code> function so that it returns a formatted string:</p>
<p><code>MyProject.Lib/Library.fs</code></p>
<pre><code class="hljs language-fs"><span class="hljs-keyword">namespace</span> MyProject.Lib

<span class="hljs-keyword">module</span> Say <span class="hljs-operator">=</span>
    <span class="hljs-keyword">let</span> hello name <span class="hljs-operator">=</span>
        <span class="hljs-built_in">sprintf</span> <span class="hljs-string">&quot;Hello %s&quot;</span> name
</code></pre>
<h1 id="adding-tests" tabindex="-1">Adding Tests</h1>
<p>Depending on our preferred project structure we can either:</p>
<ol>
<li>Add tests in a separate project</li>
<li>Add test files alongside lib files</li>
</ol>
<h2 id="method-1%3A-create-tests-in-separate-project" tabindex="-1">Method 1: Create Tests in Separate Project</h2>
<p>The standard method of .NET unit testing with XUnit is to make use of separate Project and Test solutions, so a normal test setup would look something like:</p>
<pre><code class="hljs">MyProject<span class="hljs-selector-class">.Lib</span>
MyProject<span class="hljs-selector-class">.Lib</span><span class="hljs-selector-class">.Tests</span>
</code></pre>
<p>To add an new XUnit test project you can run:</p>
<pre><code class="hljs language-bash">dotnet new xunit -lang=f<span class="hljs-comment"># -o MyProject.Tests</span>
</code></pre>
<p>Then, so we're able to test the code from <code>MyProject.Lib</code>, we need to add a reference to it from the Test project we just created:</p>
<pre><code class="hljs language-bash">dotnet add MyProject.Tests reference MyProject.Lib
</code></pre>
<p>Then we can create a file in our test project called <code>LibraryTests.fs</code> which will contain our test code which we will cover in the last section, as well as adding a reference to this file in the <code>MyProject.Tests.fsproj</code></p>
<p><code>MyProject.Tests.fsproj</code></p>
<pre><code class="hljs language-xml">...
  <span class="hljs-tag">&lt;<span class="hljs-name">ItemGroup</span>&gt;</span>
    <span class="hljs-tag">&lt;<span class="hljs-name">Compile</span> <span class="hljs-attr">Include</span>=<span class="hljs-string">&quot;Tests.fs&quot;</span> /&gt;</span>
    <span class="hljs-comment">&lt;!-- Add the next line --&gt;</span>
    <span class="hljs-tag">&lt;<span class="hljs-name">Compile</span> <span class="hljs-attr">Include</span>=<span class="hljs-string">&quot;LibraryTests.fs&quot;</span> /&gt;</span> 
    <span class="hljs-tag">&lt;<span class="hljs-name">Compile</span> <span class="hljs-attr">Include</span>=<span class="hljs-string">&quot;Program.fs&quot;</span> /&gt;</span>
  <span class="hljs-tag">&lt;/<span class="hljs-name">ItemGroup</span>&gt;</span>
...
</code></pre>
<h2 id="method-2%3A-create-tests-alongside-lib-files" tabindex="-1">Method 2: Create Tests Alongside Lib Files</h2>
<p>The second method I'm going to discuss is keeping our <code>test.fs</code> files alongside the code that the file is testing. The structure of our project is something more like this:</p>
<pre><code class="hljs language-bash">MyProject.Lib
|- Library.fs
|- Library.test.fs
</code></pre>
<p>Overall I find this more manageable is the way I keep my test code in other languages and frameworks as well</p>
<p>To implement this method we need to add some dependencies to our project</p>
<pre><code class="hljs language-bash"><span class="hljs-built_in">cd</span> MyProject.Lib
dotnet add package Microsoft.NET.Test.Sdk
dotnet add package xunit
dotnet add package xunit.runner.visualstudio
</code></pre>
<p>Then we can create a file in our project called <code>Library.test.fs</code> which will contain our test code which we will cover next, as well as a reference to this file in the <code>MyProject.Lib.fsproj</code></p>
<p><code>MyProject.Lib.fsproj</code></p>
<pre><code class="hljs language-xml">...
  <span class="hljs-tag">&lt;<span class="hljs-name">ItemGroup</span>&gt;</span>
    <span class="hljs-tag">&lt;<span class="hljs-name">Compile</span> <span class="hljs-attr">Include</span>=<span class="hljs-string">&quot;Library.fs&quot;</span> /&gt;</span>
    <span class="hljs-comment">&lt;!-- Add the next line --&gt;</span>
    <span class="hljs-tag">&lt;<span class="hljs-name">Compile</span> <span class="hljs-attr">Include</span>=<span class="hljs-string">&quot;Library.test.fs&quot;</span> /&gt;</span>
  <span class="hljs-tag">&lt;/<span class="hljs-name">ItemGroup</span>&gt;</span>
...
</code></pre>
<p>It's important to note that this file must be added below the <code>Library.fs</code> file as it will reference it for tests to run</p>
<h1 id="test-files" tabindex="-1">Test Files</h1>
<blockquote>
<p>More detailed information on XUnit can be found in <a href="/docs/dotnet/unit-testing-intro">Unit Testing notes</a></p>
</blockquote>
<p>Since we've configured XUnit it may be useful to understand how these tests work in the context of F#. XUnit tests are organized into modules. Regardless of which of the two methods above you're using the test files work the same</p>
<p>Generally, a test file will contain:</p>
<ol>
<li>A top-level module definition</li>
<li><code>open</code> statements to import XUnit</li>
<li>Test functions annotated with <code>Fact</code> or <code>Theory</code></li>
</ol>
<p>XUnit tests can be broken into 2 types:</p>
<ol>
<li>Single-case tests without input parameters inputs are labelled <code>Fact</code></li>
<li>Multi-case tests which make use of input parameters are labelled <code>Theory</code> and use <code>InlineData</code></li>
</ol>
<h2 id="fact" tabindex="-1">Fact</h2>
<p>Let's add the following content into our test file into one that tests the <code>hello</code> function from our <code>Lib</code> code with the input <code>&quot;Name&quot;</code></p>
<p><code>LibraryTests.fs/Library.test.fs</code></p>
<pre><code class="hljs language-fs"><span class="hljs-keyword">module</span> LibraryTests

<span class="hljs-keyword">open</span> Xunit
<span class="hljs-keyword">open</span> MyProject.Lib.Say

<span class="hljs-meta">[&lt;Fact&gt;]</span>
<span class="hljs-keyword">let</span> <span class="hljs-variable">``Say.hello -&gt; &quot;Hello name&quot; ``</span> () <span class="hljs-operator">=</span>
    <span class="hljs-keyword">let</span> name <span class="hljs-operator">=</span> <span class="hljs-string">&quot;name&quot;</span>
    <span class="hljs-keyword">let</span> expected <span class="hljs-operator">=</span> <span class="hljs-string">&quot;Hello name&quot;</span>
    
    <span class="hljs-keyword">let</span> result <span class="hljs-operator">=</span> hello name

    Assert.Equal(expected, result)
</code></pre>
<p>F# allows us to name our functions using special characters provided they're enclosed in backticks as seen above. Naming test functions this way allows them to be more discriptive than more traditional variable names</p>
<p>Additionally, there's the normal XUnit test setup which includes calling our test function with some input and asserting something about it using <code>Assert.Equal</code> from <code>XUnit</code></p>
<h2 id="theory" tabindex="-1">Theory</h2>
<p>We can add a <code>Theory</code> to test our function with multiple different inputs:</p>
<p><code>LibraryTests.fs/Library.test.fs</code></p>
<pre><code class="hljs language-fs"><span class="hljs-meta">[&lt;Theory&gt;]</span>
<span class="hljs-meta">[&lt;InlineData(<span class="hljs-string">&quot;name&quot;</span>, <span class="hljs-string">&quot;Hello name&quot;</span>)&gt;]</span>
<span class="hljs-meta">[&lt;InlineData(<span class="hljs-string">&quot;World&quot;</span>, <span class="hljs-string">&quot;Hello World&quot;</span>)&gt;]</span>
<span class="hljs-keyword">let</span> <span class="hljs-variable">``Say.hello -&gt; concantenated string``</span> (name<span class="hljs-operator">:</span><span class="hljs-type">string</span>, expected<span class="hljs-operator">:</span> <span class="hljs-type">string</span>) <span class="hljs-operator">=</span>
    <span class="hljs-keyword">let</span> result <span class="hljs-operator">=</span> hello name

    Assert.Equal(expected, result)

</code></pre>
<p>In the above we add the <code>InlineData</code> attribute which allows us to provide inputs to our test, as well as specifying a <code>name</code> and <code>expected</code> argument for our function. The test framework will then call our test using the arguments as specified in <code>InlineData</code></p>
<p>When we're done our test file should have the following content:</p>
<pre><code class="hljs language-fs"><span class="hljs-keyword">module</span> LibraryTests

<span class="hljs-keyword">open</span> Xunit
<span class="hljs-keyword">open</span> MyProject.Lib.Say

<span class="hljs-meta">[&lt;Fact&gt;]</span>
<span class="hljs-keyword">let</span> <span class="hljs-variable">``Say.hello -&gt; &quot;Hello name&quot; ``</span> () <span class="hljs-operator">=</span>
    <span class="hljs-keyword">let</span> name <span class="hljs-operator">=</span> <span class="hljs-string">&quot;name&quot;</span>
    <span class="hljs-keyword">let</span> expected <span class="hljs-operator">=</span> <span class="hljs-string">&quot;Hello name&quot;</span>
    
    <span class="hljs-keyword">let</span> result <span class="hljs-operator">=</span> hello name

    Assert.Equal(expected, result)

<span class="hljs-meta">[&lt;Theory&gt;]</span>
<span class="hljs-meta">[&lt;InlineData(<span class="hljs-string">&quot;name&quot;</span>, <span class="hljs-string">&quot;Hello name&quot;</span>)&gt;]</span>
<span class="hljs-meta">[&lt;InlineData(<span class="hljs-string">&quot;World&quot;</span>, <span class="hljs-string">&quot;Hello World&quot;</span>)&gt;]</span>
<span class="hljs-keyword">let</span> <span class="hljs-variable">``Say.hello -&gt; concantenated string``</span> (name<span class="hljs-operator">:</span><span class="hljs-type">string</span>, expected<span class="hljs-operator">:</span> <span class="hljs-type">string</span>) <span class="hljs-operator">=</span>
    <span class="hljs-keyword">let</span> result <span class="hljs-operator">=</span> hello name

    Assert.Equal(expected, result)
</code></pre>
<h1 id="running-tests" tabindex="-1">Running Tests</h1>
<p>In order to run tests we can use the <code>dotnet-cli</code>. Depending on the method used you can run your test from the project's root directory using the following command:</p>
<ul>
<li><strong>Method 1</strong> - <code>dotnet test MyProject.Tests</code></li>
<li><strong>Method 2</strong> - <code>dotnet test MyProject.Lib</code></li>
</ul>
<p>Alternatively, tests can also be run from your IDE or Visual Studio Code with the <code>Ionide</code> and <code>.NET Core Test Explorer</code> extensions installed</p>
<h1 id="additional-resources" tabindex="-1">Additional Resources</h1>
<p>If you'd like a deeper look into F# or XUnit here are some of my other posts which cover those:</p>
<ul>
<li><a href="/blog/2019/30-10/fsharp-webapi">Introduction to F# Web APIs</a></li>
<li><a href="/docs/dotnet/intro-to-fs">Introduction to F#</a></li>
<li><a href="/docs/dotnet/fs-entity-framework">Entity Framework with F#</a></li>
<li><a href="/docs/dotnet/unit-testing-intro">Introduction to Unit Testing</a></li>
<li><a href="/docs/dotnet/test-private-members">Testing Private Members</a></li>
</ul>
<blockquote>
<p>Nabeel Valley</p>
</blockquote>
]]></content>
        <author>
            <name>Nabeel Valley</name>
            <uri>https://nabeelvalley.co.za</uri>
        </author>
    </entry>
    <entry>
        <title type="html"><![CDATA[Control a Raspberry Pi GPIO with Python]]></title>
        <id>/blog/2021/27-03/flicker-led-with-raspberry-pi/</id>
        <link href="https://nabeelvalley.co.za/blog/2021/27-03/flicker-led-with-raspberry-pi/"/>
        <updated>2021-03-27T23:00:00.000Z</updated>
        <summary type="html"><![CDATA[Flicker and control and LED via a Raspberry Pi's GPIO Output pins using Python and RPi.GPIO]]></summary>
        <content type="html"><![CDATA[<p><div class="table-of-contents"><details><summary>Contents</summary><ul><li><a href="#circuit-diagram">Circuit Diagram</a></li><li><a href="#code">Code</a></li></ul></details></div></p>
<h1 id="circuit-diagram" tabindex="-1">Circuit Diagram</h1>
<p>This script will make use of the GPIO Pins to flicker an LED</p>
<p>The circuit diagram is below:</p>
<p><img src="/content/stdout/2021/27-03/led-circuit.png" alt="Circuit diagram"></p>
<p>I've used a <span class="katex"><span class="katex-mathml"><math><semantics><mrow><mn>3</mn><mn>3</mn><mn>0</mn><mi mathvariant="normal">Ω</mi></mrow><annotation encoding="application/x-tex">330\Omega</annotation></semantics></math></span><span class="katex-html" aria-hidden="true"><span class="strut" style="height:0.68333em;"></span><span class="strut bottom" style="height:0.68333em;vertical-align:0em;"></span><span class="base textstyle uncramped"><span class="mord mathrm">3</span><span class="mord mathrm">3</span><span class="mord mathrm">0</span><span class="mord mathrm">Ω</span></span></span></span> resistor for the resistor connected in series <span class="katex"><span class="katex-mathml"><math><semantics><mrow><msub><mi>R</mi><mi>L</mi></msub><mi>E</mi><mi>D</mi></mrow><annotation encoding="application/x-tex">R_LED</annotation></semantics></math></span><span class="katex-html" aria-hidden="true"><span class="strut" style="height:0.68333em;"></span><span class="strut bottom" style="height:0.83333em;vertical-align:-0.15em;"></span><span class="base textstyle uncramped"><span class="mord"><span class="mord mathit" style="margin-right:0.00773em;">R</span><span class="vlist"><span style="top:0.15em;margin-right:0.05em;margin-left:-0.00773em;"><span class="fontsize-ensurer reset-size5 size5"><span style="font-size:0em;">​</span></span><span class="reset-textstyle scriptstyle cramped"><span class="mord mathit">L</span></span></span><span class="baseline-fix"><span class="fontsize-ensurer reset-size5 size5"><span style="font-size:0em;">​</span></span>​</span></span></span><span class="mord mathit" style="margin-right:0.05764em;">E</span><span class="mord mathit" style="margin-right:0.02778em;">D</span></span></span></span>, however the resistance for a given LED can be calculated with this equation (From <a href="https://www.circuitspecialists.com/blog/how-to-determine-resistor-value-for-led-lighting/">Circuit Specialists</a>):</p>
<p><span class="katex-display"><span class="katex"><span class="katex-mathml"><math><semantics><mrow><msub><mi>R</mi><mrow><mi>L</mi><mi>E</mi><mi>D</mi></mrow></msub><mo>=</mo><mfrac><mrow><msub><mi>V</mi><mrow><mi>s</mi><mi>o</mi><mi>u</mi><mi>r</mi><mi>c</mi><mi>e</mi></mrow></msub><mo>−</mo><msub><mi>V</mi><mrow><mi>L</mi><mi>E</mi><mi>D</mi></mrow></msub></mrow><mrow><msub><mi>I</mi><mrow><mi>L</mi><mi>E</mi><mi>D</mi></mrow></msub></mrow></mfrac></mrow><annotation encoding="application/x-tex">R_{LED} = \frac{V_{source} - V_{LED}}{I_{LED}}
</annotation></semantics></math></span><span class="katex-html" aria-hidden="true"><span class="strut" style="height:1.36033em;"></span><span class="strut bottom" style="height:2.19633em;vertical-align:-0.8360000000000001em;"></span><span class="base displaystyle textstyle uncramped"><span class="mord"><span class="mord mathit" style="margin-right:0.00773em;">R</span><span class="vlist"><span style="top:0.15em;margin-right:0.05em;margin-left:-0.00773em;"><span class="fontsize-ensurer reset-size5 size5"><span style="font-size:0em;">​</span></span><span class="reset-textstyle scriptstyle cramped"><span class="mord scriptstyle cramped"><span class="mord mathit">L</span><span class="mord mathit" style="margin-right:0.05764em;">E</span><span class="mord mathit" style="margin-right:0.02778em;">D</span></span></span></span><span class="baseline-fix"><span class="fontsize-ensurer reset-size5 size5"><span style="font-size:0em;">​</span></span>​</span></span></span><span class="mrel">=</span><span class="mord reset-textstyle displaystyle textstyle uncramped"><span class="sizing reset-size5 size5 reset-textstyle textstyle uncramped nulldelimiter"></span><span class="mfrac"><span class="vlist"><span style="top:0.686em;"><span class="fontsize-ensurer reset-size5 size5"><span style="font-size:0em;">​</span></span><span class="reset-textstyle textstyle cramped"><span class="mord textstyle cramped"><span class="mord"><span class="mord mathit" style="margin-right:0.07847em;">I</span><span class="vlist"><span style="top:0.15em;margin-right:0.05em;margin-left:-0.07847em;"><span class="fontsize-ensurer reset-size5 size5"><span style="font-size:0em;">​</span></span><span class="reset-textstyle scriptstyle cramped"><span class="mord scriptstyle cramped"><span class="mord mathit">L</span><span class="mord mathit" style="margin-right:0.05764em;">E</span><span class="mord mathit" style="margin-right:0.02778em;">D</span></span></span></span><span class="baseline-fix"><span class="fontsize-ensurer reset-size5 size5"><span style="font-size:0em;">​</span></span>​</span></span></span></span></span></span><span style="top:-0.22999999999999998em;"><span class="fontsize-ensurer reset-size5 size5"><span style="font-size:0em;">​</span></span><span class="reset-textstyle textstyle uncramped frac-line"></span></span><span style="top:-0.677em;"><span class="fontsize-ensurer reset-size5 size5"><span style="font-size:0em;">​</span></span><span class="reset-textstyle textstyle uncramped"><span class="mord textstyle uncramped"><span class="mord"><span class="mord mathit" style="margin-right:0.22222em;">V</span><span class="vlist"><span style="top:0.15em;margin-right:0.05em;margin-left:-0.22222em;"><span class="fontsize-ensurer reset-size5 size5"><span style="font-size:0em;">​</span></span><span class="reset-textstyle scriptstyle cramped"><span class="mord scriptstyle cramped"><span class="mord mathit">s</span><span class="mord mathit">o</span><span class="mord mathit">u</span><span class="mord mathit" style="margin-right:0.02778em;">r</span><span class="mord mathit">c</span><span class="mord mathit">e</span></span></span></span><span class="baseline-fix"><span class="fontsize-ensurer reset-size5 size5"><span style="font-size:0em;">​</span></span>​</span></span></span><span class="mbin">−</span><span class="mord"><span class="mord mathit" style="margin-right:0.22222em;">V</span><span class="vlist"><span style="top:0.15em;margin-right:0.05em;margin-left:-0.22222em;"><span class="fontsize-ensurer reset-size5 size5"><span style="font-size:0em;">​</span></span><span class="reset-textstyle scriptstyle cramped"><span class="mord scriptstyle cramped"><span class="mord mathit">L</span><span class="mord mathit" style="margin-right:0.05764em;">E</span><span class="mord mathit" style="margin-right:0.02778em;">D</span></span></span></span><span class="baseline-fix"><span class="fontsize-ensurer reset-size5 size5"><span style="font-size:0em;">​</span></span>​</span></span></span></span></span></span><span class="baseline-fix"><span class="fontsize-ensurer reset-size5 size5"><span style="font-size:0em;">​</span></span>​</span></span></span><span class="sizing reset-size5 size5 reset-textstyle textstyle uncramped nulldelimiter"></span></span></span></span></span></span></p>
<blockquote>
<p>It's important to connect the LED in the correct direction on the circuit</p>
</blockquote>
<h1 id="code" tabindex="-1">Code</h1>
<p>Below is a simple python script which will handle turning the GPIO pins on and off using the <a href="https://pypi.org/project/RPi.GPIO/">RPi.GPIO</a> library</p>
<pre><code class="hljs language-py"><span class="hljs-keyword">import</span> RPi.GPIO <span class="hljs-keyword">as</span> GPIO
<span class="hljs-keyword">import</span> time

pin = <span class="hljs-number">21</span>
dur = <span class="hljs-number">1</span>

GPIO.setmode(GPIO.BCM)
GPIO.setwarnings(<span class="hljs-literal">False</span>)
GPIO.setup(pin, GPIO.OUT)

<span class="hljs-keyword">while</span> <span class="hljs-literal">True</span>:
  GPIO.output(pin, GPIO.HIGH)
  <span class="hljs-built_in">print</span> <span class="hljs-string">&quot;LED ON&quot;</span>
  time.sleep(dur)

  GPIO.output(pin, GPIO.LOW)
  <span class="hljs-built_in">print</span> <span class="hljs-string">&quot;LED OFF&quot;</span>
  time.sleep(dur)
</code></pre>
]]></content>
        <author>
            <name>Nabeel Valley</name>
            <uri>https://nabeelvalley.co.za</uri>
        </author>
    </entry>
    <entry>
        <title type="html"><![CDATA[Custom Styles in Markdown]]></title>
        <id>/blog/2021/23-03/custom-styles-in-markdown/</id>
        <link href="https://nabeelvalley.co.za/blog/2021/23-03/custom-styles-in-markdown/"/>
        <updated>2021-03-22T23:00:00.000Z</updated>
        <summary type="html"><![CDATA[Add styles for specific HTML elements in a markdown document]]></summary>
        <content type="html"><![CDATA[<p><div class="table-of-contents"><details><summary>Contents</summary><ul></ul></details></div></p>
<p>When working with markdown it can often be useful to be able to style elements using custom CSS</p>
<p>We can accomplish this by including a <code>style</code> tag. An example to illustrate this is changing the way a table renders in a specific document by changing the style of table rows to be striped, you would include the following CSS:</p>
<pre><code class="hljs language-css">&lt;style&gt;
<span class="hljs-selector-tag">tr</span><span class="hljs-selector-pseudo">:nth-child</span>(even) {
  <span class="hljs-attribute">background-color</span>: <span class="hljs-number">#b2b2b2</span>;
  <span class="hljs-attribute">color</span>: <span class="hljs-number">#f4f4f4</span>;
}
&lt;/style&gt;
</code></pre>
<p>If the platform you're displaying the HTML in already has the styles included then you may need to add <code>!important</code> to override in the CSS:</p>
<pre><code class="hljs language-css">&lt;style&gt;
<span class="hljs-selector-tag">tr</span><span class="hljs-selector-pseudo">:nth-child</span>(even) {
  <span class="hljs-attribute">background-color</span>: <span class="hljs-number">#b2b2b2</span><span class="hljs-meta">!important</span>;
  <span class="hljs-attribute">color</span>: <span class="hljs-number">#f4f4f4</span><span class="hljs-meta">!important</span>;
}
&lt;/style&gt;
</code></pre>
<p><code>my-sample-doc.md</code></p>
<pre><code class="hljs language-md"><span class="hljs-section"># Custom CSS in Markdown Example</span>

This is a document where tables are rendered with every second table row with a specific background and foreground colour 

<span class="language-xml"><span class="hljs-tag">&lt;<span class="hljs-name">style</span>&gt;</span></span>
tr:nth-child(even) {
  background-color: #b2b2b2!important;
  color: #f4f4f4!important;
}
<span class="language-xml"><span class="hljs-tag">&lt;/<span class="hljs-name">style</span>&gt;</span></span>

The above CSS will lead to the following table being rendered with alternating row colours:

| Col 1 | Col 2 | Col 3 |
| ----- | ----- | ----- |
| A     | B     | C     |
| 1     | 2     | 3     |
| A1    | B2    | C3    |
</code></pre>
<blockquote>
<p>Note that depending on your markdown renderer the embeded style tags may be removed, you'll have to look at your specific renderer/converter/platform to see whether this works for you</p>
</blockquote>
<p>With the converter I'm using, <code>showdown.js</code>, this is how the table above looks (with <code>!important</code> included to override my current table styles):</p>
<style>
tr:nth-child(even) {
  background-color: #b2b2b2!important;
  color: #f4f4f4!important;
}
</style>
<table>
<thead>
<tr>
<th>Col 1</th>
<th>Col 2</th>
<th>Col 3</th>
</tr>
</thead>
<tbody>
<tr>
<td>A</td>
<td>B</td>
<td>C</td>
</tr>
<tr>
<td>1</td>
<td>2</td>
<td>3</td>
</tr>
<tr>
<td>A1</td>
<td>B2</td>
<td>C3</td>
</tr>
</tbody>
</table>
]]></content>
        <author>
            <name>Nabeel Valley</name>
            <uri>https://nabeelvalley.co.za</uri>
        </author>
    </entry>
    <entry>
        <title type="html"><![CDATA[Render Element by Tag Name in React]]></title>
        <id>/blog/2021/19-03/render-component-by-tag-name-react/</id>
        <link href="https://nabeelvalley.co.za/blog/2021/19-03/render-component-by-tag-name-react/"/>
        <updated>2021-03-18T23:00:00.000Z</updated>
        <summary type="html"><![CDATA[Dynamically render a React Element given the name of the corresponding HTML element]]></summary>
        <content type="html"><![CDATA[<p><div class="table-of-contents"><details><summary>Contents</summary><ul></ul></details></div></p>
<p>When using React it can sometimes be useful to render a standard HTML element given the element name dynamically as a prop</p>
<p>React allows us to do this provided we store the element name in a variable that starts with a capital letter, as JSX requires this to render a custom element</p>
<p>We can do something like this by defining a generic element in React which just takes in the name of the tag in addition to it's usual props and children, something like this:</p>
<pre><code class="hljs language-jsx"><span class="hljs-keyword">const</span> <span class="hljs-title function_">GenericElement</span> = (<span class="hljs-params">{ tagName:Tag, children, ...innerProps}</span>) =&gt; 
  <span class="language-xml"><span class="hljs-tag">&lt;<span class="hljs-name">Tag</span> {<span class="hljs-attr">...innerProps</span>}&gt;</span> 
    {children}
  <span class="hljs-tag">&lt;/<span class="hljs-name">Tag</span>&gt;</span></span>
</code></pre>
<p>We can then render this element by calling the <code>GenericElement</code> with the <code>tagName</code> prop and then any children we'd like:</p>
<pre><code class="hljs language-jsx">&lt;<span class="hljs-title class_">GenericElement</span> tagName=<span class="hljs-string">&quot;h1&quot;</span>&gt;I am an h1&lt;/<span class="hljs-title class_">GenericElement</span>&gt;
</code></pre>
<p>Here's a short example using <a href="https://replit.com/@nabeelvalley/render-by-element-name#src/App.jsx">Replit</a> for reference, all the important stuff is in the <code>src/App.jsx</code> file:</p>
<iframe height="700px" width="100%" src="https://replit.com/@nabeelvalley/render-by-element-name?lite=true" scrolling="no" frameborder="no" allowtransparency="true" allowfullscreen="true" sandbox="allow-forms allow-pointer-lock allow-popups allow-same-origin allow-scripts allow-modals"></iframe>]]></content>
        <author>
            <name>Nabeel Valley</name>
            <uri>https://nabeelvalley.co.za</uri>
        </author>
    </entry>
    <entry>
        <title type="html"><![CDATA[Setup HomeAssistant RaspberryPi with WiFi configured]]></title>
        <id>/blog/2021/09-03/configure-home-assistant-raspberrypi-wifi/</id>
        <link href="https://nabeelvalley.co.za/blog/2021/09-03/configure-home-assistant-raspberrypi-wifi/"/>
        <updated>2021-03-08T23:00:00.000Z</updated>
        <summary type="html"><![CDATA[Enable a HomeAssistant flashed RaspberryPi to operate over WiFi using config files]]></summary>
        <content type="html"><![CDATA[<p><div class="table-of-contents"><details><summary>Contents</summary><ul></ul></details></div></p>
<p>A short lil guide to setting up Home Assistant on a RaspberryPi using WiFi instead of Ethernet</p>
<ol>
<li>Download Balena Etcher and install from <a href="https://www.balena.io/etcher/">here</a></li>
<li>Go to the HomeAssistant website and copy the relevant release URL from <a href="https://github.com/home-assistant/operating-system/releases/download/5.12/hassos_rpi3-64-5.12.img.xz">here</a></li>
<li>Connect your RaspberryPi's SD card to your computer</li>
<li>Open Balena Etcher and select <code>Flash from URL</code> and select the RaspberryPi's SD to flash to</li>
<li>Once flashing is complete, open the RaspberryPi's SD in File Explorer, and create the following file:</li>
</ol>
<p><code>RASPBERRYPIDRIVE/CONFIG/network/my-network</code></p>
<pre><code class="hljs">!cat .\my-network
[connection]
<span class="hljs-attribute">id</span>=my-network
<span class="hljs-attribute">uuid</span>=72111c67-4a5d-4d5c-925e-f8ee26efb3c3
<span class="hljs-attribute">type</span>=802-11-wireless
[802-11-wireless]
<span class="hljs-attribute">ssid</span>=YOUR_WIFI_NETWORK_NAME
<span class="hljs-comment">#hidden=true</span>

[802-11-wireless-security]
<span class="hljs-attribute">auth-alg</span>=open
<span class="hljs-attribute">key-mgmt</span>=wpa-psk
<span class="hljs-attribute">psk</span>=YOUR_WIFI_PASSWORD

[ipv4]
<span class="hljs-attribute">method</span>=auto

[ipv6]
<span class="hljs-attribute">addr-gen-mode</span>=stable-privacy
<span class="hljs-attribute">method</span>=auto
</code></pre>
<blockquote>
<p>Be sure to use <code>LF</code> line endings, additional information on this setup can be found <a href="https://github.com/home-assistant/operating-system/blob/dev/Documentation/network.md">on GitHub</a></p>
</blockquote>
]]></content>
        <author>
            <name>Nabeel Valley</name>
            <uri>https://nabeelvalley.co.za</uri>
        </author>
    </entry>
    <entry>
        <title type="html"><![CDATA[Serialize a JsonValue Array using F# and FSharp.Data's JsonProvider]]></title>
        <id>/blog/2021/01-03/serialize-jsonvalue-array-fsharp/</id>
        <link href="https://nabeelvalley.co.za/blog/2021/01-03/serialize-jsonvalue-array-fsharp/"/>
        <updated>2021-02-02T23:00:00.000Z</updated>
        <summary type="html"><![CDATA[Making use of the FSharp.Data JsonProvider and the serialization of JsonProvider arrays into JSON]]></summary>
        <content type="html"><![CDATA[<p><div class="table-of-contents"><details><summary>Contents</summary><ul></ul></details></div></p>
<p>When working with the <code>FSharp.Data.JsonProvider</code> type provider you may encounter a need to serialize a <code>JsonValue array</code></p>
<p>Let's take a look at an example where this may be necessary:</p>
<p>First, we'll define the type of our data using a type provider, in this case it's connected to the following:</p>
<p><code>data/api-response.json</code></p>
<pre><code class="hljs language-json"><span class="hljs-punctuation">{</span>
  <span class="hljs-attr">&quot;data&quot;</span><span class="hljs-punctuation">:</span> <span class="hljs-punctuation">[</span>
      <span class="hljs-punctuation">{</span>
          <span class="hljs-attr">&quot;id&quot;</span><span class="hljs-punctuation">:</span> <span class="hljs-string">&quot;id&quot;</span><span class="hljs-punctuation">,</span>
          <span class="hljs-attr">&quot;caption&quot;</span><span class="hljs-punctuation">:</span> <span class="hljs-string">&quot;caption&quot;</span><span class="hljs-punctuation">,</span>
          <span class="hljs-attr">&quot;media_type&quot;</span><span class="hljs-punctuation">:</span> <span class="hljs-string">&quot;IMAGE&quot;</span><span class="hljs-punctuation">,</span>
          <span class="hljs-attr">&quot;media_url&quot;</span><span class="hljs-punctuation">:</span> <span class="hljs-string">&quot;url_to_image&quot;</span>
      <span class="hljs-punctuation">}</span>
  <span class="hljs-punctuation">]</span><span class="hljs-punctuation">,</span>
  <span class="hljs-attr">&quot;paging&quot;</span><span class="hljs-punctuation">:</span> <span class="hljs-punctuation">{</span>
      <span class="hljs-attr">&quot;cursors&quot;</span><span class="hljs-punctuation">:</span> <span class="hljs-punctuation">{</span>
          <span class="hljs-attr">&quot;before&quot;</span><span class="hljs-punctuation">:</span> <span class="hljs-string">&quot;hash&quot;</span><span class="hljs-punctuation">,</span>
          <span class="hljs-attr">&quot;after&quot;</span><span class="hljs-punctuation">:</span> <span class="hljs-string">&quot;hash&quot;</span>
      <span class="hljs-punctuation">}</span><span class="hljs-punctuation">,</span>
      <span class="hljs-attr">&quot;next&quot;</span><span class="hljs-punctuation">:</span> <span class="hljs-string">&quot;full_request_url&quot;</span>
  <span class="hljs-punctuation">}</span>
<span class="hljs-punctuation">}</span>
</code></pre>
<p>And the F# file that's using this as the basis for the type definition is as follows:</p>
<pre><code class="hljs language-fs"><span class="hljs-keyword">open</span> FSharp.Data

<span class="hljs-keyword">type</span> <span class="hljs-title class_">ApiResponse</span> <span class="hljs-operator">=</span> JsonProvider<span class="hljs-operator">&lt;</span><span class="hljs-string">&quot;./data/api-response.json&quot;</span>, SampleIsList<span class="hljs-operator">=</span><span class="hljs-literal">true</span><span class="hljs-operator">&gt;</span>
</code></pre>
<p>We can also create some sample data using the <code>ApiResponse.Parse</code> method that's now defined on our type thanks to the JsonProvider</p>
<pre><code class="hljs language-fs"><span class="hljs-comment">// get some sample data</span>
<span class="hljs-keyword">let</span> sampleData <span class="hljs-operator">=</span> ApiResponse.Parse(<span class="hljs-string">&quot;&quot;&quot;{
  &quot;data&quot;: [
      {
          &quot;id&quot;: &quot;id&quot;,
          &quot;caption&quot;: &quot;caption&quot;,
          &quot;media_type&quot;: &quot;IMAGE&quot;,
          &quot;media_url&quot;: &quot;url_to_image&quot;
      }
  ],
  &quot;paging&quot;: {
      &quot;cursors&quot;: {
          &quot;before&quot;: &quot;hash&quot;,
          &quot;after&quot;: &quot;hash&quot;
      },
      &quot;next&quot;: &quot;full_request_url&quot;
  }
}&quot;&quot;&quot;</span>)
</code></pre>
<p>If you were to use the <code>sampleData</code> object and try to parse it to JSON you could directly call the <code>sampleData.JsonValue.ToString()</code> method. As designed, this immediately returns the JSON representation of the object</p>
<p>However, when we take a look at the <code>sampleData.Data</code> property, we will notice this is a <code>Datum array</code>, the problem here is that the <code>array</code> type doesn't have <code>JsonValue</code> property</p>
<p>However, if we look at how <code>JsonValue</code> is defined we will see the following:</p>
<pre><code class="hljs language-fs">union JsonValue <span class="hljs-operator">=</span>
  <span class="hljs-operator">|</span> String <span class="hljs-keyword">of</span> <span class="hljs-type">string</span>
  <span class="hljs-operator">|</span> Number <span class="hljs-keyword">of</span> <span class="hljs-type">decimal</span>
  <span class="hljs-operator">|</span> Float <span class="hljs-keyword">of</span> <span class="hljs-type">float</span>
  <span class="hljs-operator">|</span> Record <span class="hljs-keyword">of</span> properties <span class="hljs-operator">:</span> (<span class="hljs-type">string</span> <span class="hljs-operator">*</span> JsonValue) <span class="hljs-type">array</span>
  <span class="hljs-operator">|</span> Array <span class="hljs-keyword">of</span> elements <span class="hljs-operator">:</span> JsonValue <span class="hljs-type">array</span>
  <span class="hljs-operator">|</span> Boolean <span class="hljs-keyword">of</span> <span class="hljs-type">bool</span>
  <span class="hljs-operator">|</span> Null
</code></pre>
<p>Based on this, we can see that an <code>Array of elements</code> can be seen as a <code>JsonValue array</code>, using this information, we can make use of the <code>JsonValue.Array</code> constructor and the <code>JsonValue</code> property of each of the elements of the <code>Data</code> property to convert the <code>JsonValue array</code> to a <code>JsonValue</code></p>
<pre><code class="hljs language-fs"><span class="hljs-keyword">let</span> jsonValue <span class="hljs-operator">=</span>
    <span class="hljs-comment">// get the property we want</span>
    sampleData.Data 
    <span class="hljs-comment">// extract the JsonValue property from each element</span>
    <span class="hljs-operator">|&gt;</span> Array.map (<span class="hljs-keyword">fun</span> p <span class="hljs-operator">-&gt;</span> p.JsonValue)
    <span class="hljs-comment">// pass into the JsonValue.Array constructor</span>
    <span class="hljs-operator">|&gt;</span> JsonValue.Array

<span class="hljs-keyword">let</span> json <span class="hljs-operator">=</span> jsonValue.ToString()
</code></pre>
]]></content>
        <author>
            <name>Nabeel Valley</name>
            <uri>https://nabeelvalley.co.za</uri>
        </author>
    </entry>
    <entry>
        <title type="html"><![CDATA[Jenkins: A Git process may have crashed in the repository]]></title>
        <id>/blog/2021/03-02/jenkins-git-process-crashed/</id>
        <link href="https://nabeelvalley.co.za/blog/2021/03-02/jenkins-git-process-crashed/"/>
        <updated>2021-02-02T23:00:00.000Z</updated>
        <summary type="html"><![CDATA[Repair an issue preventing Jenkins from running Git processes]]></summary>
        <content type="html"><![CDATA[<p><div class="table-of-contents"><details><summary>Contents</summary><ul></ul></details></div></p>
<blockquote>
<p>Taken from <a href="https://stackoverflow.com/questions/38004148/another-git-process-seems-to-be-running-in-this-repository">this StackOverflow answer</a></p>
</blockquote>
<pre><code class="hljs">Another git <span class="hljs-built_in">process</span> seems <span class="hljs-built_in">to</span> be running <span class="hljs-keyword">in</span> this repository, e.g.
<span class="hljs-keyword">an</span> edirot opened <span class="hljs-keyword">by</span> <span class="hljs-string">&#x27;git commit&#x27;</span>. Please make sure all processes
are terminated <span class="hljs-keyword">then</span> <span class="hljs-keyword">try</span> again. If <span class="hljs-keyword">it</span> still fails, <span class="hljs-keyword">a</span> git <span class="hljs-built_in">process</span>
may have crashed <span class="hljs-keyword">in</span> this repository earlier:
remove <span class="hljs-keyword">the</span> <span class="hljs-built_in">file</span> manually <span class="hljs-built_in">to</span> continue
</code></pre>
<p>Sometimes when using Jenkins a Git process may crash or timeout resulting in an error message like the above one. This can result in issues when running later Git steps or running other Git steps in the repository in the Jenkins workspace</p>
<p>The simplest way I've found to fix this is to simply delete the <code>.git/index.lock</code> or <code>.git/shallow.lock</code> file from the workspace that's giving the issue and run again</p>
]]></content>
        <author>
            <name>Nabeel Valley</name>
            <uri>https://nabeelvalley.co.za</uri>
        </author>
    </entry>
    <entry>
        <title type="html"><![CDATA[Custom Attributes in C# Web Controllers]]></title>
        <id>/blog/2020/17-12/csharp-webapi-custom-attributes/</id>
        <link href="https://nabeelvalley.co.za/blog/2020/17-12/csharp-webapi-custom-attributes/"/>
        <updated>2020-12-16T23:00:00.000Z</updated>
        <summary type="html"><![CDATA[Modify controller behaviour using Attributes]]></summary>
        <content type="html"><![CDATA[<p>Implementing an attribute for a WebAPI or class in C# can help to reduce duplication and centralize parts of the application logic. This could be used for a variety of tasks such as logging information when methods are called as well as managinng authorization</p>
<p>In this post I'm going to cover the following:</p>
<p><div class="table-of-contents"><details><summary>Contents</summary><ul><li><a href="#attribute-types-and-execution-order">Attribute Types and Execution Order</a><ul><li><a href="#iactionfilter">IActionFilter</a></li><li><a href="#iauthorizationfilter">IAuthorizationFilter</a></li></ul></li><li><a href="#modify-response-data">Modify Response Data</a></li><li><a href="#attribute-on-a-class">Attribute on a Class</a></li><li><a href="#attributes-with-input-parameters">Attributes with Input Parameters</a></li><li><a href="#attribute-setting-at-class-and-method-level">Attribute Setting at Class and Method Level</a></li></ul></details></div></p>
<h1 id="attribute-types-and-execution-order" tabindex="-1">Attribute Types and Execution Order</h1>
<p>There are a few different attribute types that we can handle on a WebAPI that provide us with the ability to wrap some functionality around our endpoints, below are some of the common attributes that we can implement and the order in which they execute (<a href="https://stackoverflow.com/questions/19249511/difference-between-iactionfilter-and-iauthorizationfilter">StackOverflow</a>)</p>
<ol>
<li>Authorization - <code>IAuthorizationFilter</code></li>
<li>Action - <code>IActionFilter</code></li>
<li>Result - <code>IResultFilter</code></li>
<li>Exception - <code>IExceptionFilter</code></li>
</ol>
<h2 id="iactionfilter" tabindex="-1">IActionFilter</h2>
<p>The <code>IActionFilter</code> executes before and after a method is executed and contains two different methods for doing this, namely the <code>OnActionExecuting</code> and <code>OnActionExecuted</code> methods respectively. A basic implemtation of <code>IActionFilter</code> would look like this:</p>
<pre><code class="hljs language-cs"><span class="hljs-keyword">namespace</span> <span class="hljs-title">CSharpAttributes.Attributes</span>
{
  <span class="hljs-keyword">public</span> <span class="hljs-keyword">class</span> <span class="hljs-title">LogStatusAttribute</span> : <span class="hljs-title">Attribute</span>, <span class="hljs-title">IActionFilter</span>
  {
    <span class="hljs-function"><span class="hljs-keyword">public</span> <span class="hljs-title">LogStatusAttribute</span>()</span>
    {
      Console.WriteLine(<span class="hljs-string">&quot;Attribute Initialized&quot;</span>);
    }

    <span class="hljs-function"><span class="hljs-keyword">public</span> <span class="hljs-keyword">void</span> <span class="hljs-title">OnActionExecuting</span>(<span class="hljs-params">ActionExecutingContext context</span>)</span>
    {
      Console.WriteLine(<span class="hljs-string">&quot;OnActionExecuting&quot;</span>);
    }

    <span class="hljs-function"><span class="hljs-keyword">public</span> <span class="hljs-keyword">void</span> <span class="hljs-title">OnActionExecuted</span>(<span class="hljs-params">ActionExecutedContext context</span>)</span>
    {
      Console.WriteLine(<span class="hljs-string">&quot;OnActionExecuted&quot;</span>);
    }
  }
}
</code></pre>
<p>This can then be implemented on a controller method with a <code>[LogStatus]</code> attribute:</p>
<pre><code class="hljs language-cs">[<span class="hljs-meta">LogStatus</span>]
[<span class="hljs-meta">HttpGet</span>]
<span class="hljs-function"><span class="hljs-keyword">public</span> IEnumerable&lt;WeatherForecast&gt; <span class="hljs-title">Get</span>()</span>
{
  Console.WriteLine(<span class="hljs-string">&quot;Executing Get&quot;</span>);
  <span class="hljs-keyword">return</span> data;
}
</code></pre>
<p>The order of logging which we see will be as follows:</p>
<ol>
<li><code>Attribute Initialized</code> when the controller is instantiated</li>
<li><code>OnActionExecuting</code> when the controller is called</li>
<li><code>Executing Get</code> when the controller is executed</li>
<li><code>OnActionExecuted</code> when the controller is done executing</li>
</ol>
<h2 id="iauthorizationfilter" tabindex="-1">IAuthorizationFilter</h2>
<p>The <code>IAuthorizationFilter</code> executes as the first filter on a controller's method call</p>
<pre><code class="hljs language-cs"><span class="hljs-keyword">namespace</span> <span class="hljs-title">CSharpAttributes.Attributes</span>
{
  <span class="hljs-keyword">public</span> <span class="hljs-keyword">class</span> <span class="hljs-title">CustomAuthorizeAttribute</span> : <span class="hljs-title">Attribute</span>, <span class="hljs-title">IAuthorizationFilter</span>
  {
    <span class="hljs-function"><span class="hljs-keyword">public</span> <span class="hljs-title">CustomAuthorizeAttribute</span>()</span>
    {
      Console.WriteLine(<span class="hljs-string">&quot;Attribute Initialized&quot;</span>);
    }

    <span class="hljs-function"><span class="hljs-keyword">public</span> <span class="hljs-keyword">void</span> <span class="hljs-title">OnAuthorization</span>(<span class="hljs-params">AuthorizationFilterContext context</span>)</span>
    {
      Console.WriteLine(<span class="hljs-string">&quot;OnAuthorization&quot;</span>);
    }
  }
}
</code></pre>
<p>This can then be implemented on a controller method with a <code>[CustomAuthorize]</code> attribute:</p>
<pre><code class="hljs language-cs">[<span class="hljs-meta">CustomAuthorize</span>]
[<span class="hljs-meta">HttpGet</span>]
<span class="hljs-function"><span class="hljs-keyword">public</span> IEnumerable&lt;WeatherForecast&gt; <span class="hljs-title">Get</span>()</span>
{
  Console.WriteLine(<span class="hljs-string">&quot;Executing Get&quot;</span>);
  <span class="hljs-keyword">return</span> data;
}
</code></pre>
<p>The order of logging which we see will be as follows:</p>
<ol>
<li><code>Attribute Initialized</code> when the controller is instantiated</li>
<li><code>OnAuthorization</code> when the controller is called</li>
<li><code>Executing Get</code> when the controller is executed</li>
</ol>
<h1 id="modify-response-data" tabindex="-1">Modify Response Data</h1>
<p>An attribute's <code>context</code> parameter gives us ways by which we can access the <code>HttpContext</code> as well as set the result of a method call so that it can be handled down the line. For example, we can implement our CustomAuthorize attribute with the following:</p>
<pre><code class="hljs language-cs"><span class="hljs-function"><span class="hljs-keyword">public</span> <span class="hljs-keyword">void</span> <span class="hljs-title">OnAuthorization</span>(<span class="hljs-params">AuthorizationFilterContext context</span>)</span>
{
  <span class="hljs-keyword">if</span> (!context.HttpContext.Request.Headers.ContainsKey(<span class="hljs-string">&quot;X-Custom-Auth&quot;</span>))
  {
    context.Result = <span class="hljs-keyword">new</span> UnauthorizedResult();
  }

  Console.WriteLine(<span class="hljs-string">&quot;Attribute Called&quot;</span>);
}
</code></pre>
<p>This will mean that if we set the <code>context.Result</code> in our method then the controller will not be executed and the endpoint will return the <code>UnauthorizedResult</code> early. You can also see that we're able to access things like the <code>HttpContext</code> which makes it easy for us to view the request/response data and do things based on that</p>
<h1 id="attribute-on-a-class" tabindex="-1">Attribute on a Class</h1>
<p>Note that it's also possible to apply the above to each method in a class by adding the attribute at the top of the class declaration:</p>
<pre><code class="hljs language-cs">[<span class="hljs-meta">ApiController</span>]
[<span class="hljs-meta">LogStatus</span>]
[<span class="hljs-meta">Route(<span class="hljs-string">&quot;[controller]&quot;</span>)</span>]
<span class="hljs-keyword">public</span> <span class="hljs-keyword">class</span> <span class="hljs-title">WeatherForecastController</span> : <span class="hljs-title">ControllerBase</span>
{
  ...
</code></pre>
<h1 id="attributes-with-input-parameters" tabindex="-1">Attributes with Input Parameters</h1>
<p>We are also able to create attributes that enable the consumer to modify their behaviour by taking input parameters to the constructor, we can update our <code>LogStatus</code> attribute to do something like add a prefix before all logs:</p>
<pre><code class="hljs language-cs"><span class="hljs-keyword">namespace</span> <span class="hljs-title">CSharpAttributes.Attributes</span>
{
  <span class="hljs-keyword">public</span> <span class="hljs-keyword">class</span> <span class="hljs-title">LogStatusAttribute</span> : <span class="hljs-title">Attribute</span>, <span class="hljs-title">IActionFilter</span>
  {
    <span class="hljs-keyword">private</span> <span class="hljs-keyword">readonly</span> <span class="hljs-built_in">string</span> _prefix;

    <span class="hljs-function"><span class="hljs-keyword">public</span> <span class="hljs-title">LogStatusAttribute</span>(<span class="hljs-params"><span class="hljs-built_in">string</span> prefix = <span class="hljs-string">&quot;&quot;</span></span>)</span>
    {
      _prefix = prefix;
      Console.WriteLine(<span class="hljs-string">&quot;Attribute Initialized&quot;</span>);
    }

    <span class="hljs-function"><span class="hljs-keyword">public</span> <span class="hljs-keyword">void</span> <span class="hljs-title">OnActionExecuted</span>(<span class="hljs-params">ActionExecutedContext context</span>)</span>
    {
      Console.WriteLine(_prefix + <span class="hljs-string">&quot;OnActionExecuted&quot;</span>);
    }

    <span class="hljs-function"><span class="hljs-keyword">public</span> <span class="hljs-keyword">void</span> <span class="hljs-title">OnActionExecuting</span>(<span class="hljs-params">ActionExecutingContext context</span>)</span>
    {
      Console.WriteLine(_prefix + <span class="hljs-string">&quot;OnActionExecuting&quot;</span>);
    }
  }
}
</code></pre>
<p>Then, applying to our controller method like so:</p>
<pre><code class="hljs language-cs">[<span class="hljs-meta">LogStatus(<span class="hljs-string">&quot;WeatherController-Get:&quot;</span>)</span>]
[<span class="hljs-meta">HttpGet</span>]
<span class="hljs-function"><span class="hljs-keyword">public</span> IEnumerable&lt;WeatherForecast&gt; <span class="hljs-title">Get</span>()</span>
{
  Console.WriteLine(<span class="hljs-string">&quot;Executing Get&quot;</span>);
  <span class="hljs-keyword">return</span> data;
}
</code></pre>
<p>So the new output will look like so:</p>
<ol>
<li><code>Attribute Initialized</code> when the controller is instantiated</li>
<li><code>WeatherForecast-Get:OnActionExecuting</code> when the controller is called</li>
<li><code>Executing Get</code> when the controller is executed</li>
<li><code>WeatherForecast-Get:OnActionExecuted</code> when the controller is done executing</li>
</ol>
<h1 id="attribute-setting-at-class-and-method-level" tabindex="-1">Attribute Setting at Class and Method Level</h1>
<p>Since an attribute can be implemented at a class and method level it's useful for us to be able to implement it at a class and the override the behaviour or add behaviour for a specific method</p>
<p>We can do this by setting the attribute inheritence to <code>false</code></p>
<p>Updating out <code>LogStatusAttribute</code> we can add the  <code>AttributeUsage</code> Attribute as follows:</p>
<pre><code class="hljs language-cs"><span class="hljs-keyword">namespace</span> <span class="hljs-title">CSharpAttributes.Attributes</span>
{
  [<span class="hljs-meta">AttributeUsage(AttributeTargets.All, Inherited = false)</span>]
  <span class="hljs-keyword">public</span> <span class="hljs-keyword">class</span> <span class="hljs-title">LogStatusAttribute</span> : <span class="hljs-title">Attribute</span>, <span class="hljs-title">IActionFilter</span>
  {
    ...
</code></pre>
<p>This means that we can independently apply the attribute at class and method levels, so now our controller can look something like this:</p>
<pre><code class="hljs language-cs"><span class="hljs-keyword">namespace</span> <span class="hljs-title">CSharpAttributes.Controllers</span>
{
  [<span class="hljs-meta">ApiController</span>]
  [<span class="hljs-meta">Route(<span class="hljs-string">&quot;[controller]&quot;</span>)</span>]
  [<span class="hljs-meta">LogStatus(<span class="hljs-string">&quot;WeatherForecast:&quot;</span>)</span>]
  <span class="hljs-keyword">public</span> <span class="hljs-keyword">class</span> <span class="hljs-title">WeatherForecastController</span> : <span class="hljs-title">ControllerBase</span>
  {
    [<span class="hljs-meta">LogStatus(<span class="hljs-string">&quot;Get:&quot;</span>)</span>]
    [<span class="hljs-meta">HttpGet</span>]
    <span class="hljs-function"><span class="hljs-keyword">public</span> IEnumerable&lt;WeatherForecast&gt; <span class="hljs-title">Get</span>()</span>
    {
      Console.WriteLine(<span class="hljs-string">&quot;Executing Get&quot;</span>);
      <span class="hljs-keyword">return</span> data;
    }
  }
}
</code></pre>
<p>Which will output the logs as follows:</p>
<ol>
<li><code>Attribute Initialized</code> when the controller is instantiated</li>
<li><code>WeatherForecast:OnActionExecuting</code> when the class is called</li>
<li><code>Get:OnActionExecuting</code> when the controller is called</li>
<li><code>Executing Get</code> when the controller is executed</li>
<li><code>Get:OnActionExecuted</code> when the controller is done executing</li>
<li><code>WeatherForecast:OnActionExecuted</code> when the class is done executing</li>
</ol>
]]></content>
        <author>
            <name>Nabeel Valley</name>
            <uri>https://nabeelvalley.co.za</uri>
        </author>
    </entry>
    <entry>
        <title type="html"><![CDATA[Debug POSTs using an Express App]]></title>
        <id>/blog/2020/04-12/post-endpoint-logger-express/</id>
        <link href="https://nabeelvalley.co.za/blog/2020/04-12/post-endpoint-logger-express/"/>
        <updated>2020-12-03T23:00:00.000Z</updated>
        <summary type="html"><![CDATA[Create an express.js app with an endpoint that logs and returns a request's JSON body]]></summary>
        <content type="html"><![CDATA[<p><div class="table-of-contents"><details><summary>Contents</summary><ul></ul></details></div></p>
<p>Sometimes it's useful to have an endpoint that you can use to debug data that's being <code>POST</code>ed to an application</p>
<p>You can make use of the following <code>express.js</code> app to log your application's POST requests:</p>
<iframe height="400px" width="100%" src="https://repl.it/@nabeelvalley/Express-POST-Logger?lite=true" scrolling="no" frameborder="no" allowtransparency="true" allowfullscreen="true" sandbox="allow-forms allow-pointer-lock allow-popups allow-same-origin allow-scripts allow-modals"></iframe>
<details>
<summary>View Code</summary>
<pre><code class="hljs language-js"><span class="hljs-keyword">const</span> express = <span class="hljs-built_in">require</span>(<span class="hljs-string">&quot;express&quot;</span>)
<span class="hljs-keyword">const</span> app = <span class="hljs-title function_">express</span>()

<span class="hljs-comment">// parse json</span>
app.<span class="hljs-title function_">use</span>(express.<span class="hljs-title function_">json</span>())  

<span class="hljs-comment">// GET endpoint to check uptime</span>
app.<span class="hljs-title function_">get</span>(<span class="hljs-string">&#x27;/&#x27;</span>, <span class="hljs-function">(<span class="hljs-params">req, res</span>) =&gt;</span> {
  res.<span class="hljs-title function_">json</span>({ <span class="hljs-attr">data</span>: <span class="hljs-string">&#x27;hello&#x27;</span> })
})

<span class="hljs-comment">// POST endpointthat logs request body</span>
app.<span class="hljs-title function_">post</span>(<span class="hljs-string">&#x27;/&#x27;</span>, <span class="hljs-function">(<span class="hljs-params">req, res</span>) =&gt;</span> {
  <span class="hljs-variable language_">console</span>.<span class="hljs-title function_">log</span>(req.<span class="hljs-property">body</span>)
  res.<span class="hljs-title function_">json</span>(req.<span class="hljs-property">body</span>)
})

<span class="hljs-comment">// listen for requests</span>
<span class="hljs-keyword">const</span> listener = app.<span class="hljs-title function_">listen</span>(process.<span class="hljs-property">env</span>.<span class="hljs-property">PORT</span>, <span class="hljs-function">() =&gt;</span> {
  <span class="hljs-variable language_">console</span>.<span class="hljs-title function_">log</span>(<span class="hljs-string">&quot;listening on port &quot;</span> + listener.<span class="hljs-title function_">address</span>().<span class="hljs-property">port</span>)
})
</code></pre>
<detail>]]></content>
        <author>
            <name>Nabeel Valley</name>
            <uri>https://nabeelvalley.co.za</uri>
        </author>
    </entry>
    <entry>
        <title type="html"><![CDATA[Backup SQL Server Database as Script]]></title>
        <id>/blog/2020/26-11/backup-database-as-script/</id>
        <link href="https://nabeelvalley.co.za/blog/2020/26-11/backup-database-as-script/"/>
        <updated>2020-11-25T23:00:00.000Z</updated>
        <summary type="html"><![CDATA[Create a DB Backup/Restore Script using SQL Server]]></summary>
        <content type="html"><![CDATA[<p><div class="table-of-contents"><details><summary>Contents</summary><ul></ul></details></div></p>
<p>To create a scripted backup of a database on SQL Server do the following:</p>
<ol>
<li>Right click on the database name &gt; <code>Tasks</code> &gt; <code>Generate Scripts...</code></li>
<li>On the <code>Choose Objects</code> screen select <code>Scriot entire database and all database objects</code></li>
<li>On the <code>Set Scripting Options</code> screen click on <code>Advanced</code> and select:
<ol>
<li><code>Script DROP and CREATE = Script CREATE</code></li>
<li><code>Types of data to script = Schema and data</code></li>
</ol>
</li>
<li>Set the location to save the script</li>
<li>On the <code>Summary</code> page you can click <code>Next</code> which will start the generation</li>
<li>Thereafter you can view the generated database script from the location it was generated to</li>
</ol>
]]></content>
        <author>
            <name>Nabeel Valley</name>
            <uri>https://nabeelvalley.co.za</uri>
        </author>
    </entry>
    <entry>
        <title type="html"><![CDATA[Linear Regression with Sklearn]]></title>
        <id>/blog/2020/25-11/linear-regression-model-with-sklearn/</id>
        <link href="https://nabeelvalley.co.za/blog/2020/25-11/linear-regression-model-with-sklearn/"/>
        <updated>2020-11-24T23:00:00.000Z</updated>
        <summary type="html"><![CDATA[Create a simple Linear Regression model using Scikit-learn and the Iris dataset]]></summary>
        <content type="html"><![CDATA[<p>{
&quot;cells&quot;: [
{
&quot;cell_type&quot;: &quot;code&quot;,
&quot;execution_count&quot;: 1,
&quot;metadata&quot;: {
&quot;execution&quot;: {
&quot;iopub.execute_input&quot;: &quot;2020-11-25T14:15:57.160680Z&quot;,
&quot;iopub.status.busy&quot;: &quot;2020-11-25T14:15:57.159762Z&quot;,
&quot;iopub.status.idle&quot;: &quot;2020-11-25T14:15:58.438004Z&quot;,
&quot;shell.execute_reply&quot;: &quot;2020-11-25T14:15:58.438642Z&quot;
},
&quot;papermill&quot;: {
&quot;duration&quot;: 1.295154,
&quot;end_time&quot;: &quot;2020-11-25T14:15:58.438846&quot;,
&quot;exception&quot;: false,
&quot;start_time&quot;: &quot;2020-11-25T14:15:57.143692&quot;,
&quot;status&quot;: &quot;completed&quot;
},
&quot;tags&quot;: []
},
&quot;outputs&quot;: [
{
&quot;data&quot;: {
&quot;text/html&quot;: [
&quot;<div>\n&quot;,
&quot;<style scoped>\n&quot;,
&quot;    .dataframe tbody tr th:only-of-type {\n&quot;,
&quot;        vertical-align: middle;\n&quot;,
&quot;    }\n&quot;,
&quot;\n&quot;,
&quot;    .dataframe tbody tr th {\n&quot;,
&quot;        vertical-align: top;\n&quot;,
&quot;    }\n&quot;,
&quot;\n&quot;,
&quot;    .dataframe thead th {\n&quot;,
&quot;        text-align: right;\n&quot;,
&quot;    }\n&quot;,
&quot;</style>\n&quot;,
&quot;&lt;table border=&quot;1&quot; class=&quot;dataframe&quot;&gt;\n&quot;,
&quot;  <thead>\n&quot;,
&quot;    &lt;tr style=&quot;text-align: right;&quot;&gt;\n&quot;,
&quot;      <th></th>\n&quot;,
&quot;      <th>sepal_length</th>\n&quot;,
&quot;      <th>sepal_width</th>\n&quot;,
&quot;      <th>petal_length</th>\n&quot;,
&quot;      <th>petal_width</th>\n&quot;,
&quot;      <th>species</th>\n&quot;,
&quot;    </tr>\n&quot;,
&quot;  </thead>\n&quot;,
&quot;  <tbody>\n&quot;,
&quot;    <tr>\n&quot;,
&quot;      <th>0</th>\n&quot;,
&quot;      <td>5.1</td>\n&quot;,
&quot;      <td>3.5</td>\n&quot;,
&quot;      <td>1.4</td>\n&quot;,
&quot;      <td>0.2</td>\n&quot;,
&quot;      <td>Iris-setosa</td>\n&quot;,
&quot;    </tr>\n&quot;,
&quot;  </tbody>\n&quot;,
&quot;</table>\n&quot;,
&quot;</div>&quot;
],
&quot;text/plain&quot;: [
&quot;   sepal_length  sepal_width  petal_length  petal_width      species\n&quot;,
&quot;0           5.1          3.5           1.4          0.2  Iris-setosa&quot;
]
},
&quot;execution_count&quot;: 1,
&quot;metadata&quot;: {},
&quot;output_type&quot;: &quot;execute_result&quot;
}
],
&quot;source&quot;: [
&quot;import pandas as pd\n&quot;,
&quot;import seaborn as sns\n&quot;,
&quot;\n&quot;,
&quot;DATA_PATH = '../input/iris-flower-dataset/IRIS.csv'\n&quot;,
&quot;\n&quot;,
&quot;df = pd.read_csv(DATA_PATH)\n&quot;,
&quot;\n&quot;,
&quot;df.head(1)&quot;
]
},
{
&quot;cell_type&quot;: &quot;markdown&quot;,
&quot;metadata&quot;: {
&quot;papermill&quot;: {
&quot;duration&quot;: 0.008301,
&quot;end_time&quot;: &quot;2020-11-25T14:15:58.456652&quot;,
&quot;exception&quot;: false,
&quot;start_time&quot;: &quot;2020-11-25T14:15:58.448351&quot;,
&quot;status&quot;: &quot;completed&quot;
},
&quot;tags&quot;: []
},
&quot;source&quot;: [
&quot;A Linear Regression model tries to fit a straight line to the given data set, to train a linear regression model with <code>sklearn</code> you will need to first split the data into <code>x</code> and <code>y</code> components:\n&quot;
]
},
{
&quot;cell_type&quot;: &quot;code&quot;,
&quot;execution_count&quot;: 2,
&quot;metadata&quot;: {
&quot;execution&quot;: {
&quot;iopub.execute_input&quot;: &quot;2020-11-25T14:15:58.484480Z&quot;,
&quot;iopub.status.busy&quot;: &quot;2020-11-25T14:15:58.483571Z&quot;,
&quot;iopub.status.idle&quot;: &quot;2020-11-25T14:15:58.487092Z&quot;,
&quot;shell.execute_reply&quot;: &quot;2020-11-25T14:15:58.486338Z&quot;
},
&quot;papermill&quot;: {
&quot;duration&quot;: 0.022027,
&quot;end_time&quot;: &quot;2020-11-25T14:15:58.487228&quot;,
&quot;exception&quot;: false,
&quot;start_time&quot;: &quot;2020-11-25T14:15:58.465201&quot;,
&quot;status&quot;: &quot;completed&quot;
},
&quot;tags&quot;: []
},
&quot;outputs&quot;: [],
&quot;source&quot;: [
&quot;x_labels = ['sepal_length', 'petal_width']\n&quot;,
&quot;y_labels = ['petal_length']\n&quot;,
&quot;\n&quot;,
&quot;np_x = df[x_labels].to_numpy()\n&quot;,
&quot;np_y = df[y_labels].transpose().to_numpy()[0]&quot;
]
},
{
&quot;cell_type&quot;: &quot;markdown&quot;,
&quot;metadata&quot;: {
&quot;papermill&quot;: {
&quot;duration&quot;: 0.008472,
&quot;end_time&quot;: &quot;2020-11-25T14:15:58.504628&quot;,
&quot;exception&quot;: false,
&quot;start_time&quot;: &quot;2020-11-25T14:15:58.496156&quot;,
&quot;status&quot;: &quot;completed&quot;
},
&quot;tags&quot;: []
},
&quot;source&quot;: [
&quot;Next, we need to split our training and testing data&quot;
]
},
{
&quot;cell_type&quot;: &quot;code&quot;,
&quot;execution_count&quot;: 3,
&quot;metadata&quot;: {
&quot;execution&quot;: {
&quot;iopub.execute_input&quot;: &quot;2020-11-25T14:15:58.528923Z&quot;,
&quot;iopub.status.busy&quot;: &quot;2020-11-25T14:15:58.528110Z&quot;,
&quot;iopub.status.idle&quot;: &quot;2020-11-25T14:15:58.660824Z&quot;,
&quot;shell.execute_reply&quot;: &quot;2020-11-25T14:15:58.659938Z&quot;
},
&quot;papermill&quot;: {
&quot;duration&quot;: 0.147418,
&quot;end_time&quot;: &quot;2020-11-25T14:15:58.660979&quot;,
&quot;exception&quot;: false,
&quot;start_time&quot;: &quot;2020-11-25T14:15:58.513561&quot;,
&quot;status&quot;: &quot;completed&quot;
},
&quot;tags&quot;: []
},
&quot;outputs&quot;: [],
&quot;source&quot;: [
&quot;from sklearn.model_selection import train_test_split\n&quot;,
&quot;\n&quot;,
&quot;x_train, x_test, y_train, y_test = train_test_split(np_x, np_y)&quot;
]
},
{
&quot;cell_type&quot;: &quot;markdown&quot;,
&quot;metadata&quot;: {
&quot;papermill&quot;: {
&quot;duration&quot;: 0.008605,
&quot;end_time&quot;: &quot;2020-11-25T14:15:58.680911&quot;,
&quot;exception&quot;: false,
&quot;start_time&quot;: &quot;2020-11-25T14:15:58.672306&quot;,
&quot;status&quot;: &quot;completed&quot;
},
&quot;tags&quot;: []
},
&quot;source&quot;: [
&quot;Once we've got our data split into <code>test</code> and <code>train</code> sets, we can train our model using the <code>test</code> data using the <code>fit</code> function of the <code>LinearRegression</code> model&quot;
]
},
{
&quot;cell_type&quot;: &quot;code&quot;,
&quot;execution_count&quot;: 4,
&quot;metadata&quot;: {
&quot;execution&quot;: {
&quot;iopub.execute_input&quot;: &quot;2020-11-25T14:15:58.712907Z&quot;,
&quot;iopub.status.busy&quot;: &quot;2020-11-25T14:15:58.710718Z&quot;,
&quot;iopub.status.idle&quot;: &quot;2020-11-25T14:15:58.932255Z&quot;,
&quot;shell.execute_reply&quot;: &quot;2020-11-25T14:15:58.930194Z&quot;
},
&quot;papermill&quot;: {
&quot;duration&quot;: 0.242616,
&quot;end_time&quot;: &quot;2020-11-25T14:15:58.932542&quot;,
&quot;exception&quot;: false,
&quot;start_time&quot;: &quot;2020-11-25T14:15:58.689926&quot;,
&quot;status&quot;: &quot;completed&quot;
},
&quot;tags&quot;: []
},
&quot;outputs&quot;: [],
&quot;source&quot;: [
&quot;from sklearn.linear_model import LinearRegression\n&quot;,
&quot;\n&quot;,
&quot;model = LinearRegression().fit(x_train, y_train)&quot;
]
},
{
&quot;cell_type&quot;: &quot;markdown&quot;,
&quot;metadata&quot;: {
&quot;papermill&quot;: {
&quot;duration&quot;: 0.015089,
&quot;end_time&quot;: &quot;2020-11-25T14:15:58.963415&quot;,
&quot;exception&quot;: false,
&quot;start_time&quot;: &quot;2020-11-25T14:15:58.948326&quot;,
&quot;status&quot;: &quot;completed&quot;
},
&quot;tags&quot;: []
},
&quot;source&quot;: [
&quot;Lastly, we can use <code>model.score</code> to get the <span class="katex"><span class="katex-mathml"><math><semantics><mrow><msup><mi>R</mi><mn>2</mn></msup></mrow><annotation encoding="application/x-tex">R^2</annotation></semantics></math></span><span class="katex-html" aria-hidden="true"><span class="strut" style="height:0.8141079999999999em;"></span><span class="strut bottom" style="height:0.8141079999999999em;vertical-align:0em;"></span><span class="base textstyle uncramped"><span class="mord"><span class="mord mathit" style="margin-right:0.00773em;">R</span><span class="vlist"><span style="top:-0.363em;margin-right:0.05em;"><span class="fontsize-ensurer reset-size5 size5"><span style="font-size:0em;">​</span></span><span class="reset-textstyle scriptstyle uncramped"><span class="mord mathrm">2</span></span></span><span class="baseline-fix"><span class="fontsize-ensurer reset-size5 size5"><span style="font-size:0em;">​</span></span>​</span></span></span></span></span></span> value for the model&quot;
]
},
{
&quot;cell_type&quot;: &quot;code&quot;,
&quot;execution_count&quot;: 5,
&quot;metadata&quot;: {
&quot;execution&quot;: {
&quot;iopub.execute_input&quot;: &quot;2020-11-25T14:15:58.998196Z&quot;,
&quot;iopub.status.busy&quot;: &quot;2020-11-25T14:15:58.997079Z&quot;,
&quot;iopub.status.idle&quot;: &quot;2020-11-25T14:15:59.001277Z&quot;,
&quot;shell.execute_reply&quot;: &quot;2020-11-25T14:15:59.002075Z&quot;
},
&quot;papermill&quot;: {
&quot;duration&quot;: 0.024152,
&quot;end_time&quot;: &quot;2020-11-25T14:15:59.002263&quot;,
&quot;exception&quot;: false,
&quot;start_time&quot;: &quot;2020-11-25T14:15:58.978111&quot;,
&quot;status&quot;: &quot;completed&quot;
},
&quot;tags&quot;: []
},
&quot;outputs&quot;: [
{
&quot;data&quot;: {
&quot;text/plain&quot;: [
&quot;0.931396085809373&quot;
]
},
&quot;execution_count&quot;: 5,
&quot;metadata&quot;: {},
&quot;output_type&quot;: &quot;execute_result&quot;
}
],
&quot;source&quot;: [
&quot;model.score(x_test, y_test)&quot;
]
},
{
&quot;cell_type&quot;: &quot;markdown&quot;,
&quot;metadata&quot;: {
&quot;papermill&quot;: {
&quot;duration&quot;: 0.01061,
&quot;end_time&quot;: &quot;2020-11-25T14:15:59.023994&quot;,
&quot;exception&quot;: false,
&quot;start_time&quot;: &quot;2020-11-25T14:15:59.013384&quot;,
&quot;status&quot;: &quot;completed&quot;
},
&quot;tags&quot;: []
},
&quot;source&quot;: [
&quot;&gt; You can find out more about how the <code>LinearRegression</code> model works <a href="https://scikit-learn.org/stable/modules/generated/sklearn.linear_model.LinearRegression.html">in the Sklearn Docs</a>, and you can find an interactive version of this notebook <a href="https://www.kaggle.com/nabeelvalley/linear-regression-model-with-sklearn">on Kaggle</a>&quot;
]
}
],
&quot;metadata&quot;: {
&quot;kernelspec&quot;: {
&quot;display_name&quot;: &quot;Python 3&quot;,
&quot;language&quot;: &quot;python&quot;,
&quot;name&quot;: &quot;python3&quot;
},
&quot;language_info&quot;: {
&quot;codemirror_mode&quot;: {
&quot;name&quot;: &quot;ipython&quot;,
&quot;version&quot;: 3
},
&quot;file_extension&quot;: &quot;.py&quot;,
&quot;mimetype&quot;: &quot;text/x-python&quot;,
&quot;name&quot;: &quot;python&quot;,
&quot;nbconvert_exporter&quot;: &quot;python&quot;,
&quot;pygments_lexer&quot;: &quot;ipython3&quot;,
&quot;version&quot;: &quot;3.7.6&quot;
},
&quot;papermill&quot;: {
&quot;duration&quot;: 7.504575,
&quot;end_time&quot;: &quot;2020-11-25T14:15:59.148851&quot;,
&quot;environment_variables&quot;: {},
&quot;exception&quot;: null,
&quot;input_path&quot;: &quot;<strong>notebook</strong>.ipynb&quot;,
&quot;output_path&quot;: &quot;<strong>notebook</strong>.ipynb&quot;,
&quot;parameters&quot;: {},
&quot;start_time&quot;: &quot;2020-11-25T14:15:51.644276&quot;,
&quot;version&quot;: &quot;2.1.0&quot;
}
},
&quot;nbformat&quot;: 4,
&quot;nbformat_minor&quot;: 4
}</p>
]]></content>
        <author>
            <name>Nabeel Valley</name>
            <uri>https://nabeelvalley.co.za</uri>
        </author>
    </entry>
    <entry>
        <title type="html"><![CDATA[Generate data for a Postman request]]></title>
        <id>/blog/2020/24-11/generate-postman-data/</id>
        <link href="https://nabeelvalley.co.za/blog/2020/24-11/generate-postman-data/"/>
        <updated>2020-11-23T23:00:00.000Z</updated>
        <summary type="html"><![CDATA[Using Pre-Request Scripts and Environment variables to generate data in Postman]]></summary>
        <content type="html"><![CDATA[<p><div class="table-of-contents"><details><summary>Contents</summary><ul></ul></details></div></p>
<p>When making requests with Postman to test an API it is often useful to have generated data, for example when creating users in a backend system you may want the ability to get custom user data</p>
<p>The method we will use to do this is by setting Postman environment variables in the Pre-request Script of a Postman request</p>
<p>Firstly, we can write some basic logging in the Pre-request script section on Postman and view the result in the Postman console:</p>
<pre><code class="hljs language-js"><span class="hljs-keyword">const</span> name = <span class="hljs-string">&quot;Nabeel&quot;</span>

<span class="hljs-variable language_">console</span>.<span class="hljs-title function_">log</span>(<span class="hljs-string">`Hello <span class="hljs-subst">${name}</span>`</span>)
</code></pre>
<p>Additionally, postman gives us some functions to set and get environment variables, so we can set the name as an environment variable like so:</p>
<pre><code class="hljs language-js"><span class="hljs-keyword">const</span> name = <span class="hljs-string">&quot;Nabeel&quot;</span>

pm.<span class="hljs-property">environment</span>.<span class="hljs-title function_">set</span>(<span class="hljs-string">&#x27;name&#x27;</span>, name)
</code></pre>
<p>And log it like so:</p>
<pre><code class="hljs language-js"><span class="hljs-variable language_">console</span>.<span class="hljs-title function_">log</span>(pm.<span class="hljs-property">environment</span>.<span class="hljs-title function_">get</span>(<span class="hljs-string">&#x27;name&#x27;</span>))
</code></pre>
<p>Aditionally, we can make HTTP Requests using <code>pm.sendRequest</code> which then takes a callback for what we want to do after the request, we can use the <code>randomuser</code> api to get a user:</p>
<pre><code class="hljs language-js">pm.<span class="hljs-title function_">sendRequest</span>(<span class="hljs-string">&#x27;https://randomuser.me/api/&#x27;</span>, <span class="hljs-function">(<span class="hljs-params">err, res</span>) =&gt;</span> {
  <span class="hljs-keyword">const</span> apiResponse = res.<span class="hljs-title function_">json</span>()

  <span class="hljs-comment">// do more stuff</span>
})
</code></pre>
<p>Using this method, we can get some random user data and set it in the environment variables as follows:</p>
<pre><code class="hljs language-js">pm.<span class="hljs-title function_">sendRequest</span>(<span class="hljs-string">&#x27;https://randomuser.me/api/&#x27;</span>, <span class="hljs-function">(<span class="hljs-params">err, res</span>) =&gt;</span> {
  <span class="hljs-keyword">const</span> apiResponse = res.<span class="hljs-title function_">json</span>()

  <span class="hljs-keyword">const</span> user = apiResponse.<span class="hljs-property">results</span>[<span class="hljs-number">0</span>]
  
  <span class="hljs-keyword">const</span> email = user.<span class="hljs-property">email</span>
  <span class="hljs-keyword">const</span> firstName = user.<span class="hljs-property">name</span>.<span class="hljs-property">first</span>
  <span class="hljs-keyword">const</span> lastName = user.<span class="hljs-property">name</span>.<span class="hljs-property">last</span>

  pm.<span class="hljs-property">environment</span>.<span class="hljs-title function_">set</span>(<span class="hljs-string">&#x27;email&#x27;</span>, email)
  pm.<span class="hljs-property">environment</span>.<span class="hljs-title function_">set</span>(<span class="hljs-string">&#x27;firstName&#x27;</span>, firstName)
  pm.<span class="hljs-property">environment</span>.<span class="hljs-title function_">set</span>(<span class="hljs-string">&#x27;lastName&#x27;</span>, lastName)
})
</code></pre>
<p>We can then use this in our request body using Postman's <code>{\{}\}</code> syntax. If we were making a JSON request, our body would look something like this:</p>
<p><code>POST: https://my-api.com/users</code></p>
<pre><code class="hljs language-json"><span class="hljs-punctuation">{</span>
  <span class="hljs-attr">&quot;email&quot;</span><span class="hljs-punctuation">:</span> <span class="hljs-string">&quot;{{email}}&quot;</span><span class="hljs-punctuation">,</span>
  <span class="hljs-attr">&quot;firstName&quot;</span><span class="hljs-punctuation">:</span> <span class="hljs-string">&quot;{{firstName}}&quot;</span><span class="hljs-punctuation">,</span>
  <span class="hljs-attr">&quot;lastName&quot;</span><span class="hljs-punctuation">:</span> <span class="hljs-string">&quot;{{lastName}}&quot;</span>
<span class="hljs-punctuation">}</span>
</code></pre>
<p>Postman will then populate the slots from the environment variables that we set automatically when making the request</p>
]]></content>
        <author>
            <name>Nabeel Valley</name>
            <uri>https://nabeelvalley.co.za</uri>
        </author>
    </entry>
    <entry>
        <title type="html"><![CDATA[Capture Fetch with Cypress]]></title>
        <id>/blog/2020/10-11/capture-fetch-response-cypress/</id>
        <link href="https://nabeelvalley.co.za/blog/2020/10-11/capture-fetch-response-cypress/"/>
        <updated>2020-11-09T23:00:00.000Z</updated>
        <summary type="html"><![CDATA[Capture and Use Fetch Requests and Responses in Cypress]]></summary>
        <content type="html"><![CDATA[<p><div class="table-of-contents"><details><summary>Contents</summary><ul><li><a href="#setup">Setup</a></li><li><a href="#usage">Usage</a></li></ul></details></div></p>
<p>To capture the result of a <code>fetch</code> request with Cypress you will need to make use of <code>cy.route2</code></p>
<h1 id="setup" tabindex="-1">Setup</h1>
<p>The <code>cy.route2</code> command needs to be enabled in your <code>cypress.json</code> file before usage, to do so add the following:</p>
<p><code>cypress.json</code></p>
<pre><code class="hljs language-json"><span class="hljs-punctuation">{</span>
  <span class="hljs-attr">&quot;experimentalNetworkStubbing&quot;</span><span class="hljs-punctuation">:</span> <span class="hljs-keyword">true</span>
<span class="hljs-punctuation">}</span>
</code></pre>
<h1 id="usage" tabindex="-1">Usage</h1>
<p>Next, using the command to capture requests to a route looks a bit like this in a test:</p>
<pre><code class="hljs language-js">cy.<span class="hljs-title function_">route2</span>(<span class="hljs-string">&#x27;POST&#x27;</span>, <span class="hljs-string">&#x27;/do-stuff&#x27;</span>).<span class="hljs-title function_">as</span>(<span class="hljs-string">&#x27;data&#x27;</span>)
</code></pre>
<p>In the above you need to use the <code>cy.route2</code> function. In the above we're capturing <code>POST</code> requests to the <code>/do-stuff</code> endpoint. The object which contains the request and response data is stored in the <code>@data</code> which can be retreived and worked with like so:</p>
<pre><code class="hljs language-js">cy.<span class="hljs-title function_">wait</span>(<span class="hljs-string">&#x27;@data&#x27;</span>).<span class="hljs-title function_">then</span>(<span class="hljs-function">(<span class="hljs-params">data</span>) =&gt;</span> {
  <span class="hljs-comment">// do stuff using the data object</span>
  <span class="hljs-variable language_">console</span>.<span class="hljs-title function_">log</span>(data)
})
</code></pre>
<p>The <code>cy.wait</code> function retreives the <code>data</code> object, we use the <code>.then</code> function with a callback function to do stuff with the fully resolved <code>data</code> object</p>
<p>Furthermore, the HTTP response from the <code>data</code> object can be parsed using <code>JSON.parse</code>, you can then also add assertions based on the response object. Adding this in, the above code would look more like this:</p>
<pre><code class="hljs language-js">cy.<span class="hljs-title function_">wait</span>(<span class="hljs-string">&#x27;@data&#x27;</span>).<span class="hljs-title function_">then</span>(<span class="hljs-function">(<span class="hljs-params">data</span>) =&gt;</span> {
  <span class="hljs-variable language_">console</span>.<span class="hljs-title function_">log</span>(data)

  <span class="hljs-comment">// parse the response body</span>
  <span class="hljs-keyword">const</span> res = <span class="hljs-title class_">JSON</span>.<span class="hljs-title function_">parse</span>(data.<span class="hljs-property">response</span>.<span class="hljs-property">body</span>)

  <span class="hljs-comment">// assertions on the response</span>
  assert.<span class="hljs-title function_">isTrue</span>(res.<span class="hljs-property">success</span>)
  assert.<span class="hljs-title function_">isNotNull</span>(res.<span class="hljs-property">message</span>)
})
</code></pre>
]]></content>
        <author>
            <name>Nabeel Valley</name>
            <uri>https://nabeelvalley.co.za</uri>
        </author>
    </entry>
    <entry>
        <title type="html"><![CDATA[Position Legends in Seaborn]]></title>
        <id>/blog/2020/14-10/position-legend-in-seaborn/</id>
        <link href="https://nabeelvalley.co.za/blog/2020/14-10/position-legend-in-seaborn/"/>
        <updated>2020-10-13T22:00:00.000Z</updated>
        <summary type="html"><![CDATA[Move figure legends outside of your graph area with seaborn]]></summary>
        <content type="html"><![CDATA[<p>{
&quot;cells&quot;: [
{
&quot;cell_type&quot;: &quot;code&quot;,
&quot;execution_count&quot;: 1,
&quot;metadata&quot;: {
&quot;execution&quot;: {
&quot;iopub.execute_input&quot;: &quot;2020-10-15T15:29:20.942684Z&quot;,
&quot;iopub.status.busy&quot;: &quot;2020-10-15T15:29:20.941889Z&quot;,
&quot;iopub.status.idle&quot;: &quot;2020-10-15T15:29:22.071790Z&quot;,
&quot;shell.execute_reply&quot;: &quot;2020-10-15T15:29:22.071079Z&quot;
},
&quot;papermill&quot;: {
&quot;duration&quot;: 1.142622,
&quot;end_time&quot;: &quot;2020-10-15T15:29:22.071926&quot;,
&quot;exception&quot;: false,
&quot;start_time&quot;: &quot;2020-10-15T15:29:20.929304&quot;,
&quot;status&quot;: &quot;completed&quot;
},
&quot;tags&quot;: []
},
&quot;outputs&quot;: [
{
&quot;data&quot;: {
&quot;text/html&quot;: [
&quot;<div>\n&quot;,
&quot;<style scoped>\n&quot;,
&quot;    .dataframe tbody tr th:only-of-type {\n&quot;,
&quot;        vertical-align: middle;\n&quot;,
&quot;    }\n&quot;,
&quot;\n&quot;,
&quot;    .dataframe tbody tr th {\n&quot;,
&quot;        vertical-align: top;\n&quot;,
&quot;    }\n&quot;,
&quot;\n&quot;,
&quot;    .dataframe thead th {\n&quot;,
&quot;        text-align: right;\n&quot;,
&quot;    }\n&quot;,
&quot;</style>\n&quot;,
&quot;&lt;table border=&quot;1&quot; class=&quot;dataframe&quot;&gt;\n&quot;,
&quot;  <thead>\n&quot;,
&quot;    &lt;tr style=&quot;text-align: right;&quot;&gt;\n&quot;,
&quot;      <th></th>\n&quot;,
&quot;      <th>Id</th>\n&quot;,
&quot;      <th>SepalLengthCm</th>\n&quot;,
&quot;      <th>SepalWidthCm</th>\n&quot;,
&quot;      <th>PetalLengthCm</th>\n&quot;,
&quot;      <th>PetalWidthCm</th>\n&quot;,
&quot;      <th>Species</th>\n&quot;,
&quot;    </tr>\n&quot;,
&quot;  </thead>\n&quot;,
&quot;  <tbody>\n&quot;,
&quot;    <tr>\n&quot;,
&quot;      <th>0</th>\n&quot;,
&quot;      <td>1</td>\n&quot;,
&quot;      <td>5.1</td>\n&quot;,
&quot;      <td>3.5</td>\n&quot;,
&quot;      <td>1.4</td>\n&quot;,
&quot;      <td>0.2</td>\n&quot;,
&quot;      <td>Iris-setosa</td>\n&quot;,
&quot;    </tr>\n&quot;,
&quot;  </tbody>\n&quot;,
&quot;</table>\n&quot;,
&quot;</div>&quot;
],
&quot;text/plain&quot;: [
&quot;   Id  SepalLengthCm  SepalWidthCm  PetalLengthCm  PetalWidthCm      Species\n&quot;,
&quot;0   1            5.1           3.5            1.4           0.2  Iris-setosa&quot;
]
},
&quot;execution_count&quot;: 1,
&quot;metadata&quot;: {},
&quot;output_type&quot;: &quot;execute_result&quot;
}
],
&quot;source&quot;: [
&quot;import pandas as pd\n&quot;,
&quot;import seaborn as sns\n&quot;,
&quot;\n&quot;,
&quot;DATA_PATH = '../input/iris/Iris.csv'\n&quot;,
&quot;\n&quot;,
&quot;df = pd.read_csv(DATA_PATH)\n&quot;,
&quot;\n&quot;,
&quot;df.head(1)&quot;
]
},
{
&quot;cell_type&quot;: &quot;markdown&quot;,
&quot;metadata&quot;: {
&quot;papermill&quot;: {
&quot;duration&quot;: 0.005804,
&quot;end_time&quot;: &quot;2020-10-15T15:29:22.084931&quot;,
&quot;exception&quot;: false,
&quot;start_time&quot;: &quot;2020-10-15T15:29:22.079127&quot;,
&quot;status&quot;: &quot;completed&quot;
},
&quot;tags&quot;: []
},
&quot;source&quot;: [
&quot;When working with Python and Seaborn (<code>sns</code>) it's common to have plots in which the legend overlaps the plot content, we can see this issue in the below code output:\n&quot;
]
},
{
&quot;cell_type&quot;: &quot;code&quot;,
&quot;execution_count&quot;: 2,
&quot;metadata&quot;: {
&quot;execution&quot;: {
&quot;iopub.execute_input&quot;: &quot;2020-10-15T15:29:22.107779Z&quot;,
&quot;iopub.status.busy&quot;: &quot;2020-10-15T15:29:22.107027Z&quot;,
&quot;iopub.status.idle&quot;: &quot;2020-10-15T15:29:22.437199Z&quot;,
&quot;shell.execute_reply&quot;: &quot;2020-10-15T15:29:22.436447Z&quot;
},
&quot;papermill&quot;: {
&quot;duration&quot;: 0.346349,
&quot;end_time&quot;: &quot;2020-10-15T15:29:22.437328&quot;,
&quot;exception&quot;: false,
&quot;start_time&quot;: &quot;2020-10-15T15:29:22.090979&quot;,
&quot;status&quot;: &quot;completed&quot;
},
&quot;tags&quot;: []
},
&quot;outputs&quot;: [
{
&quot;data&quot;: {
&quot;image/png&quot;: &quot;iVBORw0KGgoAAAANSUhEUgAAAYcAAAEGCAYAAACO8lkDAAAABHNCSVQICAgIfAhkiAAAAAlwSFlzAAALEgAACxIB0t1+/AAAADh0RVh0U29mdHdhcmUAbWF0cGxvdGxpYiB2ZXJzaW9uMy4yLjEsIGh0dHA6Ly9tYXRwbG90bGliLm9yZy+j8jraAAAgAElEQVR4nOydd3iUVfbHP3dKMpn0Ri8J0pQkFCmCgGABFbCgiOKqWEAXVBZXF93iuqir/nR3Laisi7qCvesCNlAElCJVpEovCZBeZjL9/v54Q8hkSiYwk0Lu53nmSebMe+eemcB73veec79HSClRKBQKhaImusZ2QKFQKBRNDxUcFAqFQuGDCg4KhUKh8EEFB4VCoVD4oIKDQqFQKHwwNLYD9SUtLU1mZGQ0thsKhULRrFi/fn2BlDI91OObXXDIyMhg3bp1je2GQqFQNCuEEAfqc3xEl5WEEDOFEFuFEL8IId4RQphqvS6EEM8LIXYLIX4WQvSLpD8KhUKhCI2IBQchRHvgXqC/lDIL0APX1zrsMqBb1WMq8HKk/FEoFApF6EQ6IW0AYoQQBsAM5NZ6/UpgvtRYDSQJIdpG2CeFQqFQ1EHEcg5SyiNCiGeAg0Al8LWU8utah7UHDtV4frjKllfzICHEVLQ7Czp16uQzl9Pp5PDhw9hstvB9AMVpYzKZ6NChA0ajsbFdUSgU9SRiwUEIkYx2Z5AJlAAfCCF+I6V8s+Zhfob6iD1JKV8BXgHo37+/z+uHDx8mPj6ejIwMhPD3loqGRkpJYWEhhw8fJjMzs7HdUSgU9SSSy0oXA/uklPlSSifwMTCk1jGHgY41nnfAd+mpTmw2G6mpqSowNCGEEKSmpqq7OYUPDreD49bjrM5bzb7SfZTaSxvbJYUfIlnKehA4TwhhRltWugioXYP6OXC3EOJdYBBQKqXM4xRQgaHpof4mCn/8Wvwrk7+cjM2tXTjc0PMGpveZTmJ0YiN7pqhJxO4cpJRrgA+BDcCWqrleEULcJYS4q+qwxcBeYDfwH2BapPxRKBSNT7GtmMfWPFYdGADe2fEOFc6KRvRK4Y+IVitJKf8qpewppcySUt4kpbRLKedKKedWvS6llNOllGdJKbOllM16d9vjjz9Or169yMnJoU+fPqxZsyZs73355ZdTUlIStvdTKBoDl8fFMcsxH3u5o7wRvFEEo9ntkG6qrFq1ioULF7Jhwwaio6MpKCjA4XCE7f0XL14ctvdSKBqLxOhExnYZy+tbX6+2pZpSSTWlNqJXCn8o4b0wkZeXR1paGtHR0QCkpaXRrl07MjIymDVrFgMHDmTgwIHs3r0bgPz8fK655hoGDBjAgAED+OGHHwCoqKjg1ltvJTs7m5ycHD766CNAkw0pKCgA4M0332TgwIH06dOHO++8E7fbjdvtZvLkyWRlZZGdnc2//vWvRvgWFIrgROmjuDXrVqb1nkZmYiYjO45k/mXzSY1RwaGpoe4cwsSoUaOYPXs23bt35+KLL2bixIlccMEFACQkJLB27Vrmz5/P7373OxYuXMiMGTOYOXMmQ4cO5eDBg4wePZrt27fz6KOPkpiYyJYtWwAoLi72mmf79u289957/PDDDxiNRqZNm8Zbb71Fr169OHLkCL/88guAWoJSNFmSTcnckXMH1/W4jih9FPFR8Y3tksIPKjiEibi4ONavX8+KFSv47rvvmDhxIk8++SQAN9xwQ/XPmTNnArBkyRK2bdtWPb6srIzy8nKWLFnCu+++W21PTk72mmfp0qWsX7+eAQMGAFBZWUmrVq0YN24ce/fu5Z577mHMmDGMGjUqop9XoTgdjDqjulto4qjgEEb0ej0jRoxgxIgRZGdn88YbbwDeJZ0nfvd4PKxatYqYmBiv95BSBi0BlVJyyy238MQTT/i8tnnzZr766itefPFF3n//fV577bVwfCyFQtECUTmHMLFz505+/fXX6uebNm2ic+fOALz33nvVPwcPHgxoy1Bz5szxOt6fvfay0kUXXcSHH37I8ePHASgqKuLAgQMUFBTg8Xi45pprePTRR9mwYUMEPqVCoWgpqDuHMFFRUcE999xDSUkJBoOBrl278sorr7Bw4ULsdjuDBg3C4/HwzjvvAPD8888zffp0cnJycLlcDB8+nLlz5/LnP/+Z6dOnk5WVhV6v569//Svjx4+vnuecc87hscceY9SoUXg8HoxGIy+++CIxMTHceuuteDweAL93FgqFQhEqQkofqaImTf/+/WXtZj/bt2/n7LPPbiSPgnOiOVFaWlpjuxIybo8bt3Rjd9uJ1kejF3r0Ov0pvVegv42UkoLKAvaW7iXOGEfbuLakmFJO13Ufim3F5FvzKbAV0DWpKynRKRj06pqoMbG77ZTYSthdsps2sW1IjUklKTqpsd064xFCrJdS9g/1ePW/ROGFR3ood5RzpOJIta1dXDsSoxPRifCtQh61HOX6RddTZCsCoHd6b54b+VxYk5TFtmL+tupvLD24FACzwczbY97mrKSzwjaHov7sKtrF5C8n4/Bo+4Cu7X4tv+v3OyWf0cRQOYcIs3///mZ315Bn8Za3Omo5itvjDtscDreDeVvmVQcGgM35m9lVvCtscwAUVBZUBwYAq8vKMz89o3bjNiLFtmIeX/N4dWAA+HDXh+pv0gRRwUHhg0d6gj4/XZxuJ7kWX/Hd2kHpdKkZfE5wzHoMhzt8O9cV9cPlcXHcetzHbnFaGsEbRTBUcFB4IYQg1hjrZTMbzWFVWI2NiuW67td52Qw6A+e1PS9scwBkJmYSZ4zzso3vNl6tbzciCVEJXHnWlV62VFNqRPJNitND5RwUXhh0BtrHtaegsgCLy4LZYCY9Jh2DLrz/VPq17seTw55k/rb5xBvjua//fWHX10kxpfD2mLf5x7p/kGfJY3y38YzJHHPKyXXF6RNtiObmXjdjNpr5Yt8XZCRmMPPcmaTFNJ+l15aCCg4KH4x6I61jW+ORHnRCF9ZE9AkSoxO5PPNyhrQbgl7oSYhOCPscUko8Hg8jOo7AIAwY9Uakb6NBRQOTbErm1qxbuabbNUTro4mNiq17kKLBUcEhTMTFxVFR4V+TfsiQIfz4448Rmffvf/87f/zjH8P+vpEKCjURQpBsSq77wFOk2F7M9Yuu9+odMKPfDCb3mhz2OyFF/TDoDKTEqKWkpozKOUQQt1ur8IlUYAAtOCj8s7dkr1dgAFi4d6FqS6lQhECLDA6fbjzC+U9+S+aDizj/yW/5dOORugeFyLJlyxg5ciSTJk0iOzsb0O4qQJP1Hj58OH369CErK4sVK1b4jN+6dWu1HHdOTk61JIc/me4HH3yQyspK+vTpw4033gjAP//5T7KyssjKyuLZZ58FwGKxMGbMGHr37k1WVla1nMfs2bMZMGAAWVlZTJ06lea2IbIu0s3pPraOcR2J0kc1gjcKRfOixd1bf7rxCA99vIVKp3ZVf6Skkoc+1uSxr+rbPixzrF27ll9++YXMzEwv+9tvv83o0aP505/+hNvtxmq1+oydO3cuM2bM4MYbb8ThcOB2uwPKdD/55JPMmTOnWpdp/fr1vP7666xZswYpJYMGDeKCCy5g7969tGvXjkWLFgFQWqpdOd999908/PDDANx0000sXLiQcePGheU7aAqkmlK5uuvVfLL7EwCSopO4f8D9SiJaoQiBiAUHIUQP4L0api7Aw1LKZ2scMwL4DNhXZfpYSjk7Uj4BPP3VzurAcIJKp5unv9oZtuAwcOBAn8AAMGDAAG677TacTidXXXUVffr08Tlm8ODBPP744xw+fJjx48fTrVu3gDLdtVm5ciVXX301sbFagm/8+PGsWLGCSy+9lPvvv59Zs2YxduxYhg0bBsB3333H//3f/2G1WikqKqJXr15nVHBIMiVx37n3cUf2HZTaS2kT20aVTCoUIRKx4CCl3An0ARBC6IEjwCd+Dl0hpRwbKT9qk1tSWS/7qXDi5Fyb4cOHs3z5chYtWsRNN93EAw88QHx8PH/7298AmDdvHpMmTWLQoEEsWrSI0aNHM2/evKAy3TUJtCzUvXt31q9fz+LFi3nooYcYNWoUf/jDH5g2bRrr1q2jY8eOPPLII9hsNr/jmzNJpiSSTGpfg0JRXxoq53ARsEdKeaCB5gtIu6SYetnDyYEDB2jVqhVTpkzh9ttvZ8OGDVx99dVs2rSJTZs20b9/f/bu3UuXLl249957ueKKK/j5558DynQDGI1GnE4noAWfTz/9FKvVisVi4ZNPPmHYsGHk5uZiNpv5zW9+w/3338+GDRuqA0FaWhoVFRV8+OGHEf/8CoWi+dBQOYfrgXcCvDZYCLEZyAXul1JurX2AEGIqMBWgU6dOp+XIA6N7eOUcAGKMeh4Y3eO03jcUli1bxtNPP43RaCQuLo758+f7HPPee+/x5ptvYjQaadOmDQ8//DApKSl+Zbo7d+7M1KlTycnJoV+/frz11ltMnjyZgQMHAnDHHXfQt29fvvrqKx544AF0Oh1Go5GXX36ZpKQkpkyZQnZ2NhkZGdVLVgqFQgENINkthIhCO/H3klIeq/VaAuCRUlYIIS4HnpNSdgv2fuGQ7P504xGe/monuSWVtEuK4YHRPcKWb1B405Tl1BWKlkRTlOy+DNhQOzAASCnLavy+WAjxkhAiTUpZEEmHrurbXgWDJoDL46LEXoJO6FSiWKFoYjREcLiBAEtKQog2wDEppRRCDETLgRQ2gE+KRqbEVsJnez7j7e1vExcVxx8G/IHstGzMRnNju6ZQKIhwQloIYQYuAT6uYbtLCHFX1dNrgV+qcg7PA9fLM20nlsIvP+b+yDPrniHXksuu4l1M/WYqhZXqukChaCpE9M5BSmkFUmvZ5tb4fQ4wJ5I+KJoeFY4KPtvzmZfNIz2sObqGjgkdG8krhUJRkxYpn6FoXKL10ZyV6NuqMyMho+GdUSgUflHBQdHgGPVGbul1Cx3iOlTbRnQYQZfELo3olUKhqIkKDmHihLieP4YMGdKAnviSm5vLtddee0pjR4wYQe3S4XDQOrY1Cy5fwEfjPmLhVQuZff7sOiWcKxwVHCo7xNf7v2ZvyV6lrqpQRJAWJ7zXkLjdbvR6fUQlu2vicrkwGHz/pO3atWuwHdAnPnMopMWkhdwBzOVxsezwMh5a8VC17d6+93Lj2TeqCieFIgK0zDuHn9+Hf2XBI0naz5/fD9tbn45kd2lpKRkZGXg8HgCsVisdO3bE6XSyZ88eLr30Us4991yGDRvGjh07AJg8eTL33XcfI0eOZNasWXz//ff06dOHPn360LdvX8rLy9m/fz9ZWVmAdvK+//77yc7OJicnhxdeeAGApUuX0rdvX7Kzs7ntttuw2+0+n+2dd94hOzubrKwsZs2aVW2Pi4vj4YcfZtCgQaxatSps32VNiu3FPLn2SS/bS5tfotxRHpH5FIqWTsu7c/j5ffjfveCsEtorPaQ9B8i5LvC4enCqkt2JiYn07t2b77//npEjR/K///2P0aNHYzQamTp1KnPnzqVbt26sWbOGadOm8e233wKwa9culixZgl6vZ9y4cbz44oucf/75VFRUYDKZvOZ45ZVX2LdvHxs3bsRgMFBUVITNZmPy5MksXbqU7t27c/PNN/Pyyy/zu9/9rnpcbm4us2bNYv369SQnJzNq1Cg+/fRTrrrqKiwWC1lZWcyeHTlBXSmlTyBweVy4pTvACIVCcTq0vDuHpbNPBoYTOCs1e5gIJtn9+uuv88gjj7Blyxbi4337CkycOLG6Gc+7777LxIkTqaio4Mcff2TChAnVzX7y8vKqx0yYMKF6Kef888/nvvvu4/nnn6ekpMRnmWnJkiXcdddd1faUlBR27txJZmYm3bt3B+CWW25h+fLlXuN++uknRowYQXp6OgaDgRtvvLH6GL1ezzXXXHOqX1dImA1mLul0iZctJy2HGEPkBRMVipZIy7tzKD1cP/spcDqS3VdccQUPPfQQRUVFrF+/ngsvvBCLxUJSUlJ1U59g8z344IOMGTOGxYsXc95557FkyRKvuwcpJUIIr/Gh7DsMdozJZAo5z3CqxEXF8dCgh8hMzGTFkRX0adWH27NuD6kHdZGtCLfHTUJ0AtH66Ij4Z3FasDqtROmjSIxOjMgcDUWJrQSnx0mcMY4Yowq+LZWWd+eQ2KF+9jASimR3XFwcAwcOZMaMGYwdOxa9Xk9CQgKZmZl88MEHgHai3rx5s9859uzZQ3Z2NrNmzaJ///7VuYkTjBo1irlz5+JyuQBN/rtnz57s37+f3bt3A7BgwQIuuOACr3GDBg3i+++/p6CgALfbzTvvvONzTKRJjUllau+pvHzxy8zsN9NvG9Ca2F12tuRv4bff/JYJ/5vAnI1zKLIVhd2vfGs+s1fN5urPr+a+ZfdxsOxgs2y56va42V28m3u+vYdrPr+Gp356Su1ab8G0vOBw0cNQ+2rIGKPZI8yyZcuqE8UfffQRM2bM8HvcxIkTefPNN5k4cWK17a233uLVV1+ld+/e9OrVi88++8zv2GeffZasrCx69+5NTEwMl112mdfrd9xxB506dSInJ4fevXvz9ttvYzKZeP3115kwYQLZ2dnodDruuusur3Ft27bliSeeYOTIkfTu3Zt+/fpx5ZVXnuY3Un+MOiPJpmSiDXXfAZTYS5j85WS2FW2j0FbIf7f+l/d2vIfL4wqbP+WOch5d/SiL9y2m1F7K2qNruf3r2ym0Nb+TapGtiFu+vIVN+Zsothfz0a8f8cLGF6isvQyraBFEXLI73IRDspuf39dyDKWHtTuGix4OWzJa4U1jSnavyl3F1G+metnOSjqLV0e9SmpMaoBR9aOgsoCLPrgIj/R42RddvYhOCafXe6Sh2VW8i2s+984dJUYn8skVn9R5l6Zo+jRFye6mR851Khi0AFrHtvaxZSZkhjXvIBB0iOvAwfKD1TajzojJYAoyqmmSEJWAQCA5ecGYkZCBQdcyTxMtnZa3rKRoMaREpzCp56Tq52kxadzX/z7iogLvZq/3HKYU/j7079VVU3qh54+D/ki80bcSrakTa4zlnr73INAKFhKiEnh48MMhJf0VZx4tc1lJ0WA09t8m35qP1WWl3FFOWkwaydGh5Svqg8PtoNReSqGtkOToZOKMccRG+a9Ya+qUO8qxOC2U2ktJMaWQbEpWdw5nCGpZSaGooshWxJ9W/ok1R9dg1BkBePPyN+mZ0jOs80Tpo0g3p58R6/LxUfHER8XTJrZNY7uiaGTUspLijOW49Tir8lbhkR7sbjt2t51nfnqGMntZ3YMVihaOCg6KM5Zyu6/uUrG9GJcMXymrQnGmooJDmIi0ZPfDDz/MkiVL6jXm888/58knnwx6zOnIeTd1MhIzfHYr39DzBpKikxrJI4Wi+aAS0mEiLi6OiooKL1t95KtPlYaY43RozL+N2+Mm15LLS5teIrcil2u7X8uwDsMiExxsZeC0gj4KzMH7UigUjUF9E9IRu3MQQvQQQmyq8SgTQvyu1jFCCPG8EGK3EOJnIUS/SPlTk0V7FzHqw1HkvJHDqA9HsWjvorC9d6QkuydPnlzdkyEjI4PZs2czdOhQPvjgAxYvXkzPnj0ZOnQo9957L2PHjgXgv//9L3fffTegSXvfe++9DBkyhC5dulS/Vyhy3rNnz2bAgAFkZWUxderUZiMNodfp6RjfkYcHP8zzFz7P2C5jIxMYyo/C5/fAnAHw7iQo2A0eT93jFIomTMSqlaSUO4E+AEIIPXAE+KTWYZcB3aoeg4CXq35GjEV7F/HIj49gc9sAyLPk8ciPjwAwpsuYsMwRCcnu2phMJlauXInNZqNbt24sX76czMxMbrjhhoB+5eXlsXLlSnbs2MEVV1zhs5zkT84b4O677+bhhzV5kZtuuomFCxcybty4U/puGoMYQ0zk1FsrS7TA8OvX2vODq2D+OJiyDOJ9N+EpFM2Fhso5XATskVIeqGW/EpgvNVYDSUKItpF05LkNz1UHhhPY3Dae2/Bc2OYIt2S3P07Yd+zYQZcuXarnCxYcrrrqKnQ6Heeccw7Hjh3zed2fnDfAd999x6BBg8jOzubbb79l69atwT5+y8Jlh93feNvKcsFhaRx/FIow0VDB4XrgHT/29sChGs8PV9m8EEJMFUKsE0Ksy8/PPy1HjlqO1st+KtQl2d2+fXtuuukm5s+fzyeffFLduW3dunVcccUVfPHFF16S3cHmqM8ST3T0yc1f/sb5k/O22WxMmzaNDz/8kC1btjBlyhRsNpvP2BaLEJBylrfNEO0r7qhQNDMiHhyEEFHAFcAH/l72Y/M5a0kpX5FS9pdS9k9PP72NRoE29zTEpp9TlewORs+ePdm7dy/79+8HqL7rOBX8yXmfCARpaWlUVFQ0WC/qZkNcK7j63xDfFtr3036O+SeYEhrbM4XitGiIHdKXARuklL7rGNqdQscazzsAuZF0Zka/GV45BwCT3sSMfv7ls8PJsmXLePrppzEajcTFxTF//ny/x02cOJEJEyawbNmyOt8zJiaGl156iUsvvZS0tDQGDhx4yv7dcccd7Nq1i5ycHIxGI1OmTOHuu+9mypQpZGdnk5GRwYABA075/ZsDTqedQkcxPx39iViDmV5pWX4F/GpSkd6Nwju+YOOxDXRP6UE7cxuSmql8hkJxgoiXsgoh3gW+klK+7ue1McDdwOVoiejnpZRBz27hKGVdtHcRz214jqOWo7SJbcOMfjPCloxuDCoqKoiLi0NKyfTp0+nWrRszZ85sbLeAplFmXB8Olx/m+kXXU2ovBaBzQmdeHfVqwADh8rhYcmAJDyx/oNr2m7N/w7Q+04iPan7ie4ozlyalrSSEMAOXAHfWsN0FIKWcCyxGCwy7AStwayT9OcGYLmOadTCozX/+8x/eeOMNHA4Hffv25c4776x7kMIHu7OSN7a+UR0YAA6UHWB13iqu7HqV3zEl9hKeXOu90fCt7W9xS69bVHBQNGsiGhyklFYgtZZtbo3fJTA9kj60BGbOnNlk7hSaMy6Pi2J7sY89WKtMKSVlDm+tJokMa7c5haIxOGPkM5rLxqyWRHP7m8RGx3v1fwCI0kVxSedLAo8xxjK+23gv29kpZ2M2miPio0LRUJwRkt0mk4nCwkJSU1N9SjEVjYOUksLCQkymIB3RnDawlWrloOY00EXmWqWwshCP9BAXFVfnZriM+I7Mu+Q//HfbG5j0Ju7qfRcpUYkBjzcbzdzd524uzbgUndDh9DjpltSNFJOS0FA0b86I4NChQwcOHz7M6e6BUIQXk8lEhw4d/L9oLYTVL8FPr0J0Aox+AjKHgyl86/Q2l42thVuZvWo2x6zHGJM5hul9pwc9caeY0xlkTqdbUlcMOj0JIXRBc3gcLNi2gB9zf6R7cnceHfooSaYkdOKMuTFXtEDOCOE9RTNDStj0FnxWI90kBNy9DlK7hm2aY5ZjXPrxpV7r/1Oyp/Db3r/FqPeVJDkVyuxlzFo+i5W5K6tt6THpvD/2fdLMaWGZQ6EIB01GeE+hCIi9HLbU2kwnJexbHtZp9pTs8UkMLz241CeBfDrY3XZ+yP3By5ZfmY/FpeQzFM0bFRwUDY/BBO36+Npb9QrrNO3i2vnYuiV1w2QIkgepJzqhIyMxw8sWrY+OnNCfQtFAqOCgaHgMUTDoLmhVY3NczvWQelbgMadAsimZ27Nup1N8J3LScugc35mZ/WcSawzf7uXUmFSeGPoE8UYtV2LQGfjr4L+qPQ6KZk9IOQchRH/gT0BntCS2QNumkBNZ93xROYf64XQ7KbQVsiZvDWkxafRM6UlqTGrdAxuCiuPaEpPeCFHxYK47+Vtf8i3H2F2yhyOWXM5rO4i0qCRM0YFP3C5nJUX2En7KXYXZaCa7VR/S6tDdcrm1/RHlznJijbEkGBOIqUN477j1OHtK9nCg7ABD2g0hMTrRp2udQhFOIrVD+i3gAWALoLqYNCMOlR9i4sKJ1VpSPVN6MvfiuU0jQMS10h4RoshyjAe+f4D1+RsB7ap+wejXyWrlZ0mriuOVBUxYdH11XqJDfAcWjH49aIAw6A2km9NJJzRRyOPW4/zlh7/wY+6PAOiFnlcueYWBbU9dF0uhCDehLivlSyk/l1Luk1IeOPGIqGeK08bitPDCxhe8RAZ3FO1gb+neRvSq4ThmPVYdGEDbAf3Pjc9TZvFf8uxyVjJ/6xteCevD5YdZc+THsPpVai+tDgwAbunmn+v/yTGLP21KhaJxCPXO4a9CiHnAUsB+wiil/DgiXinCgtvjptRR6mMvs4evWqcpY3FU+NjKHeW4pH9pC4/HTZGf76vEXhJWv6wuq4+t3FGOR6qbckXTIdQ7h1vRWn5eCoyreoyNlFOK8JAQncAt59ziZYs3xpOdnt1IHjUsnRO7kGryXj77TffrSIrxv5QVFR3HzWff6GWL1kczMoh8xqnQxtzGp3/Idd2vIy1G7YtQNB1CTUhvkVI2iTOKSkjXjzJ7GVsKtvDm9jdJi0njzpw7aRvbFr0ueBOhJou1GNwO0BvAHDxvIj0e8iqOMG/LPI5YjzLhrKsY0KY/iebAuYEKSz67y/Yzb9sbmA0m7sq5k/YxrYkOc/Oe3IpcXt3yKofKDzG2y1gGtxtMehC/FIrTpb4J6VCDw3+Af0kpt52Oc+FABYdTw+KwYNAZiDZE131wU6X0sLarev9KbZ/EVf/Wyl8D6Wk5KuHYzzgqjuOIMhNXdgy6XwKxdZ+ELdYidDpBTAjyGaeK1WnF5rKREqN0mBSRJ1LVSkOBW4QQ+9ByDo1Wyqo4NWKbe2cySyF8eCscWqs9P7wO3hwPdywJXPFUWQSvX06Ux0XUCdvQ+2DEg1qf5yDEmiN/wjYbzUq9VdFkCTU4XBpRLxSKunA7TgaGE5QcAKdvcrea/J1Qu6/CjoVw3m8jWkKrUJwJBE1ICyEGCCEuq1m+WlXCmgOo7Jmi4dDpIamzty06QZPiCERyJ19b62xQV+sKRZ3UVa30NLDdj3171WsKRcNgToNr5oGpahexMQau/jfEBMkJmNNg+APQ/3YY9Th0HAyXPALRcQ3iskLRnKlrWSlVSrm/tlFKuVsIUecWWyFEEjAPyAIkcJuUcsN/QvIAACAASURBVFWN10cAnwH7qkwfSylnh+a6olnjdmryGXuWQkwKdBwYfKlHp4N2fWH6Wk1yIzoOTEnBcwcxSRwbNIVtRds4Un6E4RNeISE6gaQwf5RyRznHrcdZk7eGc1LPoXNCZ5IjmMhWKBqCuoJDMIGYUDKczwFfSimvFUJEAf7u51dIKdWeiZZGyUH49zBwVElbp3aFW78IHiD0Rohvoz1C4KjlKPd/fz+b8zcD8I91/+C1S1+jb6u+p+t9NS63i+8OfseffvhTte3a7tcys99MEqLDW/6qUDQkdS0rLRFCPC5q9d4UQvwN+DbYQCFEAjAceBVASumQUoZ3q6mieeK0wfdPnwwMAIW7tQqkMHLMeqw6MAC4pIvnNzwfVpmKEkcJz6x7xsv20a6P/O6CViiaE3UFh98DXYDdQoiPqh67gR7AfXWM7QLkA68LITYKIeYJIfzdbQwWQmwWQnwhhPAr6C+EmCqEWCeEWKdagZ4BeFxgK/a123ylK04Hq59KpgpnBW7pDtscUkqfQCCRPk2GFIrmRtDgIKW0SClvAC4B/lv1GCWlvF5K6Stc440B6Ae8LKXsC1iAB2sdswHoLKXsDbwAfBrAj1eklP2llP3T09Uu0mZPdBycP8PbFhUHXS4I6zSZiZk+khSTek6idUzrsM0RFxXHhO4TvGzZadlq/4Ki2RNyD2khRHtO9nMAQEoZsK+jEKINsFpKmVH1fBjwoJRyTJAx+4H+UsqCQMeoHdJNE7fHTbG9GCklscbYuk+OtjLK7aVYBEjpIcVgJtqUrMliBMNapCWzdXqIDV5N7Xa7OVp5lNe3vE6uJZfx3caTk55DK3PwPQ52l51yZzkASdFJGHTBfSqxlXCg7AB6nR6n20FGYqZKSCuaHBHZIS2EeAqYCGzlZD8HCQQMDlLKo0KIQ0KIHlLKncBFgJf8RlUAOSallEKIgWh3MoWhOq9oGlidVtYeXctjqx+jyFbEFWddwb197w0qC5HvsfOfHQv45NdPiDXGMvPcmQxtPzR4n4mSg/DJXXDwR2jTG8b/R0tk6/zfAOv1etrHtee+c+/D5g5NpqLYVsz8rfN5a8dbmPQmZvSbwSWdLwmaXLY5LczZNIc1eWvoltyNJ85/jHiDGUNzlipRtHhC1VbaCeRIKe11Huw9rg9aKWsUsBdN3XUigJRyrhDibuC3gAuoBO6TUgYVz1d3Dk2PI+VHuOzjy5Cc/Ld0b997uTXrVr9X3W6Pm/d2vscTa5/wsn9yxSd0Te7qfxJLAbwz0TtpndgRpiyFuPAtE32x7wv+sPwPXrYPx31Ij5Qefo8vteRz/8qHWH10TbUt1ZTKh2PeJS0utKoqhaIhqO+dQ6iS3XsBY32dkVJuqsoV5Egpr5JSFksp50op51a9PkdK2UtK2VtKeV5dgUHRNNlWuM0rMAAsPbiUcke53+NL7aUsO7TMx746b3XgSdxO32qm0kPgrKyvuwGxuWx8ue9LH/vKIysDjnFIt1dgACi0FWJR1UqKZk5d8hkvCCGeB6zAJiHEv4UQz594NIyLiqZOZmKmjy0rLYsYg/9tMrHGWM5OPdvHfk7qOYEn0ekhOcPbZkoMLp9RT4w6I338tBDNSssKOEaPpGuS992OSW8K+NkViuZCXTmHE5dq64HPa70WWiZbccaTbk7ntqzbWJW7irioOCxOC1NzpmIKcOKONkQzqeck1h9bj1FnpNJVSY/kHnSI7xB4kth0uPY1LeeQ0A7KcmH048HlM+qJXqfnirOu4LuD37Gxqr3ouC7j6JbcLeCYlLi2PHn+40xd+luKbEWY9Cb+PuQREozNXAVX0eIJNecwQ0r5XF22huCMyjlYi7TNX4fWQsZQTVjOHN4qF7ujgkJbMd8fXEp6TDp92/QnNTZ8a/QnyLfms+n4Jo5bjzO843BaxbQK2jvC6XZyvPI4yw8vJykqiX6t+9G6Dr9KbSXkVRxhTd5aerfqrclUBEtgnyJFtiKsTit6nR6zwUxidGLQ490uB0W2QqwuKzEGMwnGWEx17I4ushxjW8FW9pXuY3inkaRHp2COCSzs4fa4KbQVsvLISgzCwOB2g0mLSUME6mWhUNQiUs1+Nkgp+9Wybazav9CgnDHBwV6u7RL+sUZ8veRRGDhFE5ULE78Wbmfi4htxepwAdE3qyryL54Y1QBRWFjL1m6nsKt4FgEFn4J0x79AzpWfAMftL9zPhfxOwuW0AdIrvxBuXvRGwVabdZeeDXR/w1E9PVdt+c/ZvmN5nOnFRzUtIr9hyjPtXPMjaY9q/Y53Q8cqFLzKow9CAY45ajnLN59dQ5tD6f6fFpPHe2PfqLMtVKE4Q1oS0EOIGIcT/gEwhxOc1Ht+hSk5PD3s5rH7R2/b9k2ALn8KIpbKYFza/VB0YAHaX7GZ38a9hmwNgf9n+6sAA4PJoMhWBEtI2l41///zv6sAAcLD8ID/n/xxwjjJHGXM2zfGyvbPjHSxOS4ARTZcie0l1YADwSA//3PgCRRVH/R4vpeTdHe9WBwaAgsoClhxYEnFfFS2XunIOPwJ5aL0b/lHDXg4E/p+sqBvp8W1E47KFNZPjlm4sfiQkrI66NrfXD38yFVaXFY/0+DlaOxlWOH198Gerid3lXUntlu6AczRlHC7finCry4rE/2eRUnoFhhMECr4KRTioSz7jgJRymZRysJTy+xqPDVJKJR5zOhhjodtob1vODRDGdp4J5jRuP+dmL1tidCJZrX0rck6Hnik9SY72zpXclnVbwLV6s9HMbVm3ednijHEMajMo4Bxmo5mrul7lZRvSbkizrApKj21Fhzjv5PvNPW4gKca/NIxOp+PGs29EL/TVtihdFGPPUmLGisgRas6hHN9r2lK0aqbfSyn3RsA3vzTpnIOtXGtbKdAazej0wY+35MPPH8C+ZdD9Mjh7XJ2SEPWl3FrArpLdLNj5Lq1NqdySdSttzG3Q1SVTUQ880sMxyzHmb5tPniWPG8++kR7JPYLuKq5wVLCnZA/zt80nKTqJW7NupW1sW/RBvrNiWzFLDyzhu8PLGNC6P+POuiL4juomzPGKPN7e/hZ7yw8yvss4+rbqQ6I5sG5YpauSwspCSuzasmOqKZWUmBSi9WoXtiI0IpWQ/huQC7yNduq7HmgD7AR+K6UccUrengJNNjhU5MNXf4StH2tll2Ofhcxhdd8JeNzacpLRDBGsPLHZy9HrjBiN4dsXUBunx4nL4wrpar7YVsy7O97F4rTgkR6y07IZ2n4o8dHxgQeVHESumkOlwUS0y47+3FshrXtA+YymjsvlwOmyEWOqu+9Dia2EBdsXsGDbAvRCz505d3J116tJNAWvpFIoThCp4LBGSjmolm21lPI8IcTmKlXVBqFJBgeXHZY9CSv/edImdDDjZ0jq2Hh+NVE80sMHOz/gsTWPedk/u/IzuiR18T/IUgBvTYDcDSdtiR1gyrdhlc9oqiw7tIx7vr3Hy7bgsgV+N+0pFP6IlHyGRwhxnRBCV/W4rsZrajOcrQx21ZJdkB44vs3/8S0ci9PC0oNLfezrjgUJ+m6Hd2AAKD0cVvmMporL4+Kr/V/52L89FLTflkJxWoQaHG4EbgKOA8eqfv+NECIGuDtCvjUfoszQrp+vPfWshvelGRBjiKF3uu/N5tkpvpIa1egMkFLrrsKUFFb5jKaKQWegf2vfC75+rfz8m1MowkRIwUFKuVdKOU5KmSalTK/6fbeUslJKGViVrKUQFQsX/hFaVZ3cdAYY+WctKa3wwaAzMLHnRHLScgBtE9iknpNCkM94HcxVCejoeE1OIwQZ7jOBkZ1GMrT9yU1yl2ZcSk56TiN6pDjTCTXnkA5MATLwbvZzW6AxkaJJ5hxOUHFcq1bSR2knr2DJ1SbMieY1a4+uZUCbAWQkZJBkCiztcErYrRQ5iql0VKDXGYk1momvS+LaWgz2Um0ZLzoeohMgNni1UqHlGBuPruNQxWEu7HwJrUwpxIT7szQQJbYSrC4rAoHZWLesh0JRk4g0+wE+A1YAS4DwNeA904hr/lIGlc5K3tr+FnN/nlttuz37dqZkTyE2nGJypQdIeWWEVqkFmuLqrV9oonr+cNpg4wL45i8nbQOmwEUPQ4Bqn0LLMaZ9ey/birTcz7ObX+K/l8yjb9sB4fscDUiSKYkkmmdgUzQ/Qs05mKWUs6SU70spPzrxiKhnikah3FnOa7+85mWbv3V+eGUqbGWw/JmTgQGgeD8cXBVkTAl8/5S3bd2rEGS391FLXnVgAK1K6tlNcyi1HD9FxxWKlkOowWGhEOLyiHqiaBJIKXHV2vzu8rgItdd4SHjc2vJbbRzBApAEdy3ZCenRHgGoLbcBmq5Tc5TcUCgamlCDwwy0AGETQpQJIcqFEL5iL4pmj9lo5rLMy7xsozNGh1emwpwMQ7xr9jElwlkXBh4TFQ99vaVA6DpK2zwYgE4JnWlt9t4Dcfs5N5GklEwVijoJKSF9ym8uRBJaD+kstP0Qt0kpV9V4XQDPAZejdZubLKXc4O+9TtCUE9Ll1gJsVQqoyaaUZttgvshWxLcHv2XFkRWc3+58Lu58MSmmOqqC3E6tPwVSO2HXtevXUgBF+2DNy1rDnsH3aPkGQ1TgMdYiKDmozSGBlIw6m/0UWvPJsxxFp9MTJQy0NqUSb26ekhs4rGCvuiYzJUEEd7srzjwikpCuOonfCGRKKR8VQnQE2kop19Yx9DngSynltUKIKKD2Zd5lQLeqxyDg5aqfzY5Cy3GeWPsE3xz6luToZP4y8EEGtzkvaAOXpkqKKYVrul3D2C5jidZH191QxlYOu7+BLx6AymI4Zzxc+gTEBdYKIjZNe7Q+Ryv9DSWQ2stg0Uw4sgHSe2qlrNGJAeUzrE4rWwq38rdVf6PIVsSFHS/kz+f9ue55miKWQlj1Aqx+Wfu+ht0P594C5pZRyqtoeEJdVnoJGAxMqnpeAbwY+HAQQiQAw4FXAaSUDill7WYFVwLzpcZqIEkI0TZU55sKdqeV+Vv/y1cHl+CRHgpthcxc/gdKnM1XUlkIgclgCq3TmLUQPrpNuxvwuOGXD7RksdtZ99io2NACg6UA3r9FCwwA+TvgrWvBmh9wSKmjlBnfzaCgsgCP9LDk4BJe++U1HG5H3fM1NQ6ugpX/0pL4jgpY+ggU7KpzmEJxqoQaHAZJKacDNgApZTEQ5P4fgC5APvC6EGKjEGKeEKJ2LWR74FCN54erbM0Ki72UFXmrvWwSya9FOxrJowYmbzPUXp7c9aVWlRQu3A7I2+RtK8sNKp+xr2SfT/J5xZEVfnsjNGk8btj+ma995xcN74uixRBqcHAKIfRU6ShVbYqrq+TDAPQDXq5qJ2oBHqx1jL/LUp8kiBBiqhBinRBiXX5+4CvFxiLGGEt26jk+9sykFiKf0cpPO9AOA8Lam8KvfEZMclD5jI7xvqKH2anZmA2Bk9hNEp0eMob72jsPaXhfFC2GUIPD88AnQCshxOPASuDvdYw5DByWUq6pev4hWrCofUzN/8Ed0KTBvZBSviKl7C+l7J+eHmQdu5GIiU5gWp9p9EjuAWjyEL/rM52kqLqlmM8I4lrBiD9qJ3CAdn1h2O/DmzCNTYcJb5zcaGhK0p4Hkc9IMiVxf//76duqL8PaD6Nvel/u7Xcv5iAVTk2WHpdpD9Ck3XOuh/bnNq5PijOakKuVhBA9gYvQrvaXAqVSSp8Tea0xK4A7pJQ7hRCPALFSygdqvD4GTbjvcrRE9PNSyoHB3rMpVysVVhzF5rZj0BuJ18dgrqOS5ozCXqEljN1O7Y4hzE2LAHC7tPyG0wrGGC0wBKtuAvItx/np2E8cKj/EJZ0voY0pFXO45TMqS7TKq1+/1O6Y2vaJzOe3FoOzAtBp33EzLHZQNB4R6ecQYKKDUspOdRzTB62UNQrYC9wKTASQUs6tqoKaA1yKVsp6q5Qy6Jm/KQcHRdOi0HKMO5dOZ2fxTkAT+Hvt4n9zbrvzwjeJywEb5sPi35+0ZU+Ay5+us8xWoWhIIqWt5Heuug6QUm4Cajszt8brEph+Gj4oFAHJq8itDgygyWc8t/klnk/sQlJsmDbCVRbDd95Ni9jyAVz8iAoOimbN6fRXVE1+FE0ap8e3ZNXutiNlmLUj/ch04FH6lIrmTdA7ByHEC/gPAgKUPKSiadMxoTNtY9uSZ8mrtk05ZzLJcWHcSmNKgPOmwYpnTtoyhkFUXPjmUCgagbqWlYIt7quF/zOZinzwOEFnDL7TuQqbo5xiRzkgiEJPagjy5RWOiur+BInRiUTp69o6Uz/SYtvw5qVv8MHO9zhgyeX6rtfQNdzlxcYYGDwN2vaGrR9Dp8HQa3ydfSYUkcfmdFNaqW3EjIs2EBt9OqvoLY+IaitFApWQbgDyd8EHN8Px7ZpMxXXzIa27VkLphyLLcZbn/cgz656h3FHOhR0v5KFBD9EqiMBdka2If677Jwv3LiTGEMOMfjO4PPNyEqLDX/7rcbtwe5wYjWEUD/SHy641egplV7kiohRbHby95iBzvt2N2yO5cVAn7rmoGymx4b0AaU6ENSEthPgfQXILUsor6uGbojlQcRzevQEKd2vP83fA2xPh9q8DNjMqc1n4yw8nm/AsObiETgmd+G32FEx+llfcHjeL9y3msz3art8KZwWPr3mc/q37RyQ46PQGdPoGuGpspkKLZyJ78yt4+quTxQiv/7iffp2TGdc7QDMphQ91/Y95po7XFWcabvvJwHCC4n3+k65V/FKw1ce2Om81k7pP9BscrC4ryw8t97FvOL6Brsld6++zQlGLZTt9lRS+2nqUS7PaYNSfTh1OyyFocJBSft9QjiiaCLooSOwApYdP2uLbasslAeiR0sPHlpOWQ3yAtqIxhhjObX0uq/K8O7/1Sut1aj4rFLUYlJnKC3hf5JzfNU0FhnoQ0jclhOgmhPhQCLFNCLH3xCPSzikagdg0LccQm37y+cQFYA684zfZmMD0PtMx6oyAFhhuz74dsynR7/EGnYFru1/LwDbaZniDMHB71u20j212mouKJso57eK5YWAndFXpn1HntGbUOa2DD1J4EVJCWgixEvgr8C9gHNpOZyGl/Gtk3fNFJaTrR6WrknxrPov2LqJVbCsuaH8BaUFO9NqgIk2qwVGulWTGpNTZN6DEWkClx4HL4yJKZ6R1XeWitgpKHCVUOi3ohJ64qFhi6xpjLYL8nfDr15BxfmgyFRXHYfdSKNoL2ddCQnuIVmWmjUlZpZMjJZUs/DmXs9smcF6XVNLiwp+vKat0YnG4kBLMUXqSzM0zGW2xuzhaauPzzbl0TI7hgh6tSI+v//cVEfmMqjc9VwixRUqZXWVbIaUcVm8PTxMVHOrHtsJtTFo0CXfVxq+O8R2Zf9l80mICnFTtFbD8/+CH507azpsOIx+C6PjwOXb0F/jPiJM9HxI7wO3faN3g/OGshB9fgO8eP2nrezOMegxi/N+hUHEc5l8Jx7dpz4WAm/8HmQ3+z1ZRhccj+XLrUaa9dbLh48CMZF7+zbmkRiBAnAn8tK+Iia+swlN1qu7WKo53pp5X74Ba3+AQ6gKcTQihA34VQtwthLgaUI14mzgVjgrmbJxTHRgADpUfYldRkCYx9jKt21hN1v5bCxrhwlaqbRqr2Qyo9DAc+CH4mJX/8rZtWqA1vglEyaGTgQG0nhPfPlrVzlTRGBRZHPzj651etrX7iympDKExVAukxOrgma93VgcGgF+PV3Cg0BLxuUMNDr9Da/F5L3AucBNwS6ScUoQHicTlcfnYnZ46/iPWlpeQHsKqliI9/rvEBamIAqD2Z5GSoH75+ey4nb6NiRQNhkTicPu2gvF41N/EH1KC08/35XJH/vsKKThIKX+SUlYAZcC9UsrxVW09FU2Y+Kh47ux9p5ctLSaNXqlBqoKi4qD3JG9bzsTwNu6JSYbzf+e9WcycAl1GBh4THQ8Dpnjbeo6FABVRAKRkQlJnb9vwB9Tu5UYkxRzFtBHe5co928ST3II3pwUjOTaKey7s5mVrnxRDl/TI581CzTn0B14HTiw6lwK3SSnXR9A3v6icQ/2wOC0cKN3POzvepU1sa67tPoFW5lbBe0NbCmDPd1p/gm6j4KyL6k78uhxaIlvKql4LdUhvWYuosJdVyWdIEkypRJvTINhmNWsh7FsOOxZC5gVa85vYOqQ9ynJh41tQtAfOvVXb8R0oR6FoEEqsDrbllfH+T4fp1T6Bq/q0P6UEa0uhzOZkb76FBav3k5Eay3X9O9I6of6NtCKVkP4ZmC6lXFH1fCjwkpQyp94eniYqONSTinz49jFcQqJ3ORCdh8HZY0M7QbpdwU/WJ7CVwfb/wVcPaTmL7pfDuGcD7qgGTT7jqbVP8eX+LzHpTdzT9x6uOOuK4DukC/fAd3/X7iIcFTDkXmh1TmAfLYWw91v49RstYLmdcOGfAye9FQ2Ky+3BoPYdhIzL40EvRPALuyBEqp9D+YnAACClXCmEKK+3d4qGxe2EdfNgw39P/qE3vwOdB4UWHEKVnLAWwmfTTj7fuUjrK33Bg347tbk9bhbuWcjifYu14S4rT/30FIPaDgocHCwF8P7NcOyXk7Z9y+HOFRAfoH7dXg4fT/HOMeijYNSj4a28UpwSKjDUD4OuYb+vUGdbK4T4txBihBDiAiHES8AyIUQ/IUTtvtCKpoK9XKvxr03uxvDOk/ezr23Pt9r8frC6rKw4ssLHvvF4EL/cDu/AAFBxDFyVgcfkb/dNPh/4QWvrqVAoghLqnUOfqp+1N70NQSsXuTBsHinCR1QsdD4fDv/kbW+THd55Wp/ta+s0JGASO8YQw4A2A1id513TkJ0WxC+dQVOGLahRhmtOAUOQtde07r629v3VXYNCEQIhBQcpZZAyEkWTxRANg6dru4r1Ru0qu/NQiGsT3nliW8Gox+Hb2Vo5aqfBcP4MMPo/cRt0Bq7pdg0bjm3gh9wfMOgM3JF1B21jg+yQjmsFE96At6+D0kNaIvq6BWAOUnkUnQCXPgVLH9E20bXvBxf+qe5kuUKhCDkh3Rr4O9BOSnmZEOIcYLCU8tU6xu0HygE34KqdDBFCjAA+A/ZVmT6WUs4O9p5nVELaUgBH1sPe76H7aGiTFfxkB1B6RGsqYymAPpO0E32w/IHdAmWHYfO7kNAWeo7Tfgb1qxDyNsPub6DrRdC2b93lnw6Llpj2uLTkb13VTUCJrYRKdyV69MRGxRIbrCwVwOMBSz64bFrgq6u6CbTNc/ZyLf9iiG5RyegSq4N9BRYWb8kjp0MSg8+KjExFS6awws76A8Ws3VfEqF5t6NY6juQmKtMRqWqlL9BKWf8kpewthDAAG09IaQQZtx/oL6UsCPD6COB+KeXYUB0+Y4KDrRS+/gtseOOkbdjvtUegPQVluTDvYig7oj3XGeCOJdCub+B5jmyAeRdVbWRDq/u/4xuIC5TErdAqgla/eNI2cCpc+DCY1HJMc8Hl9vDB+sM89PGWatuwbmk8d33fFt3wJpyUWB38+dNfWPjzyTa0sy7twW3nZxJt1DeiZ/6JlHxGmpTyfcADIKV0od0NKE4VhwU2LvC2rXpRKwUNxMHVJwMDaFfpy58Ba4AEq61M0yKSNXZYlhyAo1v8Hw/aVfZPr3jb1r0WXKZC0eQosjp4dom3TMqKXwuw2P3sGlecElaH2yswALz43R5KbWeGFEiowcEihEilSqtACHEe2ka4upDA10KI9UKIqQGOGSyE2CyE+EII4XfrrhBiqhBinRBiXX6+bxOPZok/6QfpCa5S4U8OQrqpitkB5vHzmidYXJe+Y8Itn6FoENx+JCmaW1vgpoy/b9Lfd95cCTU43Ad8DpwlhPgBmA/cE8K486WU/YDLgOlCiOG1Xt8AdJZS9gZeAD719yZSyleklP2llP3T0+tudt8siIqFrGu9bQPuAFOQTWCdz/feWCZ0MPS+wHLapgS4YJa3TEV8W03qOqBf8ZraaU36TNJkNRTNhmQ/MhX9M5KJNTVAu9QWgtmo56Ke3hs97xiWSYLJ2EgehZegOQchxADgkJTyaFWe4U7gGmAb8LCUMmR5SyHEI0CFlDJg69G6chRwBuUc4KRMxZ6lmk5Qp8HBE78eD5Tnwvr/amMH3K71JwjWa8FeDsUH4Kd5mix2nxtDSEgXwP6VsKtKPiNzeEgJ5ibJCVkPj1tLlNfRl6IpU1Rhp9LpAQFxUXoS60h8llgdbM0t45ONR+jXKYlR57QhLQIyFRa7i3K7CyEh1qQnLjr8J0eH001+hQO3lBj1graJMWGf41QorLDz3c7jrNpTyJjstvTtlNxkdaLCmpAWQmwALpZSFlVd9b+LdsfQBzhbSnltkLGxgE5KWV71+zfAbCnllzWOaQMck1JKIcRA4EO0O4mATp1RweEEHg/Ud/ejxw26eiS9TmmOUxjTlLCXw84vYPH9WgFA5gUw/j+Bd1Q3YY6X2fjHN7v4aP1hdEJw8+DOTBneJSSNHY9HotOdmuRCXRRZ7Mz5djcLVh9ASrhxUCdmXNw9rElvq93JhoMl3Pf+Zo6X2+nVLoGXbuxH59QwikGeJpH8jsNFuBPS+hp3BxOBV6SUH0kp/wLU1Qm+NbBSCLEZWAssklJ+KYS4SwhxV9Ux1wK/VB3zPHB9sMBwxnIqJ+D6BIZTnqMZBwaAymL4ZKoWGAD2fQ/fP6XteWhmrNxdwHs/HcLl0SSv563cx468IMULNYjkSevnw6W89sN+nG6JyyN5Y9UBNhwoDuscJZUu7lywnuPlmqT71twyZn30M8fLbGGd53Ro6oHhVKhrAVIvhDBUVSddBNRMKgcdK6XcC/T2Y59b4/c5wJzQ3VUo6kHBr77yGftXaHcUxqaxLBEKDpeb5bt8V1pX/FrABT0at+fW0u3HfGxLth/j4jD2a7bYXVgc3kUU6w8U4zqDkr9NkbouDd8BvhdCFBBAwgAAHKpJREFUfAZUAidUWbsSWrWSQtF4pPq5ue00uNkl16MMes7v6puLGnJW4+eBLujuG5xG9Ahv0UhstIGYWvsGendIQn8GXq03JYIGBynl48Dvgf8CQ2ss+egIrVpJoWg8YpJh3AsnNxV2HAQj/whR5sb16xS4oHs6V/Zph06AQSe4cVAnerUPUtnWQPTrnMTkwRlcltWGy7LacNN5nRiYGd6kf0KMgRcn9SXZrCW6z0qP4+kJOafU00AROiHtkG5KnJEJaUXkcFaCrURL4BtimnUXuIIKO3anGxCYo3Qkxza+FIbT7eFYmY0P1h1GSsmE/h1pkxiNUR/eHcI2p5siiwOn20OUQddkqpWaE5Hq56BQNE+MMc0qvxCMpqiLlF9uZ/S/llfnBOat3MfXM4fTITm8d2cmo552SWfG37G50MzLURQKRWPy/rpDXsliq8PNO2sPNqJHinChgoNCoThl/K1KN7OVakUAVHBQKBSnzHX9O2KOOplfiDHqmTSwUyN6pAgXKuegCA/ViV9Ps5epaKqU25xVqqqCuBBlKgor7Nicbox6HcmxURjD3Lc5PSGKb2ZewNtrtR3SkwZ2onVi08uNhEqRxYHN6UavEySbo4gytNzrZxUcFKePrRR+/gC++Qs4rdBlJIx/xVskUHFaFFnsPPnFDj6sks+4ZUgG00d2DSpTcbjIypQF69ieV05KbBTPTuzDwMwUTGHsNRCl19M+OYYHRvcM23s2FkfLbEx7cwMbDhYTH23gsauzuOjs1sRFt8zTZMsNi4rwYcmHxb/XAgPA3u/gxzlay1BFWFj5awHvrzuMR4LLI3l15T625QaWzyixOpj18c9szysHtCviqQvWUVp5ZvQaCDcWu4v/+2IHGw5q0h/ldhcz39tEWQv+vlRwUJw+/poH7V+udZVTnDYuj4elO4772Ff8Gri3icPlYd1+b40jm9NDuU01+/GH1eFi7X5vkWmPhINF1kbyqPFRwUFx+rTx0y02YzhENy+ZiqaKQafjop6+WkXDuweWqYgy6OifkexlMxl1xKt+Dn6JjTYwMMM7T6YT0DGl+e2mDxcqOChOn9h0GPOPkzIVZ10IQ+4GQ/NNTDY1hnZL4+bBnbiyTzvG9W7Lb0d04ey2gXt6J5mjeOqaHM5pq0lspMZG8Z+b+5MYc2Y0ogk35igDsy7rybmdtYCaYDLw7MS+JMW03GCq5DPOdOwVUHoQfnpNa/bTe6LWDS7cOG1gK66qVjKDObnuMS2Y/HI7X2zJY8fRcq7r34Eu6XEkBDlx251ujpbZeGv1QYwGwQ0D/7+9O4+TsyoTPf57aut9Sbo7nZCEhCwEAsFshB0CAlcCgpcBRQwCXmUQRhmHcRSdj446emdwRhEYySiMwDDcCA4uMKyOBh0CgSwkEBKQhJA9nV7SS1XX/tw/3jed7q6lq0NVL9XP9/PJp6veOm/VOTnd9VS955znHMvE6lJ8WWYftXRFaAtFCceS+LxCfUWA+qr85iOKJRIc6Ijw6JqdJFX51GnTaKwuIeDLPOh9oKOb95pD/GrDHo6fWMWykycxsWZk5ElqDUYIx5JFOVspr5v9jEQWHAZp16vwbxcfWZlUPRlu+j1Ujr4Nb4pFc1eE5fevYev+zp5j/3LtApbNm4RI+kyj77cEufiHfyASd/b3rizx8fyXzs2YUiIci/PIKzv5+//a0nPs1OnjuPfahXlNWLenrZuLfvgiIXeVdKnfwwtfOi/j5ZhoPMET6/fw1SeOjFOdPLman163mEmWHqOg8r3ZjxnNwh2w6h/6Llnt2AN7Nw5fnQwHOyN9AgPAXb/9Ey3BaNryyaTy4Es7egIDQFckzm827s34Gq3BGP/64vY+x17b0dbzJp4vj63d1ec5w7Ekj2ZJn9HUGeG+F7f1Ofbmng6bRTUCWXAoduk+iWb4dGqGj2eAPkm3Kd9AvZi263OvUk7SvcZA2yyka2umb0xm+FhwKGal1bD0DpBe3VwzFSadMnx1MjRUlXDSMX33YvjSRbOpy7CgzeMRrj/zOEr9R/qxutTH5fOPyfgadRUBbjm/72ZHZ8yooyyQ31TaVy+e2meRWHnAy7VLpmUsP7GqhFuXzuxzbP7UWqrH8MDvSFXQMQcR2QF0Agkg3v96lzgfF34ELANCwA2quj7bcx7VmEMiDqFmSETBV+rMrhkJn1QSCQgdPFKv8vr879scDUL7Hlj/71AzGU76GFRNzO9rjGDhWIL27hiJpFLq9+Z14/vDVJWWrijheIJAjmkqWjojtHVHicaTlJf4qKsMUJUlHUY0nmB/e5jH1+3G7/XwZwsnM7G6FG+W12kPRekIx4knk/g8HsoCHuors483ROMJ2kIxYokkZX4vdQOkCY8nkjR1RvjFul0kFa5eNJUJ1SVZ27+/vZs9h8L8+vU9zGms4sNzG5loG/cU3IgakHaDw2JVTd0A13l8Gc6OcsuA04Afqepp2Z5z0MEhHoXdr8Hjn4ZgM4yfAdc+BvWzc3+OQkgkYN8GWHktdB2A2mPhkz+HxrnDW68i0hmO8dSmfXznqbcIRRMsPLaW+5YvyvsOYu81B7nxZ6+yoyXE+IoA935yAYunj8s4YycYifHbLU18/Zdv0hWJ5zQg29QR5vvPbaUzkkBVmVRdyufPn5W1LTuag3z24bW829RFTZmff7r6FE6fUUdVafogFIrG+eOfmvny4xvpCMc5YWIV91+/OO97M5jhMdoGpK8AHlbHK0CtiOR3nmV3q/MGHHTjU+t2+MVnjtwfLqGDsPKTTmAAOLQTHlsOXakrYc3RORSKcccTb/QMmK7feYgfvvAO3XkclG0NRrlt5QZ2tIR67v/5v6+jLZR5gLW920nN0BVxViu/uaeD7z29ha5w5nN+/3YTj6/bw7Nv7ue5zQd48OX32bwnc/qMpo4wdzzxBu82dbmvGeMvHt2QdYV0RzjOFx7dQIdbZuv+Tv72V2/aYPEYVejgoMDzIrJORG5K8/hkYFev+7vdY32IyE0islZE1h48mDllQFqxkJMttLf9myA5zGkE4pHUQNCyDRL2h5gv25tT03e8tqOt5005H+KJJJt2t/c51hmJZ50VtPdQN8l+X9jXvt9GKJb+nGg8wcvbWlOOr96W+QNOPKls2NU3fUYknqQzSwBqC0aJJpJ9jq3f2eZuTWrGmkIHh7NUdSFwCXCriJzb7/F0F/5TrnOp6k9UdbGqLm5oyJwyIC1/RWr66GMWgmeYB8D8pamL0RrmgNdWsObLzIbKlKGlM2fWUZnHFBI+r4eFx9b2OVZd5uuzx0F/k2vL8PWb0nP6cXVUBNLXK+Dzct7x9SnHz01z7DC/V1g8re/vfZnfm/GSEsD4igAl/RZ9LZme3yyuZvQoaHBQ1b3uzybgl8CSfkV2A1N73Z8CZJ68fTTKxztjDDVTnPsT5sJVD0BF5j+sIVFe79Sr1p3ZUT8bPv5I7mmuk8mBy/QuroMrXwxqy5w01Ydnwpw9q44vfHgWZTm82SVz/P91UmEv6EllMammlJ/dcCrjKzK/CdeU+fnxpxYyrtwps+S48Xx12QlUZEkNfdaseq45dSo+j1Di8/C5c2YwZ2J1xvINVaV878p5zJtc494v4V+vW0R1lsBYU+bnp59eTH2lM2i/YGot37ni5Kwrt03xKtiAtIhUAB5V7XRvvwB8W1Wf7VXmUuAvODIgfbeq9g8gfRzVbKVkwhljSMbAWwKVg/z2USiqTrrrRBS8gYEDgyp07oN1DzljFUs+B7XToaQi4ynBWJDdnbtZuXUljRWNXDn7SiaUj519Fpo7wxzsipJUpczvpaGqJOun59ZghOauKA+v3kFFiY/lp0+jvsJP2QAb67R0RYjEnTQVdRUleAeY7B9LJGgLxkioUurzMi6HWVRtwQihaBIRqAh4qSkf+Jx97d3EE4rX46TPCAwQGOOJJK3BKImkUlKg2V1meIyY2UoiMgPn2wI4mwo9qqrfFZGbAVR1hTuV9V7gIzhTWW9U1azv/GM6fUbnflhxthNQwJmO+9n/hsmLMp6y/sB6bnj2BtS9WjehfAIrL11JQ/kICZAFdLAzwp/dt7pP2uUHrl/Mh0/MnDpky74OPnrP/xB3BwWqy3w888VzmTzOUjuY0W3EzFZS1e2q+iH330mq+l33+ApVXeHeVlW9VVVnquq8gQLDmLdzzZHAAM43iRfvzLhvQle0ixWbVvQEBoCmUBNbWrekLV9sdraGUvLx3/3ff6I1mH4TomA4zk//sL0nMAB0dMd5bvO+gtbTmJFouKeymsHwprle7PFnXdDnk9RzvDI2BhjTXdnxegTJkERCPODzpj7my/fCRGNGAfutH00mLz4ysA7OjKulXz2yj0I/lYFKbpl/S59gMKVyCnPGzyl0TUeEqePLmT3hyIZDInD7xXMyXt8vD/i46dwZfWbs1FUEuHCuZbA1Y4+l7B5tOvfDliedNRIfusaZDhvIvII1FAvRFGriye1P0ljeyPlTzx8T4w2HHewME44liScVv1cYXx6gPMusoI5QlNZQjF+s301FwMsV8yfTUBHAPwKmcx7sjBCOJRCBUr+X+gFSWxjT24gZkC6UMR8cTM6auyL85vW93PncVsKxJKdMqWHF8kUZ90AAZ9bRd/9rCzMmVBKJJYjGE/z5ebOGfdbOgY4w33pyM8+8uR8Brlo0ldsvPj7vqUBM8RpscLBUiKZodYbjfPupt3rub9rdzj8//zbf/OhcqstS3+yTSeWpTft4YsOePscvnDuR8RXjU8oPpd9tbeLpN/YDzirRx9bu4uK5jTTOteBgCsPGHEzR2taUOovr9V3tdIbTp4OIJJK89G5qSorX3ktNXTGUYvEEa7an1uGV7S3DUBszVlhwMEXr+MbU9BmnzxhPTYa9A0p9nrSDz2fNGt7V9H6fl/NPSB0nOm/O2Bk7MkPPgoMpWlWlfn748fmMK/cjAkuPb+ALF8yiMsMKaRHhwhMbe9JUlPm9fOUjc5hWl1vK6nABE9SdMaOO5acfi98rlPo9fP68mcxprCrY6xljA9KmqHXH4rQFY6gqAZ+HhqqBr9F3hWME3ayqNWX+ARPPNXWEeW1HK89tPsD8qTVcesoxBRkobgtG6XYDUGWJz3IemUGxAWljeinz+yirHdyveWWpP+O3i/66wjEeXL2DH6/aBsBvNu7lhS1N3PXx+TTW5DdAjKsIMC6vz2hMZnZZyZgPoCMc58HVO/oce3lbC+G47YFgRjcLDsZ8QOlSbshI2KPcmA/AgoMxH8C4cj9fuKDvfuTLTp5Iqc/+tMzoZmMOxvTTFowSiibweKCixEd1lvGHsoCPKxcew0UnNtIViVMe8FJZ4mVCAQakD4WcegluvQowIB2OJWjvjhGJJ3v2vzBjkwUHY3pp7opw+2Ov8+I7zXgErjt9GrddOJvxFZnfJNuCMT79wKvsbQ9TXerj7k8uoKY8QIkvf/mYWroifP2Xb/Ds5gOIwFULp3DHshOy1muwQtE4v32ria8+sYlQNMFx9RU89JklHDs+t6m8prjYd19jXMmk8uTGvbz4jrNKOqnw0Mvv826aldaHtXRFuG3l6+xtDwPOAPWt/7GeQ6FYXuv2u61NPLv5AOBs4/H4ut1s3NWe19fo6I7xV4+9Tsidxvtec5CvPbGJ9lA0r69jRgcLDsa4IokkL29LTUmxdkdbxnMSqmze29HnWDCaoDuav9lKiWSSl95Nrdea9/KbPqMtFOuz0RHApj3tROJjb/9xY8HBmB5lfi8Xn5SaPuOc2ZnTZ/i9Hk6d3nf1wbhyP+WB/F1S8no8XDIvtV4XnJDffSbGVwQo9fd9SzhrZj1leWyLGT0sOAwzVSVSwLQLZnAuOKGxJ01FZYmPr196IlOzXHMfVx7grk/MZ8HUWgCm1ZXz0GeW5D3F96nT6/jcOc5GRGV+L7dfdHyfjYzyobbMz4M3LuEYd/HeGTPq+OZHT6IqxwWBprgUPH2GiHiBtcAeVb2s32NLgV8D77mHnlDVb2d7vmJKn9HSFeG5zfv545+auWhuI0vnNOR1gNEcnWAkTlckjuCkzyjJYaOf1mCEaDyJ1+OhvjJQkHUOoUicTrde1Tmk9TgaiaTSGoySSCqlfg+15cO7j4XJn5GYPuM2YAtQneHxP/YPGmPBoVC0Z/YJwDNv7ufa047la8tOoLLEPqkNp4oSHxVZdotLZyiCenmJL+sudvng9YhNXzVAgS8ricgU4FLg/kK+zmgUiiZ6AsNhj722i2DELjEZY4Zfoccc7gL+Bsg23eEMEdkoIs+IyEnpCojITSKyVkTWHjx4sCAVHWoecT6l9ZYuDYMxxgyHggUHEbkMaFLVdVmKrQemqeqHgHuAX6UrpKo/UdXFqrq4oaE4NjipKPFx3WnH9jl269JZlobZGDMiFPIC5lnA5SKyDCgFqkXkEVVdfriAqnb0uv20iPxYROpVNXWvxiJTVernixfO5iPzJrFmewvnzG7guIYKygowyFgsEokkLaEo3dEEZX4vteV+AgOsQg5G4nSGY8QSSlnAS31l/q+nO4O4EULRBKVuvfK5OtqY4VCw4KCqdwB3QM+spL/uHRjc4xOBA6qqIrIE55vMmNkYd3xFCafPKOH0GXXDXZURT1XZur+T63/2Ks1dUapLfdy3fBGnTh+XMUC0d8f4+Wu7+P5zW4kllOMbK3noxiVMqi3La922HeziugfWcKAjQkXAy4+uWcDZs+sLMpvImKEy5OscRORmEbnZvXsV8KaIbATuBq7R0bY1nRkSLV1Rbn10Pc1dTiqHjnCcWwZIU9EWjPK9p7cQSzi/Uu8c6OLO594mFInnsV4Rblu5gQMdEcBZHf3FlRto785v+gxjhtqQJN5T1VXAKvf2il7H7wXuHYo6mNEtnkyyoyXU51h7dyzrpjo7W0MpxzbtbicYTeRtSmhClS37OvscC0UTPfmJjBmtbIW0GRX8Xg/zJtf0OTappjTrpZtZEypTZoQtndNAdWn+PhP5vR5OO258n2PjKwJUWMoJM8pZcDCjQl1lCf/yqYXMd9NUHN9YyYM3LqE+y+Kz2nI/P7luEROqSvAIXDJvIjefNzOnFc+5Glce4AefmN+TX2lmQwUPFyB9hjFDreDpM/KtmNJnmMFrDUaIJRSvR3KaedTcGWbPoW48Hg8BrzCppqwg04XbglGiiSReEepthbEZgUZi+gxj8mYwaSqaOsNcfs9L7O8I9xy799oFXDpvUt5zH42zbwqmyNhlJVO03m8O9QkMACte3EZr0DavMWYgFhxM0Srxp/56l/m9KYPUxphUFhxM0TqmtoyTJx9JBuz1CF+55ARLQ21MDmzMwRSt+soSHrxhCet2trGzNcRFcxuZUID0GcYUIwsOpqjVV5Xwv06aONzVMGbUsctKxhhjUlhwMMYYk8KCgzHGmBQWHIwxxqSw4GCMMSaFBQdjjDEpRl3iPRE5CLx/lKfXA0W/BWkWY7n9Y7ntMLbbb213TFPVhlxPHHXB4YMQkbWDyUpYbMZy+8dy22Fst9/afnRtt8tKxhhjUlhwMMYYk2KsBYefDHcFhtlYbv9YbjuM7fZb24/CmBpzMMYYk5ux9s3BGGNMDiw4GGOMSVF0wUFEporI70Vki4hsFpHb0pQREblbRN4VkU0isnA46loIObZ/qYi0i8jr7r9vDEdd801ESkXkVRHZ6Lb9W2nKFGXf59j2ouz3w0TEKyIbROSpNI8VZb/3NkD7B933xbifQxy4XVXXi0gVsE5EXlDVt3qVuQSY7f47DbjP/VkMcmk/wB9V9bJhqF8hRYALVLVLRPzA/4jIM6r6Sq8yxdr3ubQdirPfD7sN2AJUp3msWPu9t2zth0H2fdF9c1DVfaq63r3difOfNblfsSuAh9XxClArIpOGuKoFkWP7i5Lbn13uXb/7r/+Mi6Ls+xzbXrREZApwKXB/hiJF2e+H5dD+QSu64NCbiEwHFgBr+j00GdjV6/5uivANNEv7Ac5wL0E8IyInDWnFCsj9av060AS8oKpjpu9zaDsUab8DdwF/AyQzPF60/e4aqP0wyL4v2uAgIpXAfwJ/qaod/R9Oc0pRfcoaoP3rcfKsfAi4B/jVUNevUFQ1oarzgSnAEhE5uV+Rou37HNpelP0uIpcBTaq6LluxNMeKot9zbP+g+74og4N7zfU/gf9Q1SfSFNkNTO11fwqwdyjqNhQGar+qdhy+BKGqTwN+Eakf4moWlKoeAlYBH+n3UFH3PWRuexH3+1nA5SKyA1gJXCAij/QrU8z9PmD7j6bviy44iIgADwBbVPUHGYr9Bvi0O4PhdKBdVfcNWSULKJf2i8hEtxwisgTn96Bl6GpZGCLSICK17u0y4EJga79iRdn3ubS9WPtdVe9Q1SmqOh24Bvidqi7vV6wo+x1ya//R9H0xzlY6C7gOeMO9/grwNeBYAFVdATwNLAPeBULAjcNQz0LJpf1XAZ8XkTjQDVyjxbFUfhLwkIh4cX75H1PVp0TkZij6vs+l7cXa72mNkX7P6IP2vaXPMMYYk6LoLisZY4z54Cw4GGOMSWHBwRhjTAoLDsYYY1JYcDDGGJPCgoMZ9UTk624m0k1uxsm8JVRzs1k+5c6PbxaRce7xSSKiInJ2r7IHRaRORO4XkblpnusGEbnXvf2x3mVEZJWIpN0IXkSWiMgfRORtEdnqPn95vtpoTDoWHMyoJiJnAJcBC1X1FJzFX7uynzV47pzwNcAZ7qEzgQ3uT0RkDtCsqi2q+tk0WXD7+xiQEkD6E5FG4HHgK6o6BzgReBaoOqqGGJMjCw5mtJuE86YcAVDVZlXdKyKLRORFEVknIs8dzsDpfkK/S0RWi8ib7mrRw5/OV4uTD3+1+2bf30u4wcD9+QP6BovVvV5jsXv7RhF5R0RexFmgiIicCVwOfN/9pjPTfY6rxdmT4R0ROcc9divwkKq+7LZPVfUXqnpARP5ORB4SkedFZIeIXCkid4rIGyLyrDhpVIw5KhYczGj3PDDVfUP9sYic574p3gNcpaqLgH8DvtvrnApVPRO4xX0MnFQT56rqAuAbwPfSvNZqjgSHJTjJyw7n6zkTJ3j0cAPSt3CCwkW43xRUdTVOOocvq+p8Vd3mnuJT1SXAXwLfdI+dDGRLqDYTJ1XzFcAjwO9VdR7OKthLs5xnTFbFmD7DjCHu5jaLgHOA84GfA3+P86b6gptOxgv0zqPz/9xz/yAi1W5Ooiqc9BOzcbJ1pvvU/SqwQEQqAL/72ttFZBZOcPjnfuVPA1ap6kEAEfk5cHyW5hxOkrgOmJ5L+4FnVDUmIm+47XzWPf7GIJ7DmBQWHMyop6oJnCykq9w3yVuBzap6RqZT0tz/Ds6n7v8tzj4Yq9K8TkhE3gU+g5MCGeAVnJw9E4C3c3itbCLuzwRH/jY3A4uAX2c7R1WTIhLrlS8nif19mw/ALiuZUU1E5rif9g+bj7P7XYM7WI2I+KXv5iafcI+fjZOdsx2oAfa4j9+Q5SVfwrns87J7/2Wc7RlfSZPIbA2w1J3B5Aeu7vVYJ7kNKt8LXN97BpaILBeRiTmca8xRs+BgRrtKnMtBb4nIJpzr+t/AyUL5jyKyEXidI2MFAG0ishpYAfwf99idwP8VkZdwLs9k8hIwgyPBYT3O3gCr+xd0U0L/nVv2txz5tgFO3v0vuwPgM/uf2+s5DuCkYf4ndyrrFpxLaP03cDImrywrqxlTRGQV8Nequna462LMSGbfHIwxxqSwbw7GGGNS2DcHY4wxKSw4GGOMSWHBwRhjTAoLDsYYY1JYcDDGGJPi/wPnptjCTzHG8wAAAABJRU5ErkJggg==\n&quot;,
&quot;text/plain&quot;: [
&quot;&lt;Figure size 432x288 with 1 Axes&gt;&quot;
]
},
&quot;metadata&quot;: {
&quot;needs_background&quot;: &quot;light&quot;
},
&quot;output_type&quot;: &quot;display_data&quot;
}
],
&quot;source&quot;: [
&quot;g = sns.scatterplot(x = 'SepalWidthCm', y = 'SepalLengthCm', hue = 'Species', data = df)&quot;
]
},
{
&quot;cell_type&quot;: &quot;markdown&quot;,
&quot;metadata&quot;: {
&quot;papermill&quot;: {
&quot;duration&quot;: 0.007205,
&quot;end_time&quot;: &quot;2020-10-15T15:29:22.452895&quot;,
&quot;exception&quot;: false,
&quot;start_time&quot;: &quot;2020-10-15T15:29:22.445690&quot;,
&quot;status&quot;: &quot;completed&quot;
},
&quot;tags&quot;: []
},
&quot;source&quot;: [
&quot;Using the <code>g.legend</code> function of a graph we are able to move the legend to a more suitable location&quot;
]
},
{
&quot;cell_type&quot;: &quot;code&quot;,
&quot;execution_count&quot;: 3,
&quot;metadata&quot;: {
&quot;execution&quot;: {
&quot;iopub.execute_input&quot;: &quot;2020-10-15T15:29:22.486058Z&quot;,
&quot;iopub.status.busy&quot;: &quot;2020-10-15T15:29:22.484490Z&quot;,
&quot;iopub.status.idle&quot;: &quot;2020-10-15T15:29:22.703773Z&quot;,
&quot;shell.execute_reply&quot;: &quot;2020-10-15T15:29:22.704297Z&quot;
},
&quot;papermill&quot;: {
&quot;duration&quot;: 0.244028,
&quot;end_time&quot;: &quot;2020-10-15T15:29:22.704488&quot;,
&quot;exception&quot;: false,
&quot;start_time&quot;: &quot;2020-10-15T15:29:22.460460&quot;,
&quot;status&quot;: &quot;completed&quot;
},
&quot;tags&quot;: []
},
&quot;outputs&quot;: [
{
&quot;data&quot;: {
&quot;text/plain&quot;: [
&quot;&lt;matplotlib.legend.Legend at 0x7fc2034acb10&gt;&quot;
]
},
&quot;execution_count&quot;: 3,
&quot;metadata&quot;: {},
&quot;output_type&quot;: &quot;execute_result&quot;
},
{
&quot;data&quot;: {
&quot;image/png&quot;: &quot;iVBORw0KGgoAAAANSUhEUgAAAe4AAAEGCAYAAACjAHa5AAAABHNCSVQICAgIfAhkiAAAAAlwSFlzAAALEgAACxIB0t1+/AAAADh0RVh0U29mdHdhcmUAbWF0cGxvdGxpYiB2ZXJzaW9uMy4yLjEsIGh0dHA6Ly9tYXRwbG90bGliLm9yZy+j8jraAAAgAElEQVR4nOzdeXhU1fnA8e+ZLZPJvkEgLEFICCEkLBHEvVoVFahVUEAqKCiIFTesa8W61or+LFpEXFpRitatKCpaEAVU0LDvYQ1bCNm3yezn98eEmElmJgNMVs/nefLonLk39yQK79x73vO+QkqJoiiKoijtg6a1J6AoiqIoSuBU4FYURVGUdkQFbkVRFEVpR1TgVhRFUZR2RAVuRVEURWlHdK09gVMVHx8vk5OTW3saiqIo7cr69euLpJQJrT0P5cy1u8CdnJxMTk5Oa09DURSlXRFC5LX2HJTgaNZH5UKIe4QQ24UQ24QQi4UQxgbvCyHEXCHEXiHEFiHE4Oacj6IoiqK0d80WuIUQScBMIFtKmQFogXENDrsSSKn9ug14tbnmoyiKoigdQXMnp+mAUCGEDjABxxq8/ztgoXRbC0QLIbo085wURVEUpd1qtsAtpTwKzAEOAflAuZTy6waHJQGH670+UjvmQQhxmxAiRwiRU1hY2FxTVhRFUZQ2rzkflcfgvqPuBXQFwoQQExse5uXURsXTpZQLpJTZUsrshASVFKkoiqL8ejXno/LfAgeklIVSSjvwMXBug2OOAN3rve5G48fpiqJ0IDanjRPmE6zNX8uB8gOUW8tbe0qK0q4053awQ8A5QggTUANcCjTcx/Up8EchxHvAMNyP0/ObcU6KorSyPaV7mLxsMhanBYDxaeO5Y+AdRIVEtfLMFKV9aM417nXAh8AGYGvttRYIIaYLIabXHvYFsB/YC7wOzGiu+SiK0vpKLaU8te6puqANsHjXYqrsVa04K0VpX5q1AIuUcjYwu8Hw/HrvS+CO5pyDoihth8PloKC6oNF4pa2yFWajKO2TqlWuKEqLiQqJYuRZIz3G4oxxxBnjWmlGitL+tLuSp4qitF8GrYGbM24mVBfKlwe/JDkymVnZs4gLVYFbUQIl3E+r24/s7GypapUrSvtmd9mpsFZg0BqIMES09nR+FYQQ66WU2a09D+XMqTtuRVFanF6jV3fZinKa1Bq3oiiKorQjKnAriqIoSjuiAreiKIqitCNqjVtppMpWRbm1nP3l++kV1YuokKigJxBJKSmqKWJ/+X7C9eF0Ce9CrDE2qNcAd8GPQnMhRZYi+kT3ITYkFp1W/W/fmqxOK2WWMvaW7SUxLJG40DiiQ6Jbe1qK0m6ov8EUD1aHlRWHVvDo94/WjT0+/HFGnjWSEF1I0K5zvPo44z4fR4mlBICshCz+/pu/BzVhqdRSyl9+/AsrDq0AwKQz8e+r/03v6N5Bu4Zy6nJLcpm8bDI2lw2AMaljuHvw3arkqaIESD0qVzyU28r5609/9Rj7289/o8JWEbRr2Jw23tj6Rl3QBthcuJnc0tygXQOgqKaoLmgDmB1m5vw8R1XpakWlllKeXvd0XdAG+DD3Q/XfRFFOgQrcigeXdDWqG212mHFKZ9CuYXfaOVbduAlcfnVw+8vU/2BwUoG5AJvT5uVopSU4XA5OmE80Gq+2V7fCbBSlfVKBW/Fg1BoZljjMY2xI5yEYtcagXSPMEMb1qdd7jOk0Os7pck7QrgHQK6oX4fpwj7FrU65V66mtKNIQye96/85jLM4Y1yz5DYrSUanKaUojReYiXtvyGj8X/Ex252ymZU4jwZQQ1GuUW8tZc3QNC3csJEIfwb3Z99I7qndQ19EdLgeHKw/zQs4L5Ffnc23KtVzd62qijSpwt6ZSSykf5n7Ilwe+JDkqmXuG3EO38G4IIVp7ah2aqpzWcajArXhlcViotlcTpg/DqAve3XZ9UkrKrGVohZbIkMigf3+7086hikNsLNyITujQa/Wc2/VcYowxQb+WcmocLgcV1gpCtCGEGcJaezq/Cipwdxwqq1zxyqgzNlvAPkkI0axBtNRayrjPx3n0fr5r8F1M7j8ZnUb9r9+adBodsaHq8biinA61xq10WPvL9nsEbYCl+5dSbi1vpRkpiqKcORW4lQ7L27p89/DuGLSGVpiNoihKcKjArXRYccY4ft/n93Wvo0OimXX2LNVGUlGUdq3ZktOEEH2B9+sNnQU8JqV8qd4xFwNLgAO1Qx9LKZ/w931VcppyKsosZVTYKii3lpMYlkisMRatRtva01KUFqeS0zqOZsvQkVLuBgYCCCG0wFHgEy+HrpZSjmyueSi/btHGaLX9S1GUDqWlHpVfCuyTUua10PUURVEUpUNqqcA9Dljs473hQojNQogvhRD9vR0ghLhNCJEjhMgpLCxsvlkqiqIoShvX7IFbCGEARgMfeHl7A9BTSpkFvAz819v3kFIukFJmSymzExKCW8FLURRFUdqTlrjjvhLYIKUsaPiGlLJCSllV++9fAHohRHwLzElpAxwuB0U1RV6bgSiKoijetUT5qPH4eEwuhEgECqSUUggxFPcHieIWmJPSysosZSzZt4R/7/w34YZw/nT2nxgQPwCT3tTaU1MURWnTmvWOWwhhAi4DPq43Nl0IMb325RhgmxBiMzAXGCfbW/F05bT8cOwH5uTM4Vj1MXJLc7ntf7dRXKM+symKojSlWe+4pZRmIK7B2Px6//4K8EpzzkFpe6psVSzZt8RjzCVdrDu+ju6R3VtpVoqiKO2DqpymtLgQbQi9o3o3Gk+OTG75ySiKorQzKnArLU6v1TOp/yS6hXerG7u428WcFXVWK85KURSlfVC9DZVW0TmsM+9c9Q4lNSWEaEOIDIlsssVnla2KUkspO0t20ie6D3GhcUSFRLXQjBVFUdoGFbiVVhMfGk98aGC7/xwuB98e+ZaHVj9UNzZz0Exu7HejykRXFOVXRT0qV9qFUmspf/3prx5j8zbPo9JW2UozUhRFaR0qcCvtgpSyUZB2uBw4pbOVZqQoitI6VOBW2gWTzsRlPS7zGMuMzyRUF9pKM1IURWkdao1baRfCDeE8NOwhekX1YvXR1QzsNJApGVOaTGgDKLGU4HQ5iQyJJEQb0izzq7ZXY7abMWgN7T5hrsxSht1lJ1wfTqhefTBSlLZGtLdCZdnZ2TInJ6e1p6G0ErvLTpWtCpPORIjOfxC2Oqzkluby1NqnKDAXMKr3KG7OuJlYY2xQ51RoLmROzhy+P/Y9fWP6Mnv4bLpHdEcIEdTrNDeny8mB8gP85ce/kFeRxyU9LuHOQXcSFxrX9MlKmyeEWC+lzG7teShnTj0qV9oVvUZPjDGmyaANUGYtY/Kyyewo2UGxpZh/bf8X7+96H4fLEbT5VNoqeXLtk3xx4AvKreX8dPwnpnw9hWJL+yvfWmIpYdKySWwq3ESptZSP9nzEyxtfpsZe09pTUxSlHhW4lQ5rf/l+bC6bx9hXeV9Rbi0P2jWsTivfHfnOY+x49XHMdnPQrtFSSq2lVNgqPMaWH1pOlb2qlWakKIo3KnArHVbnsM6NxnpF9grqOrdAeFSAA/dTAaPOGLRrtJRIQyQCz8f7yZHJ6DQqFUZR2hIVuJUOKzYklglpE+pex4fGc2/2vYQbwoN3DWMsz5z/TF12u1ZoeXjYw0ToI4J2jZYSpg/jzkF31gXvSEMkjw1/LKAEQEVRWo5KTlM6tEJzIWaHmUpbJfGh8cSEBLY+fipsThvl1nKKLcXEhMQQrg8nzBAW1Gu0lEpbJdX2asqt5cQaY4kxxqg77g5CJad1HOpPpNJhlVhKeGTNI6w7vg69Rg/Au1e9S1psWlCvY9AaSDAlkGBKCOr3bQ0RhggiDBEkhiW29lQURfFBPSpXOqwT5hP8mP8jLunC6rRidVqZ8/McKqwVTZ+sKIrSRqnArXRYldbGdcxLraU4ZPC2gymKorQ0FbiVDis5KrlRFbPxaeOJDolupRkpiqKcObXGrXRYscZYFl+9mHmb5nGs6hhjUsdwQbcL0Ihm+LxqqQC7GbQGMAW3MpuiKEp9zRa4hRB9gffrDZ0FPCalfKneMQL4O3AVYAYmSyk3NNeclF8XrUZL94juPDb8MWxOm3ufcnOUIa08Dl8+APu+gc79YfQrEHsWaNQDLUVRgq/Z/maRUu6WUg6UUg4EhuAOzJ80OOxKIKX26zbg1eaaj/LrFaoLJSokqnmCdk0ZfHon7PgvWCvg0I+wcBRUFwb/WoqiKLTcGvelwD4pZV6D8d8BC6XbWiBaCNGlheakKGfOYYW9//McqzgGturWmY+iKB1eSwXuccBiL+NJwOF6r4/UjnkQQtwmhMgRQuQUFqo7GaUNEQJie3uO6UJAtcNUFKWZNHvgFkIYgNHAB97e9jLWqJSblHKBlDJbSpmdkND+i1woHUh4J/j9axDRBZIGu/959YtgjGztmSmK0kG1RFb5lcAGKWWBl/eOAN3rve4GHGuBOSmKV3a7lWJbKT8f/5kwnYn+8Rlem5XUV5WQQvHUL9lYsIHU2L50NSUS3U5LniqK0va1ROAej/fH5ACfAn8UQrwHDAPKpZT5LTAnRfGqwFLIuM/H1bX+7BnZkzcvf9Nn8Ha4HKw59iP3r7q/bmxiv4nMGDiDCEP7azSiKErb16yPyoUQJuAy4ON6Y9OFENNrX34B7Af2Aq8DM5pzPorij9Vew9vb3/bo151Xkcfa/B99nlNmLeOvP/3VY2zRzkVU21VymqIozaNZ77illGYgrsHY/Hr/LoE7mnMOihIoh8tBqbW00XhxTbHPc6SUVNg8a59LJA6XKquqKErzUBUiFKVWWEiER/9uAIPGwGU9L/N9jj6Ma1Ou9RjrF9sPk97ULHNUFEVR/biV1mO3gKXcvaXKFN9slcaKa4pxSRfhhnBCdf63aZWYC9lTto9/7Xgbo9bI9KzpdDMlEmaM8nlOmaWMvWV70QgNdpedlOgUYkNV2VOlbVH9uDsOVatcaR3mYlg7D35+E0Ii4YpnodeFYAxeQpfFYWF78Xae+PEJCswFXN3rau4YdAexRt9BNdaUwDBTAinRfdBptEQaY5q8js1l450d7/DDsR9IjUnlyfOfJNoY3Tw10RVF+dVTf7MoLU9K2P0lrJoDNaVQlgf/uRGqve0YPH3l1nKmfj2V/eX7qbZX85/c//DujnexO+1Nnhtrig8oaFdYK5j9/Wy+OfwNFqeFLUVbmPrVVEpqSoLxIyiKojSiArfS8qyVsPVDzzEp4cCqoF5mX9m+RkliKw6taJRMdiasTivfH/veY6ywppBqh8oqVxSleajArbQ8nRG6Dmw83ql/UC/TNbxro7GU6BSMOmPQrqERGpKjkj3GQrQhTa6lK4qinC4VuJWWpzPAsOnQqd8vY5njIK6373NOQ4wxhikZU+gR0YPM+Ex6RvTknux7CNMHr6pZXGgcz57/LBF699q8TqNj9vDZqviKoijNJqCsciFENvAI0BN3QpvAvQ07s3mn15jKKj81dqedYksx6/LXER8aT1psGnGhcU2f2BKqTrgfm2v1YIgAU9NryqeqsLqAvWX7OFp9jHO6DCPeEI0xxHdQddhrKLGW8fOxHzHpTQzoNJD4sES/13A43fu/K+2VhOnDiNRHEtpEk5ET5hPsK9tHXkUe53Y9l6iQKKJCfGeuK8qZUlnlHUegWeWLgPuBrYCr+aajBNvhysPcsPQGLE4LAGmxacz/7fy2EbzDO7m/mklJdQH3f3c/6ws3Au674Xeu+CcZnbw8pq91oqaIsZ+Pq1sH7xbRjXeu+Kff4K3T6kgwJZBAYA1wTphP8Ofv/8wPx34AQCu0LLhsAUO7DA30R1MU5Vcs0EflhVLKT6WUB6SUeSe/mnVmyhmrtlfz8saX64I2wK6SXewv39+Ks2o5BeaCuqAN7spoL26cS0W199awDnsNC7e/7ZG8dqTyCOuO/hDUeZVby+uCNoBTOnlx/YsUBDmrXlGUjinQO+7ZQog3gBWA9eSglPJj36corc3pclJuK280XmENXlZ1W1Ztq2o0VmmrxCG9lyN1uZyUePl9lVnLgjovs8PsdV4uqR5mKYrStEDvuG8GBgIjgFG1XyOba1JKcESGRDIpfZLHWIQ+ggEJA1ppRi2rZ9RZxBk9lwQmpl5PdKj3x/OGkHBu6nejx1iINoTf+Cl5ejoSTYkkNnj0fn3q9cSHxgf1OoqidEyBJqdtlVK2ib/tVXLaqamwVrC1aCvv7nyX+NB4pmVOo0tYF7QabWtP7fSYS8FpA60OTP7X6aXLRX7VUd7Y+gZHzccZ2/sazk7MJsrkey26qrqQvRUHeWPH25h0RqZnTiMptDMhxsig/hjHqo7x5tY3OVx5mJFnjWR41+Ek+JmXopwpb8lp69ev76TT6d4AMlC7jNoKF7DN4XBMHTJkyAlvBwQauF8H/k9KuSPIEzxlKnCfnmpbNTqNjhBdSGtP5fSVH4Eld8DBNe594Ne85t5CJoT34201ULAFW9UJbAYT4RUFkHoZhDUdIKvNJWg0gtAAqqedLrPdjMVhUXXNlRbhLXBv3rz508TExH4JCQkVGo2mfTWu6KBcLpcoLCyMOn78+I6srKzR3o4JdI37fGCSEOIA7jXuVtsOppyeMEPw9i63iupi+PBmOPyT+/WRHHj3Wpi63Hdmek0J/PMqDC4HhpNj598LFz8ITXyACTM1fzA16U2qi5jS2jISEhJKVdBuOzQajUxISCg/fvx4hq9jAg3cI4I0J0U5PU7bL0H7pLI8sDdO9KpTuBsa9sXetRTOub1Zt6EpSjuiUUG77an9b+Jz6cLvmoYQ4mwhxJX1t4DVbgPLBFQmjdJyNFqI7uk5FhLpLp/qS0yPxmOdB4C6y1WUNuWBBx5I7NOnT//U1NT0tLS09G+++SZojwgvuuiiPkVFRe00qce7pu64nwcmexnfCSwALgn2hBTFK1M8XPcGLBrj7uGtD4XfvwahftagTfFw4f1gLoHYs2DnUrjscQgJb7FpK4ri3/Lly8O++uqr6K1bt+4IDQ2V+fn5OqvV6iNx5dR99913e4P1vdqKprII46SUBxsOSin3Ak2W3hJCRAshPhRC7BJC7BRCDG/w/sVCiHIhxKbar8dOafZK++W0Q/lR2LDQHVCrvCZP/kKjga6D4I6f4I85MHMj9P6N/7Xq0GgKht3KyqxRvBsdzaGxCygLDW52OLj3YO8r28e/d/6bTSc2UWopDfo1FKWjOnr0qD42NtYRGhoqAbp06eJITk62JyUlDbj99tuTBgwY0G/AgAH9tm3bFgJw7Ngx3RVXXNE7IyOjX0ZGRr+vv/46DKC8vFwzZsyY5NTU1PTU1NT0f/3rX9EASUlJA/Lz83UA8+bNix0wYEC/tLS09AkTJvR0OBw4HA6uu+665JSUlP6pqanpf/nLX9r8OlpTd9z+Ci4H8ijj78AyKeUYIYQB8PaMcrWUUu0J/7UpOwSvXQC22vaXcX3g5i/9rz1r9RCR6P4KwPHq48z6bhabCzcD8ELOC7w14i0GdRp0prOv43A6WHloJY98/0jd2JjUMdwz+B4iQ4L/IUFROpprrrmm4tlnn+2anJyccf7551eMHz++5Oqrr64CiIyMdG7dunXnK6+8EnfnnXd2X7ly5d5p06Z1v/feewuuuOKKqj179hiuuOKKlP37929/8MEHu0RGRjpzc3N3ABQWFno8Ht+wYYPxww8/jM3JydkVEhIiJ06c2GP+/PlxWVlZNfn5+fo9e/ZsB2gPj9WbuuNeLoR4WgjP/TZCiL8A3/g7UQgRCVwIvAkgpbRJKYNbgkppn+wW+O75X4I2QPFed6Z4EBWYC+qCNoBDOpi7YW5QS4uW2cqYkzPHY+yj3I+8VkdTFKWxqKgo17Zt23a88soreQkJCY5Jkyb1njt3bhzApEmTSgBuvfXWko0bN4YDfP/995F33XVXj7S0tPRRo0b1qaqq0paWlmpWrVoVec8999Q9uktISHDWv86yZcsitm3bZsrKyuqXlpaWvmbNmsj9+/eHpKWlWQ8fPhwyadKk7h9++GFkTEyMx3ltUVN33PcBbwB7hRCbaseygBxgahPnngUUAv8UQmQB64G7pJTVDY4bLoTYDBwDZkkptzf8RkKI24DbAHr08JJwpLQvLgd4e5xsaVxu9EyYvWScV9mrcMrg/bmUUjYK0hKJo2E2u6IoPul0OkaOHFk5cuTIyszMzJp33nknDkCj+eXeUgghwf1nLicnZ2d4eLhHNryUEuGrpoP7fTF27Njif/zjH0cbvrdt27Ydn3zySeS8efM6vf/++7EffPDBwSD9aM3C7x23lLJaSjkeuAz4V+3X5VLKcVLKxoWgPemAwcCrUspBQDXwYINjNgA9pZRZwMvAf33MY4GUMltKmZ2QoKpLtXsh4XDeXZ5jhnA466KgXqZXVK9GZUQnpE2gc2jnoF0j3BDO2NSxHmMD4geo/dmKEqDNmzeHbN26tS5ZZePGjaHdunWzASxcuDAW4M0334wZNGhQNcD5559f8dxzz9Wtqf3www+hABdffHHFiy++WDfe8FH5iBEjKpYuXRpz9OhRHUBBQYE2NzfXkJ+fr3M6nUyePLnsqaeeOrp169Y2/4c3oH3cUsr9Qggr7n7c3YQQ3WrHV/k57QhwREq5rvb1hzQI3FLKinr//oUQYp4QIl5KWXQqP4TS+pwuJ6XWUqSUhOnDmg5cnTOovGcb1QKkdBGrMxESSJUyc4k7sU2jhTD/OxITjAm8e9W7/HPrPzlWfYxrU64lMyETrdb/EpbVYaXSXglAdEg0Oo3vPyahulCmZU5jRPIItBotdqeN5KhexDRjxTVF6UgqKiq0M2fO7FFRUaHVarUyOTnZ+vbbb+dlZ2dHWa1WkZmZmeZyucR77723H2DBggWHp06d2iM1NTXd6XSKYcOGVZ577rmHnn322fybb765R0pKSn+NRiMffvjhY5MmTapbnh0yZIjl0UcfPXrppZemulwu9Hq9nDt37iGTyeSaMmVKssvlEgBPPPHEkdb6XQQq0JKnzwE3ANv5pR+3lFJ6LcdW77zVwFQp5W4hxONAmJTy/nrvJwIFUkophBiKO7j3lH4mpUqetj1mu5mfjv/EU2ufosRSwujeo5k5aKbfUp6F5kJe3/o6n+z5hDB9GPcMuYfzk8733ye87BB8Mh0O/QCJWXDt6+6kNo3/VA2zzYzFGVhp0VJLKQu3L2TRrkUYtUbuGnwXl/W8zG+i2fHKo/z5x8dZl7+OlJgUnj3vKc6KOgtdey4vq3Q4PkqeHszKymqTN0pJSUkDcnJydnbp0uVXue60efPm+KysrGRv7wVaVP4aoK+U8mop5ajaL79Bu9adwCIhxBbc3cWeEUJMF0JMr31/DLCtdo17LjDOX9BW2qZSSykzv5lJgbkAu8vOR3s+4qM9H/lc53W6nPwv738s3rUYi9NCsaWYR79/1P82quoid8nTvO9BSsjf5C55avbeW7s+k8EUcD3wtflreWPbG9Q4aii1lvL4j4+TX53v8/jy6kL+/MNs1uavRSLJLc3ltuW3U6a2hCmK0kwCLXm6H9BTrxd3IKSUm4DsBsPz673/CvDKqXxPpe3ZUbwDiefnrRWHVjAmdYzXR8bl1nK+Pfxto/G1+WvpE9PH+0Wc9sZZ5+WHwV5zutNuxOKwsOzAskbja46uoW9sX6/n2KSTtcfXeYwVW4qpdphVaUFFOQNHjx7d2tpzaKuaKnn6shBiLmAGNgkhXhNCzD351TJTVNq6XlG9Go1lxGcQqvNeBiBMH0a/uH6NxtPj0n1fRKOFmGTPMWOU/5Knp0iv0TOw08BG4xnxPmv9o0XSJ9rzw4ZRa/T5syuKopyppu64T97irAc+bfCeeqStAJBgSuCWjFv48diPhBvCqbZXc1vmbRh9BNUQXQgT0iawvmA9eo2eGkcNfWP60i2im++LhCXAmLfca9yRXaHiGFzxtP+Sp6dIq9EyuvdoVh5aycbCjQCMOmsUKTEpPs+JDe/CX897mttW3E6JpQSj1sgz5z5OpL6dd2NTFKXNCjQ57S4p5d+bGmsJHSo5zVziLjxy+CdIPt/dRMMU3Gxkq62KYksp3x1aQUJoAoMSs4kLC952qJMKzYVsOrGJE+YTXNj9QjqFdvLb+9vutHOi5gSrjqwi2hDN4M6D6dzEvMotZeRXHWVd/k9kdcqiZ2RPYvwls52mEksJZrsZrUaLSWciKiTK7/FOh40SSzFmh5lQnYlIfRjGJqqmlVQXsKNoOwfKD3Bhj9+QEBKLKTTa9zVcTootxaw5ugad0DG863DiQ+P97ltVlPraW3Lar52/5LRA17gn4S5fWt9kL2NKoKyVsOYl+KHer/CyJ2Hore4GGkFyqPIwN3xxI3aXHYA+0X1447fzgxq8i2uKmb58OrmluQDMWT+HxVcvJi02zec5R6uOMvazsVicFgB6RPTg7SvfbrTv+iSrw8pn+5fy3M/P1Y1N7DeROwbeQbghuE1DYo2xxBoD78et1RlICO8S8PGl1QXcv/pBfipwfwCds2kuCy75B8O6ne/znMKaQq779DoqbO4dlPGh8bw/8n06mdp8WWVFUYKsqTXu8UKIz4BeQohP632tBIpbZoodlLUS1v7Dc+y7v4IleFVhq2tKeXnzvLqgDbC3bC97S/cE7RoABysO1gVtAIfLXVq00lbp9XiLw8JrW16rC9oAhyoPsaVwi89rVNgqeGWTZx7j4l2LqbY3LMTX9pVYy+qCNoBLunhx48uUVB33eryUkvd2vVcXtAGKaopYnre82eeqKM3NZDL5bB4waNAg35/+z9CDDz4YWNODNqipO+4fgHzcvbdfqDdeCfj+W1ZpmnS5S3/W57AENXPAKZ1Ueyn7abY1VfTu1HgrLWp2mHFJl5ej3YGqyt54Dt7G6rM6PDc1OKXT5zXaMpuj8eYMs8OMxPvPIqX0CNon+fpgpCjtncPhQKfTsXHjxl3NdY25c+d2+etf/+r903Ib11TJ0zwp5bdSyuFSyu/qfW2QUv4qN8UHjT4MUq7wHMscD4bgJTVFmuKZkn6Tx1hUSBQZnRtnTp+JtNg0YkI8148k8tUAACAASURBVOZvybjF59qwSW/iloxbPMbC9eEMSxzm8xomvYlr+lzjMXZu13PbZfZ2QlgnuoV7JuLd1Hc80aHey/lqNBpu7HcjWvFLxTeDxsDI3qqpntKy3l2bFzv06eUDej34+ZChTy8f8O7avMDXlJqwdOnSiGHDhqWOGjWqV9++ffvDL3fjeXl5+uzs7L5paWnpKSkp/ZctW9ZofSwnJ8d4smVnampq+skyqt5aec6YMSPJarVq0tLS0kePHt0L4PHHH++ckpLSPyUlpf8TTzzRCaCiokJz8cUX9+nbt296SkpK/9dffz0GYNasWV0yMjL6paSk9B8/fnxPl6tlbyACTU6rpPG9YDnurPP7pJT7m2FuXrXp5DRLJdjNIABTvHsLkz/VhbDlAzjwLaReCf1GNVnG81RVmovILdvLO7vfo7MxjkkZN5NoSkSjDTS9oWku6aKguoCFOxaSX53Pjf1upG9MX7/VxqpsVewr28fCHQuJDonm5oyb6RLWBa2f31mppZQVectZeeRbzu6czajeo/1XWmvDTlTl8++di9hfeYhrzxrFoE4DiTL5rsNf46ihuKaYMqt7KSXOGEdsaCwhWlWdTQnMmSanvbs2L/bJpTt6Wh2uuhu+EJ3G9eeR6XkTz+lZcrrzMplMg8xm88alS5dGjB07ts/GjRu3p6Wl2eq/N3v27M4Wi0U899xzxx0OB5WVlZqYmBiPaDlp0qTu55xzTvXtt99eYrFYhMPhIDc3N2TWrFndvvzyy30nW3mec8451X/84x+LT35vgNWrV5umTJmSnJOTs0tKyZAhQ/q9/fbb+/fs2ROybNmyqPfeey8PoLi4WBsXF+csKCjQdu7c2QlwzTXX9Lr++utLJkyYENQuScFITnsRd/euf+MOS+OARGA38BZw8RnPsr2rKoSvHobtH7u3Lo18CXpd4P8OOiwBhk2DIZNAb4JmyBCOMMUzxBRP/7j+aDV69Prg7Xs+SSM0dAnvwr3Z9+JwOQK6C7a77Pxw7Ae6hHXBJV1sLdxKlCGKiJAIn+fEWCq5bv/PXKWLI+TwLrSdhkNITJMlT9uiTuFd+OOgmdgdFkKNTffttjqsfLL3E97Z8Q5aoWVa5jR+3+f3KnArLWbuij1J9YM2gNXh0sxdsSfpTAJ3fZmZmdUng3Z955xzTvW0adOS7Xa7ZsyYMaXnnntuo8pLw4cPr54zZ06XI0eOGMaNG1c6YMAAa/1WngAWi0XTqVOnRk+Lv/322/CrrrqqLDIy0gVw9dVXl65cuTJi9OjR5Y888kj322+/Pel3v/td+YgRI6oAvvzyy4gXX3wx0WKxaMrKynTp6ek1uG9mW0SggXuElLL+c8wFQoi1UsonhBAPN8fE2hWHFdbOg63/cb+uzIf3xsNdW5p+9K3RBvXxuC9GPwExWPQaPXqNvsnjXNLF1we/Zt7meR7jS363xHfgri6C/0xCHNtAXfuSXUvh1m8gPPjb21qCTmdApzMEdOymwk0s2LKg7vUL619gYKeBDDQGd9lDUXwprLR6/Z/V1/jpMJlMXp85X3nllVWrVq3a/dFHH0VNnjy518yZMwsiIyOdzzzzTFeABQsWHJw+fXrJBRdcUP3JJ59EXXnllanz5s076K+VZ32+njxnZmZaN2zYsOOjjz6KeuSRR5KWL19e8cQTTxy/7777eq5bt25Hnz597Pfee29Xi8XSoncPgV7MJYS4Xgihqf26vt57qhCLpQJyG5TKlC44saN15tPGVdurWXFoRaPxnAI/SyBOGxzb4DlWfiSoJU/bKofLwVcHv2o0/s3hb1phNsqvVUJESKM7YX/jwZSbm2tISkqy33fffUUTJ04s2rBhg+mmm24q27Vr145du3btuPDCC807duww9OvXz/roo4+euPzyy8s2bdoU6quVJ4BOp5NWq1UAXHLJJVVffPFFdGVlpaaiokLzxRdfxPzmN7+pPHjwoD4iIsI1Y8aMkrvvvrtg06ZNJrPZrAFITEx0lJeXaz777LMWbwUY6B33jbj3bM/DHajXAhOFEKHAH5tpbu2HwQRdBzcO1HG9W2c+bVyoLpSshCx+zP/RY7xfbOMyqHU0Oog9C0rqpVMYo4Na8rSt0ml0ZHfOZun+pR7jgzsNbqUZKb9GMy9NOeptjXvmpSl+72aD4auvvoqYO3duok6nkyaTyblo0aIDDY955513Yj/44IM4nU4nExIS7M8+++yxzp07O7218kxNTbXdeOONhf369UvPyMgwf/rppwcmTJhQPHjw4H4Af/jDHwrPO++8mo8++ijyoYce6qbRaNDpdHLevHl58fHxzhtvvLEwPT29f7du3WxZWVktvic1oOS0tqTNJqdVHIV3r4MTO91B5qIH3cVU/FTD+jUrqinirm/uYkvRFjRCw7i+45ieNd13H2spIX9zbUewYgiJgLFvQ/IFEODj5vasxFLCI2seYc3RNQCMSB7BQ8MeOqVCMcqvWzAqp727Ni927oo9SYWVVkNCRIht5qUpR4O1vq148pecFmhWeQJwK5BMvbt0KeUtvs5pLm02cANUnXBnlWsN7sDSAuvKzaHMUkZeRR4/Hf+JsxPPJjkymWhjkD+AWM2U2EqpsVWh1egJ05uICG+iHoK5FKzl7qWJkAgIiYQw/1nlxdUFbDyew+GqI1zS8zI6GWMJDfbP0kLKLGWYHWYEApO+6VKsilKfKnnavgQjq3wJsBpYDjiDNK+OJ7z9l5+ssdewaOci5m+p677KlAFTuHXArYQFs3FGeR6xCy52F50Bd+evm790NxDxxm6Bje/A//78y9jZt8Klj4GPrOzi6gJmfDOTHSXuJYyXNs/jX5e9waAuZwfv52hB0cZoommfHzoURQmeQJPTTFLKB6SU/5FSfnTyq1lnprSKSnslb217y2Ns4faFwS0taqmAVXN+CdoApQfh0I8+T8FSBt895zmW8yb4qQJ3vDq/LmiDO5v9pU2vUF594jQnriiK0voCDdxLhRBXNetMlDZBSomjQVE8h8vhc7vEaXE53UsKDdn8fTiQ4GxQKlS63F8+NCyRCu466e2xTKqiKMpJgQbuu3AHb4sQokIIUSmEaFw8WWn3THoTV/a60mPsiuQrglta1BQD597pOWaMgt6X+D7HEAGDPMu30udyd+EaH3pE9qSzyXOP95T0PxCtOmopitKOBbTGLaU8rSwrIUQ08AaQgXsb2S1Syh/rvS9wbzO7CjADk6WUG7x9r/ag0lyEpbYTV4wxFp2fftRtVYQhgj+d/SeyO2ez+uhqzut6Hr/t+Vu/5UsBcNrd/cWR7mDaVDWw+FSYshzWvQqhMTD8TgjzE1BDwuGSR2HwTe5rSCA22X2ur0uEJ/L+1YvJrz6ORqPFIHR0NsYh2mGlNQBsZrDWfl42RkMzVMFTFKXtC+hvMOE2UQjx59rX3YUQQwM49e/AMillGpAF7Gzw/pVASu3XbcCrAc+8jSmuPsFf1j3Nbz8ewdjPx/Pd4ZWYa4LXorMlxRpjuS7lOp674DnGpo5tesuRpRJ2fgbzz4X/S4el97pLwPoTFg/dz4bRL8MVz7iDcFPbuqwV8Pk9sOBi+O90qDgGfor7m+1mthZv586VMxn/+Xj+sflVbMGvKtsyqoth1d/g71nw8hBY+2rtByVFad9aq61nIA4ePKgfMWLEWadz7tChQ/uuWrXK9yPBMxDorcc8YDgwofZ1FfAP34eDECISuBB4E0BKaZNSNoxkvwMWSre1QLQQokugk28rrHYzC7f/i68OLcclXRRbirln1Z8os7fftotCCIw6IyKQ+unmYvjoFndZUpcTtn3gThxz2ps+1xAGgTyZqC15ytHaBzKFu2DRGDD7/oBQbivnrpV3UVRThEu6WH5oOW9tewubs9kLPQXfoR9hzf+5E/psVbDicSjKbfI0RWmPHA53nk1ztvWsz273/ndVcnKyfdmyZS3SROvkzxyIQAP3MCnlHYAFQEpZCjRV9eIsoBD4pxBioxDiDSFEw/1EScDheq+P1I61K9XWclbnr/UYk0j2lLTI/3OtL3+zu0BKfbnL3NnjweK0Qf4mz7GKY35Lnh4oO9AoEW310dVee1u3aS4n7FzSeHz3ly0/F+XX7ec3Y5mTOoDHo4cwJ3UAP7/ZJtp6FhcXa5OSkgY4ne7dypWVlZrExMRMq9Uqtm/fHnLBBRek9O/fv9+QIUP6bty40Qhw3XXXJU+dOrXbsGHDUmfMmNHt888/D09LS0tPS0tL79evX3ppaalm9+7dhpSUlP7gDqy33XZbt9TU1PTU1NT0p59+uhPAkiVLIvr165eempqaPnbs2OSamppGdzuvvfZabGpqanpKSkr/22+/vS7GmUymQXfffXfXzMzMtBUrVjRqVepLoIHbLoTQUluXvLYgS1OpuTpgMPCqlHIQUA082OAYb7dzjdKXhRC3CSFyhBA5hYVNPIJtBaH6MAbEpTca7xX9Kyl52snL06xuZwe3ecrJkqf1hcb4LXnaPaJ7o7EBcQMw6Zrl6VXz0Wgh+cLG4z3Pbfm5KL9eP78Zy1cP9aSqwAASqgoMfPVQz2AG7y1btoQ9//zzR/ft27e9/vhbb70Ve+mll5bv2rVrx86dO7cPGzbMY1tKXFycMy0tzfzFF19EALz33ntRF110UXlISIicOnVqz3nz5h3avn37zueff/7I7bff3uPkefv27TN+//33ua+//vqRF154IXHu3Ll5u3bt2rF27dpd4eHhHjHuhRdeSMjLywvZvn37jtzc3B1Tp04tNpvNYtq0ab3ef//9fbm5uTscDgfPP/+8R3/egwcP6h9//PGkb7/9NnfHjh3bN27cGPbOO+9EA9TU1GgyMjJqtmzZsuuKK67wvbe1gUAD91zgE6CTEOJpYA3wTBPnHAGOSCnX1b7+EHcgb3hM/b9du+FuH+pBSrlASpktpcxOSPDds7i1hIZEMmPgDPrG9AXctaXvHngH0Yam2zV2COGd4OKH3cEVoOsguOC+4CZPhSW4S5yeLHJjjHa/DvX9d0a0MZpZ2bMY1GkQFyRdwKCEQcwcPBOTn0z0Nqvvle4vcLd/zRwHSUNad07Kr8t3zyXhsHrGDIdVw3fPBe0pqb+2nosXL46/9957u/7000+hDXtxA4wdO7Z08eLFMQD/+c9/YseNG1daXl6u2bhxY/jYsWN7p6Wlpc+YMaPniRMn6loYXnvttaU6ne7kNapmzZrV/amnnupUVFSk1es9Ox1+8803kdOnTy88Od65c2fn5s2bjd26dbNmZmZaASZPnly8Zs0aj2TuNWvWhJ1zzjmVXbt2dej1em644YaS7777LhxAq9UyefLk0lP9PQWaVb5ICLEeuBT3XfI1NNF7VEp5XAhxWAjRV0q5u/bchu2yPgX+KIR4DxgGlEsp80/1h2gLOod35bVLXsHitKLT6onQhmLyk/HcoYTGwPA7YPAf3OvahjB38lkwCQGd0mHaGvcecH2oO2j7SWiLMERwVfKVJITGc7jyMJf1vIyI5uhfXVMGJQdgzzL3k4YuA4P/84fFw+9eBXsVoHH/jlUdfKUlVZ3w/ofN1/hpOJO2nuPHjy974oknkgoKCrTbtm0zjRo1qqKiokITERHh2LVrl9dWjfXvqp955pnj11xzTfmSJUuizj333H7Lli3LrT8fKSVCCI8nwoHUt/B3jMFgcJ384HAqAj5DSrkLqFu0FUIcAnr4PgOAO4FFQggDsB+4WQgxvfb7zQe+wL0VbC/u7WA3n9Ls25i4pmptd2Qh4e6v5qTVQUTgvbeLqwu4fcUd7C7dDcC8za/y1m9fY0jXc4I3J4cNtn4IX9z3y9iAsXDV8363qp0WUwzwK/kwqLQ94Z1s7sfkXsabWW5urqFXr162++67r6i6ulqzYcMG01tvvXX4pptu8kh4zsrKqp42bVqPSy+9tFyn0xEbG+vq1q2b7a233oq55ZZbSl0uF+vWrQsdPnx4o+SY7du3hwwdOrRm6NChNevWrQvbtm2bcejQoXWP5H/7299WzJ8/P+Hqq6+u1Ov1FBQUaAcOHGg5evSoYdu2bSEZGRnWhQsXxl1wwQUeWckXXnhh9QMPPNA9Pz9fl5CQ4Pjggw9iZ8yYcUblG89kQ2uT6cZSyk21j7gzpZTXSClLpZTza4M2tdnkd0gpe0spB0gp22j3EKU9yq86Vhe0wV3y9O+b51EWzJKnNaWw8inPsa0fNFEFTlHaoYseOIouxPOOWBfi4qIHWqStZ3p6ev9+/fqlL1myJOZPf/pTgbfjrr/++tIlS5bEjh8/vm6v5OLFi/f/85//jO/bt296SkpK/48++sjro6q//e1vnVJSUvr37ds3PTQ01DVmzBiPp8r33HNPYbdu3WxpaWn9+/btm/7mm2/GmkwmOX/+/INjx47tnZqamq7RaJg1a5ZHIlbPnj3tjz322NGLLrootV+/fv0zMzPNEydOPKO9wqfd1lMIcUhK2dQdd9C16e5gSpuyMX8dN3091WMsPS6d+Re/REx4kHYdVhbA3IGNS7jetQViegbnGooSBEHpDvbzm7F891wSVScMhHeycdEDRzl7iioo0AxOuzuYEOJlvGR5477bVgtsSpvWPbInXcK6kF/9S9rEremTgxe0wV0h7pwZsHrOL2PJF4ChmZcNFKU1nD2lRAXq1tfUGre/W1t129uRVRWCyw4aPYQ3nclvsVVSaqsEBAa0xAXQ4rTKVlXXXzoqJAqDNmg5LgDEhyXy7oi3+WD3++RVH2Ncn+voE+wtevpQGD4DumTB9o+hx3Dof22TfcKV5mexOymvcRfWCA/RERZy6klAitIW+f0/WUr5dktNRGlDCnPhg5vgxE5ISIPrF7pri/uoolZSfYJV+T8wJ2cOlbZKLul+CQ8Ne4hOfpp5lFhKeDHnRZbuX0qoLpS7Bt/FVb2uarom+inqFN6F2wf+EafLjl4fxEYp9ZniIH00pF4BWoPP35PSckrNNv697hCvfLMXp0ty47Ae3HlpCrFhwf1wqCitoalH5Z/h/VE5AFLK0UGfkdK6qk7Ae+OheK/7deEu+PcNMOXrX/ZQN1DhqObP3/+57vXyQ8vpEdmD2wfcitHLI2Ony8kXB75gyT53NbAqexVPr3ua7M7ZQQ/cABqtDo22Be622mFTmY5qf2EVz3/1S2LiP384yOCeMYzK6tqKs1KU4Gjqb7M5TbyvdDRO6y9B+6TSA+Clt/VJ24q2Nxpbm7+WCak3eA3cZoeZVYdXNRrfcGIDfWL6nPqcFaWBb3c3rrD41fbjjMhIRK9tp93hFKVWU4/Kv2upiShthMYAUd2g/MgvYxFd3I+Afegb27fRWGZ8JhF67yVPQ3WhDOk8hB/zf/QY7x/f//TmrCgNDOsVx8t4fgA9r0+8CtpKhxBoW88UIcSHQogdQoj9J7+ae3JKKwiLd69phyX88vqGd8DkuxJYjD6SOwbegV7jLgWYGZ/JlAFTMBmjvB6v0+gYkzqGoYnuzrA6oWNKxhSSwtpdfxmljUrvGsH4oT3Q1KYbXJ7emcvTAy/eo7Sc5m7reffdd3f973//G9H0kb9YtGhR1MMPP+y3otaZtPw8UwHt4xZCrAFmA/8HjMJd4UxIKWc37/QaU/u4T02No4ZCcyGf7/+cTmGduCjpIuL9BGH3SSVgLgVbpXtbU2gsmPz3ESgzF1HjsuFwOTBo9HRuasuVpYoyWxk19mo0Qku4IYywps4xl0DhbtjzNSSfF1hp0aoTsHcFlOyHAWMgMqn5K7wpflXU2DlaVsPSLcfo1yWSc86KIz48+PkBFTV2qm0OpASTQUu0qX0mplVbHRwvt/Dp5mN0jwnlor6dSIg49d9XUPZxNwOTyTTIbDZvrD/mcDg4nVKgp6IlrnEmTnsfdz2hUsoVQgghpcwDHhdCrMYdzJU27ED5ASZ8PgGndLe76x7RnYVXLiQ+1EfAs1bBmpfg+7//MnbOHfCbhyDE94fWaFP8qW3sLztI9OsXE32yZ3dUN5jyP4j0kTxkr4Gf34CVT7tfr3kRBt0Elz8Fod7v7Kk6AQt/BydqyxSvfh5u+gx6XXAqM1WCyOWSrNlbxIxFG+rGhibH8OrEIcQFOXhHhuqJDNU3fWAbt+NYBTcs+BFX7T1WSqdwFt92TrN82GnK+7vfj52/eX5ScU2xIS40zjY9a/rRG/reEJR93UuXLo148sknu3Tq1Mm+Y8cO0759+7afDOp5eXn666677qyqqiqt0+kUL7/8ct6IESPqumkVFxdrMzMz0w8dOrRVq9VSWVmpSUlJycjLy9s6YcKEniNHjiy/+eabS5OSkgaMHz++aOXKlZHTpk07ERUV5XrwwQe7xcbGOgYMGGDOy8sLWbly5d65c+fG5eTkhC1cuPDQddddlxwREeHcvHlzWGFhof7JJ588cvPNN5fu3r3bMHLkyJQ9e/ZsdzgczJgxo9u3334bCTBp0qSiRx555MSsWbO6LFu2LNpqtWqys7OrFi1alKfRnPlyTaDfwSKE0AB7hBB/FEL8Hmh6o67SqqpsVbyy8ZW6oA1wuPIwuSW5vk+yVsDaVz3HfnrNHdCDxVLuLljirNe8vvwI5H3v/5w1/+c5tukdsPmZV9nhX4I2uHuGf/Ok+85daRUl1TZe+Hq3x9hPB0spq7H7OOPXrcxsY87Xu+uCNsCeE1XkFbd8Sd33d78f+7ef/9azqKbIIJEU1RQZ/vbz33q+v/v9Nt3Ws+E1jEaja/369bsnTpxYdtddd/X88ssv96xfv353cXGxzxvZgoICfU5Ozq4lS5bsmT17dqM1PW8tPwHuv//+E9u2bdu5Z8+e7TU1NZr33nvPx13GqQk0cN8NmICZwBDgD8CkYExAaT4SicPlaDRudzXxl2S9QO9+7cLPrsDTmJjLM2if5CdzHYCGP4uU+J2Xl58dp732PKU1SCQ2Z+MGUC6X+m/ijZRg9/L7cjhb/vc1f/P8JJvT5hEzbE6bZv7m+W22rae3a9x0002lAJs2bTJ2797devJ648aN8/mJfvTo0WVarZYhQ4ZYiouLGz3G8dbyE+DLL7+MyMzMTEtNTU3/4YcfIrZt2xaUYhIBBW4p5c9SyiqgApgppbxWSrk2GBNQmk+EIYJpWdM8xuJD4+kf5yd72xAOWRM8xzJvcLeRDJbQGDjvbs9CJaZYOOs3vs8JiYCzb/UcSxsJPjLXAYjtBdEN6oVfeL+qataKYk0GZlzsueUvLTGCGFUYxauYMAN3XpLiMZYUHcpZCS2fp1FcU+z1P5Kv8dPRVFvPpKQk2+TJk3u98sorcQsXLoxOS0tLT0tLS1+1apVp/PjxZd9++21U/bae3r5XRESECwJryXmS0WisO9jbed5afprNZnHffff1/Pjjj/fl5ubumDhxYpHFYgnKtoaA1riFENnAP4GI2tflwC1SyvXBmITSfNJi03j/6vdYvOs9EsM6MyZ1LHGhfgKXMRJ++zj0usjdXzrlcuh9KfjIEK/jsLmT2qSs7ZXdxIp3XG+qZm6qLXkqiTTGEeIvac4QBhfeB93Phl1L3fPre2Vtq0sfwjvBLctg4yIo2QdDbnZXglNajVar4cqMRHrGmfjPz0fonxTJNQOTWmW9tr0YkhzDf+84j3fWHiQ5Lozrs7ufVnLamYoLjbMV1RQ1CtJxoXFttq2nP1lZWZbDhw+H7N6929C3b1/b+++f/iN/by0/tVotAImJiY7y8nLNZ599FjNq1CivTwFOVaDJaW8BM6SUqwGEEOfjDuSZwZiE0nzCrGbSf1jAbCHRFhYiZAz0G+k7oQvcmdqZY6H/7909sJtiqYCdn8FXD7nXyFOvglEv+ay0BlCigee2vsqyg8swao3cOehORvceTaTWT+W0mjLYudR9931glTur3Bjje47Vxe518+I97g8TG96GSx71/7MrzS7aZODc3vEMTY5Fp/ZVNynSqGdg92gykjLRCoFopZK607OmH/3bz3/rWf9xuUFrcE3Pmt4ibT3nzp2bqNPppMlkci5atOiAt+Ouv/760ltuueWspUuX7vb2fn3h4eHyxRdfzBsxYkRKbGysY9CgQaedOHDPPfcU5ubmhqSlpfXX6XRy0qRJhQ8//HDhjTfeWJient6/W7dutqysrKAlJgS6Hex7KeV5TY21BLUd7BQ47e4ksG//6jl+53qIC2KFspID7taW9V1wH1z0IOgaP0Vzupws2rmI53Oe9xj/ePTHpMSkNDoegOoid4Z4wbZfxsI7w7TVEOFjf27JQXh5oOea9pCb4fIn/WbIK0pHFIztYM2ZVd4aysvLNVFRUS6Xy8VNN93UIyUlxTJ79uwTrT0vCM52sJ+EEK8Bi3FnA90AfCuEGAwgpdzg72SllVgr3XuYGzq2MbiBO39L47F937i3kekaP5Y3O8ysPrq60fjGExt9B26nzTNoA1QVgKPG97wKdzZORMv73n3nrgK3opyyG/reUNKeA3VDL730UvzixYvj7Xa76N+/v/nee+9t1T3tgQo0cJ+8nWq4b/tc3IH8kqDNSAkeQxj0PA+O/Ow5njgguNfp3K/xWI9zfSa0hepCOTvxbNbme+Y3Doj3My+Nzt2hrKjeVjZTLOiMvs+JT208lpStgraiKADMnj37RFu5wz4VAQVuKaWfdF+lzdKFwPA73NXGtHr33WnP8yHcbyW/UxfWCS5/Gr55wr2lq8dwOO8u0HsPqjqNjutSrmNDwQa+P/Y9Oo2OqRlT6RLmp3JaeCcY+zb8+3ooP+wuyXr9O+6Wmr6ERMKI52DF4+4CLkmD4ZJHmk6cUxRFacMCXePuDDwDdJVSXimESAeGSynfbOK8g0Al4AQcDddXhBAXA0uAk4kGH0spn/D3PTvUGnd1ERxdD/u/c/dyTszwH4gAyo/C9o/d5w6c4A7C/pKtrNVQcQQ2vweRXSBtlPuffudVDPmbYe//oM+lkdr+igAAIABJREFU0GVQ01uobNXuJDWXw50I1lQpUqDMUkaNswYtWsIMYYT529oF4HJBdSE4LO4PJab4ppPnLOXuJQOn3X2Or8psHVCZ2caBomq+2JpPZrdohvduntKiv2bFVVbW55Xy04ESLu+fSErncGLaaGlVH2vc+wcMGFCq0WjURvo2xOVyia1bt8ZkZWV5rYUe6KPyf+HOIn+k9nUu8D7gN3DX+o2U0t+6wWop5cgA59FxWMphxRPuTGeAtf9wJ3RdcJ/vPdMVx+DNy6CiNonzx1dg6nII9VmjH4p2wxuX1hZRAX54Bab+z53Y5Y21Cla/4J4PwNp5MPQ2uOQxMPp5xGwIO+W93tHGaKJPpVCqRuM7Ec0XY1TTW9k6IIfTxZfbjvPQx1vrxi5Iiefv4wYRq/ZMB0WZ2cbsT7ezdEs+AG+sOcADI/pyy3m9CNFrW3l2AdtWWFiYnpCQUK6Cd9vgcrlEYWFhFLDN1zGBBu54KeV/hBAPAUgpHUIIZ1MnKX7YqmHjO55jP/4Dht7qOwAeWvtL0Ab33e2qOTD6H2DyEgAtFe7a3rJeTYOyPDi+Ffr4CtyV8PMCz7Gct+D8e/0HbqVNKTHbeGm5Z2nb1XuKqLY6VOAOErPNWRe0T/rHyn1cN6QbndpJ4HY4HFOPHz/+xvHjxzMIvJKm0rxcwDaHwzHV1wGBBu5qIUQctfUlhRDnAOUBnCeBr2sryrwmpVzg5ZjhQojNwDFglpRye8MDhBC3AbcB9OjRI8Apt3HeynVKl//Kot5KeEon7v/Ovq7j5T2Xv89csvE5wS55qrQIp5cyoqdSLUrxz9tv0tvvvC0bMmTICWB0a89DOTWBfsK6F/gU6C2E+B5YCNwZwHnnSSkHA1cCdwghLmzw/gagp5QyC3gZ+K+3byKlXCClzJZSZickJAQ45TbOEAYZYzzHzp7qrlzmS8/zPIuaCI37TthXy01jJFz0gGdp0Ygu7sIlPucV4e66Vd/ACe5SqEq7EeOltGh2cgxhxrbbxrC9Mem1XJrmWWRo6gW9iDS2/45kStvmNzlNCHE2cFhKeVwIoQOmAdcBO4DHpJQB7+cTQjwOVEkp5/g55iCQ7W9NvMMlp+1bCftWuOtu9xjuPwnM5YLKY7D+X+5zz57i7i/tr1e2tRJK89wtMaO6wcAbA0hOK4KDayC3tuRprwsDSjZrk06WYnU53UlzTfQVb8tKqqzU2F0gINygJaqJJKgys43txyr4ZONRBveI5vL0ROKboVRmtdVBpdWBkBBm1BIeEvzAZbM7Kayy4ZQSvVbQJSoovRrOWHGVlZW7T/DjvmKuHtCFQT1i2mzddW/JaUr71FTg3gD8VkpZUnu3/B7uO+2BQD8p5Rg/54YBGillZe2//w94Qsr/b+++w+OqzsSPf99pKqNqS5a7jTs2BjdkTLOpCRAgSyAQOtmEEEjCsiRLSHaTTf1tyCYh4CReAgkEQowhpBFMScEU01ywwdgUG+NuWZasMqPp5/fHvZZVZkYje0bSXL2f5/EjzZl7Z87xlfTOvee97zFPddhmOLDXGGNEpBZ4DOsMPGWnHBW4D0okrMSrXu0TB1cv5tEO6z0OY5+BJNwC7yyHJ79sJQMetRAu+mXvE9wGgLrmED969l1+v3oHLhGuXjCOz546gZqyNPex2xIJg8uVmzKZDYEwi//xPg++8iHGwBXzx3LzmVOyOo8eDEdZs+0A/75sHXUtYWaMLOPnV8xh3NAsLnxzhHL5f5wtGrido6e/yu4OZ9WXAvcYY35vjPkvoKfSWzXAi/b89WvAX40xT4nIDSJyg73NxcBb9jZ3AZelC9qOdTjBsTdB+7DfI4+DNkBbI/zheitoA3ywAlb8wLqnO8+8+H49j7y+nVjCWhbz3hc/YNPupIsfdZPLgLJ+RxO/emkr0bghljA88PKHrPkwK+sotDvQFuNzD66mrsVa9nXDrmZu+/166ppDWX2fIzHQg7Zylp4mvNwi4jHGxIAzsBPEMtnXGLMFOC5J+5IO3y8GFmfeXaV6of697iVPt75gnYl7B8al1kxEYnGef7f77NEL79WzcGrqhVz6wt837u3W9reNezlzevauagTCMQKRzgmVqz9sJJZniWBKZUtPp1S/A1aIyJ+ANuDg6mCTyCyrXKn+k6we+9gFeZdo5/O4OWlS99yHEyf2f97BwindPzgsmprdBFJ/gYeiLrdXHTe6Aree5apBKm3gNsZ8D7gVqwDLyR0uY7vILKtcqf5TVAnn333ovvgx8+G0r4GvuH/7dRgWTqnmwlkjcQl4XMIV88cyY1SaOxD6yJxxFVy7YDznHDOcc44ZzlUnjKX2qOwmAJYVefjZ5bOpLLaS3iZWl/DDS47NaH5fKSfKqOTpQOLI5DSVO9E2CB2wkvk8RT2Xbh3A6lvDhKNxQCj2uaj093/50mg8wd7mEI+u2oExhkvmjWF4eQFed3YLkISicRoCEaLxBD6Pa8BklecTTU5zDr2pUzmbtyiv5rPTGYh1xve1hPnIT55vn4O+98UPeOaWUxldmd2rGoVeNyMrnHEclTpSeZ42rJTqT8tWbe+UOBaMxPnda9v6sUdKOZ8GbqXUYUs205Zns29K5R0N3Eqpw/bJeWMo9h2azy7yurm81iHrCSg1QOkct8qO9iSwRN6XFh2oWkJRAuEYIJRkWFp0f2uYUDSO1+2i0u/D687uZ/XqMh/P3rKQh1+zKqddXjuWmvKBNxefqYZAhFA0jtslVBb78Hn03EYNPBq41ZELNcH6R+HZ/4JoECacBhfd03lBFHVEGgJh/mf5Jh6zS55ec+J4bjptUtrSojsagnz2wVVs3N3CEL+POy+dRe1RQyjM4pKTPrebUZVFfOUj07L2mv1lT3OIGx9aw5ptjZQWePjuvxzDGUfXUFKgfybVwKIfJ9WRC+yDJ2+1gjbAln/CysUQC/dvvxzkxffqWbZqBwkDsYThvhc/4O1dqUueHghGuO3x9Wzc3QJYZ5LXP7iKprZoX3U5rwTCMe5Yvok126xyrS3hGLc88gbN+v+lBiAN3OrI7Xmze9vW5yHc2vd9caBYIsHfN9V1a3/hvX0p94nEEqza2rlmeCiaoCWUZE13RTAS47WtnRc7TBjY1hDspx4plZoGbnXkhs/s3jb+VCjIr9KiA5XH5eKMad1rf586JXVpUZ/HxbzxlZ3aCr0uSnU97qT8BR5qx3fOy3AJjBmSf1X2lPNp4FZHzl8N5/3oUGnRiafDiV8AT/4mKQ00J0+u4uoFY7lw1kjOP24En180gaNHlKbcvqLYxw8+cSzTR1hlUYf6ffzy6nmUF2V/rWwnKPZ5uO2cacwdZ33YKSv0cOels6ko0g86auDRkqdOF26Fpm3w+q+gfDQcdymUjsj++0RDEGq0s8qLobiy530GsX0tYZa/uZtNe1r45LzRTKguoSxNUA1H4+xpDvHbV7bh9Qifqh3L8LJCPGmyxPe3hmkMRghFE3jcQpXfR1Vpdut7R+Nx9jaHefjVbSSM4Yr546gpK8DnSZ0At7e5jQ/qg/xx7U6mDC/l3GNGMLx8YNQdbwiECUUTjswq15KnzqGB2+m2vwa/OvtQVYyyUXD9P6Eke8suqt6pbw1z5b2vsmlPS3vbzy6fzbkzRyCSfMWrD/cHOPsnzxOOJQAoKfDwzC2npiwDGorGeOiVbXz3rxvb244fX8niy+dkdXGOnY1tnPWTFQTt6mmFXhfP3rIw5SXmSCzO42t28tXHD+VFHDOqjF9eNY8RWtI0pzRwO4dzPk6q7kLN8Nz/dC5l1bwTdq3rvz4p9rWEOwVtgDv/9h77A5Gk2ycShvtf2toetAFawzH+vG5XyvdoCET5vxVbOrW9vrWxPcBmy7JV2zu9Ziia4OE0JU/rWsL8YsXmTm1v7WzWbHelekEDt9MlO4NLcVan+o+rh2PiSvKb2tNRTHroM+9SRpK9R0/LZCcba6orDUqp7jRwO1lhGSy6HaTDYS4fAyOO7b8+KapLC5gxsvNa2recNZmhKYqpuFzCNSceRaH30HEsK/RwwayRKd9jqN/HjadN6tS2YMJQinzZXW7zknljOhUoKfa5ubx2XMrth5cWcNOiiZ3aZo2poEyTwJTKWE7nuEVkK9ACxIFY1/kVsT5m/xQ4FwgC1xpj1qR7zcOa447HIFgP8Qh4Cq0s6IHwCT8eh+C+Q/0qrkp+anUkIgFo2glrHoTyUTDj41A6PLvvMYCFonGa2qLEE4ZCrzttpbHDZYxhf2uEUCyOL8PSovtbwjS2RYjEEhQXeBha4qM0TQnTSCzOnqYQj67egdft4hNzRjG8rBB3mvdpCkZoDsWIJRJ4XC6KfC6qStLPb0dicRqDUaLxBEVeN0N7WEo0Fk9Q1xLmsdXbSRi4ZO4YhpUVpB3/nqY2dh4I8ac3djK1ppQzptcwPIvz7io5neN2jr4I3POMMfUpnj8X+CJW4J4P/NQYMz/da/Y6cMcisON1ePRqCNTDkAlw+TKompz5a+RCPA6718LSy6F1L1SMhU89AjXT+7dfDtISivLE+t1854m3CUbizBlbwS+unJvV5CyAD+oDXPfr19i6P8gQv4/Fn5rNvPGVKTOrA+Eof9tYx9f/8Bat4VhGyVl1zSF++PQmWsJxjDGMKCvk86dNSjuWrfUBPvObVbxf10p5kZf/veRYTpgwlNLC5B8QgpEYL7xXz1ceXUdzKMa04aXce828rK+trfqHBm7n6O9L5RcCvzGWV4AKEcnuvUptDVZwDNifHRq2wGOfPvS4vwT3wdJPWUEb4MA2WHYltHavkKUOz4FglNsff7M9eWrNtgP85Nl3actiglZDIMLNS9eydX+w/fHnHlxNYzB1slVTm1VOszVsVTF7a2cz339yI62h1Pv88506Hl29k6fe2sPTG/Zy/8sfsmFn6pKndc0hbn/8Td6va7XfM8oXHl6btnJacyjGFx9eS7O9zaY9LfznH9/SxDGlBphcB24DPCMiq0Xk+iTPjwK2d3i8w27rRESuF5FVIrJq377UZR6TigatVas62rMeEv1c+jEW7h6k92+GuP6RzJYt9d1Lrr6+tbE9YGZDLJ5g/Y6mTm0t4Vja7O1dB9pIdLnQterDRoLR5PtEYnFe3tzQrX3l5tQfPmMJw9rtnUuehmMJWtJ8OGgMRIjEE53a1mxrJJyiX0qp/pHrwH2SMWYOcA5wk4ic2uX5ZBPN3a7dG2PuMcbMM8bMq65OXeYxKa+/+xKTI+eAq5+TYbyF3QuhVE8Ft1a2ypaJ1SXdUhlOnDiUkiyW/fS4XcwZW9GprazI02mN6q5GVRTh6ZJ6fcJRQ/H7kvfL53GzcEpVt/ZTk7Qd5HUL88Z1/rkv8rpTXiYHGOL3UdCl4Ejt+OyuJqaUOnI5DdzGmF321zrgD0Btl012AGM6PB4NpL459XAUD7HmtMtHW4+HTYeL7wN/6j96faK4yupXhZ2BWzUZPvlQ5kthJhI9b9Nxc9O77Z2goshayvJgxvLJk4byxTMmUZRBIEpk+P9rLZc5u7386IjyQn597fEM8acOkOVFXn5+xRwqi61tao8awlfPnYY/zfKRJ02q4rLjx+BxCQUeF589ZQJTh5el3L66tJDvXzSTmaPK7ccF/N9VcylL86GlvMjLL6+eR1WJlcA3e0wF37nwmLQV3ZRSfS9nyWki4gdcxpgW+/tngW8bY57qsM15wBc4lJx2lzGma3Dv5LCyyhNxa047EQV3AZT08qw9V4yxlsSMR8Dt6zloGwMtu2H1A9bceO1noWI8FPhT7hKIBtjRsoOlm5ZS46/hoskXMax48KyTXd8SYl9rhIQxFHndVJcWpD3rbAiEqW+N8JuVW/EXeLjyhHFU+b0Upcn4Bqu8aDhmlRYd6i/A3cPNzNF4nMZAlLgxFHrcVGaQ7d4YCBOMJBABv89NeXHP++xuaiMWN7hdVslTXw8fWmLxBA2BCPGEoSBHWfiqf2hymnPkMnBPwDrLBvAADxtjviciNwAYY5bYt4MtBj6KdTvYdcaYtFF5UJc8bdkDS062gj1Yt7R95u8wam7KXdbsXcO1T12LsWcghhUPY+l5S6kuHiAfXnJoX0uYT/xiZaelGe+7Zh5nHJ263OvG3c2cf/eLxOxJ6LIiD8u/dCqjKrUcp8pvGridI2eXyo0xW4wxx9n/Zhhjvme3LzHGLLG/N8aYm4wxE40xM3sK2oPetlcPBW2wzsBX3JFy3evWSCtL1i9pD9oAdcE6NjZsTLq902xrCHZbT/muv79HQyCcdPtAKMYvn9/SHrQBmttiPL1hd077qZRSvdHft4Op3nAnmZ90edMWk/FI933cMjiSjZJdrXa7BElR+FNc4HF3f86T7aI4Sil1BPQvUj4ZNe9Qkh1YmfGLvnpoHewuSnwl3Djrxk6BenTJaKYOmZrrng4IY4YUM3lYSftjEbj17Kkp55OLfR6uP3VCp8zqoX4fZ07XldSUUgOHLuuZb1r2wMa/WPeAH3eZdUuZL3Vlq2A0SF2wjr9s+Qs1xTWcNua0QTG/fdC+lhChaIJYwuB1C0OKfRSnyd5uDkZoCEZ5bM0O/D43F84aRbXfh3cA3BK1ryVMKBpHBAq9bqp6KEeqVEc6x+0cGriVY9W3hvnzG7u44+lNhKIJjh1dzpIr56Zcwxqs7PDv/XUjE4aVEI7GicTifG7hpH7Prt7bHOJbf9nA8rf2IMDFc8dw69lTsl6+VTmXBm7n0CV5lGO1hGJ8+4m32x+v39HEj555h2+eP52you6BOJEwPLF+N4+v3dmp/czpwxniH9Jt+770j011PPnmHsCqULRs1XbOnl5DzXQN3EoNNjrHrRxrc133bPs3tjfREkpewjMcT/DS+93LiL7+Qfdyo30pGovz6pbufXhly/5+6I1Sqr9p4FaONaWme8nTEyYMoTzF2s+FHlfSRLSTJvVvlT2vx81p07rnJSycOnhyFZRSh2jgVo5VWujlJ5+cRWWxFxFYNKWaL54+iZIUldNEhDOPrmkvLVrkdXPbR6cybmhmy1qGcrgYx4IJQ7nyhLF43UKh18XnF05kak1pzt5PKTVwaXKacrS2aIzGQBRjDD6Pi+rSnueEW0NRAvbqXuVF3h4X2ahrDvH61gae3rCXWWPKOe/YkTlJGmsMRGizPxyUFHi0hrjqFU1Ocw5NTlOOVuT1UFTRux/zkkJvyrPyrlpDUe5fuZWfP7cZgD+v28WzG+u485OzqCnPbvCu9PuozOorKqXykV4qV+oINIdi3L9ya6e2lzfvJxTTNayVUrmhgVupI5SsTKqkKUOrlFJHQgO3UkegstjLF0+f3Knt3GOGU+jRXy2lVG7oHLdSXTQGIgQjcVwu8Bd4KEsz313k83DRnJGcdXQNreEYxT43JQVuhuUgOe1A0OqXYPcrB8lpoWicprYo4Viiff1ypdTAooFbqQ7qW8PcuuwNVrxbj0vgqhPGcfOZkxniTx3AGgNRrr7vNXY1hSgr9HDXp2ZTXuyjwJO9+ub7W8N8/Q9v8tSGvYjAxXNGc/u509L2q7eCkRh/e7uOrz6+nmAkzlFVfh74dC1jh2R2O5xSqm/o9TylbImE4S/rdrHiXat6WsLAAy9/yPtJKrAdtL81zM1L32BXUwiwktVu+u0aDgSjWe3bPzbV8dSGvYC1DPujq3ewbntTVt+juS3Kvy97g6B9K9wH9QG+9vh6moKRrL6PUurIaOBWyhaOJ3h5c/cyoqu2NqbcJ24MG3Y1d2oLROK0RbKXVR5PJHjp/e79evWD7JY8bQxGiSU613VYv7OJcCyR1fdRSh0ZDdxK2Yq8bs6e0b3k6SmTU5c89bpdHD++893VlcVein3Zu0zudrk4Z2b3fp0+LbvrhA/x+yj0dv6TcNLEKoqyOBal1JHTwN3PjDGEc1gqU/XO6dNq2kuLlhR4+Pp5RzMmzRxvZbGPOy+dxewxFQCMG1rMA5+uzfoyoMePH8pnT5lAgcdFkdfNrWdNYfKwkqy+R0WRl/uvq2WkXThmwYShfPP8GZRmWIxGKdU3cl7yVETcwCpgpzHmY12eWwT8CfjAbnrcGPPtdK/npJKn+1vDPL1hDy+8V89Z02tYNLU6q8lG6vAEwjFawzEEq+RpQQ8lTwEaAmEisQRul4uqEl9O7uMOhmO02P0qy6AU6+GIJwwNgQjxhKHQ66KiuH/XIVfZoyVPnaMvsspvBjYCZSmef6FrQB8MDgQj7VnCAMvf2sPl88fytXOnUVKgZzj9yV/gwV/Qu1+NvvjAVVzgobiX/eott0v0FjClBricXioXkdHAecC9uXyffBSMxNuD9kHLXt9OIKyXzZVSSqWW6znuO4H/ANKlpS4QkXUislxEZiTbQESuF5FVIrJq3759OeloX3OJdXbTUbLSmUoppVRHOQvcIvIxoM4YszrNZmuAccaY44C7gT8m28gYc48xZp4xZl51dXUOetv3/AUerpo/tlPbTYsm6VKNSiml0srlhNlJwAUici5QCJSJyEPGmCsPbmCMae7w/ZMi8nMRqTLG1OewXwNCaaGXL505mY/OHMGrW/ZzyuRqjqr2U5SDhCOniMcT7A9GaIvEKfK6qSj24uuhOlkgHKMlFCUaNxT53FSVZH/+1kroChOMxCm0+5XNqmlKKdVRzgK3MeZ24HZozx7/csegbbcPB/YaY4yI1GJdAchuVYkBbIi/gBMmFHDChKH93ZUBzxjDpj0tXPPr16hvjVBW6OEXV87l+PGVKYN3U1uUR17fzg+f3kQ0bphSU8ID19UyoqIoq33bvK+Vq+57lb3NYfw+Nz+9bDYnT67KSda3Ukr1+X3cInKDiNxgP7wYeEtE1gF3AZeZXN+fpvLS/tYINz28hvpWq/xmcyjGjT2UFm0MRPj+kxuJxq0fqXf3tnLH0+8QDMey2K8wNy9dy97mMGBVTfvS0rU0tWW35KlSSh3UJ4uMGGOeA56zv1/SoX0xsLgv+qDyWyyRYOv+YKe2prYooVjqLPxtDcFubet3NBGIxLN2W1XcGDbubunUFozE2+t9K6VUtmnlNJUXvG4XM0eVd2obUV6Y9nL0pGEl3TL3F02tpqwwe59XvW4X848a0qltiN+HX8uEKqVyRAO3ygtDSwr42RVzmGWXFp1SU8L919VSlabwSUWxl3uumsuw0gJcAufMHM4NCydmVAktU5XFPn586az2euUTq/38JgclT5VS6qCclzzNNieVPFW91xAIE40b3C7JKEO8viXEzgNtuFwufG5hRHlRTm65awxEiMQTuEWo0spjagDSkqfO0Sdz3EplS29Ki9a1hLjg7pfY0xxqb1t8+WzOmzki67XEK/UMWynVR/RSuXKsD+uDnYI2wJIVm2kIRPqpR0opdeQ0cCvHKvB2//Eu8rq7JawppVQ+0cCtHGtkRRHHjDq0KJ3bJdx2zjRdqlIpldd0jls5VlVJAfdfW8vqbY1sawhy1vQahuWg5KlSSvUlDdzK0apKC/jIjOH93Q2llMoavVSulFJK5REN3EoppVQe0cCtlFJK5REN3EoppVQe0cCtlFJK5REN3EoppVQeybtFRkRkH/DhYe5eBdRnsTv5ZjCPfzCPHQb3+HXslnHGmOr+7IzKjrwL3EdCRFYN5tVxBvP4B/PYYXCPX8c+OMfuZHqpXCmllMojGriVUkqpPDLYAvc9/d2BfjaYxz+Yxw6De/w6duUog2qOWymllMp3g+2MWymllMprGriVUkqpPOK4wC0iY0TknyKyUUQ2iMjNSbYREblLRN4XkfUiMqc/+poLGY5/kYg0icgb9r9v9Edfs01ECkXkNRFZZ4/9W0m2ceSxz3DsjjzuB4mIW0TWisgTSZ5z5HHvqIfxO/rYDzZOXI87BtxqjFkjIqXAahF51hjzdodtzgEm2//mA7+wvzpBJuMHeMEY87F+6F8uhYHTjTGtIuIFXhSR5caYVzps49Rjn8nYwZnH/aCbgY1AWZLnnHrcO0o3fnD2sR9UHHfGbYzZbYxZY3/fgvWDPKrLZhcCvzGWV4AKERnRx13NiQzH70j28Wy1H3rtf12zLx157DMcu2OJyGjgPODeFJs48rgflMH4lYM4LnB3JCLjgdnAq12eGgVs7/B4Bw4MbmnGD7DAvqy6XERm9GnHcsi+XPgGUAc8a4wZNMc+g7GDQ487cCfwH0AixfOOPe62nsYPzj32g45jA7eIlAC/B/7NGNPc9ekkuzjq7KSH8a/Bqlt8HHA38Me+7l+uGGPixphZwGigVkSO6bKJY499BmN35HEXkY8BdcaY1ek2S9LmiOOe4fgdeewHK0cGbnuO7/fAb40xjyfZZAcwpsPj0cCuvuhbX+hp/MaY5oOXVY0xTwJeEanq427mlDHmAPAc8NEuTzn62EPqsTv4uJ8EXCAiW4GlwOki8lCXbZx83Hscv4OP/aDkuMAtIgLcB2w0xvw4xWZ/Bq62M01PAJqMMbv7rJM5lMn4RWS4vR0iUov1c7C/73qZGyJSLSIV9vdFwJnApi6bOfLYZzJ2px53Y8ztxpjRxpjxwGXAP4wxV3bZzJHHHTIbv1OP/WDlxKzyk4CrgDft+T6ArwFjAYwxS4AngXOB94EgcF0/9DNXMhn/xcDnRSQGtAGXGWeU0BsBPCAibqw/TMuMMU+IyA3g+GOfydidetyTGiTHPaXBfOydTkueKqWUUnnEcZfKlVJKKSfTwK2UUkrlEQ3cSimlVB7RwK2UUkrlEQ3cSimlVB7RwK3ynoh83V4Ra7298lHWFo+wV1V6wr7/t15EKu32ESJiROTkDtvuE5GhInKviExP8lrXishi+/uPd9xGRJ4TkXkp+lArIs+LyDsissl+/eJsjVEplV80cKu8JiILgI8Bc4wxx2IVHtmefq/es+95fRVYYDedCKy1vyIiU4F6Y8x+Y8xnkqzG1tXHgW7BvSsRqQEeBW4zxkzIvzdOAAADDklEQVQFjgaeAkoPayBKqbyngVvluxFYATMMYIypN8bsEpG5IrJCRFaLyNMHV4Kyz2zvFJGVIvKWXUXq4FntSrHWM15pB+KuXsIO1PbXH9M5kK/s8B7z7O+vE5F3RWQFVnEcRORE4ALgh/YVgon2a1wi1pra74rIKXbbTcADxpiX7fEZY8xjxpi9IvLfIvKAiDwjIltF5CIRuUNE3hSRp8QqfauUchgN3CrfPQOMsYPdz0VkoR2w7gYuNsbMBX4FfK/DPn5jzInAjfZzYJUHPdUYMxv4BvD9JO+1kkOBuxZroYaD9a9PxArs7ewPC9/CCthnYZ9hG2NWYpXg/IoxZpYxZrO9i8cYUwv8G/BNu+0YIN3iEROxlnO8EHgI+KcxZiZWdazz0uynlMpTTix5qgYRY0yriMwFTgFOAx4BvosV8J61yzO7gY51qX9n7/u8iJTZNb5LsUqGTsZaNSrZ2eprwGwR8QNe+723iMgkrMD9oy7bzweeM8bsAxCRR4ApaYZzcEGY1cD4TMYPLDfGREXkTXucT9ntb/biNZRSeUQDt8p7xpg41mpYz9kB7CZggzFmQapdkjz+DtbZ6r+ItY75c0neJygi7wOfxlomEeAVrBrYw4B3MnivdML21ziHfjc3AHOBP6XbxxiTEJFoh/rTCfT3WylH0kvlKq+JyFT7LPmgWcBGoNpOXENEvCIyo8M2l9rtJ2OtEtUElAM77eevTfOWL2Fdyn7ZfvwycDPwSpJFG14FFtmZ5l7gkg7PtZBZgtli4JqOmfIicqWIDM9gX6WUA2ngVvmuBOsS99sish5rHvkbWKsh/UBE1gFvcGhuGqBRRFYCS4B/tdvuAP6fiLyEdck5lZeACRwK3Guw1nZe2XVDe9nI/7a3/RuHztLBWjf5K3Yy3MSu+3Z4jb1YSzX+r3072EasaYHmNH1USjmYrg6mBhUReQ74sjFmVX/3RSmlDoeecSullFJ5RM+4lVJKqTyiZ9xKKaVUHtHArZRSSuURDdxKKaVUHtHArZRSSuURDdxKKaVUHvn/NXSsIgLTsu8AAAAASUVORK5CYII=\n&quot;,
&quot;text/plain&quot;: [
&quot;&lt;Figure size 432x288 with 1 Axes&gt;&quot;
]
},
&quot;metadata&quot;: {
&quot;needs_background&quot;: &quot;light&quot;
},
&quot;output_type&quot;: &quot;display_data&quot;
}
],
&quot;source&quot;: [
&quot;g = sns.scatterplot(x = 'SepalWidthCm', y = 'SepalLengthCm', hue = 'Species', data = df)\n&quot;,
&quot;g.legend(loc = 'center left', bbox_to_anchor = (1, 0.5), ncol = 1)&quot;
]
},
{
&quot;cell_type&quot;: &quot;markdown&quot;,
&quot;metadata&quot;: {
&quot;papermill&quot;: {
&quot;duration&quot;: 0.008973,
&quot;end_time&quot;: &quot;2020-10-15T15:29:22.724920&quot;,
&quot;exception&quot;: false,
&quot;start_time&quot;: &quot;2020-10-15T15:29:22.715947&quot;,
&quot;status&quot;: &quot;completed&quot;
},
&quot;tags&quot;: []
},
&quot;source&quot;: [
&quot;&gt; You can find out more about how the <code>legend</code> function works <a href="https://matplotlib.org/3.1.1/api/_as_gen/matplotlib.pyplot.legend.html">in the Matplotlib Docs</a>, and you can find an interactive version of this notebook <a href="https://www.kaggle.com/nabeelvalley/position-legends-in-seaborn">on Kaggle</a>&quot;
]
}
],
&quot;metadata&quot;: {
&quot;kernelspec&quot;: {
&quot;display_name&quot;: &quot;Python 3&quot;,
&quot;language&quot;: &quot;python&quot;,
&quot;name&quot;: &quot;python3&quot;
},
&quot;language_info&quot;: {
&quot;codemirror_mode&quot;: {
&quot;name&quot;: &quot;ipython&quot;,
&quot;version&quot;: 3
},
&quot;file_extension&quot;: &quot;.py&quot;,
&quot;mimetype&quot;: &quot;text/x-python&quot;,
&quot;name&quot;: &quot;python&quot;,
&quot;nbconvert_exporter&quot;: &quot;python&quot;,
&quot;pygments_lexer&quot;: &quot;ipython3&quot;,
&quot;version&quot;: &quot;3.7.6&quot;
},
&quot;papermill&quot;: {
&quot;duration&quot;: 7.020618,
&quot;end_time&quot;: &quot;2020-10-15T15:29:22.842616&quot;,
&quot;environment_variables&quot;: {},
&quot;exception&quot;: null,
&quot;input_path&quot;: &quot;<strong>notebook</strong>.ipynb&quot;,
&quot;output_path&quot;: &quot;<strong>notebook</strong>.ipynb&quot;,
&quot;parameters&quot;: {},
&quot;start_time&quot;: &quot;2020-10-15T15:29:15.821998&quot;,
&quot;version&quot;: &quot;2.1.0&quot;
}
},
&quot;nbformat&quot;: 4,
&quot;nbformat_minor&quot;: 4
}</p>
]]></content>
        <author>
            <name>Nabeel Valley</name>
            <uri>https://nabeelvalley.co.za</uri>
        </author>
    </entry>
    <entry>
        <title type="html"><![CDATA[Scripting with FSharp]]></title>
        <id>/blog/2020/13-10/launch-fsi-from-terminal/</id>
        <link href="https://nabeelvalley.co.za/blog/2020/13-10/launch-fsi-from-terminal/"/>
        <updated>2020-10-12T22:00:00.000Z</updated>
        <summary type="html"><![CDATA[Using the .NET CLI to use the F# Interactive console and run F# Scripts ]]></summary>
        <content type="html"><![CDATA[<p><div class="table-of-contents"><details><summary>Contents</summary><ul><li><a href="#open-the-f%23-interactive-console">Open the F# Interactive Console</a></li><li><a href="#run-an-f%23-script">Run an F# Script</a></li></ul></details></div></p>
<blockquote>
<p>Before you can use the following, you will need the <a href="https://dotnet.microsoft.com/download">.NET Core SDK installed</a></p>
</blockquote>
<h1 id="open-the-f%23-interactive-console" tabindex="-1">Open the F# Interactive Console</h1>
<p>To open an F# interactive console using the <code>dotnet</code> CLI. You can run the following command:</p>
<pre><code class="hljs language-sh">dotnet fsi
</code></pre>
<blockquote>
<p>Note that to end statements/execute in the F# Interactive console use <code>;;</code> at the end of a line or section of code</p>
</blockquote>
<p>Once in the console, running <code>#help;;</code> from the <code>fsi</code> console to view the help menu, and <code>#quit;;</code> to quit the interactive session</p>
<p>Additionally, you can write multi-line <code>F#</code> code as well as just single line expressions. Each expression should be terminated with <code>;;</code>. For example, you can write a function that will print some data into the console:</p>
<pre><code class="hljs language-fs"><span class="hljs-keyword">let</span> printer s <span class="hljs-operator">=</span>
    <span class="hljs-built_in">printfn</span> s
;;
</code></pre>
<p>Next, you can call the function with:</p>
<pre><code class="hljs language-fs">printer <span class="hljs-string">&quot;Hello World&quot;</span>;;
</code></pre>
<p>Which will execute the above code and output <code>Hello World</code></p>
<h1 id="run-an-f%23-script" tabindex="-1">Run an F# Script</h1>
<p>F# scripts can be run using the <code>dotnet fsi</code> command as well, followed by the path to an F# script file:</p>
<pre><code class="hljs language-sh">dotnet fsi ./myscript.fsx
</code></pre>
]]></content>
        <author>
            <name>Nabeel Valley</name>
            <uri>https://nabeelvalley.co.za</uri>
        </author>
    </entry>
    <entry>
        <title type="html"><![CDATA[Package Management with Poetry]]></title>
        <id>/blog/2020/07-10/python-packages-with-poetry/</id>
        <link href="https://nabeelvalley.co.za/blog/2020/07-10/python-packages-with-poetry/"/>
        <updated>2020-10-06T22:00:00.000Z</updated>
        <summary type="html"><![CDATA[Manage python packages using poetry]]></summary>
        <content type="html"><![CDATA[<p><div class="table-of-contents"><details><summary>Contents</summary><ul><li><a href="#install-poetry">Install Poetry</a><ul><li><a href="#windows-powershell">Windows Powershell</a></li><li><a href="#bash">Bash</a></li></ul></li><li><a href="#initialize-poetry">Initialize Poetry</a><ul><li><a href="#create-a-new-project">Create a New Project</a></li><li><a href="#add-to-existing-project">Add to Existing Project</a></li></ul></li><li><a href="#using-poetry">Using Poetry</a><ul><li><a href="#add-dependency">Add Dependency</a></li><li><a href="#run-application">Run Application</a></li></ul></li><li><a href="#create-a-shell">Create a Shell</a></li></ul></details></div></p>
<blockquote>
<p><a href="https://python-poetry.org/docs/">Poetry Docs</a></p>
</blockquote>
<p>Python package management is typically quite a mess. Managing packages with <code>pip</code> often requires additional management of things like virtual environments and python version management</p>
<p>Poetry is a package manager that abstracts a lot of the typical Python dependency and environment management away from the user</p>
<h1 id="install-poetry" tabindex="-1">Install Poetry</h1>
<p>Before you can install <code>poetry</code> you need to have Python installed</p>
<p>To install <code>poetry</code> you can do one of the following depending on your OS:</p>
<h2 id="windows-powershell" tabindex="-1">Windows Powershell</h2>
<pre><code class="hljs language-ps1">(<span class="hljs-built_in">Invoke-WebRequest</span> <span class="hljs-literal">-Uri</span> https://raw.githubusercontent.com/python<span class="hljs-literal">-poetry</span>/poetry/master/<span class="hljs-built_in">get-poetry</span>.py <span class="hljs-literal">-UseBasicParsing</span>).Content | python -
</code></pre>
<h2 id="bash" tabindex="-1">Bash</h2>
<pre><code class="hljs language-sh">curl -sSL https://raw.githubusercontent.com/python-poetry/poetry/master/get-poetry.py | python -
</code></pre>
<h1 id="initialize-poetry" tabindex="-1">Initialize Poetry</h1>
<h2 id="create-a-new-project" tabindex="-1">Create a New Project</h2>
<p>If you're starting a new project, you can run the following:</p>
<pre><code class="hljs language-sh">poetry new my-project
</code></pre>
<p>The above will generate a <code>pyproject.toml</code> file with the project settings. Alternatively you can use the following to add <code>poetry</code> to an existing project</p>
<h2 id="add-to-existing-project" tabindex="-1">Add to Existing Project</h2>
<p>To add <code>poetry</code> to an existing project, run the following:</p>
<pre><code class="hljs language-sh">poetry init
</code></pre>
<h1 id="using-poetry" tabindex="-1">Using Poetry</h1>
<h2 id="add-dependency" tabindex="-1">Add Dependency</h2>
<p>To manage dependencies you can use the <code>poetry add</code> command. For example, if we would like to install <code>flask</code></p>
<pre><code class="hljs language-sh">poetry add flask
</code></pre>
<h2 id="run-application" tabindex="-1">Run Application</h2>
<p>To run an application using the virtual environment created by <code>poetry</code> you can use the <code>poetry run</code> command, followed by the command you want to run:</p>
<pre><code class="hljs language-sh">poetry run python app.py
</code></pre>
<p>Running a <code>flask</code> app would look something like this:</p>
<pre><code class="hljs language-sh">poetry run flask run
</code></pre>
<h1 id="create-a-shell" tabindex="-1">Create a Shell</h1>
<p>To create a shell in the <code>poetry</code> virtual environment run:</p>
<pre><code class="hljs language-sh">poetry shell
</code></pre>
<p>The above will open a <code>poetry</code> shell with the virtual environment. You can then do something like run the <code>python</code> command to open a <code>python</code> shell in the environment</p>
]]></content>
        <author>
            <name>Nabeel Valley</name>
            <uri>https://nabeelvalley.co.za</uri>
        </author>
    </entry>
    <entry>
        <title type="html"><![CDATA[Trust .NET Core Dev Certificates]]></title>
        <id>/blog/2020/07-10/trust-dotnet-dev-certs/</id>
        <link href="https://nabeelvalley.co.za/blog/2020/07-10/trust-dotnet-dev-certs/"/>
        <updated>2020-10-06T22:00:00.000Z</updated>
        <summary type="html"><![CDATA[Adding .NET Core Certificates to the Cert store from the CLI]]></summary>
        <content type="html"><![CDATA[<p><div class="table-of-contents"><details><summary>Contents</summary><ul></ul></details></div></p>
<p>When developing .NET Core web applications with HTTPS, to simplifiy your experience and avoid browser warnings you can trust the .NET Core dev certs on your local device with the followning commands:</p>
<pre><code class="hljs language-sh">dotnet dev-certs https --clean
dotnet dev-certs https --trust
</code></pre>
]]></content>
        <author>
            <name>Nabeel Valley</name>
            <uri>https://nabeelvalley.co.za</uri>
        </author>
    </entry>
    <entry>
        <title type="html"><![CDATA[Highlight Specific Elements]]></title>
        <id>/blog/2020/29-09/highlight-specific-elements/</id>
        <link href="https://nabeelvalley.co.za/blog/2020/29-09/highlight-specific-elements/"/>
        <updated>2020-09-28T22:00:00.000Z</updated>
        <summary type="html"><![CDATA[Add a border around all HTML Elements that match a CSS Selector to aid in debugging]]></summary>
        <content type="html"><![CDATA[<p><div class="table-of-contents"><details><summary>Contents</summary><ul></ul></details></div></p>
<p>You can highlight all HTML elements which respond to a specific CSS selector with the following. This can be useful for debugging purposes:</p>
<pre><code class="hljs language-js"><span class="hljs-variable language_">document</span>
  .<span class="hljs-title function_">querySelectorAll</span>(selector)
  .<span class="hljs-title function_">forEach</span>(<span class="hljs-function">(<span class="hljs-params">el</span>) =&gt;</span> (el.<span class="hljs-property">style</span>.<span class="hljs-property">border</span> = <span class="hljs-string">&#x27;solid 2px red&#x27;</span>))
</code></pre>
<p>For example, the following <code>[id]</code> selector will find all elements with an <code>id</code> attribute:</p>
<pre><code class="hljs language-js"><span class="hljs-variable language_">document</span>
  .<span class="hljs-title function_">querySelectorAll</span>(<span class="hljs-string">&#x27;[id]&#x27;</span>)
  .<span class="hljs-title function_">forEach</span>(<span class="hljs-function">(<span class="hljs-params">el</span>) =&gt;</span> (el.<span class="hljs-property">style</span>.<span class="hljs-property">border</span> = <span class="hljs-string">&#x27;solid 2px red&#x27;</span>))
</code></pre>
]]></content>
        <author>
            <name>Nabeel Valley</name>
            <uri>https://nabeelvalley.co.za</uri>
        </author>
    </entry>
    <entry>
        <title type="html"><![CDATA[URL Text Fragments]]></title>
        <id>/blog/2020/29-09/text-fragments/</id>
        <link href="https://nabeelvalley.co.za/blog/2020/29-09/text-fragments/"/>
        <updated>2020-09-28T22:00:00.000Z</updated>
        <summary type="html"><![CDATA[Link to, and highlight, content on any part of a Web page with the Text Fragment directive]]></summary>
        <content type="html"><![CDATA[<p><div class="table-of-contents"><details><summary>Contents</summary><ul></ul></details></div></p>
<p>When linking to a webpage it can be useful to link to a specific part of a page. Using a hash in the URl you can link to the <code>id</code> attribute in the HTML of a page</p>
<p>For example, <code>https://my.website.com#overview</code> would like to the element with <code>id=&quot;overview&quot;</code> in the HTML</p>
<p>However, it may be useful for us to link to a general piece of text on a page, we can use <em>text fragments</em> to do so. These work similar to the way a hash does, but we can link to any text on a page even if it does not have an <code>id</code>. Additionally, the user's browser will highlight the text set to draw the user's attention to it</p>
<blockquote>
<p>Note that at the moment only Chromium based browsers support this</p>
</blockquote>
<p>To do this, we need to identifiy the text on the page we want to link to. Say we'd like to link to the first paragraph of this page, we can use the <strong>text directive</strong> (<code>#:~:text=</code>) param in the URL to link to specific text instead of just the <code>#</code> like we use for an ID</p>
<p>We would need to take the part of the text we want to focus, URL encode it, then add it to the <strong>text directive</strong> the final URL may look something like this:</p>
<pre><code class="hljs"><span class="hljs-symbol">https:</span>//my.website.com/#:~:text<span class="hljs-operator">=</span>When<span class="hljs-variable">%20</span>linking<span class="hljs-variable">%20</span><span class="hljs-keyword">to</span><span class="hljs-variable">%20</span>a<span class="hljs-variable">%20</span>webpage
</code></pre>
<p>If you need to highlight a larger piece of text, you can use the start and end of your text segment, separated by a comma, for example selecting the entire first paragraph of this post:</p>
<pre><code class="hljs"><span class="hljs-attribute">https</span>://my.website.com/#:~:text=when%<span class="hljs-number">20</span>linking,HTML%<span class="hljs-number">20</span>of%<span class="hljs-number">20</span>a%<span class="hljs-number">20</span>page
</code></pre>
<p>The link below should link to the first paragraph of this page if opened in a new tab (provided your browser supports text fragments):</p>
<blockquote>
<p><a href="#:~:text=when%20linking,HTML%20of%20a%20page">ctrl + click me</a></p>
</blockquote>
<p>You can read more about text fragments in URLs on &lt;a href=&quot;https://web.dev/text-fragments/&quot; rel=”noopener noreferrer” target=&quot;_blank&quot;&gt;web.dev</a></p>
]]></content>
        <author>
            <name>Nabeel Valley</name>
            <uri>https://nabeelvalley.co.za</uri>
        </author>
    </entry>
    <entry>
        <title type="html"><![CDATA[Node.js Dirname vs Resolve]]></title>
        <id>/blog/2020/25-09/dirname-vs-resolve/</id>
        <link href="https://nabeelvalley.co.za/blog/2020/25-09/dirname-vs-resolve/"/>
        <updated>2020-09-24T22:00:00.000Z</updated>
        <summary type="html"><![CDATA[Working with paths using resolve and __dirname in Node.js]]></summary>
        <content type="html"><![CDATA[<p><div class="table-of-contents"><details><summary>Contents</summary><ul><li><a href="#get-the-current-directory">Get the Current Directory</a><ul><li><a href="#process-directory">Process Directory</a></li><li><a href="#file%2Fmodule-directory">File/Module Directory</a></li></ul></li><li><a href="#get-path-to-a-target-location">Get Path to a Target Location</a><ul><li><a href="#joining-paths">Joining Paths</a></li><li><a href="#absolute-path-from-process-directory">Absolute Path from Process Directory</a></li><li><a href="#absolute-path-from-file%2Fmodule-directory">Absolute Path from File/Module Directory</a></li></ul></li></ul></details></div></p>
<p>Node.js has a few methods by which we can get the directory in which we are currently executing, and get paths relative to it</p>
<h1 id="get-the-current-directory" tabindex="-1">Get the Current Directory</h1>
<h2 id="process-directory" tabindex="-1">Process Directory</h2>
<p>We can get the working directory from where we started the <code>node</code> script with:</p>
<pre><code class="hljs language-js"><span class="hljs-keyword">const</span> processDir = process.<span class="hljs-title function_">cwd</span>()
</code></pre>
<h2 id="file%2Fmodule-directory" tabindex="-1">File/Module Directory</h2>
<p>And we can get the directory in which the currently executing file is in with:</p>
<pre><code class="hljs language-js"><span class="hljs-keyword">const</span> fileDir = __dirname
</code></pre>
<h1 id="get-path-to-a-target-location" tabindex="-1">Get Path to a Target Location</h1>
<p>To get an absolute path to a specific target file/directory we have a few methods</p>
<h2 id="joining-paths" tabindex="-1">Joining Paths</h2>
<p>We can use the <code>path</code> module's <code>join</code> method to get a path given any path pieces you can go up or down a directory using the <code>../</code> notation</p>
<pre><code class="hljs language-js"><span class="hljs-keyword">const</span> { join } = <span class="hljs-built_in">require</span>(<span class="hljs-string">&#x27;path&#x27;</span>)

<span class="hljs-keyword">const</span> path1 = <span class="hljs-title function_">join</span>(basePath, <span class="hljs-string">&#x27;./downdir/myfile.txt&#x27;</span>)
<span class="hljs-keyword">const</span> path2 = <span class="hljs-title function_">join</span>(basePath, <span class="hljs-string">&#x27;../updir&#x27;</span>)
</code></pre>
<h2 id="absolute-path-from-process-directory" tabindex="-1">Absolute Path from Process Directory</h2>
<p>To get an absolute path from the process directory, you can use the <code>path</code> module's <code>resolve</code> function:</p>
<pre><code class="hljs language-js"><span class="hljs-keyword">const</span> { resolve } = <span class="hljs-built_in">require</span>(<span class="hljs-string">&#x27;path&#x27;</span>)

<span class="hljs-keyword">const</span> absPath = <span class="hljs-title function_">resolve</span>(<span class="hljs-string">&#x27;./downdir/myfile.txt&#x27;</span>)
</code></pre>
<blockquote>
<p>Like the <code>join</code> method you can also use the <code>../</code> notation to move up a directory</p>
</blockquote>
<p>Using <code>resolve</code> is basically shorthand for using <code>join</code> with <code>process.cwd()</code></p>
<pre><code class="hljs language-js"><span class="hljs-keyword">const</span> absPath = <span class="hljs-title function_">join</span>(process.<span class="hljs-title function_">cwd</span>(), <span class="hljs-string">&#x27;./downdir/myfile.txt&#x27;</span>)
</code></pre>
<h2 id="absolute-path-from-file%2Fmodule-directory" tabindex="-1">Absolute Path from File/Module Directory</h2>
<p>If it makes more sense to get the path relative to the executing file, you can use a combination of <code>__dirname</code> and <code>join</code> like so:</p>
<pre><code class="hljs language-js"><span class="hljs-keyword">const</span> { join } = <span class="hljs-built_in">require</span>(<span class="hljs-string">&#x27;path&#x27;</span>)

<span class="hljs-keyword">const</span> absPath = <span class="hljs-title function_">join</span>(__dirname, <span class="hljs-string">&#x27;./downdir/myfile.txt&#x27;</span>)
</code></pre>
]]></content>
        <author>
            <name>Nabeel Valley</name>
            <uri>https://nabeelvalley.co.za</uri>
        </author>
    </entry>
    <entry>
        <title type="html"><![CDATA[Split an Array into Segments]]></title>
        <id>/blog/2020/23-09/split-an-array-into-segments/</id>
        <link href="https://nabeelvalley.co.za/blog/2020/23-09/split-an-array-into-segments/"/>
        <updated>2020-09-22T22:00:00.000Z</updated>
        <summary type="html"><![CDATA[Distribute elements of an array over a fixed number of segments]]></summary>
        <content type="html"><![CDATA[<p><div class="table-of-contents"><details><summary>Contents</summary><ul></ul></details></div></p>
<p>It can sometimes be useful to split an array into a separated set of rows or columns, such as when trying to separate elements into buckets while maintaing order.</p>
<p>For example, given the following <code>input</code>:</p>
<pre><code class="hljs language-js"><span class="hljs-keyword">const</span> input = [<span class="hljs-number">1</span>, <span class="hljs-number">2</span>, <span class="hljs-number">3</span>, <span class="hljs-number">4</span>, <span class="hljs-number">5</span>, <span class="hljs-number">6</span>, <span class="hljs-number">7</span>, <span class="hljs-number">8</span>, <span class="hljs-number">9</span>, <span class="hljs-number">10</span>]
</code></pre>
<p>With the desired <code>output</code> array as follows, in which we split elements into different rows, while maintaing a top-down/left-right ordering:</p>
<pre><code class="hljs language-js"><span class="hljs-keyword">const</span> output = [
  [<span class="hljs-number">1</span>, <span class="hljs-number">4</span>, <span class="hljs-number">7</span>, <span class="hljs-number">10</span>],
  [<span class="hljs-number">2</span>, <span class="hljs-number">5</span>, <span class="hljs-number">8</span>],
  [<span class="hljs-number">3</span>, <span class="hljs-number">6</span>, <span class="hljs-number">9</span>],
]
</code></pre>
<p>We can accomplish this using a function like so:</p>
<pre><code class="hljs language-js"><span class="hljs-keyword">const</span> <span class="hljs-title function_">transform</span> = (<span class="hljs-params">arr, segments</span>) =&gt;
  [...<span class="hljs-keyword">new</span> <span class="hljs-title class_">Array</span>(segments)].<span class="hljs-title function_">map</span>(<span class="hljs-function">(<span class="hljs-params">_, outerPos</span>) =&gt;</span>
    input.<span class="hljs-title function_">filter</span>(<span class="hljs-function">(<span class="hljs-params">el, innerPos</span>) =&gt;</span> innerPos % segments === outerPos)
  )
</code></pre>
<p>Which can then be used with:</p>
<pre><code class="hljs language-js"><span class="hljs-keyword">const</span> rows = <span class="hljs-number">3</span>
<span class="hljs-keyword">const</span> transformedData = <span class="hljs-title function_">transform</span>(input, rows)
</code></pre>
]]></content>
        <author>
            <name>Nabeel Valley</name>
            <uri>https://nabeelvalley.co.za</uri>
        </author>
    </entry>
    <entry>
        <title type="html"><![CDATA[Mongo DB in Docker]]></title>
        <id>/blog/2020/22-09/mongo-db-in-docker/</id>
        <link href="https://nabeelvalley.co.za/blog/2020/22-09/mongo-db-in-docker/"/>
        <updated>2020-09-21T22:00:00.000Z</updated>
        <summary type="html"><![CDATA[Run a MongoDB Instance with Docker or Docker Compose]]></summary>
        <content type="html"><![CDATA[<p><div class="table-of-contents"><details><summary>Contents</summary><ul><li><a href="#considerations">Considerations</a></li><li><a href="#from-terminal">From Terminal</a></li><li><a href="#from-compose">From Compose</a></li></ul></details></div></p>
<h1 id="considerations" tabindex="-1">Considerations</h1>
<p>To run MongDB in a Docker Container there are a few things to take note of:</p>
<ul>
<li>You may need to configure auth</li>
<li>Volume storage to be set up</li>
</ul>
<h1 id="from-terminal" tabindex="-1">From Terminal</h1>
<p>To run a Docker container using a single command in the terminal you can run the following command:</p>
<pre><code class="hljs language-sh">docker run -d -p 27017:27017
</code></pre>
<p>You can also specify additional information like the volumes you would like to use using flags when running:</p>
<pre><code class="hljs language-sh">docker run -d -p 27017:27017
</code></pre>
<h1 id="from-compose" tabindex="-1">From Compose</h1>
<blockquote>
<p>More info can be found <a href="https://medium.com/faun/managing-mongodb-on-docker-with-docker-compose-26bf8a0bbae3">here</a></p>
</blockquote>
<p>You can also run a MongoDB Container with Compose which may be a bit easier:</p>
<p><code>docker-compose.yml</code></p>
<pre><code class="hljs language-yml"><span class="hljs-attr">version:</span> <span class="hljs-string">&#x27;3.3&#x27;</span>

<span class="hljs-attr">services:</span>
  <span class="hljs-comment"># mongonode0:27017</span>
  <span class="hljs-attr">mongo0:</span>
    <span class="hljs-attr">image:</span> <span class="hljs-string">mongo</span>
    <span class="hljs-attr">hostname:</span> <span class="hljs-string">mongo0</span>
    <span class="hljs-attr">container_name:</span> <span class="hljs-string">mongo0</span>
    <span class="hljs-attr">restart:</span> <span class="hljs-string">always</span>
    <span class="hljs-attr">ports:</span>
      <span class="hljs-bullet">-</span> <span class="hljs-string">&#x27;37000:27017&#x27;</span>
    <span class="hljs-attr">volumes:</span>
      <span class="hljs-bullet">-</span> <span class="hljs-string">./mongo0-data:/data/db</span>
    <span class="hljs-attr">environment:</span>
      <span class="hljs-attr">MONGO_INITDB_ROOT_USERNAME:</span> <span class="hljs-string">root</span>
      <span class="hljs-attr">MONGO_INITDB_ROOT_PASSWORD:</span> <span class="hljs-string">password</span>
</code></pre>
]]></content>
        <author>
            <name>Nabeel Valley</name>
            <uri>https://nabeelvalley.co.za</uri>
        </author>
    </entry>
    <entry>
        <title type="html"><![CDATA[Web APIs with AdonisJS and PostgreSQL]]></title>
        <id>/blog/2020/06-09/first-look-at-adonisjs/</id>
        <link href="https://nabeelvalley.co.za/blog/2020/06-09/first-look-at-adonisjs/"/>
        <updated>2020-09-05T22:00:00.000Z</updated>
        <summary type="html"><![CDATA[A look at developing Web APIs using the AdonisJS Framework and MongoDB]]></summary>
        <content type="html"><![CDATA[<p><div class="table-of-contents"><details><summary>Contents</summary><ul><li><a href="#about-adonisjs">About AdonisJS</a></li><li><a href="#prerequisites">Prerequisites</a></li><li><a href="#initialize-an-application">Initialize an Application</a></li><li><a href="#the-ace-cli">The Ace CLI</a></li><li><a href="#environment-variables">Environment Variables</a></li><li><a href="#making-requests">Making Requests</a></li><li><a href="#controllers">Controllers</a></li><li><a href="#database">Database</a></li><li><a href="#defining-models">Defining Models</a></li><li><a href="#migrating-the-database">Migrating the Database</a></li><li><a href="#interact-with-the-database">Interact with the Database</a></li><li><a href="#consume-the-api">Consume the API</a><ul><li><a href="#create-a-user">Create a User</a></li></ul></li><li><a href="#summary">Summary</a></li></ul></details></div></p>
<p>In this post, we'll take a look at building an API using the AdonisJS framework. We'll specifically be looking at the <a href="https://preview.adonisjs.com/">AdonisJS v5 Release Preview</a> and how we can create a simple REST API that handles some CRUD operations on a Database</p>
<p>Because we're going to be creating a REST API, you should have some experience making HTTP Requests, for our purposes we can use a website called <a href="https://postwoman.io/">Postwoman</a> to interact with our API, but you can also use any other tool you prefer</p>
<h1 id="about-adonisjs" tabindex="-1">About AdonisJS</h1>
<p>AdonisJS is an opinionated, Typescript-first web framework that provides a lot more &quot;out of the box&quot; functionality than the traditional framework or library in the Node.js ecosystem and is more comparable to something like .NET's WebAPI or MVC Framework than things like Express or Next in Node.js</p>
<p>Some of the built-in features and decisions that stand out for me are:</p>
<ul>
<li>First-class Typescript support</li>
<li>Class-based controllers</li>
<li>Class-Based SQL ORM</li>
<li>Dependency Injection</li>
<li>Request Body Validation</li>
<li>Authentication</li>
<li>Server-side View Rendering</li>
</ul>
<p>There are a lot more features, and it would be impractical for me to talk about all of them in a single post. Overall, the framework seems to be very complete at this point</p>
<h1 id="prerequisites" tabindex="-1">Prerequisites</h1>
<p>We'll be using a Node.js and a SQL Database for this post, so if you're going to follow along with this post you will need to have a couple of things installed:</p>
<ul>
<li><a href="http://nodejs.org/">Node.js and NPM</a></li>
<li>Any Supported SQL Database:
<ul>
<li>MySQL</li>
<li>SQLite</li>
<li>Microsoft SQL Server</li>
<li>PostgreSQL</li>
<li>MariaDB</li>
<li>OracleDB</li>
</ul>
</li>
</ul>
<p>Alternatively, you can run a Docker image for the database which may be easier, I'll be using Postgres via Docker with VSCode</p>
<blockquote>
<p>To learn more about VSCode Dev Containers you can look at <a href="/blog/2020/25-07/developing-in-a-container-vscode/">my previous post</a> on how to use Dev Containers</p>
</blockquote>
<h1 id="initialize-an-application" tabindex="-1">Initialize an Application</h1>
<p>Now that we've got all our necessary dependencies installed, we can initialize an application using the <code>npm init</code> command:</p>
<blockquote>
<p>During the initialization the CLI will ask you what type of project to initialize, be sure to select <code>API Server</code></p>
</blockquote>
<pre><code class="hljs language-bash">npm init adonis-ts-app my-api
</code></pre>
<p>The above command is made up of the following parts:</p>
<ol>
<li><code>npm init</code> which is the npm command that will run an initialization script from the provided package</li>
<li><code>adonis-ts-app</code> which is the package to be used for initialization</li>
<li><code>my-api</code> is the name of the folder/project we want to create</li>
</ol>
<p>Once the project has been configured, navigate into the project directory:</p>
<pre><code class="hljs language-bash"><span class="hljs-built_in">cd</span> my-api
</code></pre>
<p>And start the app:</p>
<pre><code class="hljs language-bash">npm start
</code></pre>
<h1 id="the-ace-cli" tabindex="-1">The Ace CLI</h1>
<p>AdonisJS makes use of a command-line application called <code>ace</code>, <code>ace</code> can be used to do common tasks as well as custom tasks that we define. By default, it can scaffold controllers, commands, and a bunch of other things as well as run and build an AdonisJS application</p>
<h1 id="environment-variables" tabindex="-1">Environment Variables</h1>
<p>AdonisJS Makes use of Environment Variables do set the application configuration, in your generated files you should see a file named <code>.env</code>, this file contains the environment variables used by the application. Looking at this file will give us an idea of our current configuration:</p>
<p><code>.env</code></p>
<pre><code class="hljs language-bash">PORT=3333
HOST=0.0.0.0
NODE_ENV=development
APP_KEY=mE8zN8V_7PzazKfv9_ds-8CGjVRLA2wo
</code></pre>
<p>At the moment, we can see that our application will be listening on host <code>0.0.0.0</code> and port <code>3333</code>, this means that we can access our application from our browser at <code>http://localhost:3333</code></p>
<p>If we open this page on our browser we will see the adonis logs kicked off in our command line, something like this:</p>
<pre><code class="hljs language-bash">ℹ  info      cleaning up build directory build
ℹ  info      copy .<span class="hljs-built_in">env</span>,ace build
☐  pending   compiling typescript <span class="hljs-built_in">source</span> files
✔  success   built successfully
ℹ  info      copy .adonisrc.json build
…  watch     watching file system <span class="hljs-keyword">for</span> changes
ℹ  info      starting http server
✔  create    ace-manifest.json
[1595755199986] INFO  (my-app/1531 on 47f057d8722c): started server on 0.0.0.0:3333
</code></pre>
<p>The first request may take some time, this is because the server is still starting itself up. In the meantime, however, let's discuss how we'll be accessing our API</p>
<h1 id="making-requests" tabindex="-1">Making Requests</h1>
<blockquote>
<p>You will need to use <a href="https://postwoman.io/">Postwoman</a> or something similar when making requests</p>
</blockquote>
<p>Now that our application is running, we can start making requests to our API. By default, AdonisJS sets up a <code>hello-world</code> route at the base of our application (the <code>/</code> route`)</p>
<p>We can reach this endpoint by simply making a <code>GET</code> request to <code>http://localhost:3333</code> which will return the following:</p>
<pre><code class="hljs language-json"><span class="hljs-punctuation">{</span>
  <span class="hljs-attr">&quot;hello&quot;</span><span class="hljs-punctuation">:</span> <span class="hljs-string">&quot;world&quot;</span>
<span class="hljs-punctuation">}</span>
</code></pre>
<p>AdonisJS can define routes using a method similar to libraries like Express.js, the &quot;Hello World&quot; route is defined in the <code>start/routes.ts</code> file and has the following:</p>
<p><code>routes.ts</code></p>
<pre><code class="hljs language-ts"><span class="hljs-keyword">import</span> <span class="hljs-title class_">Route</span> <span class="hljs-keyword">from</span> <span class="hljs-string">&#x27;@ioc:Adonis/Core/Route&#x27;</span>

<span class="hljs-title class_">Route</span>.<span class="hljs-title function_">get</span>(<span class="hljs-string">&#x27;/&#x27;</span>, <span class="hljs-keyword">async</span> () =&gt; {
  <span class="hljs-keyword">return</span> { <span class="hljs-attr">hello</span>: <span class="hljs-string">&#x27;world&#x27;</span> }
})
</code></pre>
<p>The <code>Route.get</code> portion states that this is a <code>GET</code> route on the <code>/</code> path with an <code>async</code> handler function that returns an object</p>
<p>However, for this post, we won't be defining our route's handler functions like this. We're going to make use of <code>controllers</code></p>
<h1 id="controllers" tabindex="-1">Controllers</h1>
<p>AdonisJS uses <code>controllers</code> to structure our API. This makes use of a <code>class</code> which contains functions intended to work as an interface between the HTTP request and the work we want to do via a <code>provider</code></p>
<p>We will simply state which <code>controller</code> and <code>method</code> we want to use in our <code>routes.ts</code> file instead of containing all the handler logic in that file</p>
<p>To generate a controller we can use <code>ace</code>. We will use <code>ace</code> to create a <code>UsersContoller</code>.</p>
<p>First, stop your running application with <code>ctrl + c</code> in the terminal, then use the following <code>ace</code> command to generate a <code>User</code> <code>controller</code>:</p>
<pre><code class="hljs language-bash">node ace make:controller User
</code></pre>
<p>This will generate an <code>app/Controllers/Http/UsersController.ts</code> file with the following contents:</p>
<p><code>UsersController.ts</code></p>
<pre><code class="hljs language-ts"><span class="hljs-keyword">export</span> <span class="hljs-keyword">default</span> <span class="hljs-keyword">class</span> <span class="hljs-title class_">UsersController</span> {}
</code></pre>
<p>Which exports a class called <code>UsersController</code> with no default functionality</p>
<p>We can create any functions inside of here that we want to, and then map these functions to routes. For now, let's add a <code>get</code> function that will put some placeholder data into. We'll update this later to use our database</p>
<p>A few things to note about the function we're going to create:</p>
<ul>
<li>The function is asynchronous, so if there are any long-running operations it won't block other things from running</li>
<li>The name of the function is <code>get</code> and it has no parameters</li>
<li>The function returns an array of objects that represents a <code>User</code></li>
</ul>
<p><code>UsersController.ts</code></p>
<pre><code class="hljs language-ts"><span class="hljs-keyword">export</span> <span class="hljs-keyword">default</span> <span class="hljs-keyword">class</span> <span class="hljs-title class_">UsersController</span> {
  <span class="hljs-keyword">public</span> <span class="hljs-keyword">async</span> <span class="hljs-title function_">get</span>(<span class="hljs-params"></span>) {
    <span class="hljs-keyword">return</span> [
      {
        <span class="hljs-attr">id</span>: <span class="hljs-number">1</span>,
        <span class="hljs-attr">name</span>: <span class="hljs-string">&#x27;Bob Smith&#x27;</span>,
        <span class="hljs-attr">email</span>: <span class="hljs-string">&#x27;bob@smithmail.com&#x27;</span>,
      },
    ]
  }
}
</code></pre>
<p>Now that we have defined our function, we can add a <code>route</code> that will cause this function to be called. We do this by adding the following in the <code>routes.ts</code> file:</p>
<pre><code class="hljs language-ts"><span class="hljs-title class_">Route</span>.<span class="hljs-title function_">get</span>(<span class="hljs-string">&#x27;users&#x27;</span>, <span class="hljs-string">&#x27;UsersController.get&#x27;</span>)
</code></pre>
<p>We can then run <code>npm start</code> from the command line and make a <code>GET</code> request to <code>http://localhost:3333/users</code> which should return our user:</p>
<pre><code class="hljs language-json"><span class="hljs-punctuation">[</span>
  <span class="hljs-punctuation">{</span>
    <span class="hljs-attr">&quot;id&quot;</span><span class="hljs-punctuation">:</span> <span class="hljs-number">1</span><span class="hljs-punctuation">,</span>
    <span class="hljs-attr">&quot;name&quot;</span><span class="hljs-punctuation">:</span> <span class="hljs-string">&quot;Bob Smith&quot;</span><span class="hljs-punctuation">,</span>
    <span class="hljs-attr">&quot;email&quot;</span><span class="hljs-punctuation">:</span> <span class="hljs-string">&quot;bob@smithmail.com&quot;</span>
  <span class="hljs-punctuation">}</span>
<span class="hljs-punctuation">]</span>
</code></pre>
<h1 id="database" tabindex="-1">Database</h1>
<p>Now that we've got some basic understanding of how AdonisJS maps routes to functionality, we can connect our application to a Database</p>
<p>To add database functionality, we first want to install the <code>adonisjs/lucid</code> package to our application. Behind the scenes, AdonisJS makes use of <code>Lucid</code> for connecting to and working with databases</p>
<pre><code class="hljs language-bash">npm i @adonisjs/lucid@alpha
</code></pre>
<p>And then run the following command to initialize it:</p>
<pre><code class="hljs language-bash">node ace invoke @adonisjs/lucid
</code></pre>
<p>Which should give the following output:</p>
<pre><code class="hljs">   <span class="hljs-keyword">create</span>    config/<span class="hljs-keyword">database</span>.ts
   <span class="hljs-keyword">update</span>    .env
   <span class="hljs-keyword">update</span>    tsconfig.json { <span class="hljs-keyword">types</span> += @adonisjs/lucid }
   <span class="hljs-keyword">update</span>    .adonisrc.json { commands += @adonisjs/lucid/build/commands }
   <span class="hljs-keyword">update</span>    .adonisrc.json { providers += @adonisjs/lucid }
✔  <span class="hljs-keyword">create</span>    ace-manifest.json
</code></pre>
<p>If you open your <code>.env</code> file you will see the configuration for a <code>sqlite</code> database</p>
<p><code>.env</code></p>
<pre><code class="hljs language-bash"><span class="hljs-comment"># ... other config</span>
DB_CONNECTION=sqlite
DB_HOST=127.0.0.1
DB_USER=lucid
DB_PASSWORD=lucid
DB_NAME=lucid
</code></pre>
<p>You can follow the general database setup information on the <a href="https://preview.adonisjs.com/guides/database/setup">AdonisJS Docs</a> to set yours up, but I'll be using Postgres as I've mentioned before</p>
<p>To use Postgress, you need to install the <code>pg</code> package from npm:</p>
<pre><code class="hljs language-bash">npm i pg
</code></pre>
<p>Then configure your application to use Postgres. We will first update our <code>.env</code> file to have our database credentials:</p>
<p><code>.env</code></p>
<pre><code class="hljs language-bash">DB_CONNECTION=pg
DB_HOST=db
DB_USER=user
DB_PASSWORD=pass
DB_NAME=data
DB_PORT=5432
</code></pre>
<p>Once you've configured your database connection information in the <code>.env</code> file, our database connection information will be taken care of by AdonisJS</p>
<p>These environment variables are used in the <code>config/database.ts</code> file, we can see them in the <code>pg</code> part of the file</p>
<p><code>database.ts</code></p>
<pre><code class="hljs language-ts">  ...
    <span class="hljs-attr">pg</span>: {
      <span class="hljs-attr">client</span>: <span class="hljs-string">&#x27;pg&#x27;</span>,
      <span class="hljs-attr">connection</span>: {
        <span class="hljs-attr">host</span>: <span class="hljs-title class_">Env</span>.<span class="hljs-title function_">get</span>(<span class="hljs-string">&#x27;DB_HOST&#x27;</span>, <span class="hljs-string">&#x27;127.0.0.1&#x27;</span>) <span class="hljs-keyword">as</span> <span class="hljs-built_in">string</span>,
        <span class="hljs-attr">port</span>: <span class="hljs-title class_">Number</span>(<span class="hljs-title class_">Env</span>.<span class="hljs-title function_">get</span>(<span class="hljs-string">&#x27;DB_PORT&#x27;</span>, <span class="hljs-number">5432</span>)),
        <span class="hljs-attr">user</span>: <span class="hljs-title class_">Env</span>.<span class="hljs-title function_">get</span>(<span class="hljs-string">&#x27;DB_USER&#x27;</span>, <span class="hljs-string">&#x27;lucid&#x27;</span>) <span class="hljs-keyword">as</span> <span class="hljs-built_in">string</span>,
        <span class="hljs-attr">password</span>: <span class="hljs-title class_">Env</span>.<span class="hljs-title function_">get</span>(<span class="hljs-string">&#x27;DB_PASSWORD&#x27;</span>, <span class="hljs-string">&#x27;lucid&#x27;</span>) <span class="hljs-keyword">as</span> <span class="hljs-built_in">string</span>,
        <span class="hljs-attr">database</span>: <span class="hljs-title class_">Env</span>.<span class="hljs-title function_">get</span>(<span class="hljs-string">&#x27;DB_NAME&#x27;</span>, <span class="hljs-string">&#x27;lucid&#x27;</span>) <span class="hljs-keyword">as</span> <span class="hljs-built_in">string</span>,
      },
      <span class="hljs-attr">healthCheck</span>: <span class="hljs-literal">true</span>,
    },
  ...
</code></pre>
<p>In the <code>database.ts</code> file above, look for the section for your relevant database, and set the <code>healthCheck</code> property to <code>true</code></p>
<p>Now that we've set things up, we can create a health-check route that will enable us to view the current status of our database connection. We will add a handler for this in the <code>routes.ts</code> file:</p>
<pre><code class="hljs language-ts"><span class="hljs-keyword">import</span> <span class="hljs-title class_">HealthCheck</span> <span class="hljs-keyword">from</span> <span class="hljs-string">&#x27;@ioc:Adonis/Core/HealthCheck&#x27;</span>
<span class="hljs-comment">// ... existing file content</span>

<span class="hljs-title class_">Route</span>.<span class="hljs-title function_">get</span>(<span class="hljs-string">&#x27;health&#x27;</span>, <span class="hljs-keyword">async</span> ({ response }) =&gt; {
  <span class="hljs-keyword">const</span> report = <span class="hljs-keyword">await</span> <span class="hljs-title class_">HealthCheck</span>.<span class="hljs-title function_">getReport</span>()
  <span class="hljs-keyword">return</span> report.<span class="hljs-property">healthy</span> ? response.<span class="hljs-title function_">ok</span>(report) : response.<span class="hljs-title function_">badRequest</span>(report)
})
</code></pre>
<p>Once you've done all the above, start the development server again with <code>npm start</code></p>
<p>Then make a <code>GET</code> request to <code>http://localhost:3333/health</code> to view your health-check information</p>
<pre><code class="hljs language-json"><span class="hljs-punctuation">{</span>
  <span class="hljs-attr">&quot;healthy&quot;</span><span class="hljs-punctuation">:</span> <span class="hljs-keyword">true</span><span class="hljs-punctuation">,</span>
  <span class="hljs-attr">&quot;report&quot;</span><span class="hljs-punctuation">:</span> <span class="hljs-punctuation">{</span>
    <span class="hljs-attr">&quot;env&quot;</span><span class="hljs-punctuation">:</span> <span class="hljs-punctuation">{</span>
      <span class="hljs-attr">&quot;displayName&quot;</span><span class="hljs-punctuation">:</span> <span class="hljs-string">&quot;Node Env Check&quot;</span><span class="hljs-punctuation">,</span>
      <span class="hljs-attr">&quot;health&quot;</span><span class="hljs-punctuation">:</span> <span class="hljs-punctuation">{</span>
        <span class="hljs-attr">&quot;healthy&quot;</span><span class="hljs-punctuation">:</span> <span class="hljs-keyword">true</span>
      <span class="hljs-punctuation">}</span>
    <span class="hljs-punctuation">}</span><span class="hljs-punctuation">,</span>
    <span class="hljs-attr">&quot;appKey&quot;</span><span class="hljs-punctuation">:</span> <span class="hljs-punctuation">{</span>
      <span class="hljs-attr">&quot;displayName&quot;</span><span class="hljs-punctuation">:</span> <span class="hljs-string">&quot;App Key Check&quot;</span><span class="hljs-punctuation">,</span>
      <span class="hljs-attr">&quot;health&quot;</span><span class="hljs-punctuation">:</span> <span class="hljs-punctuation">{</span>
        <span class="hljs-attr">&quot;healthy&quot;</span><span class="hljs-punctuation">:</span> <span class="hljs-keyword">true</span>
      <span class="hljs-punctuation">}</span>
    <span class="hljs-punctuation">}</span><span class="hljs-punctuation">,</span>
    <span class="hljs-attr">&quot;lucid&quot;</span><span class="hljs-punctuation">:</span> <span class="hljs-punctuation">{</span>
      <span class="hljs-attr">&quot;displayName&quot;</span><span class="hljs-punctuation">:</span> <span class="hljs-string">&quot;Database&quot;</span><span class="hljs-punctuation">,</span>
      <span class="hljs-attr">&quot;health&quot;</span><span class="hljs-punctuation">:</span> <span class="hljs-punctuation">{</span>
        <span class="hljs-attr">&quot;healthy&quot;</span><span class="hljs-punctuation">:</span> <span class="hljs-keyword">true</span><span class="hljs-punctuation">,</span>
        <span class="hljs-attr">&quot;message&quot;</span><span class="hljs-punctuation">:</span> <span class="hljs-string">&quot;All connections are healthy&quot;</span>
      <span class="hljs-punctuation">}</span><span class="hljs-punctuation">,</span>
      <span class="hljs-attr">&quot;meta&quot;</span><span class="hljs-punctuation">:</span> <span class="hljs-punctuation">[</span>
        <span class="hljs-punctuation">{</span>
          <span class="hljs-attr">&quot;connection&quot;</span><span class="hljs-punctuation">:</span> <span class="hljs-string">&quot;pg&quot;</span><span class="hljs-punctuation">,</span>
          <span class="hljs-attr">&quot;message&quot;</span><span class="hljs-punctuation">:</span> <span class="hljs-string">&quot;Connection is healthy&quot;</span><span class="hljs-punctuation">,</span>
          <span class="hljs-attr">&quot;error&quot;</span><span class="hljs-punctuation">:</span> <span class="hljs-keyword">null</span>
        <span class="hljs-punctuation">}</span>
      <span class="hljs-punctuation">]</span>
    <span class="hljs-punctuation">}</span>
  <span class="hljs-punctuation">}</span>
<span class="hljs-punctuation">}</span>
</code></pre>
<p>In the <code>lucid</code> section we will see if our database connection is working or any applicable error information.</p>
<h1 id="defining-models" tabindex="-1">Defining Models</h1>
<p>Once we've configured our database, we will want to interact with the data in it. Lucid makes use of <code>models</code> essentially as proxies for database tables. We can generate a <code>model</code> for our <code>User</code> with <code>ace</code> as follows:</p>
<blockquote>
<p>Stop your development server with <code>ctrl + c</code> before running this:</p>
</blockquote>
<pre><code class="hljs language-bash">node ace make:model User
</code></pre>
<p>The above script will have generated a <code>User</code> model class in the <code>app/Models/User.ts</code> file that extends <code>BaseModel</code>. All models must do this. The generated <code>User.ts</code> file looks like this:</p>
<p><code>User.ts</code></p>
<pre><code class="hljs language-ts"><span class="hljs-keyword">import</span> { <span class="hljs-title class_">DateTime</span> } <span class="hljs-keyword">from</span> <span class="hljs-string">&#x27;luxon&#x27;</span>
<span class="hljs-keyword">import</span> { <span class="hljs-title class_">BaseModel</span>, column } <span class="hljs-keyword">from</span> <span class="hljs-string">&#x27;@ioc:Adonis/Lucid/Orm&#x27;</span>

<span class="hljs-keyword">export</span> <span class="hljs-keyword">default</span> <span class="hljs-keyword">class</span> <span class="hljs-title class_">User</span> <span class="hljs-keyword">extends</span> <span class="hljs-title class_ inherited__">BaseModel</span> {
  <span class="hljs-meta">@column</span>({ <span class="hljs-attr">isPrimary</span>: <span class="hljs-literal">true</span> })
  <span class="hljs-keyword">public</span> <span class="hljs-attr">id</span>: <span class="hljs-built_in">number</span>

  <span class="hljs-meta">@column</span>.<span class="hljs-title function_">dateTime</span>({ <span class="hljs-attr">autoCreate</span>: <span class="hljs-literal">true</span> })
  <span class="hljs-keyword">public</span> <span class="hljs-attr">createdAt</span>: <span class="hljs-title class_">DateTime</span>

  <span class="hljs-meta">@column</span>.<span class="hljs-title function_">dateTime</span>({ <span class="hljs-attr">autoCreate</span>: <span class="hljs-literal">true</span>, <span class="hljs-attr">autoUpdate</span>: <span class="hljs-literal">true</span> })
  <span class="hljs-keyword">public</span> <span class="hljs-attr">updatedAt</span>: <span class="hljs-title class_">DateTime</span>
}
</code></pre>
<blockquote>
<p>When viewing the above file your code editor may give you a warning saying that decorators are not supported, if you see this then set the <code>experimentalDecorators</code> property to <code>true</code> in your <code>tsconfig.json</code> file:</p>
</blockquote>
<pre><code class="hljs language-json">...
  <span class="hljs-attr">&quot;compilerOptions&quot;</span><span class="hljs-punctuation">:</span> <span class="hljs-punctuation">{</span>
    <span class="hljs-attr">&quot;experimentalDecorators&quot;</span><span class="hljs-punctuation">:</span> <span class="hljs-keyword">true</span><span class="hljs-punctuation">,</span>
...
</code></pre>
<p>Note the <code>@column</code> decorators, these are used to map columns in our database to our model fields. We'll add a field for our user's <code>name</code> and <code>email</code> as follows:</p>
<p><code>User.ts</code></p>
<pre><code class="hljs language-ts"><span class="hljs-keyword">export</span> <span class="hljs-keyword">default</span> <span class="hljs-keyword">class</span> <span class="hljs-title class_">User</span> <span class="hljs-keyword">extends</span> <span class="hljs-title class_ inherited__">BaseModel</span> {
  <span class="hljs-comment">// ... other stuff in class</span>
  <span class="hljs-meta">@column</span>()
  <span class="hljs-keyword">public</span> <span class="hljs-attr">name</span>: <span class="hljs-title class_">String</span>

  <span class="hljs-meta">@column</span>()
  <span class="hljs-keyword">public</span> <span class="hljs-attr">email</span>: <span class="hljs-title class_">String</span>
}
</code></pre>
<blockquote>
<p>Any properties or methods defined in a class without the <code>@column</code> decorator will not be mapped to the database, we can just use these as normal functions in the class and implement utilities from them</p>
</blockquote>
<h1 id="migrating-the-database" tabindex="-1">Migrating the Database</h1>
<p>At this point, our database does not contain a <code>user</code> table, which will be used to store our data for the <code>User</code> model. We need to create a Database Migration which will add the required table and fields.</p>
<p><code>ace</code> provides us with a method to scaffold a migration file. To create this file we will run the following command:</p>
<pre><code class="hljs language-bash">node ace make:migration <span class="hljs-built_in">users</span>
</code></pre>
<p>Which will have created a <code>database/migrations/SOME_ID_users.ts</code> file with the following:</p>
<p><code>*_users.ts</code></p>
<pre><code class="hljs language-ts"><span class="hljs-keyword">import</span> <span class="hljs-title class_">BaseSchema</span> <span class="hljs-keyword">from</span> <span class="hljs-string">&#x27;@ioc:Adonis/Lucid/Schema&#x27;</span>

<span class="hljs-keyword">export</span> <span class="hljs-keyword">default</span> <span class="hljs-keyword">class</span> <span class="hljs-title class_">Users</span> <span class="hljs-keyword">extends</span> <span class="hljs-title class_ inherited__">BaseSchema</span> {
  <span class="hljs-keyword">protected</span> tableName = <span class="hljs-string">&#x27;users&#x27;</span>

  <span class="hljs-keyword">public</span> <span class="hljs-keyword">async</span> <span class="hljs-title function_">up</span>(<span class="hljs-params"></span>) {
    <span class="hljs-variable language_">this</span>.<span class="hljs-property">schema</span>.<span class="hljs-title function_">createTable</span>(<span class="hljs-variable language_">this</span>.<span class="hljs-property">tableName</span>, <span class="hljs-function">(<span class="hljs-params">table</span>) =&gt;</span> {
      table.<span class="hljs-title function_">increments</span>(<span class="hljs-string">&#x27;id&#x27;</span>)
      table.<span class="hljs-title function_">timestamps</span>(<span class="hljs-literal">true</span>)
    })
  }

  <span class="hljs-keyword">public</span> <span class="hljs-keyword">async</span> <span class="hljs-title function_">down</span>(<span class="hljs-params"></span>) {
    <span class="hljs-variable language_">this</span>.<span class="hljs-property">schema</span>.<span class="hljs-title function_">dropTable</span>(<span class="hljs-variable language_">this</span>.<span class="hljs-property">tableName</span>)
  }
}
</code></pre>
<p>The generated file (above) contains an <code>up</code> function which will create a <code>users</code> table with an <code>id</code> as well as <code>createdAt</code> and <code>updatedAt</code> fields. We will need to modify the <code>up</code> function to add our new fields as well:</p>
<pre><code class="hljs language-ts"><span class="hljs-keyword">export</span> <span class="hljs-keyword">default</span> <span class="hljs-keyword">class</span> <span class="hljs-title class_">Users</span> <span class="hljs-keyword">extends</span> <span class="hljs-title class_ inherited__">BaseSchema</span> {
  ...

  <span class="hljs-keyword">public</span> <span class="hljs-keyword">async</span> up () {
    <span class="hljs-variable language_">this</span>.<span class="hljs-property">schema</span>.<span class="hljs-title function_">createTable</span>(<span class="hljs-variable language_">this</span>.<span class="hljs-property">tableName</span>, <span class="hljs-function">(<span class="hljs-params">table</span>) =&gt;</span> {
      table.<span class="hljs-title function_">increments</span>(<span class="hljs-string">&#x27;id&#x27;</span>)
      table.<span class="hljs-title function_">timestamps</span>(<span class="hljs-literal">true</span>)

      <span class="hljs-comment">// our added fields</span>
      table.<span class="hljs-title function_">string</span>(<span class="hljs-string">&#x27;name&#x27;</span>).<span class="hljs-title function_">notNullable</span>()
      table.<span class="hljs-title function_">string</span>(<span class="hljs-string">&#x27;email&#x27;</span>).<span class="hljs-title function_">unique</span>().<span class="hljs-title function_">notNullable</span>()
    })
  }

  ...
</code></pre>
<p>Once we've defined our migration script we need to build the application with:</p>
<pre><code class="hljs language-bash">node ace build
</code></pre>
<p>And then we can run the migration using <code>ace</code> as follows:</p>
<pre><code class="hljs language-bash">node ace migration:run
</code></pre>
<blockquote>
<p>If there is an error in a migration script, we can rollback the migration with <code>node ace migration:rollback</code> which will run the <code>down</code> function in your migration</p>
</blockquote>
<h1 id="interact-with-the-database" tabindex="-1">Interact with the Database</h1>
<p>Now that we've got our database, we can interact with it using the <code>User</code> model we defined earlier</p>
<p>The first change we'll make is to modify the <code>get</code> function to return all users. To do this we need to import <code>App/Models/User</code> and use the <code>User.all</code> method:</p>
<pre><code class="hljs language-ts"><span class="hljs-keyword">import</span> <span class="hljs-title class_">User</span> <span class="hljs-keyword">from</span> <span class="hljs-string">&#x27;App/Models/User&#x27;</span>

<span class="hljs-keyword">export</span> <span class="hljs-keyword">default</span> <span class="hljs-keyword">class</span> <span class="hljs-title class_">UsersController</span> {
  <span class="hljs-keyword">public</span> <span class="hljs-keyword">async</span> <span class="hljs-title function_">get</span>(<span class="hljs-params"></span>) {
    <span class="hljs-comment">// get all users</span>
    <span class="hljs-keyword">return</span> <span class="hljs-keyword">await</span> <span class="hljs-title class_">User</span>.<span class="hljs-title function_">all</span>()
  }
}
</code></pre>
<blockquote>
<p>We use <code>await</code> because the <code>User.all</code> function is asynchronous</p>
</blockquote>
<p>Next, we'll add a function to create a <code>User</code>. We will call it <code>post</code>. To make this function work we need to do a couple of things:</p>
<ol>
<li>Import <code>HttpContextContract</code> from <code>@ioc:Adonis/Core/HttpContext</code></li>
<li>Retrieve the <code>request</code> from the <code>HttpContextContract</code></li>
<li>Create a <code>User</code></li>
<li>Return the created user</li>
</ol>
<pre><code class="hljs language-ts"><span class="hljs-keyword">import</span> { <span class="hljs-title class_">HttpContextContract</span> } <span class="hljs-keyword">from</span> <span class="hljs-string">&#x27;@ioc:Adonis/Core/HttpContext&#x27;</span>
<span class="hljs-comment">// ... other imports</span>

<span class="hljs-keyword">export</span> <span class="hljs-keyword">default</span> <span class="hljs-keyword">class</span> <span class="hljs-title class_">UsersController</span> {
  <span class="hljs-comment">// ... get user code above</span>
  <span class="hljs-keyword">public</span> <span class="hljs-keyword">async</span> <span class="hljs-title function_">post</span>(<span class="hljs-params">{ request }: HttpContextContract</span>) {
    <span class="hljs-comment">// get the user from the request body</span>
    <span class="hljs-keyword">const</span> newUser = request.<span class="hljs-title function_">all</span>() <span class="hljs-keyword">as</span> <span class="hljs-title class_">Partial</span>&lt;<span class="hljs-title class_">User</span>&gt;

    <span class="hljs-comment">// create a user using the object we received</span>
    <span class="hljs-keyword">const</span> user = <span class="hljs-keyword">await</span> <span class="hljs-title class_">User</span>.<span class="hljs-title function_">create</span>(newUser)

    <span class="hljs-comment">// return the created user object</span>
    <span class="hljs-keyword">return</span> user
  }
}
</code></pre>
<blockquote>
<p>The <code>request.all</code> function combines the data from the request body and query string into a single object</p>
</blockquote>
<p>When we've added that, our completed <code>UsersController.ts</code> file should look like this:</p>
<p><code>UsersController.ts</code></p>
<pre><code class="hljs language-ts"><span class="hljs-keyword">import</span> { <span class="hljs-title class_">HttpContextContract</span> } <span class="hljs-keyword">from</span> <span class="hljs-string">&#x27;@ioc:Adonis/Core/HttpContext&#x27;</span>
<span class="hljs-keyword">import</span> <span class="hljs-title class_">User</span> <span class="hljs-keyword">from</span> <span class="hljs-string">&#x27;App/Models/User&#x27;</span>

<span class="hljs-keyword">export</span> <span class="hljs-keyword">default</span> <span class="hljs-keyword">class</span> <span class="hljs-title class_">UsersController</span> {
  <span class="hljs-keyword">public</span> <span class="hljs-keyword">async</span> <span class="hljs-title function_">get</span>(<span class="hljs-params"></span>) {
    <span class="hljs-keyword">return</span> <span class="hljs-keyword">await</span> <span class="hljs-title class_">User</span>.<span class="hljs-title function_">all</span>()
  }

  <span class="hljs-keyword">public</span> <span class="hljs-keyword">async</span> <span class="hljs-title function_">post</span>(<span class="hljs-params">{ request }: HttpContextContract</span>) {
    <span class="hljs-keyword">const</span> newUser = request.<span class="hljs-title function_">all</span>() <span class="hljs-keyword">as</span> <span class="hljs-title class_">Partial</span>&lt;<span class="hljs-title class_">User</span>&gt;
    <span class="hljs-keyword">const</span> user = <span class="hljs-keyword">await</span> <span class="hljs-title class_">User</span>.<span class="hljs-title function_">create</span>(newUser)
    <span class="hljs-keyword">return</span> user
  }
}
</code></pre>
<p>Now that we've added a new function to our controller, we need to expose a route to it in the <code>routes.ts</code> file:</p>
<p><code>routes.ts</code></p>
<pre><code class="hljs language-ts">...
<span class="hljs-title class_">Route</span>.<span class="hljs-title function_">post</span>(<span class="hljs-string">&#x27;users&#x27;</span>, <span class="hljs-string">&#x27;UsersController.post&#x27;</span>)
...
</code></pre>
<h1 id="consume-the-api" tabindex="-1">Consume the API</h1>
<p>Now that we've created API endpoints for listing all users and creating a user we can restart our development server with <code>npm start</code> and consume our API from wherever we want to make some HTTP requests</p>
<h2 id="create-a-user" tabindex="-1">Create a User</h2>
<p>To create a <code>User we need to make a</code>POST<code>request to</code>http://localhost:3333/users<code>and a Content-Type of</code>application/json<code>with the following as the</code>body` for our request:</p>
<pre><code class="hljs language-json"><span class="hljs-punctuation">{</span>
  <span class="hljs-attr">&quot;name&quot;</span><span class="hljs-punctuation">:</span> <span class="hljs-string">&quot;Bob Smith&quot;</span><span class="hljs-punctuation">,</span>
  <span class="hljs-attr">&quot;email&quot;</span><span class="hljs-punctuation">:</span> <span class="hljs-string">&quot;bob@smithmail.com&quot;</span>
<span class="hljs-punctuation">}</span>
</code></pre>
<p>Which should return a created user like:</p>
<pre><code class="hljs language-json"><span class="hljs-punctuation">{</span>
  <span class="hljs-attr">&quot;name&quot;</span><span class="hljs-punctuation">:</span> <span class="hljs-string">&quot;Bob Smith&quot;</span><span class="hljs-punctuation">,</span>
  <span class="hljs-attr">&quot;email&quot;</span><span class="hljs-punctuation">:</span> <span class="hljs-string">&quot;bob@smithmail.com&quot;</span><span class="hljs-punctuation">,</span>
  <span class="hljs-attr">&quot;created_at&quot;</span><span class="hljs-punctuation">:</span> <span class="hljs-string">&quot;2020-07-26T14:35:25.987-00:00&quot;</span><span class="hljs-punctuation">,</span>
  <span class="hljs-attr">&quot;updated_at&quot;</span><span class="hljs-punctuation">:</span> <span class="hljs-string">&quot;2020-07-26T14:35:25.988-00:00&quot;</span><span class="hljs-punctuation">,</span>
  <span class="hljs-attr">&quot;id&quot;</span><span class="hljs-punctuation">:</span> <span class="hljs-number">4</span>
<span class="hljs-punctuation">}</span>
</code></pre>
<blockquote>
<p>We can also try to create a <code>User</code> with the same information but we will see that this fails due to the database constraints we added in our migration script</p>
</blockquote>
<p>Next, we can get a list of all Users by making a <code>GET</code> request to <code>http://localhost:333/users</code> which should give us back our created users:</p>
<pre><code class="hljs language-json"><span class="hljs-punctuation">[</span>
  <span class="hljs-punctuation">{</span>
    <span class="hljs-attr">&quot;id&quot;</span><span class="hljs-punctuation">:</span> <span class="hljs-number">4</span><span class="hljs-punctuation">,</span>
    <span class="hljs-attr">&quot;created_at&quot;</span><span class="hljs-punctuation">:</span> <span class="hljs-string">&quot;2020-07-26T14:35:25.987-00:00&quot;</span><span class="hljs-punctuation">,</span>
    <span class="hljs-attr">&quot;updated_at&quot;</span><span class="hljs-punctuation">:</span> <span class="hljs-string">&quot;2020-07-26T14:35:25.988-00:00&quot;</span><span class="hljs-punctuation">,</span>
    <span class="hljs-attr">&quot;name&quot;</span><span class="hljs-punctuation">:</span> <span class="hljs-string">&quot;Bob Smith&quot;</span><span class="hljs-punctuation">,</span>
    <span class="hljs-attr">&quot;email&quot;</span><span class="hljs-punctuation">:</span> <span class="hljs-string">&quot;bob@smithmail.com&quot;</span>
  <span class="hljs-punctuation">}</span>
<span class="hljs-punctuation">]</span>
</code></pre>
<h1 id="summary" tabindex="-1">Summary</h1>
<p>My overall impression of AdonisJS is pretty good. The framework feels very stable and I had much fewer issues in the process of learning it and writing this post than I have had using other more popular frameworks.</p>
<p>AdonisJS is very well documented with code samples for most traditional tasks and is backed by some solid libraries for things like database integration</p>
<p>Working with SQL using the framework has been fairly straightforward, and the ability to write database migrations using functionality provided by the framework instead of just tossing some wild SQL together makes it more approachable</p>
<p>Personally, however, I prefer no-SQL databases like MongoDB and tend to use them more often when using JavaScript or TypeScript, but I feel like if the need arises for a SQL database then AdonisJS is a really good option, especially if you're a JavaScript developer and don't want to have to learn Java or C# for this type of functionality</p>
<p>There is also a <strong>lot</strong> more functionality than what I've gone through in this post, so I'd recommend browsing <a href="https://preview.adonisjs.com/">the AdonisJS docs</a> to get a broader sense of what the framework entails</p>
<p>If you feel like playing around with the code I've gone through in this post without having to write it all then I've got it all <a href="https://github.com/nabeelvalley/blog-code/tree/post/adonisjs-first-look">on GitHub</a> and it should just be plug-and-play using Visual Studio Code Remote Containers. If you want to learn more about that, then you can check out <a href="/blog/2020/25-07/developing-in-a-container-vscode/">my previous blog post</a> on developing within a container</p>
]]></content>
        <author>
            <name>Nabeel Valley</name>
            <uri>https://nabeelvalley.co.za</uri>
        </author>
    </entry>
    <entry>
        <title type="html"><![CDATA[Automate Anything with GitHub Actions]]></title>
        <id>/blog/2020/11-08/automate-anything-with-actions/</id>
        <link href="https://nabeelvalley.co.za/blog/2020/11-08/automate-anything-with-actions/"/>
        <updated>2020-08-10T22:00:00.000Z</updated>
        <summary type="html"><![CDATA[Build a GitHub action that updates your Twitter Profile]]></summary>
        <content type="html"><![CDATA[<p><div class="table-of-contents"><details><summary>Contents</summary><ul><li><a href="#prerequisites">Prerequisites</a></li><li><a href="#create-a-github-repo">Create a GitHub Repo</a></li><li><a href="#get-some-twitter-cred.">Get Some Twitter Cred.</a></li><li><a href="#using-the-twitter-api">Using the Twitter API</a></li><li><a href="#configure-the-action-metadata">Configure the Action Metadata</a></li><li><a href="#setting-up-secrets-in-github">Setting Up Secrets in GitHub</a></li><li><a href="#create-a-workflow">Create a Workflow</a></li><li><a href="#run-the-action">Run the Action</a></li><li><a href="#summary">Summary</a></li></ul></details></div></p>
<p><img src="https://github.com/nabeelvalley/twitter-bio-update/workflows/Build%20Action%20Dist/badge.svg" alt="Build Action Dist">
<img src="https://github.com/nabeelvalley/twitter-bio-update/workflows/Run%20Twitter%20Bio%20Action/badge.svg" alt="Run Twitter Bio Action"></p>
<blockquote>
<p>You can take a look at the Action we build in this post <a href="https://github.com/nabeelvalley/twitter-bio-update/actions">here on GitHub</a>. I've also included an action that's responsible for building and updating the action <code>dist</code> which may also be of interest. It's all in <a href="https://github.com/nabeelvalley/twitter-bio-update">this Repository</a></p>
</blockquote>
<p>A few weeks ago I was playing around with GitHub actions and the recently introduced GitHub Account README functionality and wanted a way to make this &quot;static&quot; file a bit more dynamic</p>
<p>Enter GitHub Actions. GitHub actions are a way for you to define and run programmatic tasks. If you can put it in code, then you can run it as an action</p>
<p>Usually, you'll be using actions that have been defined by GitHub or another developer for common tasks, such as running your application CI or deployment processes. However, since actions are <strong>extremely</strong> generic, we're going to do something a little different - update our Twitter bio?</p>
<p>In this post, we're going create a GitHub action that uses the Twitter API to update our bio, as well as make the action we created run automatically on GitHub</p>
<ol>
<li>Create a GitHub Repository for us to work in</li>
<li>Set up Twitter Developer Credentials</li>
<li>Write a Node.js script that uses the Twitter API</li>
<li>Configure our GitHub Action Metadata</li>
<li>Add our Twitter Secrets in GitHub</li>
<li>Configure a GitHub Action that will run our script (an action, within an action)</li>
</ol>
<h1 id="prerequisites" tabindex="-1">Prerequisites</h1>
<ul>
<li><a href="https://git-scm.com/downloads">Git</a></li>
<li><a href="http://nodejs.org/">Node.js</a></li>
<li><a href="https://code.visualstudio.com/">Visual Studio Code</a> or any other Code Editor</li>
</ul>
<h1 id="create-a-github-repo" tabindex="-1">Create a GitHub Repo</h1>
<p>For us to run our action we'll need a GitHub Repository to use, to create a Repo go to <a href="https://github.com/">GitHub</a> and sign in, thereafter go the <a href="https://github.com/new">'Create a new repository page'</a> and fill in the details, be sure to select <code>Initialize this repository with a README</code>, pick <code>Node</code> as the <code>.gitignore</code> file, and select a license if you'd like to</p>
<p>Once you've done that, click <code>Create repository</code> and you should see the initial files we added to the Repo. Next, click on the <code>Code</code> button and copy the URL in the text box</p>
<p>Now, from a terminal, you will need to clone the repository. Run the following command and make sure to paste the link you just copied in place of <code>&lt;YOUR URL&gt;</code> below:</p>
<pre><code class="hljs language-sh">git <span class="hljs-built_in">clone</span> &lt;YOUR URL&gt;
</code></pre>
<p>Next, open the folder you just cloned in your code editor and create a new file called <code>.env</code> in the folder root directory. We'll keep our Twitter credentials in this file for testing. For now, just add the following to the file:</p>
<p><code>.env</code></p>
<pre><code class="hljs language-sh">TWITTER_CONSUMER_KEY=
TWITTER_CONSUMER_SECRET=
TWITTER_ACCESS_KEY=
TWITTER_ACCESS_SECRET=
</code></pre>
<p>In the next step, we're going to get the credentials from Twitter, we'll add them into the file above when we're done</p>
<h1 id="get-some-twitter-cred." tabindex="-1">Get Some Twitter Cred.</h1>
<p>Twitter exposes the Twitter Developer API that allows us to do all kinds of useful and pointless things by interacting with Twitter's data</p>
<p>For us to consume the Twitter API we require credentials for the API. To set these up we'll need to do a few things</p>
<p>First, open your browser on <a href="https://developer.twitter.com/">the Twitter Developer Portal</a> and click the sign-in button. Then, once you've signed in, you should see your name on the top right of the page, click on the dropdown arrow and select <code>Apps</code> to go to the App Dashboard</p>
<p>On the App Dashboard, click <code>Create an app</code> and fill in the <strong>required</strong> information. For the <code>Website URL</code> you can put the URL of your GitHub repository that you copied previously into this field. Once you've filled in all the details click <code>Create</code> at the bottom of the page</p>
<p>You should now see the Details Page for the app we just created. Next, click on the <code>Keys and Tokens</code> tab and click <code>Generate</code> then copy and paste each token after the <code>=</code> in the <code>.env</code> file we created without any spaces before or after the key</p>
<p>When you've pasted your tokens into their places, your <code>.env</code> file should look something like this:</p>
<blockquote>
<p>Note that using the template for <code>.gitignore</code> that we chose, the <code>.env</code> file will be automatically ignored. Don't publically upload this data just anywhere as it can potentially give someone access to your Twitter account</p>
</blockquote>
<p><code>.env</code></p>
<pre><code class="hljs language-sh">TWITTER_CONSUMER_KEY=xxxxxxxxxxxxxxxxxxxxxx
TWITTER_CONSUMER_SECRET=xxxxxxxxxxxxxxxxxxx
TWITTER_ACCESS_KEY=xxxxxxxxxxxxxxxxxxxxxxxx
TWITTER_ACCESS_SECRET=xxxxxxxxxxxxxxxxxxxxx
</code></pre>
<p>(With the actual keys, and not just <code>xxxx</code>)</p>
<p>Now that we've got our credentials set up, we can start to work on the application</p>
<h1 id="using-the-twitter-api" tabindex="-1">Using the Twitter API</h1>
<p>We're going to be writing a script that runs on Node.js (JavaScript) and makes use of the Twitter API using the <code>twit</code> library for Node.js and the GitHub libraries for working with GitHub actions</p>
<p>To get started, run the following command from a terminal within your repository's directory to initialize a new Node.js project and select the defaults for all the questions:</p>
<pre><code class="hljs language-sh">npm init -y
</code></pre>
<p>Next, we'll add the dependencies that our application is going to need to run:</p>
<ul>
<li><code>@actions/core</code> allows us to interact with the data provided to our action by GitHub</li>
<li><code>twit</code> is used to interact with the Twitter API</li>
<li><code>dotenv</code> enables us to load in our <code>.env</code> file so our application can use it</li>
</ul>
<pre><code class="hljs language-sh">npm install @actions/core twit dotenv
</code></pre>
<p>Once the application is done installing we'll create an <code>index.js</code> file inside of our repo folder and we can get started on our code</p>
<p>Inside of the <code>index.js</code> the first thing we'll want to do is import our environment variables from the <code>.env</code> file we configured, we'll do that using the <code>dotenv</code> NPM Package we installed previously:</p>
<p><code>index.js</code></p>
<pre><code class="hljs language-js"><span class="hljs-built_in">require</span>(<span class="hljs-string">&#x27;dotenv&#x27;</span>).<span class="hljs-title function_">config</span>()
</code></pre>
<p>Next, we'll configure a new <code>Twitter</code> API Client using our environment variables. The <code>twitter</code> Package exports a <code>Twitter</code> class that we can create an instance of, do to this we will use the <code>Twitter</code> constructor and get our environment variables that are all stored in the <code>process.env</code> variable:</p>
<p><code>index.js</code></p>
<pre><code class="hljs language-js"><span class="hljs-keyword">const</span> <span class="hljs-title class_">Twitter</span> = <span class="hljs-built_in">require</span>(<span class="hljs-string">&#x27;twitter&#x27;</span>)

<span class="hljs-keyword">const</span> client = <span class="hljs-keyword">new</span> <span class="hljs-title class_">Twitter</span>({
  <span class="hljs-attr">consumer_key</span>: process.<span class="hljs-property">env</span>.<span class="hljs-property">TWITTER_CONSUMER_KEY</span>,
  <span class="hljs-attr">consumer_secret</span>: process.<span class="hljs-property">env</span>.<span class="hljs-property">TWITTER_CONSUMER_SECRET</span>,
  <span class="hljs-attr">access_token_key</span>: process.<span class="hljs-property">env</span>.<span class="hljs-property">TWITTER_ACCESS_KEY</span>,
  <span class="hljs-attr">access_token_secret</span>: process.<span class="hljs-property">env</span>.<span class="hljs-property">TWITTER_ACCESS_SECRET</span>,
})
</code></pre>
<p>Now that we've got an instance of a <code>Twitter</code> client that we can use to interact with the API we'll want to use it</p>
<p>The Twitter API Client runs asynchronously, for us to work with it correctly we have two options:</p>
<ol>
<li>Using the <code>callback</code> method, which means that we give the <code>client</code> a function to run when it's done sending the data to Twitter. While this is easier in our specific circumstance it can become difficult to keep track of when we have many different callback functions</li>
<li>The second option is to use <code>async</code> and <code>await</code> syntax, which allows us to write our code more sequentially and makes it easier for us to control our sequence and flow</li>
</ol>
<p>To use the <code>async/await</code> functionality, we need the code that we need to <code>await</code> to be inside of an <code>async</code> function. In this one function, we can <code>await</code> as many tasks as we want sequentially without worrying about callbacks</p>
<p>We'll create a <code>main</code> function that is <code>async</code> in which we will do any asynchronous interactions, in our case - interact with Twitter</p>
<p>After the code we've already got in our <code>index.js</code> file, define the <code>main</code> function as follows:</p>
<p><code>index.js</code></p>
<pre><code class="hljs language-js"><span class="hljs-keyword">const</span> <span class="hljs-title function_">main</span> = <span class="hljs-keyword">async</span> (<span class="hljs-params"></span>) =&gt; {
  <span class="hljs-comment">// this is where we&#x27;ll work with the twitter client</span>
}
</code></pre>
<p>Next, we'll add the code to interact with the Twitter API inside of this function. To update our Profile Bio (or <code>description</code> as it's called in the Twitter API) we'll make use of the <code>account/update_profile</code> endpoint</p>
<p>The data we send the Twitter API will need to be an object with a <code>description</code> property for what we want to set our Twitter Bio as. We'll <code>await</code> this function call by adding it within our <code>main</code> function:</p>
<p><code>index.js</code></p>
<pre><code class="hljs language-js"><span class="hljs-keyword">const</span> <span class="hljs-title function_">main</span> = <span class="hljs-keyword">async</span> (<span class="hljs-params"></span>) =&gt; {
  <span class="hljs-keyword">const</span> response = <span class="hljs-keyword">await</span> client.<span class="hljs-title function_">post</span>(<span class="hljs-string">&#x27;account/update_profile&#x27;</span>, {
    <span class="hljs-attr">description</span>: <span class="hljs-string">&#x27;Hello, World!&#x27;</span>,
  })

  <span class="hljs-variable language_">console</span>.<span class="hljs-title function_">log</span>(response)
}
</code></pre>
<p>The above code will set our Twitter <code>description</code> to <code>Hello, World!</code> and then print our the <code>response</code> we get back from Twitter</p>
<p>The way we've written the above code is a little bit dangerous as we aren't handling any potential errors/failures that may happen when interacting with the Twitter API</p>
<p>When working with an API via an HTTP Request there's always the chance that there could be an error. Errors can be caused by anything ranging from poor network connections, incorrect credentials, or a system outage on the API host itself</p>
<p>For our application to give us a bit more information about what happened, we may want to handle the error before passing it on to the process that kicked off our script. We'll make use of a <code>try/catch</code> to handle this error:</p>
<p><code>index.js</code></p>
<pre><code class="hljs language-js"><span class="hljs-keyword">const</span> <span class="hljs-title function_">main</span> = <span class="hljs-keyword">async</span> (<span class="hljs-params"></span>) =&gt; {
  <span class="hljs-keyword">try</span> {
    <span class="hljs-keyword">const</span> response = <span class="hljs-keyword">await</span> client.<span class="hljs-title function_">post</span>(<span class="hljs-string">&#x27;account/update_profile&#x27;</span>, {
      <span class="hljs-attr">description</span>: <span class="hljs-string">&#x27;Hello, World!&#x27;</span>,
    })

    <span class="hljs-variable language_">console</span>.<span class="hljs-title function_">log</span>(response)
  } <span class="hljs-keyword">catch</span> (error) {
    <span class="hljs-variable language_">console</span>.<span class="hljs-title function_">error</span>(error)
    <span class="hljs-keyword">throw</span> <span class="hljs-keyword">new</span> <span class="hljs-title class_">Error</span>(
      <span class="hljs-string">`The Twitter API Responded with an Error: <span class="hljs-subst">${error[<span class="hljs-number">0</span>].code}</span>, <span class="hljs-subst">${error[<span class="hljs-number">0</span>].message}</span>`</span>
    )
  }
}
</code></pre>
<p>You can see above that we're just doing some cleanup of the error message before throwing the exception to the process</p>
<p>Now that we've fully defined our <code>client</code> and <code>main</code> functions we can call the function as the last line of the script:</p>
<p><code>index.js</code></p>
<pre><code class="hljs language-js"><span class="hljs-title function_">main</span>()
</code></pre>
<p>This should make a request to the Twitter API and print our the <code>response</code> or <code>error</code> if there is one</p>
<p>So, the above function will always set our Twitter Bio to the same value, this isn't interesting. Next, we'd like to get some data from the workflow that's going to be running our action. The way we would do this is with an <code>input</code></p>
<p>Our action is going to take an <code>input</code> called <code>bio</code>. We can use the <code>@actions/core</code> library to get the value of the <code>input</code>. We can do this with the following:</p>
<p><code>index.js</code></p>
<pre><code class="hljs language-js"><span class="hljs-keyword">const</span> core = <span class="hljs-built_in">require</span>(<span class="hljs-string">&#x27;@actions/core&#x27;</span>)

<span class="hljs-keyword">const</span> bio = core.<span class="hljs-title function_">getInput</span>(<span class="hljs-string">&#x27;bio&#x27;</span>) || <span class="hljs-string">&#x27;Hello, World!&#x27;</span>
</code></pre>
<p>The above code also sets a default value of <code>Hello, World!</code> to the description, this will allow us to also run the action without throwing an exception on our local machine as well as if the <code>bio</code> is not provided to the action</p>
<p>Furthermore, instead of just throwing errors, we can rather set the error-status using the <code>core.setFailed</code> function. Updating our <code>main</code> function to do this we now have:</p>
<p><code>index.js</code></p>
<pre><code class="hljs language-js"><span class="hljs-keyword">const</span> <span class="hljs-title function_">main</span> = <span class="hljs-keyword">async</span> (<span class="hljs-params"></span>) =&gt; {
  <span class="hljs-keyword">try</span> {
    <span class="hljs-keyword">const</span> response = <span class="hljs-keyword">await</span> client.<span class="hljs-title function_">post</span>(<span class="hljs-string">&#x27;account/update_profile&#x27;</span>, {
      <span class="hljs-attr">description</span>: bio,
    })

    <span class="hljs-variable language_">console</span>.<span class="hljs-title function_">log</span>(response)
  } <span class="hljs-keyword">catch</span> (error) {
    <span class="hljs-variable language_">console</span>.<span class="hljs-title function_">error</span>(error)
    core.<span class="hljs-title function_">setFailed</span>(
      <span class="hljs-string">`The Twitter API Responded with an Error: <span class="hljs-subst">${error[<span class="hljs-number">0</span>].code}</span>, <span class="hljs-subst">${error[<span class="hljs-number">0</span>].message}</span>`</span>
    )
  }
}
</code></pre>
<p>Finally, our full <code>index.js</code> file should look like this:</p>
<p><code>index.js</code></p>
<pre><code class="hljs language-js"><span class="hljs-title function_">re</span>(<span class="hljs-string">&#x27;dotenv&#x27;</span>).<span class="hljs-title function_">config</span>()

<span class="hljs-keyword">const</span> <span class="hljs-title class_">Twitter</span> = <span class="hljs-built_in">require</span>(<span class="hljs-string">&#x27;twitter&#x27;</span>)
<span class="hljs-keyword">const</span> core = <span class="hljs-built_in">require</span>(<span class="hljs-string">&#x27;@actions/core&#x27;</span>)

<span class="hljs-keyword">const</span> bio = core.<span class="hljs-title function_">getInput</span>(<span class="hljs-string">&#x27;bio&#x27;</span>) || <span class="hljs-string">&#x27;Hello, World!&#x27;</span>

<span class="hljs-keyword">const</span> client = <span class="hljs-keyword">new</span> <span class="hljs-title class_">Twitter</span>({
  <span class="hljs-attr">consumer_key</span>: process.<span class="hljs-property">env</span>.<span class="hljs-property">TWITTER_CONSUMER_KEY</span>,
  <span class="hljs-attr">consumer_secret</span>: process.<span class="hljs-property">env</span>.<span class="hljs-property">TWITTER_CONSUMER_SECRET</span>,
  <span class="hljs-attr">access_token_key</span>: process.<span class="hljs-property">env</span>.<span class="hljs-property">TWITTER_ACCESS_KEY</span>,
  <span class="hljs-attr">access_token_secret</span>: process.<span class="hljs-property">env</span>.<span class="hljs-property">TWITTER_ACCESS_SECRET</span>,
})

<span class="hljs-keyword">const</span> <span class="hljs-title function_">main</span> = <span class="hljs-keyword">async</span> (<span class="hljs-params"></span>) =&gt; {
  <span class="hljs-keyword">try</span> {
    <span class="hljs-keyword">const</span> response = <span class="hljs-keyword">await</span> client.<span class="hljs-title function_">post</span>(<span class="hljs-string">&#x27;account/update_profile&#x27;</span>, {
      <span class="hljs-attr">description</span>: bio,
    })

    <span class="hljs-variable language_">console</span>.<span class="hljs-title function_">log</span>(response)
  } <span class="hljs-keyword">catch</span> (error) {
    <span class="hljs-variable language_">console</span>.<span class="hljs-title function_">error</span>(error)
    core.<span class="hljs-title function_">setFailed</span>(
      <span class="hljs-string">`The Twitter API Responded with an Error: <span class="hljs-subst">${error[<span class="hljs-number">0</span>].code}</span>, <span class="hljs-subst">${error[<span class="hljs-number">0</span>].message}</span>`</span>
    )
  }
}

<span class="hljs-title function_">main</span>()
</code></pre>
<p>Now that we've written the functionality for our action we'll want to turn it into an action</p>
<h1 id="configure-the-action-metadata" tabindex="-1">Configure the Action Metadata</h1>
<p>For GitHub to recognise our code as an action, we need to create an <code>action.yml</code> file that contains a description of our action. Our <code>action.yml</code> file needs to have the following information:</p>
<ul>
<li><code>name</code> for our action</li>
<li><code>description</code> of the action itself</li>
<li>an <code>input</code> parameter of <code>bio</code> that will be used by our application</li>
<li><code>runs</code> which states the script to run</li>
</ul>
<p>The <code>action.yml</code> file for our action looks like the following:</p>
<p><code>action.yml</code></p>
<pre><code class="hljs language-yml"><span class="hljs-attr">name:</span> <span class="hljs-string">&#x27;Twitter Bio Update&#x27;</span>
<span class="hljs-attr">description:</span> <span class="hljs-string">&#x27;Update your Twitter Account Bio&#x27;</span>
<span class="hljs-attr">inputs:</span>
  <span class="hljs-attr">bio:</span>
    <span class="hljs-attr">description:</span> <span class="hljs-string">&#x27;Text that you would like to set as your Twitter Bio&#x27;</span>
    <span class="hljs-attr">required:</span> <span class="hljs-literal">true</span>
    <span class="hljs-attr">default:</span> <span class="hljs-string">&#x27;Hello, World!&#x27;</span>
<span class="hljs-attr">runs:</span>
  <span class="hljs-attr">using:</span> <span class="hljs-string">&#x27;node12&#x27;</span>
  <span class="hljs-attr">main:</span> <span class="hljs-string">&#x27;index.js&#x27;</span>
</code></pre>
<p>The fields we've got above are all pretty much required. The above fields are the simplest configuration for a Node.js action. The <a href="https://docs.github.com/en/actions">GitHub Docs</a> have a lot more information on more complex configurations and actions</p>
<p>Now that we've defined our action, we will want to configure it to run. But before we can do that, we'll want to set up our secrets</p>
<h1 id="setting-up-secrets-in-github" tabindex="-1">Setting Up Secrets in GitHub</h1>
<p>Now that we've got our action defined, we're almost ready to write a Workflow that will use this action. However, our action requires environment variables (that we've got saved in our <code>.env</code> file) but we don't want these to be pushed to GitHub as part of our source code. The way to set up these environment variables in GitHub is called a <code>secret</code></p>
<p>To add our environment variables in GitHub you'll need to open your Repo on GitHub and navigate to <code>Settings &gt; Secrets</code> then click <code>New secret</code> and add your first secret. If we use our <code>.env</code> file as a reference we'll want to create a secret for each line in the file. To do this look at the name of the environment variable (everything before the <code>=</code>) and set this as the <code>Name</code> for the secret, then look at the value (everything after the <code>=</code>) and set this as the <code>Value</code> for the secret then click <code>Add secret</code>. Do this for every line in your <code>.env</code> file (every environment variable`</p>
<h1 id="create-a-workflow" tabindex="-1">Create a Workflow</h1>
<p>Workflows are GitHub's way of tying together a bunch of actions to run. Often, we will want to run multiple actions. We place these into what's called a <code>step</code> in a <code>job</code>. Each Workflow can have multiple <code>steps</code> and <code>jobs</code> and a repository can have multiple workflows</p>
<p>The structure of a workflow is something like this:</p>
<pre><code class="hljs">workflow
|<span class="hljs-string">-- Job 1
</span>|<span class="hljs-string">   </span>|<span class="hljs-string">-- Step 1
</span>|<span class="hljs-string">   </span>|<span class="hljs-string">-- Step 2
</span>|<span class="hljs-string">-- Job 2
    </span>|<span class="hljs-string">-- Step 1
</span></code></pre>
<p>A Workflow can have any number of jobs and steps</p>
<p>We're going to create a Workflow with a single job with the goal of running our script. For us to do this, the job will need to do the following:</p>
<ol>
<li>Checkout our code</li>
<li>Configure Node.js and NPM</li>
<li>Install Dependencies</li>
<li>Run our Action</li>
</ol>
<p>To do Steps 1 and 2 we're going to use actions that are defined by GitHub. We're going to go through our Workflow file working from the top-down as this is the order in which everything will be run</p>
<p>Firstly, we'll need to create a new directory in our Repository named <code>.github</code> and inside of this another called <code>workflows</code>. Inside of the <code>.github/workflows</code> directory create a file named <code>main.yml</code> (this can be any name so long as it's a <code>yml</code> file)</p>
<p>Next, on the first line of this file we will define a name for our workflow like so:</p>
<p><code>main.yml</code></p>
<pre><code class="hljs language-yml"><span class="hljs-attr">name:</span> <span class="hljs-string">Run</span> <span class="hljs-string">Twitter</span> <span class="hljs-string">Bio</span> <span class="hljs-string">Action</span>
</code></pre>
<p>This is the name that will be displayed when the workflow runs. Actions are run when a specific GitHub event happens (more about that <a href="https://docs.github.com/en/actions/reference/events-that-trigger-workflows">in the Docs</a>). We're going to configure our action to run manually only, so we will use the <code>workflow_dispatch</code> event. After the <code>name</code> in the <code>main.yml</code> file, add the following:</p>
<p><code>main.yml</code></p>
<pre><code class="hljs language-yml"><span class="hljs-attr">on:</span>
  <span class="hljs-attr">workflow_dispatch:</span>
    <span class="hljs-attr">inputs:</span>
      <span class="hljs-attr">bio:</span>
        <span class="hljs-attr">description:</span> <span class="hljs-string">&#x27;Twitter Bio&#x27;</span>
        <span class="hljs-attr">required:</span> <span class="hljs-literal">true</span>
</code></pre>
<p>In the above, we set an <code>on</code> event for <code>workflow_dispatch</code> with an <code>input</code> for <code>bio</code> that we're going to pass on to our action</p>
<p>Now that we've got the workflow metadata defined, we're going to add a <code>job</code>. To do this, we'll add a <code>jobs</code> object with a name of <code>update-bio</code>, a specification on what OS it needs to run on, and the <code>steps</code> that will be a part of it:</p>
<p><code>main.yml</code></p>
<pre><code class="hljs language-yml"><span class="hljs-attr">jobs:</span>
  <span class="hljs-attr">update-bio:</span>
    <span class="hljs-attr">runs-on:</span> <span class="hljs-string">ubuntu-latest</span>
    <span class="hljs-attr">name:</span> <span class="hljs-string">Update</span> <span class="hljs-string">Twitter</span> <span class="hljs-string">Bio</span>
    <span class="hljs-attr">steps:</span>
      <span class="hljs-comment"># we&#x27;ll add the steps here in a moment</span>
</code></pre>
<p>We can see above that we're running on the <code>ubuntu-latest</code> OS. Next, we'll add the first step for checking out our code in the action. This will use <code>actions/checkout</code>:</p>
<p><code>main.yml</code></p>
<pre><code class="hljs language-yml"><span class="hljs-attr">steps:</span>
  <span class="hljs-bullet">-</span> <span class="hljs-attr">name:</span> <span class="hljs-string">Checkout</span>
    <span class="hljs-attr">uses:</span> <span class="hljs-string">actions/checkout@v2</span>
</code></pre>
<p>In the above, we give our step a <code>name</code> which is for display purposes, and a <code>uses</code> which says what action this step should use. In our case, we're checking out our code using the <code>actions/checkout@v2</code> action</p>
<p>Next, we'll want to configure Node.js and NPM because our action needs these to run. We can use the <code>actions/setup-node@v1</code> for this:</p>
<p><code>main.yml</code></p>
<pre><code class="hljs language-yml"><span class="hljs-bullet">-</span> <span class="hljs-attr">name:</span> <span class="hljs-string">Setup</span> <span class="hljs-string">Node.js</span>
  <span class="hljs-attr">uses:</span> <span class="hljs-string">actions/setup-node@v1</span>
  <span class="hljs-attr">with:</span>
    <span class="hljs-attr">node-version:</span> <span class="hljs-number">12.</span><span class="hljs-string">x</span>
</code></pre>
<p>In this action, we use the <code>with</code> to state an <code>input</code> that the action needs. In this case, we specify that we want to use a <code>node-version</code> of <code>12.x</code></p>
<p>Now we've got Node.js and NPM, we need to install the dependencies for our action to run. We do this with the <code>npm install</code> command like so:</p>
<p><code>main.yml</code></p>
<pre><code class="hljs language-yml"><span class="hljs-bullet">-</span> <span class="hljs-attr">name:</span> <span class="hljs-string">Install</span> <span class="hljs-string">Dependencies</span>
  <span class="hljs-attr">run:</span> <span class="hljs-string">npm</span> <span class="hljs-string">install</span>
</code></pre>
<p>And lastly, we will configure our action to run with the following:</p>
<p><code>main.yml</code></p>
<pre><code class="hljs language-yml"><span class="hljs-bullet">-</span> <span class="hljs-attr">name:</span> <span class="hljs-string">Run</span> <span class="hljs-string">Action</span>
  <span class="hljs-attr">uses:</span> <span class="hljs-string">./</span>
  <span class="hljs-attr">env:</span>
    <span class="hljs-attr">TWITTER_CONSUMER_KEY:</span> <span class="hljs-string">${{</span> <span class="hljs-string">secrets.TWITTER_CONSUMER_KEY</span> <span class="hljs-string">}}</span>
    <span class="hljs-attr">TWITTER_CONSUMER_SECRET:</span> <span class="hljs-string">${{</span> <span class="hljs-string">secrets.TWITTER_CONSUMER_SECRET</span> <span class="hljs-string">}}</span>
    <span class="hljs-attr">TWITTER_ACCESS_KEY:</span> <span class="hljs-string">${{</span> <span class="hljs-string">secrets.TWITTER_ACCESS_KEY</span> <span class="hljs-string">}}</span>
    <span class="hljs-attr">TWITTER_ACCESS_SECRET:</span> <span class="hljs-string">${{</span> <span class="hljs-string">secrets.TWITTER_ACCESS_SECRET</span> <span class="hljs-string">}}</span>
  <span class="hljs-attr">with:</span>
    <span class="hljs-attr">bio:</span> <span class="hljs-string">${{</span> <span class="hljs-string">github.event.inputs.bio</span> <span class="hljs-string">}}</span>
</code></pre>
<p>In this last step we're doing quite a few things:</p>
<ol>
<li>We're setting a <code>name</code> for our action</li>
<li>We set a <code>uses</code> to be <code>./</code> which means we want to run the action at the root of our Repo (our <code>action.yml</code>)</li>
<li>We set the <code>env</code>, these are the different environment variables we want to pass to the application. We use <code>${\{ ... }\}</code> to mean that it's a variable, and we use <code>secrets.variable</code> to access the variable from the secrets we configured in the repository</li>
<li>We use the <code>with</code> to set the <code>bio</code> from the input we give to the workflow on our <code>workflow_dispatch</code> event. GitHub exposes this in the <code>github.event.inputs.bio</code> variable</li>
</ol>
<p>With the <code>Run Action</code> step added, we've got a full workflow. The overall <code>main.yml</code> file should have the following:</p>
<p><code>main.yml</code></p>
<pre><code class="hljs language-yml"><span class="hljs-attr">name:</span> <span class="hljs-string">Run</span> <span class="hljs-string">Twitter</span> <span class="hljs-string">Bio</span> <span class="hljs-string">Action</span>
<span class="hljs-attr">on:</span>
  <span class="hljs-attr">workflow_dispatch:</span>
    <span class="hljs-attr">inputs:</span>
      <span class="hljs-attr">bio:</span>
        <span class="hljs-attr">description:</span> <span class="hljs-string">&#x27;Twitter Bio&#x27;</span>
        <span class="hljs-attr">required:</span> <span class="hljs-literal">true</span>

<span class="hljs-attr">jobs:</span>
  <span class="hljs-attr">update-bio:</span>
    <span class="hljs-attr">runs-on:</span> <span class="hljs-string">ubuntu-latest</span>
    <span class="hljs-attr">name:</span> <span class="hljs-string">Update</span> <span class="hljs-string">Twitter</span> <span class="hljs-string">Bio</span>
    <span class="hljs-attr">steps:</span>
      <span class="hljs-bullet">-</span> <span class="hljs-attr">name:</span> <span class="hljs-string">Checkout</span>
        <span class="hljs-attr">uses:</span> <span class="hljs-string">actions/checkout@v2</span>
      <span class="hljs-bullet">-</span> <span class="hljs-attr">name:</span> <span class="hljs-string">Setup</span> <span class="hljs-string">Node.js</span>
        <span class="hljs-attr">uses:</span> <span class="hljs-string">actions/setup-node@v1</span>
        <span class="hljs-attr">with:</span>
          <span class="hljs-attr">node-version:</span> <span class="hljs-number">12.</span><span class="hljs-string">x</span>
      <span class="hljs-bullet">-</span> <span class="hljs-attr">name:</span> <span class="hljs-string">Install</span> <span class="hljs-string">Dependencies</span>
        <span class="hljs-attr">run:</span> <span class="hljs-string">npm</span> <span class="hljs-string">install</span>
      <span class="hljs-bullet">-</span> <span class="hljs-attr">name:</span> <span class="hljs-string">Run</span> <span class="hljs-string">Action</span>
        <span class="hljs-attr">uses:</span> <span class="hljs-string">./</span>
        <span class="hljs-attr">env:</span>
          <span class="hljs-attr">TWITTER_CONSUMER_KEY:</span> <span class="hljs-string">${{</span> <span class="hljs-string">secrets.TWITTER_CONSUMER_KEY</span> <span class="hljs-string">}}</span>
          <span class="hljs-attr">TWITTER_CONSUMER_SECRET:</span> <span class="hljs-string">${{</span> <span class="hljs-string">secrets.TWITTER_CONSUMER_SECRET</span> <span class="hljs-string">}}</span>
          <span class="hljs-attr">TWITTER_ACCESS_KEY:</span> <span class="hljs-string">${{</span> <span class="hljs-string">secrets.TWITTER_ACCESS_KEY</span> <span class="hljs-string">}}</span>
          <span class="hljs-attr">TWITTER_ACCESS_SECRET:</span> <span class="hljs-string">${{</span> <span class="hljs-string">secrets.TWITTER_ACCESS_SECRET</span> <span class="hljs-string">}}</span>
        <span class="hljs-attr">with:</span>
          <span class="hljs-attr">bio:</span> <span class="hljs-string">${{</span> <span class="hljs-string">github.event.inputs.bio</span> <span class="hljs-string">}}</span>
</code></pre>
<h1 id="run-the-action" tabindex="-1">Run the Action</h1>
<p>To run the action, we first need to get everything to GitHub. From Repo directory, in the terminal, run the following commands:</p>
<pre><code class="hljs language-sh">git add .
git commit -m <span class="hljs-string">&quot;I made a GitHub Action!&quot;</span>
git push
</code></pre>
<p>Then, go to your repository on GitHub and click on the <code>Actions</code> tab. You should then see your Workflow listed. Click on your workflow name, and then the <code>Run workflow</code> dropdown. Fill in your <code>Twitter Bio</code>, wait for the workflow to complete and look at your Twitter profile!</p>
<p>From GitHub, you are also able to inspect and view any logs or errors from a Workflow run. If the workflow fails you can also take a look at the output that was thrown by the step that resulted in the failure</p>
<h1 id="summary" tabindex="-1">Summary</h1>
<p>And that's about it. We've taken a look at how you can use GitHub actions to automate a pretty silly task, but there's a lot more to using GitHub Actions, and the sky's the limit in terms of what you can use them for</p>
<p>Overall, GitHub actions aren't too different from similar options like Azure Pipelines, Jenkins, or any other CI service. What makes them so useful is how easily they hook into the source control system and how well they work and are supported within the GitHub ecosystem</p>
<p>That all being said, they're not the easiest things to configure and it can take a while to get them right if you're doing something especially complex. Overall they're pretty cool and are a pretty good place to get started with automating tasks and working with things like continuous integration and deployments and I'd definitely recommend giving them a shot</p>
]]></content>
        <author>
            <name>Nabeel Valley</name>
            <uri>https://nabeelvalley.co.za</uri>
        </author>
    </entry>
    <entry>
        <title type="html"><![CDATA[Code in a Container]]></title>
        <id>/blog/2020/25-07/developing-in-a-container-vscode/</id>
        <link href="https://nabeelvalley.co.za/blog/2020/25-07/developing-in-a-container-vscode/"/>
        <updated>2020-07-24T22:00:00.000Z</updated>
        <summary type="html"><![CDATA[Using a Docker Container as a development container using the Visual Studio Code Remote-Containers Extension]]></summary>
        <content type="html"><![CDATA[<p>Recently I'd started using Visual Studio Code's <em>Remote Containers</em> functionality for development and it's been really useful</p>
<p>The Remote Containers extension allows us to write code and develop applications within a virtualized environment that makes it easier for us to manage our development environment as well as more closely resemble our target deployment environment (if we're deploying to Docker or Kubernetes)</p>
<p>In this post, I'll take a look at what a Docker container is, why we would want to use one as a development environment, and how we can go about setting one up for VSCode</p>
<p><div class="table-of-contents"><details><summary>Contents</summary><ul><li><a href="#prerequisites">Prerequisites</a></li><li><a href="#docker-containers">Docker Containers</a></li><li><a href="#docker-images">Docker Images</a><ul><li><a href="#create-an-application">Create an Application</a></li><li><a href="#create-a-dockerfile">Create a Dockerfile</a></li></ul></li><li><a href="#development-containers">Development Containers</a><ul><li><a href="#why-develop-in-a-container">Why Develop in a Container</a></li><li><a href="#how-to-develop-in-a-container">How to Develop in a Container</a><ul><li><a href="#use-an-existing-dockerfile">Use an Existing Dockerfile</a></li><li><a href="#using-a-preconfigured-dockerfile">Using a Preconfigured Dockerfile</a></li></ul></li><li><a href="#which-method-to-use">Which Method to Use</a></li></ul></li><li><a href="#summary">Summary</a><ul><li><a href="#further-reading">Further Reading</a></li></ul></li></ul></details></div></p>
<h1 id="prerequisites" tabindex="-1">Prerequisites</h1>
<p>If you intend to follow along with this post you'll need to have the following installed:</p>
<ul>
<li>A Windows or Mac OS version capable of running Docker Desktop</li>
<li><a href="https://docs.docker.com/desktop/#download-and-install">Docker Desktop</a></li>
<li><a href="https://code.visualstudio.com/">Visual Studio Code</a></li>
<li><a href="https://marketplace.visualstudio.com/items?itemName=ms-vscode-remote.remote-containers">Visual Studio Code's Remote Containers Extension</a></li>
<li><a href="https://marketplace.visualstudio.com/items?itemName=ms-azuretools.vscode-docker">Visual Studio Code's Docker Extension</a></li>
<li>Some familiarity with using the command line</li>
</ul>
<h1 id="docker-containers" tabindex="-1">Docker Containers</h1>
<p>A Container, in this context, is a simple virtual machine that contains the code required to run an application with all its dependencies</p>
<p>A Docker container is built from a <code>docker image</code> and run by the <code>docker</code> command. I'll explain these as we go along</p>
<p>To check that Docker is installed correctly on your machine run the following command:</p>
<pre><code class="hljs">docker <span class="hljs-built_in">run</span> hello-world
</code></pre>
<p>If your install is working correctly you should see something like this:</p>
<pre><code class="hljs">Unable <span class="hljs-keyword">to</span> <span class="hljs-built_in">find</span> <span class="hljs-built_in">image</span> <span class="hljs-string">&#x27;hello-world:latest&#x27;</span> locally
latest: Pulling <span class="hljs-keyword">from</span> library/hello-world
<span class="hljs-number">0</span>e03bdcc26d7: Pull complete

Digest: sha256:<span class="hljs-number">49</span>a1c8800c94df04e9658809b006fd8a686cab8028d33cfba2cc049724254202
Status: Downloaded newer <span class="hljs-built_in">image</span> <span class="hljs-keyword">for</span> hello-world:latest

Hello <span class="hljs-keyword">from</span> Docker

...
</code></pre>
<h1 id="docker-images" tabindex="-1">Docker Images</h1>
<p>Docker images are typically used to run applications in a production-type environment, every Docker container we run needs to be based on an image, every running container is like an instance of an image - similar to how objects are an instance of a class</p>
<p>An image states what our container will need to be made of, what it depends on, and how it runs. We define how docker should build our image in a <code>Dockerfile</code></p>
<p>We're going to go through some of the basics of Docker Images and Docker as would typically be done when creating a container to be run in production before we get into development containers so you've got an understanding of how this all works</p>
<p>To get started create a new folder and open it from Visual Studio Code and do the following:</p>
<h2 id="create-an-application" tabindex="-1">Create an Application</h2>
<p>We'll need a simple &quot;hello-world&quot; web server using Node.js, for the sake of example. You can, however, use any language (or Languages) you want when creating an application to run within Docker. You do not need to have any dependencies for the specific application or language installed on your computer, we will handle this using Docker</p>
<p>For our purpose, create a file called <code>index.js</code> with the following:</p>
<pre><code class="hljs language-js"><span class="hljs-keyword">const</span> http = <span class="hljs-built_in">require</span>(<span class="hljs-string">&quot;http&quot;</span>);

<span class="hljs-keyword">const</span> requestListener = <span class="hljs-keyword">function</span> (<span class="hljs-params">req, res</span>) {
  res.<span class="hljs-title function_">writeHead</span>(<span class="hljs-number">200</span>);
  res.<span class="hljs-title function_">end</span>(<span class="hljs-string">&quot;Hello, World!&quot;</span>);
};

<span class="hljs-keyword">const</span> serverListeningCallback = <span class="hljs-keyword">function</span> (<span class="hljs-params"></span>) {
  <span class="hljs-variable language_">console</span>.<span class="hljs-title function_">log</span>(<span class="hljs-string">&quot;Server started&quot;</span>);
};

<span class="hljs-keyword">const</span> server = http.<span class="hljs-title function_">createServer</span>(requestListener);
server.<span class="hljs-title function_">listen</span>(<span class="hljs-number">8080</span>, serverListeningCallback);
</code></pre>
<p>You can see in the above on the last line that the application will listen on port 8080, just keep this in mind</p>
<p>We don't need to run this file as yet, but if we want, we can run this with the following command from our working directory:</p>
<pre><code class="hljs language-bash">node app.js
</code></pre>
<p>At this point our working directory should look like this:</p>
<pre><code class="hljs language-text">working-directory
|__ index.js
</code></pre>
<h2 id="create-a-dockerfile" tabindex="-1">Create a Dockerfile</h2>
<p>There are a few steps that are the same for most <code>Dockerfile</code>s you'll be building:</p>
<ol>
<li>A Base Image that your container/image should use, in our case <code>node:12</code>, which has <code>node</code> and <code>npm</code> preinstalled</li>
<li>Copy all the code in the current (<code>.</code>) directory</li>
<li>Define your runtime port/ports (in the case of a web application)</li>
<li>The command that will be run to start the application</li>
</ol>
<blockquote>
<p>Any line starting with a <code>#</code> is a comment, Docker will ignore these</p>
</blockquote>
<p><code>Dockerfile</code></p>
<pre><code class="hljs language-dockerfile"><span class="hljs-comment"># step 1 - FROM baseImage</span>
<span class="hljs-keyword">FROM</span> node:<span class="hljs-number">12</span>

<span class="hljs-comment"># step 2 - COPY source destination</span>
<span class="hljs-keyword">COPY</span><span class="language-bash"> . .</span>

<span class="hljs-comment"># step 3 - EXPOSE port</span>
<span class="hljs-keyword">EXPOSE</span> <span class="hljs-number">8080</span>

<span class="hljs-comment"># step 4 - CMD stratupCommandArray</span>
<span class="hljs-keyword">CMD</span><span class="language-bash"> [<span class="hljs-string">&quot;node&quot;</span>, <span class="hljs-string">&quot;app.js&quot;</span>]</span>
</code></pre>
<p>At this point our working directory should look like this:</p>
<pre><code class="hljs language-text">working-directory
|__ index.js
|__ Dockerfile
</code></pre>
<p>We can build our image, based on the <code>Dockerfile</code> using the following <code>docker</code> command:</p>
<blockquote>
<p>Note the <code>.</code> at the end of the command</p>
</blockquote>
<pre><code class="hljs">docker build -t <span class="hljs-keyword">my</span>-docker-app .
</code></pre>
<p>The above command can be broken down as follows:</p>
<ol>
<li><code>docker build</code> the command from the Docker CLI to build an image</li>
<li><code>-t my-docker-app</code> says what we want our image to be called, in the above <code>my-docker-app</code></li>
<li><code>.</code> which is the directory in which the <code>Dockerfile</code> is located, in our case our current directory</li>
</ol>
<p>We can then run the image we just built like so:</p>
<pre><code class="hljs"><span class="hljs-attribute">docker</span> run -p <span class="hljs-number">8080</span>:<span class="hljs-number">8080</span> my-docker-app
</code></pre>
<ol>
<li><code>docker run</code> is the command from the <code>Docker CLI</code> to run a container</li>
<li><code>-p 8080:8080</code> is our port mapping, it is ordered as <code>HOST_PORT:CONTAINER_PORT</code> and allows us to say which port on our host we want to map to our container, the container port is the same port that our app listens on and is <code>EXPOSE</code>d in the <code>Dockerfile</code></li>
<li><code>my-docker-app</code> is the image tag we would like to run</li>
</ol>
<blockquote>
<p>Each time we change the app files for a container like above we need to rebuild the container before running, and that normally making changes to files during the image build or container run will not modify the original files on our computer</p>
</blockquote>
<p>Now that the application is running on port <code>8080</code> you can open <code>http://localhost:8080</code> in your browser and you should see your <code>Hello World</code> app running</p>
<p>When you're done with that you can go back to the terminal where the container was started and use <code>ctrl + c</code> to stop the container</p>
<p>If you've never used Docker before and have got everything running this far, congratulations! If you've got any questions you can comment below or hit me up on <a href="https://twitter.com/not_nabeel">Twitter @not_nabeel</a></p>
<p>Moving swiftly along</p>
<h1 id="development-containers" tabindex="-1">Development Containers</h1>
<p>So now that we understand a bit about containers and how we can go about using them in production, we'll look at why we may want to use them as a development environment</p>
<h2 id="why-develop-in-a-container" tabindex="-1">Why Develop in a Container</h2>
<p>As developers, we are far too familiar with the &quot;it runs on my machine&quot; dilemma. Development environments can be wildly inconsistent between different developers or different operating systems, and ensuring that our development code runs easily on everyone's computer can be challenging</p>
<p>Containers can help us to explicitly define our development environment, our application dependencies, what networking relationships, and (potentially) what other sibling applications need to be running in development, like databases, or other application tiers</p>
<p>Visual Studio Code can help transport us into a container so that we work on our application in a well-defined environment, not just run our application within one while reducing the overall number of things we need to have installed on our computer</p>
<h2 id="how-to-develop-in-a-container" tabindex="-1">How to Develop in a Container</h2>
<p>To develop in a Container using Visual Studio Code we will need to have:</p>
<ul>
<li><a href="https://docs.docker.com/desktop/#download-and-install">Docker Desktop</a></li>
<li><a href="https://code.visualstudio.com/">Visual Studio Code</a></li>
<li><a href="https://marketplace.visualstudio.com/items?itemName=ms-vscode-remote.remote-containers">Visual Studio Code's Remote Containers Extension</a></li>
</ul>
<blockquote>
<p>What's important to note is that we don't need any of our application's runtime or development dependencies installed, like Node.js, these will all be handled by VSCode within our container</p>
</blockquote>
<p>To configure our project for running in a container we need to first open the project folder (the folder we used previously) in Visual Studio Code</p>
<h3 id="use-an-existing-dockerfile" tabindex="-1">Use an Existing Dockerfile</h3>
<p>Once open use the keyboard shortcut <code>ctrl + shift + p</code> to open the Command Palette and search for <code>Remote-Containers: Add Development Container Configuration Files</code> and click <code>enter</code>, you will then have an option to use the existing Dockerfile <code>from Dockerfile</code> which will generate a <code>.devcontainer/devcontainer.json</code> file</p>
<p>At this point our working directory should look like this:</p>
<pre><code class="hljs language-text">working-directory
|__ .devcontainer
|   |__ devcontainer.json
|
|__ index.js
|__ Dockerfile
</code></pre>
<p>The <code>.devcontainer/devcontainer.json</code> file that was created will contain the following:</p>
<p><code>devcontainer.json</code></p>
<pre><code class="hljs language-js"><span class="hljs-comment">// For format details, see https://aka.ms/vscode-remote/devcontainer.json or this file&#x27;s README at:</span>
<span class="hljs-comment">// https://github.com/microsoft/vscode-dev-containers/tree/v0.128.0/containers/docker-existing-dockerfile</span>
{
    <span class="hljs-string">&quot;name&quot;</span>: <span class="hljs-string">&quot;Existing Dockerfile&quot;</span>,

    <span class="hljs-comment">// Sets the run context to one level up instead of the .devcontainer folder.</span>
    <span class="hljs-string">&quot;context&quot;</span>: <span class="hljs-string">&quot;..&quot;</span>,

    <span class="hljs-comment">// Update the &#x27;dockerFile&#x27; property if you aren&#x27;t using the standard &#x27;Dockerfile&#x27; filename.</span>
    <span class="hljs-string">&quot;dockerFile&quot;</span>: <span class="hljs-string">&quot;..\\Dockerfile&quot;</span>,

    <span class="hljs-comment">// Set *default* container specific settings.json values on container create.</span>
    <span class="hljs-string">&quot;settings&quot;</span>: {
        <span class="hljs-string">&quot;terminal.integrated.shell.linux&quot;</span>: <span class="hljs-literal">null</span>
    },

    <span class="hljs-comment">// Add the IDs of extensions you want installed when the container is created.</span>
    <span class="hljs-string">&quot;extensions&quot;</span>: []

    ...
}
</code></pre>
<p>The above file is the configuration for our development container, we can also allow VSCode to generate a Dockerfile which we'll look at later in the post</p>
<p>We'll stick to our simple <code>Dockerfile</code> for this post, but if you've got a different <code>Dockerfile</code> when running your application in Production and Development then you may need a different file in the <code>dockerFile</code> property below</p>
<p>Now that we've got a starting point we can add a little to our configuration so that everything is just right:</p>
<ol>
<li>Change the <code>name</code> property to name our workspace (purely aesthetic)</li>
<li>Add a <code>forwardPorts</code> property to expose our application port to our localhost network, be sure to add the <code>,</code> after <code>&quot;extensions&quot;:[]</code></li>
</ol>
<p>Once we make the above changes we should have this:</p>
<p><code>devcontainer.json</code></p>
<pre><code class="hljs language-js">{
    <span class="hljs-string">&quot;name&quot;</span>: <span class="hljs-string">&quot;My Workspace&quot;</span>,

    <span class="hljs-comment">// Sets the run context to one level up instead of the .devcontainer folder.</span>
    <span class="hljs-string">&quot;context&quot;</span>: <span class="hljs-string">&quot;..&quot;</span>,

    <span class="hljs-comment">// Update the &#x27;dockerFile&#x27; property if you aren&#x27;t using the standard &#x27;Dockerfile&#x27; filename.</span>
    <span class="hljs-string">&quot;dockerFile&quot;</span>: <span class="hljs-string">&quot;..\\Dockerfile&quot;</span>,

    <span class="hljs-comment">// Set *default* container specific settings.json values on container create.</span>
    <span class="hljs-string">&quot;settings&quot;</span>: {
        <span class="hljs-string">&quot;terminal.integrated.shell.linux&quot;</span>: <span class="hljs-literal">null</span>
    },

    <span class="hljs-comment">// Add the IDs of extensions you want installed when the container is created.</span>
    <span class="hljs-string">&quot;extensions&quot;</span>: [],

    <span class="hljs-comment">// Use &#x27;forwardPorts&#x27; to make a list of ports inside the container available locally.</span>
    <span class="hljs-string">&quot;forwardPorts&quot;</span>: [
        <span class="hljs-number">8080</span>
    ],
    ...
}
</code></pre>
<p>Now that we've configured our build container, use <code>ctrl + shift + p</code> to open the Command Palette again and search for <code>Remote-Containers: Reopen in Container</code> and click <code>enter</code> which will build the container and set up an image with the following setup for us:</p>
<ul>
<li>Linked ports as defined in the <code>forwardPorts</code> property</li>
<li>Configure a VSCode development server inside the container so our editor can link to it</li>
<li>Mount our system's file directory into the container so we can edit our files</li>
<li>Does not run the <code>CMD</code> command from our <code>Dockerfile</code></li>
<li>Open a VSCode window linked to the container so we can start working with our code</li>
</ul>
<p>Now that you're in the container you can edit your files and run it by doing the following:</p>
<ol>
<li>Use <code>ctrl + shift + p</code> and then search for <code>Terminal: Create new Integrated Terminal</code> and click <code>enter</code></li>
<li>Type <code>node app.js</code> into the new Terminal window and click <code>enter</code> to run our app.js file</li>
<li>Navigate to <code>http://localhost:8080</code> in your browser to view your running app</li>
</ol>
<p>At this point we've created a container to use as a development file and run our application, you can stop the application with <code>ctrl + c</code></p>
<p>You can switch from developing in a container back to your local environment with <code>ctrl + shift + p</code> and searching for <code>Remote-Containers: Reopen locally</code> and clicking <code>enter</code></p>
<p>Now that we're back on our local environment (and not docker) we can look at the other way we can set up our project for VSCode</p>
<h3 id="using-a-preconfigured-dockerfile" tabindex="-1">Using a Preconfigured Dockerfile</h3>
<p>Visual Studio Code's Remote Containers Extension provides some pre-configured <code>Dockerfile</code>s for common application or application framework types. One of the available preconfigured <code>Dockerfile</code>s is for working on Node.js applications</p>
<blockquote>
<p>The preconfigured files usually just provide a starting point for applications and often you will need to modify these to suit your application, we don't need this for the application we're working on however</p>
</blockquote>
<p>To redefine our Docker development config, let's delete the <code>.devcontainer</code> directory in our application and regenerate this</p>
<p>We can regenerate the files needed with <code>ctrl + shift + p</code>, and searching for <code>Remote-Containers: Add Development Container Configuration Files</code> again, clicking <code>enter</code> and then selecting the <code>From a predefined configuration definition</code> option, and then selecting <code>Node.js 12</code>, this should now create a <code>.devcontainer/devcontainer.json</code> file as well as a new <code>.devcontainer/Dockerfile</code> that we did not have previously, our working directory will now look like so:</p>
<pre><code class="hljs language-text">working-directory
|__ .devcontainer
|   |__ devcontainer.json  
|   |__ Dockerfile         # predefined dev container Dockerfile
|
|__ index.js
|__ Dockerfile             # our self-defined Dockerfile
</code></pre>
<p>If we look at the <code>devcontainer.json</code> file we will see something similar to what we had before:</p>
<p><code>devcontainer.json</code></p>
<pre><code class="hljs language-js">{
    <span class="hljs-string">&quot;name&quot;</span>: <span class="hljs-string">&quot;Node.js 12&quot;</span>,
    <span class="hljs-string">&quot;dockerFile&quot;</span>: <span class="hljs-string">&quot;Dockerfile&quot;</span>,

    <span class="hljs-comment">// Set *default* container specific settings.json values on container create.</span>
    <span class="hljs-string">&quot;settings&quot;</span>: {
        <span class="hljs-string">&quot;terminal.integrated.shell.linux&quot;</span>: <span class="hljs-string">&quot;/bin/bash&quot;</span>
    },

    <span class="hljs-comment">// Add the IDs of extensions you want installed when the container is created.</span>
    <span class="hljs-string">&quot;extensions&quot;</span>: [
        <span class="hljs-string">&quot;dbaeumer.vscode-eslint&quot;</span>
    ]

    ...
}
</code></pre>
<p>You may, however, note that the <code>dockerFile</code> property is missing, this just means that VSCode will use the default <code>Dockerfile</code> which has been created in the <code>.devcontainer</code> directory</p>
<p>We can go ahead and change the name if we want, we should also add the <code>forwardPorts</code> option as we did previously:</p>
<p><code>devcontainer.json</code></p>
<pre><code class="hljs language-js">{
    ...

    <span class="hljs-string">&quot;forwardPorts&quot;</span>: [
        <span class="hljs-number">8080</span>
    ],

    ...
}
</code></pre>
<p>Now looking at the <code>Dockerfile</code> which defines the base development container:</p>
<p><code>Dockerfile</code></p>
<pre><code class="hljs language-dockerfile"><span class="hljs-keyword">FROM</span> mcr.microsoft.com/vscode/devcontainers/javascript-node:<span class="hljs-number">0</span>-<span class="hljs-number">12</span>
</code></pre>
<p>This is a bit different to ours because Visual Studio Code will handle the file copying and port exposing on its own for the development container. Note that this configuration can only be used for development and can't really be deployed as a production container. This type of setup is necessary if our development image and production image will be different (which they usually are)</p>
<p>Now that the development container has been set-up, we can use <code>ctrl + shift + p</code> and <code>Remote-Containers: Reopen in Container</code> to open our development container, from here we can work on our application and run the application the same as we did before</p>
<h2 id="which-method-to-use" tabindex="-1">Which Method to Use</h2>
<p>We've looked at two different methods for configuring our development container, either of which can be used in any project. Below are my recommendations:</p>
<p>If you've got an existing <code>Dockerfile</code> and your development container can be the same as your production container, for things like simple <code>node.js</code> or <code>python</code> apps, and you don't want to maintain another <code>Dockerfile</code> then this may be a quick solution to opt for</p>
<p>Otherwise, if your development container needs to be different from your production one then it's probably easier to start with a predefined VSCode Container as a base and add in any development configuration you need to the <code>.devcontainer/Dockerfile</code></p>
<p>Lastly, if you don't have an existing <code>Dockerfile</code> at all then I'd suggest using a predefined one so that even if it's not fully configured you've got a relatively good starting point, especially when working with more complex languages and frameworks as a custom <code>Dockerfile</code> for these can be some work to configure</p>
<h1 id="summary" tabindex="-1">Summary</h1>
<p>In this post, we've covered the basics of using Docker to run your applications in a container as well as how to define and build your images. We also looked at why we may want to use a container for development and how we can do this using Visual Studio Code</p>
<h2 id="further-reading" tabindex="-1">Further Reading</h2>
<p>For some more in-depth information on Docker and VSCode Development Containers you can look at the following resources:</p>
<ol>
<li><a href="/docs/">My General Docker Notes</a>
<ul>
<li><a href="/docs/containers-and-microservices/docker/">Docker Basics</a></li>
<li><a href="/docs/containers-and-microservices/build-an-express-app-with-mongo/">Express Application with MongoDB</a></li>
<li><a href="/docs/containers-and-microservices/docker-multi-stage/">Multi-stage Builds</a></li>
</ul>
</li>
<li><a href="https://docs.docker.com/">Docker's Documentation</a></li>
<li><a href="https://code.visualstudio.com/docs/remote/containers">VSCode's Remote Containers Documentation</a></li>
</ol>
]]></content>
        <author>
            <name>Nabeel Valley</name>
            <uri>https://nabeelvalley.co.za</uri>
        </author>
    </entry>
    <entry>
        <title type="html"><![CDATA[Code for Noobs]]></title>
        <id>/blog/2020/17-05/code-for-noobs/</id>
        <link href="https://nabeelvalley.co.za/blog/2020/17-05/code-for-noobs/"/>
        <updated>2020-05-16T22:00:00.000Z</updated>
        <summary type="html"><![CDATA[An introduction to programming and general programming concepts using JavaScript]]></summary>
        <content type="html"><![CDATA[<p><div class="table-of-contents"><details><summary>Contents</summary><ul><li><a href="#0.-what-is-programming">0. What is Programming</a></li><li><a href="#1.-what-is-javascript%3F">1. What is JavaScript?</a></li><li><a href="#2.-text-data">2. Text Data</a></li><li><a href="#3.-variables">3. Variables</a></li><li><a href="#4.-printing-data">4. Printing Data</a></li><li><a href="#5.-numbers">5. Numbers</a></li><li><a href="#6.-arrays">6. Arrays</a></li><li><a href="#7.-booleans">7. Booleans</a></li><li><a href="#8.-complex-data">8. Complex Data</a></li><li><a href="#9.-undefined-and-null">9. Undefined and Null</a></li><li><a href="#10.-functions">10. Functions</a></li><li><a href="#summary">Summary</a></li></ul></details></div></p>
<p>So I've been meaning to write an introductory post about the basics of JavaScript for quite some time. A few weeks ago I managed to finally get something going on <a href="https://twitter.com/not_nabeel/status/1255743195557888000">this Twitter thread (@not_nabeel)</a></p>
<p>Let's get into it</p>
<h1 id="0.-what-is-programming" tabindex="-1">0. What is Programming</h1>
<p>Programming is our way of telling a computer to do things. This can be anything from checking our spelling to making trippy digital art</p>
<p>The basics of programming are the same in most languages and doesn't involve much math or binary (<code>0010101</code>) like a lot of people seem to think. Programming languages <em>usually</em> make use of a very small subset of words and concepts of a normal human language like English</p>
<p>The language I'm going to be using is called <code>JavaScript</code> but many of these concepts are the same in most other programming languages</p>
<h1 id="1.-what-is-javascript%3F" tabindex="-1">1. What is JavaScript?</h1>
<p>JavaScript is the language used to add interactivity to a website but it can also be used to do pretty much anything you like. JavaScript runs in all modern web browsers and can be accessed through your browser's developer tools, but it can also be used on other devices using something like <a href="https://twitter.com/nodejs">@nodejs</a></p>
<p>For our purposes though, we don't need to worry too much about how that all works right now. To get started we'll be using tools like <a href="https://twitter.com/CodePen">@CodePen</a>, <a href="https://twitter.com/replit">@replit</a> and <a href="https://twitter.com/glitch">@glitch</a> which give you text editor and a place to run your code</p>
<blockquote>
<p>You'll see some code samples embeded in the</p>
</blockquote>
<p>I'll be posting links to the code on these sites as I go along</p>
<h1 id="2.-text-data" tabindex="-1">2. Text Data</h1>
<p>In a program, we can store different types of data (known as &quot;data types&quot;)</p>
<p>When we store text we use a data type called <code>string</code>. In JavaScript a string is just text surrounded in either double quotes, single quotes, or <code>`these things`</code> (which are known as backticks):</p>
<pre><code class="hljs language-js"><span class="hljs-string">&quot;i am text&quot;</span>
</code></pre>
<pre><code class="hljs language-js"><span class="hljs-string">&quot;i am also text&quot;</span>
</code></pre>
<pre><code class="hljs language-js">;<span class="hljs-string">`me too.`</span>
</code></pre>
<pre><code class="hljs language-js">;<span class="hljs-string">`unlike the others,
  i can b
multiple lines
lllooonnnggg
    and have random spaces`</span>
</code></pre>
<h1 id="3.-variables" tabindex="-1">3. Variables</h1>
<p>If we want to keep our data for use at a later stage we need to give it a name, otherwise how do we know what data we're trying to use right? To give a piece of data (or text, in our case) a name we create a <code>variable</code></p>
<p>We create a variable using <code>let</code> or <code>const</code> along with a variable name and the data that we want to give the name to :</p>
<iframe height="400px" width="100%" src="https://repl.it/@nabeelvalley/twitter-pt3?lite=true" scrolling="no" frameborder="no" allowtransparency="true" allowfullscreen="true" sandbox="allow-forms allow-pointer-lock allow-popups allow-same-origin allow-scripts allow-modals"></iframe>
<details>
  <summary>View Code</summary>
<pre><code class="hljs language-js"><span class="hljs-comment">// this code shouldn&#x27;t do anything if you run it</span>
<span class="hljs-comment">// we are just creating some variables</span>

<span class="hljs-keyword">let</span> myText = <span class="hljs-string">&quot;Hello World&quot;</span>

<span class="hljs-keyword">const</span> myOtherText = <span class="hljs-string">&quot;Bye World&quot;</span>
</code></pre>
</details>
<p>We use <code>let</code> for data whose data may change and <code>const</code> for data whose data won't you can remember this like: <code>const = constant</code></p>
<blockquote>
<p>Note that it is also possible to use the keyword <code>var</code> to create a variable. This is something that is left over from older versions of JavaScript and can have some effects that are better to just avoid (if you're interested you can read <a href="https://medium.com/@josephcardillo/the-difference-between-function-and-block-scope-in-JavaScript-4296b2322abe">this article about how it impacts variable scope</a> but it is a bit of a more challenging concept to understand)</p>
</blockquote>
<p>When creating a variable, there are a few rules we need to follow:</p>
<ol>
<li>Variable names <strong>must not</strong> contain spaces or stuff like <code>!@#%%^&amp;\*()</code>, underscores and dollar signs are okay though</li>
<li>Variable names <strong>must not</strong> be a word the language has set aside for something else. e.g <code>const</code> or <code>let</code></li>
<li>Variable names <strong>must not</strong> start with a number</li>
<li>Variable names <strong>should be</strong> descriptive. while names like &quot;x&quot; and &quot;blah&quot; are allowed, if they have no meaning in the context it's better to opt for something people will understand</li>
</ol>
<h1 id="4.-printing-data" tabindex="-1">4. Printing Data</h1>
<p>Languages have ways we can show data to a user (or programmer). In JavaScript this is the &quot;console.log&quot; function. We'll discuss functions later on but for now know that when we give them data, and they do stuff</p>
<iframe height="400px" width="100%" src="https://repl.it/@nabeelvalley/twitter-pt4?lite=true" scrolling="no" frameborder="no" allowtransparency="true" allowfullscreen="true" sandbox="allow-forms allow-pointer-lock allow-popups allow-same-origin allow-scripts allow-modals"></iframe>
<details>
  <summary>View Code</summary>
<pre><code class="hljs language-js"><span class="hljs-comment">// print the data</span>
<span class="hljs-variable language_">console</span>.<span class="hljs-title function_">log</span>(<span class="hljs-string">&quot;Bob Smith&quot;</span>) <span class="hljs-comment">//prints -&gt; Bob Smith</span>

<span class="hljs-comment">// print a variable</span>
<span class="hljs-keyword">const</span> jenny = <span class="hljs-string">&quot;Jenny Smith&quot;</span>
<span class="hljs-variable language_">console</span>.<span class="hljs-title function_">log</span>(jenny) <span class="hljs-comment">// prints -&gt; Jenny Smith</span>
</code></pre>
</details>
<h1 id="5.-numbers" tabindex="-1">5. Numbers</h1>
<p>Numbers are another type of data in JavaScript, to store a number we can just write the number. using numbers we can also do things like getting fat or running from the po-lice</p>
<ol>
<li><code>-</code> is plus</li>
<li><code>-</code> is minus</li>
<li><code>*</code> is multiply</li>
<li><code>/</code> is divide</li>
</ol>
<iframe height="400px" width="100%" src="https://repl.it/@nabeelvalley/twitter-pt5?lite=true" scrolling="no" frameborder="no" allowtransparency="true" allowfullscreen="true" sandbox="allow-forms allow-pointer-lock allow-popups allow-same-origin allow-scripts allow-modals"></iframe>
<details>
  <summary>View Code</summary>
<pre><code class="hljs language-js"><span class="hljs-keyword">const</span> myWeight = <span class="hljs-number">100</span>
<span class="hljs-keyword">const</span> food = <span class="hljs-number">100</span> + <span class="hljs-number">50</span>

<span class="hljs-keyword">const</span> myNewWeight = myWeight + food

<span class="hljs-variable language_">console</span>.<span class="hljs-title function_">log</span>(myNewWeight) <span class="hljs-comment">// print -&gt; 250</span>

<span class="hljs-keyword">const</span> myWeightAfterRunnin = myWeight - myWeight * <span class="hljs-number">0.2</span>

<span class="hljs-variable language_">console</span>.<span class="hljs-title function_">log</span>(myWeightAfterRunnin) <span class="hljs-comment">// print -&gt; 80</span>
</code></pre>
</details>
<p>But, JavaScript lets us add do maths with anything. so maybe like - don't do this:</p>
<iframe height="400px" width="100%" src="https://repl.it/@nabeelvalley/twitter-pt5-1?lite=true" scrolling="no" frameborder="no" allowtransparency="true" allowfullscreen="true" sandbox="allow-forms allow-pointer-lock allow-popups allow-same-origin allow-scripts allow-modals"></iframe>
<details>
  <summary>View Code</summary>
<pre><code class="hljs language-js"><span class="hljs-keyword">const</span> dontDoThis = <span class="hljs-string">&quot;apple&quot;</span> * <span class="hljs-string">&quot;pineapple&quot;</span>

<span class="hljs-variable language_">console</span>.<span class="hljs-title function_">log</span>(dontDoThis) <span class="hljs-comment">// print -&gt; NaN (Not a Number)</span>
</code></pre>
</details>
<h1 id="6.-arrays" tabindex="-1">6. Arrays</h1>
<p>Arrays are how we store a set of data. an array can have different data types in it, but usually, we want to be storing the same stuff in an array. we make an array by wrapping our items in <code>[ ]</code> and separating each item with a comma (<code>,</code>)</p>
<iframe height="400px" width="100%" src="https://repl.it/@nabeelvalley/twitter-pt6?lite=true" scrolling="no" frameborder="no" allowtransparency="true" allowfullscreen="true" sandbox="allow-forms allow-pointer-lock allow-popups allow-same-origin allow-scripts allow-modals"></iframe>
<details>
  <summary>View Code</summary>
<pre><code class="hljs language-js"><span class="hljs-keyword">const</span> myFriends = [<span class="hljs-string">&quot;i&quot;</span>, <span class="hljs-string">&quot;don&#x27;t&quot;</span>, <span class="hljs-string">&quot;have&quot;</span>, <span class="hljs-string">&quot;any&quot;</span>]

<span class="hljs-keyword">const</span> thingsToRemember = [<span class="hljs-string">&quot;uhmm&quot;</span>, <span class="hljs-number">42</span>, <span class="hljs-number">12</span>, <span class="hljs-string">&quot;idk, i guess i forgot&quot;</span>]

<span class="hljs-keyword">const</span> multipleLines = [
<span class="hljs-string">&quot;arrays don&#x27;t have to be&quot;</span>,
<span class="hljs-string">&quot;on a single&quot;</span>,
<span class="hljs-string">&quot;line&quot;</span>
]

</code></pre>
</details>
<p>If we want to get a specific element in an array we can use the variable name with the index (position) of the element. the index starts at 0. we will get <code>undefined</code> (I'll explain this in a bit) if we try to get a value at an index that does not exist</p>
<iframe height="400px" width="100%" src="https://repl.it/@nabeelvalley/twitter-pt6-1?lite=true" scrolling="no" frameborder="no" allowtransparency="true" allowfullscreen="true" sandbox="allow-forms allow-pointer-lock allow-popups allow-same-origin allow-scripts allow-modals"></iframe>
<details>
  <summary>View Code</summary>
<pre><code class="hljs language-js">  <span class="hljs-keyword">const</span> myData = [
  <span class="hljs-string">&quot;zeroeth index&quot;</span>,
  <span class="hljs-string">&quot;first index&quot;</span>,
  <span class="hljs-string">&quot;second index&quot;</span>,
  <span class="hljs-string">&quot;third index&quot;</span>
]

<span class="hljs-variable language_">console</span>.<span class="hljs-title function_">log</span>(myData[<span class="hljs-number">0</span>]) <span class="hljs-comment">// print -&gt; zeroeth index</span>
<span class="hljs-variable language_">console</span>.<span class="hljs-title function_">log</span>(myData[<span class="hljs-number">1</span>]) <span class="hljs-comment">// print -&gt; first index</span>
<span class="hljs-variable language_">console</span>.<span class="hljs-title function_">log</span>(myData[<span class="hljs-number">2</span>]) <span class="hljs-comment">// print -&gt; second index</span>
<span class="hljs-variable language_">console</span>.<span class="hljs-title function_">log</span>(myData[<span class="hljs-number">3</span>]) <span class="hljs-comment">// print -&gt; third index</span>

<span class="hljs-comment">// indexes that do not exist in our array</span>
<span class="hljs-variable language_">console</span>.<span class="hljs-title function_">log</span>(myData[-<span class="hljs-number">1</span>]) <span class="hljs-comment">// print -&gt; undefined</span>
<span class="hljs-variable language_">console</span>.<span class="hljs-title function_">log</span>(myData[<span class="hljs-number">100</span>]) <span class="hljs-comment">// print -&gt; undefined</span>
</code></pre>
</details>
<h1 id="7.-booleans" tabindex="-1">7. Booleans</h1>
<p>So far we've looked at strings and numbers, we have an even more basic data type called a boolean. a boolean is a value that can either be true or false. when creating a variable for a boolean we do not wrap the value in quotes</p>
<iframe height="400px" width="100%" src="https://repl.it/@nabeelvalley/twitter-pt7?lite=true" scrolling="no" frameborder="no" allowtransparency="true" allowfullscreen="true" sandbox="allow-forms allow-pointer-lock allow-popups allow-same-origin allow-scripts allow-modals"></iframe>
<details>
  <summary>View Code</summary>
<pre><code class="hljs language-js"><span class="hljs-keyword">var</span> myTrueBool = <span class="hljs-literal">true</span>

<span class="hljs-keyword">var</span> myFalseBool = <span class="hljs-literal">false</span>

<span class="hljs-variable language_">console</span>.<span class="hljs-title function_">log</span>(myTrueBool)
<span class="hljs-variable language_">console</span>.<span class="hljs-title function_">log</span>(myFalseBool)
</code></pre>
</details>
<h1 id="8.-complex-data" tabindex="-1">8. Complex Data</h1>
<p>If we want to store data that are more complex than the ones we've seen above, we can make use of &quot;objects&quot;. use <code>{ }</code> around our data to group more basic data. these use <code>keys</code> as names for values in the object</p>
<iframe height="400px" width="100%" src="https://repl.it/@nabeelvalley/twitter-pt8?lite=true" scrolling="no" frameborder="no" allowtransparency="true" allowfullscreen="true" sandbox="allow-forms allow-pointer-lock allow-popups allow-same-origin allow-scripts allow-modals"></iframe>
<details>
  <summary>View Code</summary>
<pre><code class="hljs language-js"><span class="hljs-keyword">const</span> jenny = {
  <span class="hljs-attr">id</span>: <span class="hljs-number">123</span>,
  <span class="hljs-attr">name</span>: <span class="hljs-string">&quot;Jenny&quot;</span>,
  <span class="hljs-attr">surname</span>: <span class="hljs-string">&quot;Smith&quot;</span>,
  <span class="hljs-attr">age</span>: <span class="hljs-string">&quot;idk, can&#x27;t ask a woman that&quot;</span>,
  <span class="hljs-attr">favouriteBooks</span>: [
    <span class="hljs-string">&quot;To not kill a Mockingbird&quot;</span>,
    <span class="hljs-string">&quot;Why are books so voilent, yoh&quot;</span>,
  ],
}

<span class="hljs-comment">// we can get specific values using their keys</span>
<span class="hljs-keyword">const</span> jennyName = jenny.<span class="hljs-property">name</span>
<span class="hljs-keyword">const</span> jennyBooks = jenny.<span class="hljs-property">favouriteBooks</span>
</code></pre>
</details>
<h1 id="9.-undefined-and-null" tabindex="-1">9. Undefined and Null</h1>
<p>the values <code>undefined</code> and <code>null</code> have a special meaning.</p>
<ul>
<li><code>undefined</code> is a representation for a variable that does not have a value</li>
<li><code>null</code> is a value of &quot;nothing&quot;</li>
</ul>
<p>For example:</p>
<ul>
<li>What's wrong with chocolate? <code>null</code></li>
<li>What's a flobuir? <code>undefined</code></li>
</ul>
<h1 id="10.-functions" tabindex="-1">10. Functions</h1>
<p>Functions are a way we can group code for a specific set of instructions, usually with some end purpose. In JavaScript we define a function in one of two ways: using the word <code>function</code> or with the <code>fat arrow syntax</code></p>
<iframe height="400px" width="100%" src="https://repl.it/@nabeelvalley/twitter-pt10?lite=false" scrolling="no" frameborder="no" allowtransparency="true" allowfullscreen="true" sandbox="allow-forms allow-pointer-lock allow-popups allow-same-origin allow-scripts allow-modals"></iframe>
<details>
  <summary>View Code</summary>
<pre><code class="hljs language-js"><span class="hljs-comment">// using the &quot;function&quot; keyword</span>
<span class="hljs-comment">// this creates a variable called &quot;myFunc1&quot;</span>
<span class="hljs-keyword">function</span> <span class="hljs-title function_">myFunc</span>(<span class="hljs-params"></span>) {
  <span class="hljs-keyword">const</span> stuff = <span class="hljs-string">&quot;I am Function&quot;</span>
  <span class="hljs-variable language_">console</span>.<span class="hljs-title function_">log</span>(stuff)
}

<span class="hljs-comment">// we can also create the variable using</span>
<span class="hljs-comment">// &quot;let&quot; or &quot;const&quot; like we do for other variables</span>
<span class="hljs-keyword">const</span> myLetFunc = <span class="hljs-keyword">function</span> (<span class="hljs-params"></span>) {
  <span class="hljs-keyword">const</span> stuff = <span class="hljs-string">&quot;I am another Function&quot;</span>
  <span class="hljs-variable language_">console</span>.<span class="hljs-title function_">log</span>(stuff)
}

<span class="hljs-comment">// fat arrow function</span>
<span class="hljs-keyword">const</span> <span class="hljs-title function_">myFatFunc</span> = (<span class="hljs-params"></span>) =&gt; {
  <span class="hljs-variable language_">console</span>.<span class="hljs-title function_">log</span>(<span class="hljs-string">&quot;Phat Funk&quot;</span>)
}

<span class="hljs-comment">// single line fat-arrow functions don&#x27;t need the {}</span>
<span class="hljs-keyword">const</span> <span class="hljs-title function_">mySingleLineFunct</span> = (<span class="hljs-params"></span>) =&gt; <span class="hljs-variable language_">console</span>.<span class="hljs-title function_">log</span>(<span class="hljs-string">&quot;single line&quot;</span>)
</code></pre>
</details>
<p>To use a function we simply write the name of the function and then add <code>()</code> at the end, provided the function doesn't take any data (also known as <code>parameters</code>)</p>
<iframe height="400px" width="100%" src="https://repl.it/@nabeelvalley/twitter-10-1?lite=false" scrolling="no" frameborder="no" allowtransparency="true" allowfullscreen="true" sandbox="allow-forms allow-pointer-lock allow-popups allow-same-origin allow-scripts allow-modals"></iframe>
<details>
  <summary>View Code</summary>
<pre><code class="hljs language-js"><span class="hljs-keyword">const</span> sayHello = <span class="hljs-keyword">function</span> (<span class="hljs-params"></span>) {
  <span class="hljs-variable language_">console</span>.<span class="hljs-title function_">log</span>(<span class="hljs-string">&quot;Hello&quot;</span>)
}

<span class="hljs-comment">// &quot;call&quot; the function</span>
<span class="hljs-title function_">sayHello</span>() <span class="hljs-comment">// prints -&gt; Hello</span>

<span class="hljs-keyword">const</span> <span class="hljs-title function_">sayBye</span> = (<span class="hljs-params"></span>) =&gt; <span class="hljs-variable language_">console</span>.<span class="hljs-title function_">log</span>(<span class="hljs-string">&quot;BYEE&quot;</span>)

<span class="hljs-comment">// &quot;call&quot; the function</span>
<span class="hljs-title function_">sayBye</span>() <span class="hljs-comment">// prints -&gt; BYEE</span>
</code></pre>
</details>
<p>Remember earlier I said that functions take data and do stuff? For us to give a function data we need to tell it what variables to store that data as when we call it. We do this by having the data in the <code>()</code> when we create (or 'declare') our function</p>
<iframe height="400px" width="100%" src="https://repl.it/@nabeelvalley/twitter-10-2?lite=false" scrolling="no" frameborder="no" allowtransparency="true" allowfullscreen="true" sandbox="allow-forms allow-pointer-lock allow-popups allow-same-origin allow-scripts allow-modals"></iframe>
<details>
  <summary>View Code</summary>
<pre><code class="hljs language-js"><span class="hljs-keyword">function</span> <span class="hljs-title function_">sayHello</span>(<span class="hljs-params">name</span>) {
  <span class="hljs-variable language_">console</span>.<span class="hljs-title function_">log</span>(<span class="hljs-string">&quot;Hello &quot;</span> + name)
}

<span class="hljs-comment">// use the function</span>
<span class="hljs-title function_">sayHello</span>(<span class="hljs-string">&quot;Bob&quot;</span>) <span class="hljs-comment">// print -&gt; Hello Bob</span>

<span class="hljs-keyword">const</span> <span class="hljs-title function_">sayBye</span> = (<span class="hljs-params">name</span>) =&gt; <span class="hljs-variable language_">console</span>.<span class="hljs-title function_">log</span>(<span class="hljs-string">&quot;Bye &quot;</span> + name)

<span class="hljs-comment">//use the function</span>
<span class="hljs-keyword">const</span> name = <span class="hljs-string">&quot;Jenny&quot;</span>
<span class="hljs-title function_">sayBye</span>(name) <span class="hljs-comment">// print -&gt; Bye Jenny</span>
</code></pre>
</details>
<p>When computers are following our code they do so from the top down, so the first line is handled by the computer before the second. the second before the third, etc. functions are a way for us to reuse code that was written on a line higher up in our code. You may notice that we use the variable <code>name</code> in a lot of different places above. this uses <code>scope</code> and broadly means any variable name created in a function (or pretty much anywhere between <code>{ }</code>) is only available within that section</p>
<blockquote>
<p>Scope complicated, you can read more about it <a href="https://scotch.io/tutorials/understanding-scope-in-JavaScript">here</a></p>
</blockquote>
<p>Functions can also take multiple parameters, this is done by listing the parameters between the () and separating them by commas. the order that we list them when we create our function is the same as the order we need to put them when using the function</p>
<iframe height="400px" width="100%" src="https://repl.it/@nabeelvalley/twitter-10-3?lite=false" scrolling="no" frameborder="no" allowtransparency="true" allowfullscreen="true" sandbox="allow-forms allow-pointer-lock allow-popups allow-same-origin allow-scripts allow-modals"></iframe>
<details>
  <summary>View Code</summary>
<pre><code class="hljs language-js"><span class="hljs-keyword">const</span> <span class="hljs-title function_">sayBye</span> = (<span class="hljs-params">firstName, lastName</span>) =&gt; {
  <span class="hljs-variable language_">console</span>.<span class="hljs-title function_">log</span>(<span class="hljs-string">&quot;Bye &quot;</span> + firstName + <span class="hljs-string">&quot; &quot;</span> + lastName)
}

<span class="hljs-comment">// use the function</span>
<span class="hljs-keyword">const</span> jennyName = <span class="hljs-string">&quot;Jenny&quot;</span>
<span class="hljs-keyword">const</span> jennySurname = <span class="hljs-string">&quot;Smith&quot;</span>
<span class="hljs-title function_">sayBye</span>(jennyName, jennySurname) <span class="hljs-comment">// print -&gt; Bye Jenny Smith</span>
</code></pre>
</details>
<p>Functions are also able to give us back a value after doing some stuff. They do this by using the <code>return</code> keyword which tells it what to give back. A function stops processing when it sees the keyword <code>return</code> - anything after it in a function is ignored</p>
<iframe height="400px" width="100%" src="https://repl.it/@nabeelvalley/twitter-10-4?lite=false" scrolling="no" frameborder="no" allowtransparency="true" allowfullscreen="true" sandbox="allow-forms allow-pointer-lock allow-popups allow-same-origin allow-scripts allow-modals"></iframe>
<details>
  <summary>View Code</summary>
<pre><code class="hljs language-js"><span class="hljs-keyword">const</span> <span class="hljs-title function_">addNumbers</span> = (<span class="hljs-params">num1, num2</span>) =&gt; {
  <span class="hljs-keyword">const</span> result = num1 + num2
  <span class="hljs-keyword">return</span> result
}

<span class="hljs-keyword">const</span> mySum = <span class="hljs-title function_">addNumbers</span>(<span class="hljs-number">1</span>, <span class="hljs-number">2</span>)

<span class="hljs-variable language_">console</span>.<span class="hljs-title function_">log</span>(mySum) <span class="hljs-comment">// print -&gt; 3</span>
</code></pre>
</details>
<h1 id="summary" tabindex="-1">Summary</h1>
<p>That's it for now, I'll definitely be updating this post/series as things are added</p>
<blockquote>
<p>Nabeel Valley</p>
</blockquote>
]]></content>
        <author>
            <name>Nabeel Valley</name>
            <uri>https://nabeelvalley.co.za</uri>
        </author>
    </entry>
    <entry>
        <title type="html"><![CDATA[Colour in Black and White Photography]]></title>
        <id>/blog/2020/07-04/filtering-in-bw/</id>
        <link href="https://nabeelvalley.co.za/blog/2020/07-04/filtering-in-bw/"/>
        <updated>2020-04-06T22:00:00.000Z</updated>
        <summary type="html"><![CDATA[Introduction to Black and White Colour Filtering and Processing for Photography]]></summary>
        <content type="html"><![CDATA[<p><div class="table-of-contents"><details><summary>Contents</summary><ul><li><a href="#brightness">Brightness</a></li><li><a href="#texture">Texture</a></li><li><a href="#colour">Colour</a><ul><li><a href="#neutral-filtering">Neutral Filtering</a></li><li><a href="#red-filter">Red Filter</a></li><li><a href="#green-filter">Green Filter</a></li></ul></li></ul></details></div></p>
<p>Let's talk about black and white shall we?. As a first-time monochromer there are a couple of aspects of shooting and editing a black and white picture that isn't immediately apparent</p>
<p>When shooting in Black and White (henceforth B&amp;W) there are some things we need to be aware especially aware of, namely:</p>
<ul>
<li>Brightness</li>
<li>Texture</li>
<li>Colour</li>
</ul>
<p>Now, of course, other considerations can be made but most of these boil down to how you use these three elements. For the most part, I'll be discussing how <em>colour</em> comes into play from an editing perspective, but this should give you an awareness of how this applies when shooting too</p>
<h1 id="brightness" tabindex="-1">Brightness</h1>
<p>When I refer to brightness in this context I am not referring to the exposure of the image but rather the distribution of brightness across the image itself, where are your shadows and highlights, how bright is your subject in relation to your background, etc.</p>
<p>Typically when we are working with a B&amp;W image we try to have our subject be a little brighter (or much brighter) than everything else, this helps us to draw the viewer's attention more easily, of course, this is only one of the factors</p>
<h1 id="texture" tabindex="-1">Texture</h1>
<p>When shooting B&amp;W we also look for texture, I would argue that texture is to a black and white picture what colour is to a colour one. Texture helps us to differentiate between different elements in a photo and is very evident when used a lot of strong contrast. Sometimes you want a lot of texture, sometimes you don't - it is, however, important that you acknowledge how it contributes to an image</p>
<h1 id="colour" tabindex="-1">Colour</h1>
<p>My focus in this post is primarily colour because I think it's the easiest to play around with and can make the biggest impact to a picture when editing (how else does anyone get B&amp;W these days?)</p>
<p>At a simplified level, the way we work with colour in a B&amp;W picture is by manipulating the brightness with which different colours are interpreted which in turn allows us to emphasize (or de-emphasize) specific elements in an image</p>
<p>Over the remainder of this post I'll be discussing a lot of this in the context of the following image:</p>
<center>
![Colour Version of Discussion Image](/blog/2020/07-04/images/colour.jpg)
</center>
<p>For our discussion there are a few important aspects of this image to note:</p>
<ol>
<li>The image is darkest in the background (top left) and transitions to being brighter in the foreground (bottom right)</li>
<li>We primarily have the subject in <strong>red</strong> and the background element (leaves) in <strong>green</strong></li>
<li>The brightness of our red and green elements in their respective sections of the image are approximately the same</li>
</ol>
<p>If we were to simply convert this image to a B&amp;W one we get the following:</p>
<center>
![Neutral Version of Discussion Image](/blog/2020/07-04/images/neutral.jpg)
</center>
<p>From the above we see that the distinction between our red and green elements isn't really visible anymore, this is because of the impact that colour mixing has on our image. Mixing allows us to control the way the different colours are seen in the image and most photo editing tools have some version of a Black and White Mixer that allows us to apply a colour filter to a Black and White image</p>
<h2 id="neutral-filtering" tabindex="-1">Neutral Filtering</h2>
<p>This is the &quot;natural&quot; way that a B&amp;W conversion works, using this method for any two colours at approximately the same brightness we should see the same brightness in the B&amp;W version</p>
<p>If we look at the neutral version of our image we can observe that the brightness across our image is fairly consistent with that of the colour version with a darker background and brighter foreground. We can also see that there is very little differentiation between the red and green elements in our image</p>
<center>
![Neutral Version of Discussion Image](/blog/2020/07-04/images/neutral.svg)
</center>
<p>In photography, there are few well-known colour filters which can be placed in front of your lens to achieve what we are doing here digitally. Commonly we have red, green, blue, and yellow filters. We'll just be looking at the red and green filters that were used to edit this image</p>
<h2 id="red-filter" tabindex="-1">Red Filter</h2>
<p>In a picture like this where our subject is red, we can use a red filter to increase the brightness of the red portions of our image. To do this we would bump up the red and orange sections of our colours while trying to maintain a smooth change from one colour to the next to prevent any sharp changes in the brightness of our image</p>
<p>Additionally, I've also made the green slightly darker to add some additional contrast. We can see the result of doing so along with the changes made to the brightness of the respective colours below:</p>
<center>
![Red Filtered Version of Discussion Image](/blog/2020/07-04/images/red.svg)
</center>
<p>Using a method like this we can draw our focus back to the red elements a little more than if we had left the brightnesses as they were in the Neutral image while pushing down the brightness of our green elements so we don't have the two competing for focus</p>
<h2 id="green-filter" tabindex="-1">Green Filter</h2>
<p>We can also do something like the above using a filter that brightens the green and darkens the red</p>
<center>
![Green Filtered Version of Discussion Image](/content/blog/2020/07-04/images/green.svg)
</center>
<p>In the resulting image above we can see that the greens are now much brighter and the reds are almost black - however we still maintain a good level of contrast between our too resulting elements. We can see a comparison of the impact the different colour filters have on our image below. These are ordered from left to right as red, neutral and green</p>
<center>
![Comparison of Filtered Versions of Discussion Image](/content/blog/2020/07-04/images/comparison.jpg)
</center>
<p>Using what we've looked at in the above we can see that the way we choose to filter a black and white image has a huge impact on how we direct the viewer's attention in our image as well as how clearly we can differentiate between different elements</p>
<p>Note that while we do have different common colour filters, when editing a B&amp;W image it usually makes sense to play around with your Black and White Mixer Tool to see what works best for your image</p>
<blockquote>
<p>Nabeel Valley</p>
</blockquote>
]]></content>
        <author>
            <name>Nabeel Valley</name>
            <uri>https://nabeelvalley.co.za</uri>
        </author>
    </entry>
    <entry>
        <title type="html"><![CDATA[The Gatsby Migration, pt.3 - Smart Pages]]></title>
        <id>/blog/2020/15-03/gatsby-migration-3/</id>
        <link href="https://nabeelvalley.co.za/blog/2020/15-03/gatsby-migration-3/"/>
        <updated>2020-03-14T23:00:00.000Z</updated>
        <summary type="html"><![CDATA[Adding dynamic pages to a Gatsby site]]></summary>
        <content type="html"><![CDATA[<p><div class="table-of-contents"><details><summary>Contents</summary><ul><li><a href="#introduction">Introduction</a></li><li><a href="#setting-up">Setting Up</a></li><li><a href="#gatsby-plugins">Gatsby Plugins</a><ul><li><a href="#reading-the-file-metadata">Reading the File Metadata</a></li><li><a href="#processing-the-files">Processing the Files</a></li></ul></li><li><a href="#create-pages">Create Pages</a><ul><li><a href="#setting-up-1">Setting Up</a></li><li><a href="#create-pages-dynamically">Create Pages Dynamically</a></li><li><a href="#render-the-page-data">Render the Page Data</a></li></ul></li><li><a href="#summary">Summary</a></li></ul></details></div></p>
<h1 id="introduction" tabindex="-1">Introduction</h1>
<p>So far we've created the initial react application as with a few routes for our <code>Home</code>, <code>Blog</code>, and <code>404</code> pages. In this post we'll look at how we can set up our <code>Post</code> component to render our pages dynamically based on the JSON data we have. We'll also extend this so that we can have some more content in a markdown file that we'll parse and add to our Gatsby data</p>
<ol>
<li><a href="/blog/2020/21-01/gatsby-migration-1">Creating the initial React App</a></li>
<li><a href="/blog/2020/01-02/gatsby-migration-2">Rendering the &quot;Dumb&quot; pages with Gatsby</a></li>
<li><strong>Rendering the &quot;Smart&quot; page with Gatsby</strong> (This post)</li>
</ol>
<h1 id="setting-up" tabindex="-1">Setting Up</h1>
<p>We're going to make our data a little more complex by creating two additional markdown files in our <code>static/posts</code> directory to enable us to have more content with each post</p>
<p>Create the following markdown files in the application and align the names with our <code>post-1.json</code> and <code>post-2.json</code> files:</p>
<ol>
<li><code>static/posts/post-1.md</code></li>
<li><code>static/posts/post-2.md</code></li>
</ol>
<h1 id="gatsby-plugins" tabindex="-1">Gatsby Plugins</h1>
<p>To read the data from our files we're going to do the following:</p>
<ol>
<li>Use the <code>gatsby-source-filesystem</code> to read our files into the Gatsby Data Layer</li>
<li>Define our own plugin that can read the file content, parse the markdown, and add it into the data layer</li>
</ol>
<h2 id="reading-the-file-metadata" tabindex="-1">Reading the File Metadata</h2>
<p>To read our file data we will need to first install the <code>gatsby-source-filesystem</code> plugin. Plugins in Gatsby enable us to ingest or transform data in our application. We then make use of GraphQL to query the data from the relevant component</p>
<p>Install the <code>gatsby-source-filesystem</code> plugin with:</p>
<pre><code class="hljs">yarn add gatsby-source-<span class="hljs-keyword">file</span><span class="hljs-params">system</span>
</code></pre>
<p>And then add the plugin configuration to the <code>gatsby-node.js</code> file into the <code>plugins</code> array:</p>
<p><code>gatsby-node.js</code></p>
<pre><code class="hljs language-js">{
    <span class="hljs-attr">resolve</span>: <span class="hljs-string">`gatsby-source-filesystem`</span>,
    <span class="hljs-attr">options</span>: {
        <span class="hljs-attr">name</span>: <span class="hljs-string">`content`</span>,
        <span class="hljs-attr">path</span>: <span class="hljs-string">`<span class="hljs-subst">${__dirname}</span>/static/posts`</span>,
    },
}
</code></pre>
<p>This will read all the data from our <code>posts</code> directory into the filesystem. We can now start the application back up with <code>yarn start</code> and navigate to <code>http://localhost:8000/__graphql</code> in our browser to view the GraphQL data. We should be able to see the GraphiQL interface</p>
<p>From the GraphiQL interface run the following query to see the data from the files in our directory:</p>
<pre><code class="hljs language-graphql"><span class="hljs-keyword">query</span> PostData <span class="hljs-punctuation">{</span>
  allFile <span class="hljs-punctuation">{</span>
    nodes <span class="hljs-punctuation">{</span>
      name
      extension
      absolutePath
    <span class="hljs-punctuation">}</span>
  <span class="hljs-punctuation">}</span>
<span class="hljs-punctuation">}</span>
</code></pre>
<p>This should yield the following JSON with our file meta data in it:</p>
<pre><code class="hljs language-json"><span class="hljs-punctuation">{</span>
  <span class="hljs-attr">&quot;data&quot;</span><span class="hljs-punctuation">:</span> <span class="hljs-punctuation">{</span>
    <span class="hljs-attr">&quot;allFile&quot;</span><span class="hljs-punctuation">:</span> <span class="hljs-punctuation">{</span>
      <span class="hljs-attr">&quot;nodes&quot;</span><span class="hljs-punctuation">:</span> <span class="hljs-punctuation">[</span>
        <span class="hljs-punctuation">{</span>
          <span class="hljs-attr">&quot;name&quot;</span><span class="hljs-punctuation">:</span> <span class="hljs-string">&quot;post-1&quot;</span><span class="hljs-punctuation">,</span>
          <span class="hljs-attr">&quot;extension&quot;</span><span class="hljs-punctuation">:</span> <span class="hljs-string">&quot;json&quot;</span><span class="hljs-punctuation">,</span>
          <span class="hljs-attr">&quot;absolutePath&quot;</span><span class="hljs-punctuation">:</span> <span class="hljs-string">&quot;C:/repos/cra-to-gatsby/static/posts/post-1.json&quot;</span>
        <span class="hljs-punctuation">}</span><span class="hljs-punctuation">,</span>
        <span class="hljs-punctuation">{</span>
          <span class="hljs-attr">&quot;name&quot;</span><span class="hljs-punctuation">:</span> <span class="hljs-string">&quot;1&quot;</span><span class="hljs-punctuation">,</span>
          <span class="hljs-attr">&quot;extension&quot;</span><span class="hljs-punctuation">:</span> <span class="hljs-string">&quot;jpg&quot;</span><span class="hljs-punctuation">,</span>
          <span class="hljs-attr">&quot;absolutePath&quot;</span><span class="hljs-punctuation">:</span> <span class="hljs-string">&quot;C:/repos/cra-to-gatsby/static/posts/1.jpg&quot;</span>
        <span class="hljs-punctuation">}</span><span class="hljs-punctuation">,</span>
        <span class="hljs-punctuation">{</span>
          <span class="hljs-attr">&quot;name&quot;</span><span class="hljs-punctuation">:</span> <span class="hljs-string">&quot;post-1&quot;</span><span class="hljs-punctuation">,</span>
          <span class="hljs-attr">&quot;extension&quot;</span><span class="hljs-punctuation">:</span> <span class="hljs-string">&quot;md&quot;</span><span class="hljs-punctuation">,</span>
          <span class="hljs-attr">&quot;absolutePath&quot;</span><span class="hljs-punctuation">:</span> <span class="hljs-string">&quot;C:/repos/cra-to-gatsby/static/posts/post-1.md&quot;</span>
        <span class="hljs-punctuation">}</span><span class="hljs-punctuation">,</span>
        <span class="hljs-comment">// file 2 data</span>
      <span class="hljs-punctuation">]</span>
    <span class="hljs-punctuation">}</span>
  <span class="hljs-punctuation">}</span>
<span class="hljs-punctuation">}</span>
</code></pre>
<h2 id="processing-the-files" tabindex="-1">Processing the Files</h2>
<p>Now that we have our metadata for each file in the file system, we're going to create a plugin that will allow us to read the file data and add it the GraphQL data layer</p>
<p>In order to do this, create a <code>plugins</code> directory in the root folder. Inside of the plugins directory create a folder and folder for our plugin.</p>
<p>Create a new folder in the <code>plugins</code> directory with another folder called <code>gatsby-transformer-postdata</code></p>
<p>From this directory run the following commands to initialize and link the yarn package:</p>
<p><code>plugins/gatsby-transformer-postdata</code></p>
<pre><code class="hljs">yarn init -y
yarn <span class="hljs-built_in">link</span>
</code></pre>
<p>We'll also add the <code>showdown</code> package which will allow us to convert the markdown into the HTML so we can render it with our <code>Post</code> component</p>
<pre><code class="hljs">yarn <span class="hljs-keyword">add </span><span class="hljs-keyword">showdown
</span></code></pre>
<p>And then create an <code>gatsby-node.js</code> file in this directory with the following content:</p>
<p><code>/plugins/gatsby-transformer-postdata/gatsby-node.js</code></p>
<pre><code class="hljs language-js"><span class="hljs-keyword">const</span> fs = <span class="hljs-built_in">require</span>(<span class="hljs-string">&#x27;fs&#x27;</span>)
<span class="hljs-keyword">const</span> crypto = <span class="hljs-built_in">require</span>(<span class="hljs-string">&#x27;crypto&#x27;</span>)
<span class="hljs-keyword">const</span> showdown = <span class="hljs-built_in">require</span>(<span class="hljs-string">&#x27;showdown&#x27;</span>)

<span class="hljs-built_in">exports</span>.<span class="hljs-property">onCreateNode</span> = <span class="hljs-keyword">async</span> ({ node, getNode, actions }) =&gt; {

    <span class="hljs-keyword">const</span> { createNodeField, createNode } = actions

    <span class="hljs-comment">// we&#x27;ll process the node data here</span>
}
</code></pre>
<p>This exposes the <code>onCreateNode</code> Gatsby API for our plugin. This is what Gatsby calls when creating nodes and we will be able to hook into this to create new nodes with all the data for each respective post based on the created file nodes</p>
<p>From the <code>onCreateNode</code> function we'll do the following to create the new nodes:</p>
<ol>
<li>Check if it is a markdown node</li>
<li>Check if the JSON file exists</li>
<li>Read file content</li>
<li>Parse the metadata into an object</li>
<li>Convert the markdown to HTML</li>
<li>Get the name of the node</li>
<li>Define the data for our node</li>
<li>Create the new node using the <code>createNode</code> function</li>
</ol>
<p><code>gatsby-transformer-postdata/gatsby-node.js</code></p>
<pre><code class="hljs language-js"><span class="hljs-keyword">const</span> fs = <span class="hljs-built_in">require</span>(<span class="hljs-string">&#x27;fs&#x27;</span>)
<span class="hljs-keyword">const</span> crypto = <span class="hljs-built_in">require</span>(<span class="hljs-string">&#x27;crypto&#x27;</span>)
<span class="hljs-keyword">const</span> showdown = <span class="hljs-built_in">require</span>(<span class="hljs-string">&#x27;showdown&#x27;</span>)

<span class="hljs-built_in">exports</span>.<span class="hljs-property">onCreateNode</span> = <span class="hljs-keyword">async</span> ({node, actions, loadNodeContent}) =&gt; {

    <span class="hljs-keyword">const</span> { createNodeField, createNode } = actions
    
    <span class="hljs-comment">// 1. Check if it is a markdown node</span>
    <span class="hljs-keyword">if</span> (node.<span class="hljs-property">internal</span>.<span class="hljs-property">mediaType</span> == <span class="hljs-string">&#x27;text/markdown&#x27;</span>) {   

        <span class="hljs-keyword">const</span> jsonFilePath = <span class="hljs-string">`<span class="hljs-subst">${node.absolutePath.slice(<span class="hljs-number">0</span>, -<span class="hljs-number">3</span>)}</span>.json`</span>

        <span class="hljs-variable language_">console</span>.<span class="hljs-title function_">log</span>(jsonFilePath)
        
        <span class="hljs-comment">// 2. Check if the JSON file exists</span>
        <span class="hljs-keyword">if</span> (fs.<span class="hljs-title function_">existsSync</span>(jsonFilePath)) {
            
            <span class="hljs-comment">// 3. Read file content</span>
            <span class="hljs-keyword">const</span> markdownFilePath = node.<span class="hljs-property">absolutePath</span>
            <span class="hljs-keyword">const</span> markdownContent = fs.<span class="hljs-title function_">readFileSync</span>(markdownFilePath, <span class="hljs-string">&#x27;utf8&#x27;</span>)
            <span class="hljs-keyword">const</span> jsonContent = fs.<span class="hljs-title function_">readFileSync</span>(jsonFilePath, <span class="hljs-string">&#x27;utf8&#x27;</span>)

            <span class="hljs-comment">// 4. Parse the metadata into an object</span>
            <span class="hljs-keyword">const</span> metaData = <span class="hljs-title class_">JSON</span>.<span class="hljs-title function_">parse</span>(jsonContent)

            <span class="hljs-comment">// 5. Convert the markdown to HTML</span>
            <span class="hljs-keyword">const</span> converter = <span class="hljs-keyword">new</span> showdown.<span class="hljs-title class_">Converter</span>()
            <span class="hljs-keyword">const</span> html = converter.<span class="hljs-title function_">makeHtml</span>(markdownContent)
            
            <span class="hljs-comment">// 6. Get the name of the node</span>
            <span class="hljs-keyword">const</span> name = node.<span class="hljs-property">name</span>
            
            <span class="hljs-comment">// 7. Define the data for our node</span>
            <span class="hljs-keyword">const</span> nodeData = {
                name,
                html,
                metaData,
                <span class="hljs-attr">slug</span>: <span class="hljs-string">`/blog/<span class="hljs-subst">${name}</span>`</span>
            }

            <span class="hljs-comment">// 8. Create the new node using the `createNode` function</span>
            <span class="hljs-keyword">const</span> newNode = {
                <span class="hljs-comment">// Node data</span>
                ...nodeData,

                <span class="hljs-comment">// Required fields.</span>
                <span class="hljs-attr">id</span>: <span class="hljs-string">`RenderedMarkdownPost-<span class="hljs-subst">${name}</span>`</span>,
                <span class="hljs-attr">children</span>: [],
                <span class="hljs-attr">internal</span>: {
                    <span class="hljs-attr">type</span>: <span class="hljs-string">`RenderedMarkdownPost`</span>,
                    <span class="hljs-attr">contentDigest</span>: crypto
                        .<span class="hljs-title function_">createHash</span>(<span class="hljs-string">`md5`</span>)
                        .<span class="hljs-title function_">update</span>(<span class="hljs-title class_">JSON</span>.<span class="hljs-title function_">stringify</span>(nodeData))
                        .<span class="hljs-title function_">digest</span>(<span class="hljs-string">`hex`</span>),
                }
            }

            <span class="hljs-title function_">createNode</span>(newNode)
        }
    }
}
</code></pre>
<p>From the root directory you can clean and rerun the application:</p>
<pre><code class="hljs">yarn clean
yarn <span class="hljs-literal">start</span>
</code></pre>
<p>Now, reload the GraphiQL at <code>http://localhost:8000/__graphql</code> and run the following query to extract the data we just pushed into the node:</p>
<pre><code class="hljs language-graphql"><span class="hljs-keyword">query</span> AllPostData <span class="hljs-punctuation">{</span>
  allRenderedMarkdownPost <span class="hljs-punctuation">{</span>
    nodes <span class="hljs-punctuation">{</span>
      html
      name
      slug
      metaData <span class="hljs-punctuation">{</span>
        body
        image
        title
      <span class="hljs-punctuation">}</span>
    <span class="hljs-punctuation">}</span>
  <span class="hljs-punctuation">}</span>
<span class="hljs-punctuation">}</span>
</code></pre>
<p>This should give us the relevant post data:</p>
<pre><code class="hljs language-json"><span class="hljs-punctuation">{</span>
  <span class="hljs-attr">&quot;data&quot;</span><span class="hljs-punctuation">:</span> <span class="hljs-punctuation">{</span>
    <span class="hljs-attr">&quot;allRenderedMarkdownPost&quot;</span><span class="hljs-punctuation">:</span> <span class="hljs-punctuation">{</span>
      <span class="hljs-attr">&quot;nodes&quot;</span><span class="hljs-punctuation">:</span> <span class="hljs-punctuation">[</span>
        <span class="hljs-punctuation">{</span>
          <span class="hljs-attr">&quot;html&quot;</span><span class="hljs-punctuation">:</span> <span class="hljs-string">&quot;&lt;p&gt;Hello here is some content for Post 1&lt;/p&gt;\n&lt;ol&gt;\n&lt;li&gt;Hello&lt;/li&gt;\n&lt;li&gt;World&lt;/li&gt;\n&lt;/ol&gt;&quot;</span><span class="hljs-punctuation">,</span>
          <span class="hljs-attr">&quot;name&quot;</span><span class="hljs-punctuation">:</span> <span class="hljs-string">&quot;post-1&quot;</span><span class="hljs-punctuation">,</span>
          <span class="hljs-attr">&quot;slug&quot;</span><span class="hljs-punctuation">:</span> <span class="hljs-string">&quot;/blog/post-1&quot;</span><span class="hljs-punctuation">,</span>
          <span class="hljs-attr">&quot;metaData&quot;</span><span class="hljs-punctuation">:</span> <span class="hljs-punctuation">{</span>
            <span class="hljs-attr">&quot;body&quot;</span><span class="hljs-punctuation">:</span> <span class="hljs-string">&quot;Hello world, how are you&quot;</span><span class="hljs-punctuation">,</span>
            <span class="hljs-attr">&quot;image&quot;</span><span class="hljs-punctuation">:</span> <span class="hljs-string">&quot;/posts/1.jpg&quot;</span><span class="hljs-punctuation">,</span>
            <span class="hljs-attr">&quot;title&quot;</span><span class="hljs-punctuation">:</span> <span class="hljs-string">&quot;Post 1&quot;</span>
          <span class="hljs-punctuation">}</span>
        <span class="hljs-punctuation">}</span><span class="hljs-punctuation">,</span>
        <span class="hljs-punctuation">{</span>
          <span class="hljs-attr">&quot;html&quot;</span><span class="hljs-punctuation">:</span> <span class="hljs-string">&quot;&lt;p&gt;Hello here is some content for Post 2&lt;/p&gt;\n&lt;ol&gt;\n&lt;li&gt;Hello&lt;/li&gt;\n&lt;li&gt;World&lt;/li&gt;\n&lt;/ol&gt;&quot;</span><span class="hljs-punctuation">,</span>
          <span class="hljs-attr">&quot;name&quot;</span><span class="hljs-punctuation">:</span> <span class="hljs-string">&quot;post-2&quot;</span><span class="hljs-punctuation">,</span>
          <span class="hljs-attr">&quot;slug&quot;</span><span class="hljs-punctuation">:</span> <span class="hljs-string">&quot;/blog/post-2&quot;</span><span class="hljs-punctuation">,</span>
          <span class="hljs-attr">&quot;metaData&quot;</span><span class="hljs-punctuation">:</span> <span class="hljs-punctuation">{</span>
            <span class="hljs-attr">&quot;body&quot;</span><span class="hljs-punctuation">:</span> <span class="hljs-string">&quot;Hello world, I am fine&quot;</span><span class="hljs-punctuation">,</span>
            <span class="hljs-attr">&quot;image&quot;</span><span class="hljs-punctuation">:</span> <span class="hljs-string">&quot;/posts/2.jpg&quot;</span><span class="hljs-punctuation">,</span>
            <span class="hljs-attr">&quot;title&quot;</span><span class="hljs-punctuation">:</span> <span class="hljs-string">&quot;Post 2&quot;</span>
          <span class="hljs-punctuation">}</span>
        <span class="hljs-punctuation">}</span>
      <span class="hljs-punctuation">]</span>
    <span class="hljs-punctuation">}</span>
  <span class="hljs-punctuation">}</span>
<span class="hljs-punctuation">}</span>
</code></pre>
<h1 id="create-pages" tabindex="-1">Create Pages</h1>
<p>Now that we've got all our data for the pages in one place we can use the <code>onCreatePages</code> API to create our posts, and the <code>Post</code> component to render the pages</p>
<h2 id="setting-up-1" tabindex="-1">Setting Up</h2>
<p>Before we really do anything we need to rename the <code>Blog.js</code> file to <code>blog.js</code> as well as create the <code>src/components</code> directory and move the <code>Post.js</code> file into it, you may need to restart your application again using <code>yarn start</code></p>
<h2 id="create-pages-dynamically" tabindex="-1">Create Pages Dynamically</h2>
<p>In our site root create a <code>gatsby-node.js</code> file which exposes an <code>onCreatePages</code> function:</p>
<p><code>gatsby-node.js</code></p>
<pre><code class="hljs language-js"><span class="hljs-keyword">const</span> path = <span class="hljs-built_in">require</span>(<span class="hljs-string">&#x27;path&#x27;</span>)

<span class="hljs-built_in">exports</span>.<span class="hljs-property">createPages</span> = <span class="hljs-keyword">async</span> ({ graphql, actions }) =&gt; {
    <span class="hljs-keyword">const</span> { createPage } = actions
    
}
</code></pre>
<p>From this function we need to do the following:</p>
<ol>
<li>Query for the PostData using the <code>graphql</code> function</li>
<li>Create a page for each <code>renderedMarkdownPost</code></li>
</ol>
<p><code>gatsby-node.js</code></p>
<pre><code class="hljs language-js"><span class="hljs-keyword">const</span> path = <span class="hljs-built_in">require</span>(<span class="hljs-string">&#x27;path&#x27;</span>)

<span class="hljs-built_in">exports</span>.<span class="hljs-property">createPages</span> = <span class="hljs-keyword">async</span> ({ graphql, actions }) =&gt; {
    
    <span class="hljs-keyword">const</span> { createPage } = actions

    <span class="hljs-comment">// 1. Query for the PostData using the `graphql` function</span>
    <span class="hljs-keyword">const</span> result = <span class="hljs-keyword">await</span> <span class="hljs-title function_">graphql</span>(<span class="hljs-string">`
    query AllPostData {
        allRenderedMarkdownPost {
          nodes {
            html
            name
            slug
            metaData {
              body
              image
              title
            }
          }
        }
      }
  `</span>)

    result.<span class="hljs-property">data</span>.<span class="hljs-property">allRenderedMarkdownPost</span>.<span class="hljs-property">nodes</span>.<span class="hljs-title function_">forEach</span>(<span class="hljs-function"><span class="hljs-params">node</span> =&gt;</span> {
        <span class="hljs-comment">// 2. Create a page for each `renderedMarkdownPost`</span>
        <span class="hljs-title function_">createPage</span>({
            <span class="hljs-attr">path</span>: node.<span class="hljs-property">slug</span>,
            <span class="hljs-attr">component</span>: path.<span class="hljs-title function_">resolve</span>(<span class="hljs-string">`./src/components/Post.js`</span>),
            <span class="hljs-attr">context</span>: node,
        })
    })
}
</code></pre>
<h2 id="render-the-page-data" tabindex="-1">Render the Page Data</h2>
<p>From the Post component we need to:</p>
<ol>
<li>Export the <code>query</code> for the data</li>
<li>Get the data for the Post</li>
<li>Render the data</li>
</ol>
<p><code>components/post.js</code></p>
<pre><code class="hljs language-js"><span class="hljs-keyword">import</span> { graphql } <span class="hljs-keyword">from</span> <span class="hljs-string">&#x27;gatsby&#x27;</span>
<span class="hljs-keyword">import</span> <span class="hljs-title class_">App</span> <span class="hljs-keyword">from</span> <span class="hljs-string">&#x27;../App&#x27;</span>

<span class="hljs-keyword">const</span> <span class="hljs-title function_">Post</span> = (<span class="hljs-params">{ data }</span>) =&gt; {

    <span class="hljs-comment">// 2. Get the data for the Post</span>
    <span class="hljs-keyword">const</span> postData = data.<span class="hljs-property">renderedMarkdownPost</span>

    <span class="hljs-comment">// 3. Render the data</span>
    <span class="hljs-keyword">return</span> <span class="language-xml"><span class="hljs-tag">&lt;<span class="hljs-name">App</span>&gt;</span>
        <span class="hljs-tag">&lt;<span class="hljs-name">div</span> <span class="hljs-attr">className</span>=<span class="hljs-string">&quot;Post&quot;</span>&gt;</span>
            <span class="hljs-tag">&lt;<span class="hljs-name">p</span>&gt;</span>This is the <span class="hljs-tag">&lt;<span class="hljs-name">code</span>&gt;</span>{postData.slug}<span class="hljs-tag">&lt;/<span class="hljs-name">code</span>&gt;</span> page<span class="hljs-tag">&lt;/<span class="hljs-name">p</span>&gt;</span>
            <span class="hljs-tag">&lt;<span class="hljs-name">h1</span>&gt;</span>{postData.metaData.title}<span class="hljs-tag">&lt;/<span class="hljs-name">h1</span>&gt;</span>
            <span class="hljs-tag">&lt;<span class="hljs-name">div</span> <span class="hljs-attr">className</span>=<span class="hljs-string">&quot;markdown&quot;</span> <span class="hljs-attr">dangerouslySetInnerHTML</span>=<span class="hljs-string">{{</span> <span class="hljs-attr">__html:</span> <span class="hljs-attr">postData.html</span> }}&gt;</span><span class="hljs-tag">&lt;/<span class="hljs-name">div</span>&gt;</span>
        <span class="hljs-tag">&lt;/<span class="hljs-name">div</span>&gt;</span>
    <span class="hljs-tag">&lt;/<span class="hljs-name">App</span>&gt;</span></span>
}

<span class="hljs-keyword">export</span> <span class="hljs-keyword">default</span> <span class="hljs-title class_">Post</span>

<span class="hljs-comment">// 1. Export the `query` for the data</span>
<span class="hljs-keyword">export</span> <span class="hljs-keyword">const</span> query = graphql<span class="hljs-string">`
query PostData($slug: String!) {
    renderedMarkdownPost(slug: {eq: $slug}) {
      html
      name
      slug
      metaData {
        body
        image
        title
      }
    }
  }
`</span>
</code></pre>
<p>From the <code>Post</code> component above we use the <code>slug</code> to determine which page to render, we also set the HTML content for the <code>markdown</code> element above using the HTML we generated. We also now have our pages dynamically created based on the data in our <code>static</code> directory</p>
<p>You can also see that we have significantly reduced the complexity in the <code>Post</code> component now that we don't need to handle the data fetching from the component</p>
<p>If you look at the site now you should be able to navigate through all the pages as you'd expect to be able to</p>
<h1 id="summary" tabindex="-1">Summary</h1>
<p>By now we have completed the the entire migration process - converting our static and dynamic pages to use Gatsby. In order to bring the dynamic page generation functionality to our site we've done the following:</p>
<ol>
<li>Used the <code>gatsby-source-filesystem</code> plugin to read our file data</li>
<li>Created a local plugin to get the data for each post and convert the markdown to HTML</li>
<li>Use the <code>onCreatePages</code> API to dynamically create pages based on the post data</li>
<li>Update the <code>Post</code> component to render from the data supplied by the <code>graphql</code> query</li>
</ol>
<p>And that's about it, through this series we've covered most of the basics on building a Gatsby site and handling a few scenarios for processing data using plugins and rendering content using Gatsby's available APIs</p>
<blockquote>
<p>Nabeel Valley</p>
</blockquote>
]]></content>
        <author>
            <name>Nabeel Valley</name>
            <uri>https://nabeelvalley.co.za</uri>
        </author>
    </entry>
    <entry>
        <title type="html"><![CDATA[The Gatsby Migration, pt.2 - Dumb Pages]]></title>
        <id>/blog/2020/01-02/gatsby-migration-2/</id>
        <link href="https://nabeelvalley.co.za/blog/2020/01-02/gatsby-migration-2/"/>
        <updated>2020-01-31T23:00:00.000Z</updated>
        <summary type="html"><![CDATA[Migrating a React.js website to Gatsby.js]]></summary>
        <content type="html"><![CDATA[<p><div class="table-of-contents"><details><summary>Contents</summary><ul><li><a href="#introduction">Introduction</a></li><li><a href="#getting-ready">Getting Ready</a><ul><li><a href="#update-folder-structure">Update Folder Structure</a></li><li><a href="#install-gatsby">Install Gatsby</a></li><li><a href="#create-config-files">Create Config Files</a></li></ul></li><li><a href="#page-setup">Page Setup</a><ul><li><a href="#fix-the-blog-error-message">Fix the Blog Error Message</a></li><li><a href="#fix-the-routes">Fix the Routes</a></li><li><a href="#fix-the-layout">Fix the Layout</a></li><li><a href="#use-the-layout">Use the Layout</a></li><li><a href="#fix-the-css">Fix the CSS</a></li></ul></li><li><a href="#summary">Summary</a></li></ul></details></div></p>
<h1 id="introduction" tabindex="-1">Introduction</h1>
<p>In the <a href="/blog/2020/21-01/gatsby-migration-1">last post</a> we looked setting up an application with a few basic routes. These routes were all assigned to Components in the <code>src/pages</code> directory.</p>
<p>This post will be going throught the Gatsby Setup necessary in order to migrate our current site to Gatsby, we will be looking at the second step in the process that was outlined in the last post:</p>
<ol>
<li><a href="/blog/2020/21-01/gatsby-migration-1">Creating the initial React App</a></li>
<li><strong>Rendering the &quot;Dumb&quot; pages with Gatsby</strong> (This post)</li>
<li><a href="/blog/2020/15-03/gatsby-migration-3">Rendering the &quot;Smart&quot; page with Gatsby</a></li>
</ol>
<h1 id="getting-ready" tabindex="-1">Getting Ready</h1>
<p>In order to <code>Gatsbyify</code> the application, there are three steps that we will need to take before we can start updating our pages to work with the new system</p>
<ol>
<li>Update folder structure</li>
<li>Install Gatsby</li>
<li>Create the necessary Gatsby Config files</li>
</ol>
<h2 id="update-folder-structure" tabindex="-1">Update Folder Structure</h2>
<p>Gatsby Builds are placed into the <code>public</code> directory. This currently is the output directory of a React build if we are using the standard React configuration</p>
<p>Before we do anything more we should rename our <code>public</code> directory to <code>static</code> as this is what Gatsby uses for static files, and then make a <code>git commit</code> before we add the <code>public</code> directory to our <code>.gitignore</code></p>
<p>Now we need to add the following lines to the end of our <code>.gitignore</code> file so that we do not track the gatsby build files:</p>
<p><code>.gitignore</code></p>
<pre><code class="hljs language-sh"><span class="hljs-comment"># gatsby</span>
public
.cache
</code></pre>
<h2 id="install-gatsby" tabindex="-1">Install Gatsby</h2>
<p>To add Gataby to our project we need to add the <code>gatsby</code> package from <code>npm</code> as a dependency to our project. From the project's root directory run:</p>
<pre><code class="hljs">yarn <span class="hljs-built_in">add</span> gatsby
</code></pre>
<p>Next we'll add/update the following commands in our <code>package.json</code> file so that we can start the Gatsby Dev Server as well as build the application</p>
<p><code>package.json</code></p>
<pre><code class="hljs language-json"><span class="hljs-attr">&quot;scripts&quot;</span><span class="hljs-punctuation">:</span> <span class="hljs-punctuation">{</span>
    <span class="hljs-attr">&quot;start&quot;</span><span class="hljs-punctuation">:</span> <span class="hljs-string">&quot;gatsby develop&quot;</span><span class="hljs-punctuation">,</span>
    <span class="hljs-attr">&quot;build&quot;</span><span class="hljs-punctuation">:</span> <span class="hljs-string">&quot;gatsby build&quot;</span><span class="hljs-punctuation">,</span>
    <span class="hljs-attr">&quot;clean&quot;</span><span class="hljs-punctuation">:</span> <span class="hljs-string">&quot;gatsby clean&quot;</span><span class="hljs-punctuation">,</span>
    ...
<span class="hljs-punctuation">}</span><span class="hljs-punctuation">,</span>
</code></pre>
<h2 id="create-config-files" tabindex="-1">Create Config Files</h2>
<p>In order to enable gatsby we need to add the <code>gatsby-config.js</code> file to our root directory, we can use the starter file with the following content, as it currently stands this doesn't do anything</p>
<p><code>gatsby-config.js</code></p>
<pre><code class="hljs language-js"><span class="hljs-variable language_">module</span>.<span class="hljs-property">exports</span> = {
  <span class="hljs-attr">plugins</span>: []
}
</code></pre>
<p>Next we'll create an <code>html.js</code> file in the <code>src</code> directory with any relevant content from your <code>index.html</code> file if any of it has been updated. Also be sure to remove the <code>%PUBLIC_URL%</code> stuff from the file content</p>
<p>The <code>html.js</code> file needs to be a React Component with the following basic structure for a standard CRA app</p>
<p><code>src/html.js</code></p>
<pre><code class="hljs language-js"><span class="hljs-keyword">import</span> <span class="hljs-title class_">React</span> <span class="hljs-keyword">from</span> <span class="hljs-string">&quot;react&quot;</span>
<span class="hljs-keyword">import</span> <span class="hljs-title class_">PropTypes</span> <span class="hljs-keyword">from</span> <span class="hljs-string">&quot;prop-types&quot;</span>

<span class="hljs-keyword">export</span> <span class="hljs-keyword">default</span> <span class="hljs-keyword">function</span> <span class="hljs-title function_">HTML</span>(<span class="hljs-params">props</span>) {
  <span class="hljs-keyword">return</span> (
    <span class="language-xml"><span class="hljs-tag">&lt;<span class="hljs-name">html</span> {<span class="hljs-attr">...props.htmlAttributes</span>}&gt;</span>
      <span class="hljs-tag">&lt;<span class="hljs-name">head</span>&gt;</span>
        <span class="hljs-tag">&lt;<span class="hljs-name">meta</span> <span class="hljs-attr">charSet</span>=<span class="hljs-string">&quot;utf-8&quot;</span> /&gt;</span>
        <span class="hljs-tag">&lt;<span class="hljs-name">link</span> <span class="hljs-attr">rel</span>=<span class="hljs-string">&quot;shortcut icon&quot;</span> <span class="hljs-attr">href</span>=<span class="hljs-string">&quot;/favicon.png&quot;</span> /&gt;</span>
        <span class="hljs-tag">&lt;<span class="hljs-name">meta</span> <span class="hljs-attr">name</span>=<span class="hljs-string">&quot;viewport&quot;</span> <span class="hljs-attr">content</span>=<span class="hljs-string">&quot;width=device-width, initial-scale=1&quot;</span> /&gt;</span>
        <span class="hljs-tag">&lt;<span class="hljs-name">meta</span> <span class="hljs-attr">name</span>=<span class="hljs-string">&quot;theme-color&quot;</span> <span class="hljs-attr">content</span>=<span class="hljs-string">&quot;#ffffff&quot;</span> /&gt;</span>

        <span class="hljs-tag">&lt;<span class="hljs-name">link</span> <span class="hljs-attr">rel</span>=<span class="hljs-string">&quot;manifest&quot;</span> <span class="hljs-attr">href</span>=<span class="hljs-string">&quot;/manifest.json&quot;</span> /&gt;</span>

        <span class="hljs-tag">&lt;<span class="hljs-name">title</span>&gt;</span>React App<span class="hljs-tag">&lt;/<span class="hljs-name">title</span>&gt;</span>

        <span class="hljs-tag">&lt;<span class="hljs-name">script</span>
          <span class="hljs-attr">dangerouslySetInnerHTML</span>=<span class="hljs-string">{{</span>
            <span class="hljs-attr">__html:</span> `
                        // <span class="hljs-attr">Any</span> <span class="hljs-attr">scripts</span> <span class="hljs-attr">that</span> <span class="hljs-attr">need</span> <span class="hljs-attr">to</span> <span class="hljs-attr">be</span> <span class="hljs-attr">included</span> <span class="hljs-attr">in</span> <span class="hljs-attr">the</span> <span class="hljs-attr">HTML</span> <span class="hljs-attr">itself</span>
                        // <span class="hljs-attr">Like</span> <span class="hljs-attr">tracking</span> <span class="hljs-attr">code</span>, <span class="hljs-attr">etc.</span>
                        <span class="hljs-attr">console.log</span>(&quot;<span class="hljs-attr">Inline</span> <span class="hljs-attr">Javascript</span>&quot;)
                    `
          }}
        &gt;</span><span class="hljs-tag">&lt;/<span class="hljs-name">script</span>&gt;</span>

        {props.headComponents}
      <span class="hljs-tag">&lt;/<span class="hljs-name">head</span>&gt;</span>
      <span class="hljs-tag">&lt;<span class="hljs-name">body</span> {<span class="hljs-attr">...props.bodyAttributes</span>}&gt;</span>
        {props.preBodyComponents}
        <span class="hljs-tag">&lt;<span class="hljs-name">div</span>
          <span class="hljs-attr">key</span>=<span class="hljs-string">{</span>`<span class="hljs-attr">body</span>`}
          <span class="hljs-attr">id</span>=<span class="hljs-string">&quot;___gatsby&quot;</span>
          <span class="hljs-attr">dangerouslySetInnerHTML</span>=<span class="hljs-string">{{</span> <span class="hljs-attr">__html:</span> <span class="hljs-attr">props.body</span> }}
        /&gt;</span>
        {props.postBodyComponents}
      <span class="hljs-tag">&lt;/<span class="hljs-name">body</span>&gt;</span>
    <span class="hljs-tag">&lt;/<span class="hljs-name">html</span>&gt;</span></span>
  )
}

<span class="hljs-variable constant_">HTML</span>.<span class="hljs-property">propTypes</span> = {
  <span class="hljs-attr">htmlAttributes</span>: <span class="hljs-title class_">PropTypes</span>.<span class="hljs-property">object</span>,
  <span class="hljs-attr">headComponents</span>: <span class="hljs-title class_">PropTypes</span>.<span class="hljs-property">array</span>,
  <span class="hljs-attr">bodyAttributes</span>: <span class="hljs-title class_">PropTypes</span>.<span class="hljs-property">object</span>,
  <span class="hljs-attr">preBodyComponents</span>: <span class="hljs-title class_">PropTypes</span>.<span class="hljs-property">array</span>,
  <span class="hljs-attr">body</span>: <span class="hljs-title class_">PropTypes</span>.<span class="hljs-property">string</span>,
  <span class="hljs-attr">postBodyComponents</span>: <span class="hljs-title class_">PropTypes</span>.<span class="hljs-property">array</span>
}
</code></pre>
<p>You can add or remove any elements in that file as per your specific requirements but most of the time the above should be fine</p>
<p>Now that we have updated the <code>index.js</code> file delete the <code>static/index.html</code> file you can run the Gatsby Dev Server</p>
<pre><code class="hljs language-js">yarn clean
yarn start
</code></pre>
<p>Your application should now be running on <code>http://localhost:8000/</code>, if started correctly you should see the Gatsby Development 404 Page:</p>
<details>
<summary>Development 404 Page</summary>
<h1>Gatsby.js development 404 page</h1>
<p>There's not a page yet at /</p>
<p><button>Preview custom 404 page</button></p>
<p>Create a React.js component in your site directory at src/pages/index.js and this page will automatically refresh to show the new page component you created.</p>
<p>If you were trying to reach another page, perhaps you can find it below.</p>
<h2>Pages (4)</h2>
<p>Search:</p>
<p><label>Search:<input type="text" id="search" placeholder="Search pages..." value=""></label><input type="submit" value="Submit"></p>
<ul>
<li><code>/Blog/</code></li>
<li><code>/Home/</code></li>
<li><code>/NotFound/</code></li>
<li><code>/Post/</code></li>
</ul>
</details>
<h1 id="page-setup" tabindex="-1">Page Setup</h1>
<p>From the Development 404 Page we can see that Gatsby has found our previously created pages - this is because Gatsby looks for pages in the <code>pages</code> directory, however when we click on a the links we will notice the following:</p>
<ol>
<li><code>Home</code> and <code>404</code> render correctly</li>
<li><code>Blog</code> results in an error message</li>
<li><code>Post</code> results in an error message (we will address this page in the next post)</li>
<li>Routes aren't aligned with our initial setup</li>
<li>Components no longer have the layout we setup in the <code>App.js</code> file</li>
</ol>
<p>These are, for the most part, easy problems to solve</p>
<h2 id="fix-the-blog-error-message" tabindex="-1">Fix the Blog Error Message</h2>
<p>If we look at the <code>Blog</code> page we will see that there is an issue with the Page render, this is because we need to change the <code>Link</code> components to be imported from <code>gatsby</code> instead of <code>react-router-dom</code> because with Gatsby we are no longer using the React Router</p>
<p><code>Blog.js</code></p>
<pre><code class="hljs language-js"><span class="hljs-keyword">import</span> { <span class="hljs-title class_">Link</span> } <span class="hljs-keyword">from</span> <span class="hljs-string">&quot;gatsby&quot;</span>
</code></pre>
<h2 id="fix-the-routes" tabindex="-1">Fix the Routes</h2>
<p>We can also see that our routes are capitalized which is not what we want. Gatsby uses the file organization to do routing, so in order to correct our routes to align what we defined previously in our <code>App.js</code> we will first need to rename our files:</p>
<table>
<thead>
<tr>
<th>Component</th>
<th>Route</th>
<th>Old Name</th>
<th>New Name</th>
</tr>
</thead>
<tbody>
<tr>
<td>Home</td>
<td><code>/</code></td>
<td><code>Home.js</code></td>
<td><code>index.js</code></td>
</tr>
<tr>
<td>Blog</td>
<td><code>/blog</code></td>
<td><code>Blog.js</code></td>
<td><code>blog.js</code></td>
</tr>
<tr>
<td>NotFound</td>
<td><code>/*</code></td>
<td><code>NotFound.js</code></td>
<td><code>404.js</code></td>
</tr>
</tbody>
</table>
<blockquote>
<p>We're not going to handle the <code>Post</code> component for now because this uses a dynamic route which is something I'll cover in the next part of this series</p>
</blockquote>
<p>You should stop and restart the Gatsby Dev server with:</p>
<pre><code class="hljs">yarn clean
yarn <span class="hljs-literal">start</span>
</code></pre>
<p>When the page loads up we should now see our <code>Home</code> content rendered on the <code>/</code> route</p>
<h2 id="fix-the-layout" tabindex="-1">Fix the Layout</h2>
<p>When we were using the standard React Routing we made use of the <code>App</code> component to wrap our page routes as well as our navigation. We'll convert our <code>App.js</code> file into a component that we can use in our other pages</p>
<ol>
<li>Remove the <code>Router</code> and <code>Switch</code></li>
<li>Update the <code>Link</code>s to use <code>gatsby</code> instead of <code>react-router-dom</code></li>
<li>Add the <code>children</code> input parameter</li>
<li>Render the <code>children</code> in the <code>main</code> section</li>
<li>Remove unused imports</li>
</ol>
<p><code>App.js</code></p>
<pre><code class="hljs language-js"><span class="hljs-keyword">import</span> <span class="hljs-title class_">React</span> <span class="hljs-keyword">from</span> <span class="hljs-string">&quot;react&quot;</span>
<span class="hljs-keyword">import</span> <span class="hljs-string">&quot;./App.css&quot;</span>
<span class="hljs-keyword">import</span> { <span class="hljs-title class_">Link</span> } <span class="hljs-keyword">from</span> <span class="hljs-string">&quot;gatsby&quot;</span>

<span class="hljs-keyword">const</span> <span class="hljs-title function_">App</span> = (<span class="hljs-params">{ children }</span>) =&gt; (
  <span class="language-xml"><span class="hljs-tag">&lt;<span class="hljs-name">div</span> <span class="hljs-attr">className</span>=<span class="hljs-string">&quot;App&quot;</span>&gt;</span>
    <span class="hljs-tag">&lt;<span class="hljs-name">header</span>&gt;</span>
      <span class="hljs-tag">&lt;<span class="hljs-name">nav</span>&gt;</span>
        <span class="hljs-tag">&lt;<span class="hljs-name">h1</span>&gt;</span>My Website Title<span class="hljs-tag">&lt;/<span class="hljs-name">h1</span>&gt;</span>
        <span class="hljs-tag">&lt;<span class="hljs-name">Link</span> <span class="hljs-attr">to</span>=<span class="hljs-string">&quot;/&quot;</span>&gt;</span>Home<span class="hljs-tag">&lt;/<span class="hljs-name">Link</span>&gt;</span>
        <span class="hljs-tag">&lt;<span class="hljs-name">Link</span> <span class="hljs-attr">to</span>=<span class="hljs-string">&quot;/blog&quot;</span>&gt;</span>Blog<span class="hljs-tag">&lt;/<span class="hljs-name">Link</span>&gt;</span>
      <span class="hljs-tag">&lt;/<span class="hljs-name">nav</span>&gt;</span>
    <span class="hljs-tag">&lt;/<span class="hljs-name">header</span>&gt;</span>
    <span class="hljs-tag">&lt;<span class="hljs-name">main</span>&gt;</span>{children}<span class="hljs-tag">&lt;/<span class="hljs-name">main</span>&gt;</span>
  <span class="hljs-tag">&lt;/<span class="hljs-name">div</span>&gt;</span></span>
)

<span class="hljs-keyword">export</span> <span class="hljs-keyword">default</span> <span class="hljs-title class_">App</span>
</code></pre>
<h2 id="use-the-layout" tabindex="-1">Use the Layout</h2>
<p>Now that we've essentially created a <code>Layout</code> component in the form of the <code>App</code> component we can use it to wrap the pages that we've exported. We can do this for the <code>Home</code> page like so:</p>
<p><code>index.js</code></p>
<pre><code class="hljs language-js"><span class="hljs-keyword">import</span> <span class="hljs-title class_">React</span> <span class="hljs-keyword">from</span> <span class="hljs-string">&quot;react&quot;</span>
<span class="hljs-keyword">import</span> <span class="hljs-title class_">App</span> <span class="hljs-keyword">from</span> <span class="hljs-string">&quot;../App&quot;</span>

<span class="hljs-keyword">const</span> <span class="hljs-title function_">Home</span> = (<span class="hljs-params"></span>) =&gt; (
  <span class="language-xml"><span class="hljs-tag">&lt;<span class="hljs-name">App</span>&gt;</span>
    <span class="hljs-tag">&lt;<span class="hljs-name">div</span> <span class="hljs-attr">className</span>=<span class="hljs-string">&quot;Home&quot;</span>&gt;</span>
      <span class="hljs-tag">&lt;<span class="hljs-name">h1</span>&gt;</span>Home<span class="hljs-tag">&lt;/<span class="hljs-name">h1</span>&gt;</span>
      <span class="hljs-tag">&lt;<span class="hljs-name">p</span>&gt;</span>This is the Home page<span class="hljs-tag">&lt;/<span class="hljs-name">p</span>&gt;</span>
    <span class="hljs-tag">&lt;/<span class="hljs-name">div</span>&gt;</span>
  <span class="hljs-tag">&lt;/<span class="hljs-name">App</span>&gt;</span></span>
)

<span class="hljs-keyword">export</span> <span class="hljs-keyword">default</span> <span class="hljs-title class_">Home</span>
</code></pre>
<p>The same applies for the <code>blog</code> and <code>404</code> pages</p>
<details>
<summary>Blog</summary>
<p><code>blog.js</code></p>
<pre><code class="hljs language-js"><span class="hljs-keyword">import</span> <span class="hljs-title class_">React</span> <span class="hljs-keyword">from</span> <span class="hljs-string">&quot;react&quot;</span>
<span class="hljs-keyword">import</span> { <span class="hljs-title class_">Link</span> } <span class="hljs-keyword">from</span> <span class="hljs-string">&quot;gatsby&quot;</span>
<span class="hljs-keyword">import</span> <span class="hljs-title class_">App</span> <span class="hljs-keyword">from</span> <span class="hljs-string">&quot;../App&quot;</span>

<span class="hljs-keyword">const</span> <span class="hljs-title function_">Blog</span> = (<span class="hljs-params"></span>) =&gt; (
  <span class="language-xml"><span class="hljs-tag">&lt;<span class="hljs-name">App</span>&gt;</span>
    <span class="hljs-tag">&lt;<span class="hljs-name">div</span> <span class="hljs-attr">className</span>=<span class="hljs-string">&quot;Blog&quot;</span>&gt;</span>
      <span class="hljs-tag">&lt;<span class="hljs-name">h1</span>&gt;</span>Blog<span class="hljs-tag">&lt;/<span class="hljs-name">h1</span>&gt;</span>
      <span class="hljs-tag">&lt;<span class="hljs-name">p</span>&gt;</span>This is the Blog page<span class="hljs-tag">&lt;/<span class="hljs-name">p</span>&gt;</span>
      <span class="hljs-tag">&lt;<span class="hljs-name">div</span>&gt;</span>
        <span class="hljs-tag">&lt;<span class="hljs-name">Link</span> <span class="hljs-attr">to</span>=<span class="hljs-string">&quot;/blog/post-1&quot;</span>&gt;</span>Post 1<span class="hljs-tag">&lt;/<span class="hljs-name">Link</span>&gt;</span>
      <span class="hljs-tag">&lt;/<span class="hljs-name">div</span>&gt;</span>
      <span class="hljs-tag">&lt;<span class="hljs-name">div</span>&gt;</span>
        <span class="hljs-tag">&lt;<span class="hljs-name">Link</span> <span class="hljs-attr">to</span>=<span class="hljs-string">&quot;/blog/post-2&quot;</span>&gt;</span>Post 2<span class="hljs-tag">&lt;/<span class="hljs-name">Link</span>&gt;</span>
      <span class="hljs-tag">&lt;/<span class="hljs-name">div</span>&gt;</span>
    <span class="hljs-tag">&lt;/<span class="hljs-name">div</span>&gt;</span>
  <span class="hljs-tag">&lt;/<span class="hljs-name">App</span>&gt;</span></span>
)

<span class="hljs-keyword">export</span> <span class="hljs-keyword">default</span> <span class="hljs-title class_">Blog</span>
</code></pre>
</details>
<details>
<summary>404</summary>
<p><code>404.js</code></p>
<pre><code class="hljs language-js"><span class="hljs-keyword">import</span> <span class="hljs-title class_">React</span> <span class="hljs-keyword">from</span> <span class="hljs-string">&quot;react&quot;</span>
<span class="hljs-keyword">import</span> <span class="hljs-title class_">App</span> <span class="hljs-keyword">from</span> <span class="hljs-string">&quot;../App&quot;</span>

<span class="hljs-keyword">const</span> <span class="hljs-title function_">NotFound</span> = (<span class="hljs-params"></span>) =&gt; (
  <span class="language-xml"><span class="hljs-tag">&lt;<span class="hljs-name">App</span>&gt;</span>
    <span class="hljs-tag">&lt;<span class="hljs-name">div</span> <span class="hljs-attr">className</span>=<span class="hljs-string">&quot;NotFound&quot;</span>&gt;</span>
      <span class="hljs-tag">&lt;<span class="hljs-name">h1</span>&gt;</span>404<span class="hljs-tag">&lt;/<span class="hljs-name">h1</span>&gt;</span>
      <span class="hljs-tag">&lt;<span class="hljs-name">p</span>&gt;</span>Page Not Found<span class="hljs-tag">&lt;/<span class="hljs-name">p</span>&gt;</span>
    <span class="hljs-tag">&lt;/<span class="hljs-name">div</span>&gt;</span>
  <span class="hljs-tag">&lt;/<span class="hljs-name">App</span>&gt;</span></span>
)

<span class="hljs-keyword">export</span> <span class="hljs-keyword">default</span> <span class="hljs-title class_">NotFound</span>
</code></pre>
</details>
<h2 id="fix-the-css" tabindex="-1">Fix the CSS</h2>
<p>Before we can use the <code>App</code> component we need to add the <code>gatsby-plugin-postcss</code> and <code>postcss-preset-env</code> plugins so that Gatsby knows how to interpret the default <code>create-react-app</code> method of importing our CSS into a component</p>
<p>Stop the Dev Server and install the required packages:</p>
<pre><code class="hljs">yarn <span class="hljs-built_in">add</span> gatsby-plugin-postcss postcss-preset-env
</code></pre>
<p>We then need to update the <code>gatsby-config.js</code> file to use the plugin we just added:</p>
<p><code>gatsby-config.js</code></p>
<pre><code class="hljs language-js"><span class="hljs-variable language_">module</span>.<span class="hljs-property">exports</span> = {
  <span class="hljs-attr">plugins</span>: [
    {
      <span class="hljs-attr">resolve</span>: <span class="hljs-string">`gatsby-plugin-postcss`</span>,
      <span class="hljs-attr">options</span>: {
        <span class="hljs-attr">postCssPlugins</span>: [<span class="hljs-built_in">require</span>(<span class="hljs-string">`postcss-preset-env`</span>)({ <span class="hljs-attr">stage</span>: <span class="hljs-number">0</span> })]
      }
    }
  ]
}
</code></pre>
<p>If you start the application now you'll notice that the font is not correct, this is because we specify the font styles in the <code>index.css</code> file. In order to fix this we need to import the <code>index.css</code> file into our application, in the default React application this is done via the <code>src/index.js</code> file, but since we don't use that to load up the application anymore we need to create another file to do that with Gatsby</p>
<p>In the root directory create a file called <code>gatsby-browser.js</code>, in this we just need to import the <code>index.css</code> file:</p>
<p><code>gatsby-browser.js</code></p>
<pre><code class="hljs language-js"><span class="hljs-keyword">import</span> <span class="hljs-string">&quot;./src/index.css&quot;</span>
</code></pre>
<p>You can now run the following commands and start up the application:</p>
<pre><code class="hljs">yarn clean
yarn <span class="hljs-literal">start</span>
</code></pre>
<p>Assuming everything went as planned the application should start up correctly and the styling from our <code>index.css</code> file will be correctly applied</p>
<h1 id="summary" tabindex="-1">Summary</h1>
<p>By now we have completed the first part of the migration process - converting our static pages to use Gatsby - by taking the following steps:</p>
<ol>
<li>Updating our file structure to better align with Gatsby</li>
<li>Create the relevant Gatsby config files</li>
<li>Update our <code>Link</code> usage</li>
<li>Update our Routing</li>
<li>Use a shared layout component</li>
<li>Fixing the CSS to work with Gatsby</li>
</ol>
<p>In the next part we'll look at how we can go about providing the data needed for our <code>Post</code> component using GraphQL and show our posts. We'll also look at how we can pre-process the data that we provide to our component so that we can enhance our content while improving our content creation process</p>
<blockquote>
<p>Nabeel Valley</p>
</blockquote>
]]></content>
        <author>
            <name>Nabeel Valley</name>
            <uri>https://nabeelvalley.co.za</uri>
        </author>
    </entry>
    <entry>
        <title type="html"><![CDATA[The Gatsby Migration, pt.1 - Setting the Scene]]></title>
        <id>/blog/2020/21-01/gatsby-migration-1/</id>
        <link href="https://nabeelvalley.co.za/blog/2020/21-01/gatsby-migration-1/"/>
        <updated>2020-01-20T23:00:00.000Z</updated>
        <summary type="html"><![CDATA[Building a basic React site with basic dynamic data loading]]></summary>
        <content type="html"><![CDATA[<p><div class="table-of-contents"><details><summary>Contents</summary><ul><li><a href="#introduction">Introduction</a></li><li><a href="#the-react-app">The React App</a></li><li><a href="#hard-coded-pages">Hard Coded Pages</a></li><li><a href="#dynamic-post-page">Dynamic Post Page</a></li><li><a href="#app-layout-and-routes">App Layout and Routes</a></li><li><a href="#summary">Summary</a></li></ul></details></div></p>
<h1 id="introduction" tabindex="-1">Introduction</h1>
<p>Lately I've been a little concerned with my current SPA approach on my personal site as well as a few others. More specifically the high initial load time due to the calls to the backend to retrieve content</p>
<p>With the aim of solving this problem I've spent a lot of time looking at and playing with Static Site Generators.Foreword: they're all a lot more complicated than one would think</p>
<p>So for a static site the &quot;static&quot; content only changes so often, based on this we can generate page content with the data we're planning to load in - that's what we're going to try to do</p>
<p>Now we'll be starting off with a React app generated with <code>create-react-app</code> so that we can have a starting point for our Gatsby site as well as understanding how we can approach some of the challenges when switching over to a site generator like Gatsby</p>
<p>For the sake of completeness, this series will be broken into four posts covering the following:</p>
<ol>
<li><strong>Creating the initial React App</strong> (This post)</li>
<li><a href="/blog/2020/21-01/gatsby-migration-2">Rendering the &quot;Dumb&quot; pages with Gatsby</a></li>
<li><a href="/blog/2020/15-03/gatsby-migration-3">Rendering the &quot;Smart&quot; page with Gatsby</a></li>
</ol>
<h1 id="the-react-app" tabindex="-1">The React App</h1>
<p>First we're going to be starting off with a new React app that we will work on changing into a Gatsby one parts <code>2</code> and <code>3</code>, we'll then focus on using plugins to enhance our content in <code>4</code></p>
<p>For this part we'll build a basic React app that has the following:</p>
<ol>
<li>Two &quot;hard-coded&quot; pages and a 404 page</li>
<li>A dynamic page with an API call to retrieve data</li>
<li>Overall app layout with child routes for <code>1</code> - <code>3</code></li>
</ol>
<p>To get started, we'll create a fresh React App:</p>
<pre><code class="hljs"><span class="hljs-string">npx</span> <span class="hljs-built_in">create-react-app</span> <span class="hljs-string">gatsby-to-be</span>
</code></pre>
<p>And add the <code>react-router</code></p>
<pre><code class="hljs">yarn <span class="hljs-built_in">add</span> react-router-dom
</code></pre>
<p>Running this command should set up the application, if you don't know much about React I'd suggest taking a look at <a href="https://create-react-app.dev/docs/getting-started">the documentation</a></p>
<p>Next <code>cd gatsby-to-be</code> and run <code>yarn start</code>, you should be able to visit the application in your browser at <code>http://localhost:3000/</code></p>
<p>Looking at the generated files we have a <code>public</code> directory with some icons, an <code>index.html</code> file into which our React application will run once built, and a <code>src</code> directory that has the application code. The <code>index.js</code> file is what loads the application into the DOM and the <code>App.js</code> file which is the main component for our application</p>
<h1 id="hard-coded-pages" tabindex="-1">Hard Coded Pages</h1>
<p>We will create the following three hard-coded pages in the <code>src/pages</code> directory</p>
<p>These pages are just React components that we will assign Routes to.</p>
<p>The pages we are using are known as <code>functional</code> components because they are javascript functions that return JSX</p>
<p>If we intend to use JSX in a file we need to ensure that we import <code>React</code>. The other component we are importing is the <code>Link</code> component which is a lot like a normal HTML <code>a</code> tag but with some special functionality to make the client-side navigation work</p>
<p><code>Blog.js</code></p>
<pre><code class="hljs language-js"><span class="hljs-keyword">import</span> <span class="hljs-title class_">React</span> <span class="hljs-keyword">from</span> <span class="hljs-string">&quot;react&quot;</span>
<span class="hljs-keyword">import</span> { <span class="hljs-title class_">Link</span> } <span class="hljs-keyword">from</span> <span class="hljs-string">&quot;react-router-dom&quot;</span>

<span class="hljs-keyword">const</span> <span class="hljs-title function_">Blog</span> = (<span class="hljs-params"></span>) =&gt; (
  <span class="language-xml"><span class="hljs-tag">&lt;<span class="hljs-name">div</span> <span class="hljs-attr">className</span>=<span class="hljs-string">&quot;Blog&quot;</span>&gt;</span>
    <span class="hljs-tag">&lt;<span class="hljs-name">h1</span>&gt;</span>Blog<span class="hljs-tag">&lt;/<span class="hljs-name">h1</span>&gt;</span>
    <span class="hljs-tag">&lt;<span class="hljs-name">p</span>&gt;</span>This is the Blog page<span class="hljs-tag">&lt;/<span class="hljs-name">p</span>&gt;</span>
    <span class="hljs-tag">&lt;<span class="hljs-name">div</span>&gt;</span>
      <span class="hljs-tag">&lt;<span class="hljs-name">Link</span> <span class="hljs-attr">to</span>=<span class="hljs-string">&quot;/blog/post-1&quot;</span>&gt;</span>Post 1<span class="hljs-tag">&lt;/<span class="hljs-name">Link</span>&gt;</span>
    <span class="hljs-tag">&lt;/<span class="hljs-name">div</span>&gt;</span>
    <span class="hljs-tag">&lt;<span class="hljs-name">div</span>&gt;</span>
      <span class="hljs-tag">&lt;<span class="hljs-name">Link</span> <span class="hljs-attr">to</span>=<span class="hljs-string">&quot;/blog/post-2&quot;</span>&gt;</span>Post 2<span class="hljs-tag">&lt;/<span class="hljs-name">Link</span>&gt;</span>
    <span class="hljs-tag">&lt;/<span class="hljs-name">div</span>&gt;</span>
  <span class="hljs-tag">&lt;/<span class="hljs-name">div</span>&gt;</span></span>
)

<span class="hljs-keyword">export</span> <span class="hljs-keyword">default</span> <span class="hljs-title class_">Blog</span>
</code></pre>
<p>Additionally we have the <code>Home.js</code> and <code>NotFound.js</code> files which are similar to the <code>Blog.js</code> file we created</p>
<details>
<summary>Home</summary>
<p><code>Home.js</code></p>
<pre><code class="hljs language-js"><span class="hljs-keyword">import</span> <span class="hljs-title class_">React</span> <span class="hljs-keyword">from</span> <span class="hljs-string">&quot;react&quot;</span>

<span class="hljs-keyword">const</span> <span class="hljs-title function_">Home</span> = (<span class="hljs-params"></span>) =&gt; (
  <span class="language-xml"><span class="hljs-tag">&lt;<span class="hljs-name">div</span> <span class="hljs-attr">className</span>=<span class="hljs-string">&quot;Home&quot;</span>&gt;</span>
    <span class="hljs-tag">&lt;<span class="hljs-name">h1</span>&gt;</span>Home<span class="hljs-tag">&lt;/<span class="hljs-name">h1</span>&gt;</span>
    <span class="hljs-tag">&lt;<span class="hljs-name">p</span>&gt;</span>This is the Home page<span class="hljs-tag">&lt;/<span class="hljs-name">p</span>&gt;</span>
  <span class="hljs-tag">&lt;/<span class="hljs-name">div</span>&gt;</span></span>
)

<span class="hljs-keyword">export</span> <span class="hljs-keyword">default</span> <span class="hljs-title class_">Home</span>
</code></pre>
</details>
<details>
<summary>Not Found</summary>
<p><code>NotFound.js</code></p>
<pre><code class="hljs language-js"><span class="hljs-keyword">import</span> <span class="hljs-title class_">React</span> <span class="hljs-keyword">from</span> <span class="hljs-string">&quot;react&quot;</span>

<span class="hljs-keyword">const</span> <span class="hljs-title function_">NotFound</span> = (<span class="hljs-params"></span>) =&gt; (
  <span class="language-xml"><span class="hljs-tag">&lt;<span class="hljs-name">div</span> <span class="hljs-attr">className</span>=<span class="hljs-string">&quot;NotFound&quot;</span>&gt;</span>
    <span class="hljs-tag">&lt;<span class="hljs-name">h1</span>&gt;</span>404<span class="hljs-tag">&lt;/<span class="hljs-name">h1</span>&gt;</span>
    <span class="hljs-tag">&lt;<span class="hljs-name">p</span>&gt;</span>Page Not Found<span class="hljs-tag">&lt;/<span class="hljs-name">p</span>&gt;</span>
  <span class="hljs-tag">&lt;/<span class="hljs-name">div</span>&gt;</span></span>
)

<span class="hljs-keyword">export</span> <span class="hljs-keyword">default</span> <span class="hljs-title class_">NotFound</span>
</code></pre>
</details>
<h1 id="dynamic-post-page" tabindex="-1">Dynamic Post Page</h1>
<p>Next up we'll create a component that can render out content for a blog post. This will consist of a few <code>hooks</code> which are react functions that we can use to sort of control the data in a function</p>
<p>The <code>Post</code> component will:</p>
<ol>
<li>Display a loading indicator initially</li>
<li>Figure out what post we're trying to render based on the URL</li>
<li>Retrieve a JSON file from the <code>public</code> directory based</li>
<li>Set the component state after reading the file</li>
<li>Display the content from the file in a JSX template</li>
</ol>
<p>The <code>useState</code> hook is used to initialize the state the component, in this case using the <code>hasError</code> and <code>data</code> variables, as well as providing the functions necessary for updating those in the form of <code>setHasError</code> and <code>setData</code> respectively</p>
<p>We use <code>fetch</code> in the <code>useEffect</code> hook to retrieve the data from the <code>public</code> directory. The <code>useEffect</code> hook allows us to pass a function that will be called to update side effects. The second input, in our case <code>[]</code> is the array of objects that, when are changed, we want the hook to run - since we only want it to run once and don't care about any other state changes we pass in an empty array for this value</p>
<p><code>Post.js</code></p>
<pre><code class="hljs language-js"><span class="hljs-keyword">import</span> <span class="hljs-title class_">React</span>, { useEffect, useState } <span class="hljs-keyword">from</span> <span class="hljs-string">&quot;react&quot;</span>

<span class="hljs-keyword">const</span> <span class="hljs-title function_">Post</span> = (<span class="hljs-params">{ match }</span>) =&gt; {
  <span class="hljs-keyword">const</span> slug = match.<span class="hljs-property">params</span>.<span class="hljs-property">slug</span>

  <span class="hljs-keyword">const</span> [hasError, setHasError] = <span class="hljs-title function_">useState</span>(<span class="hljs-literal">false</span>)
  <span class="hljs-keyword">const</span> [data, setData] = <span class="hljs-title function_">useState</span>(<span class="hljs-literal">null</span>)

  <span class="hljs-title function_">useEffect</span>(<span class="hljs-function">() =&gt;</span> {
    <span class="hljs-keyword">const</span> <span class="hljs-title function_">fetchData</span> = <span class="hljs-keyword">async</span> (<span class="hljs-params"></span>) =&gt; {
      <span class="hljs-keyword">try</span> {
        <span class="hljs-keyword">const</span> res = <span class="hljs-keyword">await</span> <span class="hljs-title function_">fetch</span>(<span class="hljs-string">`/posts/<span class="hljs-subst">${slug}</span>.json`</span>)
        <span class="hljs-keyword">const</span> json = <span class="hljs-keyword">await</span> res.<span class="hljs-title function_">json</span>()
        <span class="hljs-title function_">setData</span>(json)
      } <span class="hljs-keyword">catch</span> (error) {
        <span class="hljs-variable language_">console</span>.<span class="hljs-title function_">log</span>(error.<span class="hljs-title function_">toString</span>())
        <span class="hljs-title function_">setHasError</span>(<span class="hljs-literal">true</span>)
      }
    }

    <span class="hljs-title function_">fetchData</span>()
  }, [])

  <span class="hljs-keyword">return</span> (
    <span class="language-xml"><span class="hljs-tag">&lt;<span class="hljs-name">div</span> <span class="hljs-attr">className</span>=<span class="hljs-string">&quot;Post&quot;</span>&gt;</span>
      <span class="hljs-tag">&lt;<span class="hljs-name">p</span>&gt;</span>
        This is the <span class="hljs-tag">&lt;<span class="hljs-name">code</span>&gt;</span>{slug}<span class="hljs-tag">&lt;/<span class="hljs-name">code</span>&gt;</span> page
      <span class="hljs-tag">&lt;/<span class="hljs-name">p</span>&gt;</span>
      {data ? (
        <span class="hljs-tag">&lt;<span class="hljs-name">div</span> <span class="hljs-attr">className</span>=<span class="hljs-string">&quot;content&quot;</span>&gt;</span>
          <span class="hljs-tag">&lt;<span class="hljs-name">h1</span>&gt;</span>{data.title}<span class="hljs-tag">&lt;/<span class="hljs-name">h1</span>&gt;</span>
          <span class="hljs-tag">&lt;<span class="hljs-name">p</span>&gt;</span>{data.body}<span class="hljs-tag">&lt;/<span class="hljs-name">p</span>&gt;</span>
          <span class="hljs-tag">&lt;<span class="hljs-name">img</span> <span class="hljs-attr">src</span>=<span class="hljs-string">{data.image}</span> <span class="hljs-attr">alt</span>=<span class="hljs-string">&quot;&quot;</span> /&gt;</span>
        <span class="hljs-tag">&lt;/<span class="hljs-name">div</span>&gt;</span>
      ) : hasError ? (
        <span class="hljs-tag">&lt;<span class="hljs-name">div</span> <span class="hljs-attr">className</span>=<span class="hljs-string">&quot;error&quot;</span>&gt;</span>
          <span class="hljs-tag">&lt;<span class="hljs-name">h1</span>&gt;</span>Error<span class="hljs-tag">&lt;/<span class="hljs-name">h1</span>&gt;</span>
          <span class="hljs-tag">&lt;<span class="hljs-name">p</span>&gt;</span>{hasError}<span class="hljs-tag">&lt;/<span class="hljs-name">p</span>&gt;</span>
        <span class="hljs-tag">&lt;/<span class="hljs-name">div</span>&gt;</span>
      ) : (
        <span class="hljs-tag">&lt;<span class="hljs-name">p</span>&gt;</span>Loading .. <span class="hljs-tag">&lt;/<span class="hljs-name">p</span>&gt;</span>
      )}
    <span class="hljs-tag">&lt;/<span class="hljs-name">div</span>&gt;</span></span>
  )
}

<span class="hljs-keyword">export</span> <span class="hljs-keyword">default</span> <span class="hljs-title class_">Post</span>
</code></pre>
<p>In the above component we're making use of the following pattern to decide what to render conditionally:</p>
<ol>
<li>If the data is loaded then show the data</li>
<li>Else if there is an error then show the error data</li>
<li>Otherwise show a loading message</li>
</ol>
<p>The way we are rendering the <code>Post</code> component with a parameter for <code>match</code>. The <code>match</code> parameter will be passed in as a <code>prop</code> from the <code>Router</code> that we will configure next, this allows us to use the <code>slug</code> from the URL to retrieve the content for the page</p>
<p>The two data files we have to pull content from in the <code>public/posts</code> directory are <code>post-1.json</code> and <code>post-2.json</code></p>
<details>
<summary>Post 1 - JSON</summary>
<p><code>post-1.json</code></p>
<pre><code class="hljs language-json"><span class="hljs-punctuation">{</span>
  <span class="hljs-attr">&quot;title&quot;</span><span class="hljs-punctuation">:</span> <span class="hljs-string">&quot;Post 1&quot;</span><span class="hljs-punctuation">,</span>
  <span class="hljs-attr">&quot;body&quot;</span><span class="hljs-punctuation">:</span> <span class="hljs-string">&quot;Hello world, how are you&quot;</span><span class="hljs-punctuation">,</span>
  <span class="hljs-attr">&quot;image&quot;</span><span class="hljs-punctuation">:</span> <span class="hljs-string">&quot;/posts/1.jpg&quot;</span>
<span class="hljs-punctuation">}</span>
</code></pre>
</details>
<details>
<summary>Post 2 - JSON</summary>
<p><code>post-2.json</code></p>
<pre><code class="hljs language-json"><span class="hljs-punctuation">{</span>
  <span class="hljs-attr">&quot;title&quot;</span><span class="hljs-punctuation">:</span> <span class="hljs-string">&quot;Post 2&quot;</span><span class="hljs-punctuation">,</span>
  <span class="hljs-attr">&quot;body&quot;</span><span class="hljs-punctuation">:</span> <span class="hljs-string">&quot;Hello world, I am fine&quot;</span><span class="hljs-punctuation">,</span>
  <span class="hljs-attr">&quot;image&quot;</span><span class="hljs-punctuation">:</span> <span class="hljs-string">&quot;/posts/2.jpg&quot;</span>
<span class="hljs-punctuation">}</span>
</code></pre>
<blockquote>
<p>The images <code>posts/1.jpg</code> and <code>posts/2.jpg</code> can also just be any images in that directory</p>
</blockquote>
</details>
<h1 id="app-layout-and-routes" tabindex="-1">App Layout and Routes</h1>
<p>Lastly, we'll specify our application layout with the relevant routes in the <code>App.js</code> file, referencing the components we have created, we do this using the <code>BrowserRouter</code>. When we switch the project over to a Gatsby one, the <code>App.js</code> file will be converted into our <code>Layout</code> component to wrap our different pages</p>
<p>We use the <code>Router</code> component and the page inside of it, this essentially handles Routing via the <code>Link</code> components. Next we have a <code>div</code> as a wrapper for our component as well as a <code>header</code>, <code>nav</code>, and <code>main</code> tags to organise the page</p>
<p>The <code>Route</code> component takes in the component that we would like to display for a given route, and the <code>Switch</code> helps us to ensure that only route is actively being fisplayed at a time. The <code>Switch</code> will navigate from the first to last <code>Route</code> and render the first one that matches the given <code>path</code></p>
<p>Fow now, our <code>App.js</code> file is as follows:</p>
<pre><code class="hljs language-js"><span class="hljs-keyword">import</span> <span class="hljs-title class_">React</span> <span class="hljs-keyword">from</span> <span class="hljs-string">&quot;react&quot;</span>
<span class="hljs-keyword">import</span> <span class="hljs-string">&quot;./App.css&quot;</span>
<span class="hljs-keyword">import</span> { <span class="hljs-title class_">BrowserRouter</span> <span class="hljs-keyword">as</span> <span class="hljs-title class_">Router</span>, <span class="hljs-title class_">Link</span>, <span class="hljs-title class_">Switch</span>, <span class="hljs-title class_">Route</span> } <span class="hljs-keyword">from</span> <span class="hljs-string">&quot;react-router-dom&quot;</span>
<span class="hljs-keyword">import</span> <span class="hljs-title class_">Home</span> <span class="hljs-keyword">from</span> <span class="hljs-string">&quot;./pages/Home&quot;</span>
<span class="hljs-keyword">import</span> <span class="hljs-title class_">Blog</span> <span class="hljs-keyword">from</span> <span class="hljs-string">&quot;./pages/Blog&quot;</span>
<span class="hljs-keyword">import</span> <span class="hljs-title class_">Post</span> <span class="hljs-keyword">from</span> <span class="hljs-string">&quot;./pages/Post&quot;</span>
<span class="hljs-keyword">import</span> <span class="hljs-title class_">NotFound</span> <span class="hljs-keyword">from</span> <span class="hljs-string">&quot;./pages/NotFound&quot;</span>

<span class="hljs-keyword">const</span> <span class="hljs-title function_">App</span> = (<span class="hljs-params"></span>) =&gt; (
  <span class="language-xml"><span class="hljs-tag">&lt;<span class="hljs-name">Router</span>&gt;</span>
    <span class="hljs-tag">&lt;<span class="hljs-name">div</span> <span class="hljs-attr">className</span>=<span class="hljs-string">&quot;App&quot;</span>&gt;</span>
      <span class="hljs-tag">&lt;<span class="hljs-name">header</span>&gt;</span>
        <span class="hljs-tag">&lt;<span class="hljs-name">nav</span>&gt;</span>
          <span class="hljs-tag">&lt;<span class="hljs-name">h1</span>&gt;</span>My Website Title<span class="hljs-tag">&lt;/<span class="hljs-name">h1</span>&gt;</span>
          <span class="hljs-tag">&lt;<span class="hljs-name">Link</span> <span class="hljs-attr">to</span>=<span class="hljs-string">&quot;/&quot;</span>&gt;</span>Home<span class="hljs-tag">&lt;/<span class="hljs-name">Link</span>&gt;</span>
          <span class="hljs-tag">&lt;<span class="hljs-name">Link</span> <span class="hljs-attr">to</span>=<span class="hljs-string">&quot;/blog&quot;</span>&gt;</span>Blog<span class="hljs-tag">&lt;/<span class="hljs-name">Link</span>&gt;</span>
        <span class="hljs-tag">&lt;/<span class="hljs-name">nav</span>&gt;</span>
      <span class="hljs-tag">&lt;/<span class="hljs-name">header</span>&gt;</span>
      <span class="hljs-tag">&lt;<span class="hljs-name">main</span>&gt;</span>
        <span class="hljs-tag">&lt;<span class="hljs-name">Switch</span>&gt;</span>
          <span class="hljs-tag">&lt;<span class="hljs-name">Route</span> <span class="hljs-attr">exact</span> <span class="hljs-attr">path</span>=<span class="hljs-string">&quot;/&quot;</span> <span class="hljs-attr">component</span>=<span class="hljs-string">{Home}</span>&gt;</span><span class="hljs-tag">&lt;/<span class="hljs-name">Route</span>&gt;</span>

          <span class="hljs-tag">&lt;<span class="hljs-name">Route</span> <span class="hljs-attr">exact</span> <span class="hljs-attr">path</span>=<span class="hljs-string">&quot;/blog&quot;</span> <span class="hljs-attr">component</span>=<span class="hljs-string">{Blog}</span>&gt;</span><span class="hljs-tag">&lt;/<span class="hljs-name">Route</span>&gt;</span>

          <span class="hljs-tag">&lt;<span class="hljs-name">Route</span> <span class="hljs-attr">exact</span> <span class="hljs-attr">path</span>=<span class="hljs-string">&quot;/blog/:slug&quot;</span> <span class="hljs-attr">component</span>=<span class="hljs-string">{Post}</span>&gt;</span><span class="hljs-tag">&lt;/<span class="hljs-name">Route</span>&gt;</span>

          <span class="hljs-tag">&lt;<span class="hljs-name">Route</span> <span class="hljs-attr">path</span>=<span class="hljs-string">&quot;/*&quot;</span> <span class="hljs-attr">component</span>=<span class="hljs-string">{NotFound}</span>&gt;</span><span class="hljs-tag">&lt;/<span class="hljs-name">Route</span>&gt;</span>
        <span class="hljs-tag">&lt;/<span class="hljs-name">Switch</span>&gt;</span>
      <span class="hljs-tag">&lt;/<span class="hljs-name">main</span>&gt;</span>
    <span class="hljs-tag">&lt;/<span class="hljs-name">div</span>&gt;</span>
  <span class="hljs-tag">&lt;/<span class="hljs-name">Router</span>&gt;</span></span>
)

<span class="hljs-keyword">export</span> <span class="hljs-keyword">default</span> <span class="hljs-title class_">App</span>
</code></pre>
<p>In the above component we can see that where we are rendering the <code>Post</code> component we have a parameter in the route called <code>slug</code>, this parameter will be passed in to the <code>Post</code> component as part of the <code>match</code> object</p>
<h1 id="summary" tabindex="-1">Summary</h1>
<p>We have built a fairly simple application that makes use of both static and data-based pages, we have also tied all of these together using the <code>App</code> component and a <code>Router</code> with the following routes:</p>
<ol>
<li><code>/</code> which will render the <code>Home</code> component</li>
<li><code>/blog</code> which will render the <code>Blog</code> component</li>
<li><code>/blog/:slug</code> which will render the <code>Post</code> component and retrieve the data based on the given <code>slug</code></li>
<li><code>/*</code> which will match any other routes and render the <code>NotFound</code> component</li>
</ol>
<p>In the next post we're going to look at how to take what we have so far and transform this application into a Gatsby one, but for now it may be useful to think about what kind of steps we may need to take if we'd like to make this a static website based on the way our current routes work</p>
<blockquote>
<p>Nabeel Valley</p>
</blockquote>
]]></content>
        <author>
            <name>Nabeel Valley</name>
            <uri>https://nabeelvalley.co.za</uri>
        </author>
    </entry>
    <entry>
        <title type="html"><![CDATA[Real-time Communication with MQTT]]></title>
        <id>/blog/2019/12-11/rtc-with-mqtt/</id>
        <link href="https://nabeelvalley.co.za/blog/2019/12-11/rtc-with-mqtt/"/>
        <updated>2019-11-11T23:00:00.000Z</updated>
        <summary type="html"><![CDATA[MQTT and real-time communication with the browser, JavaScript, Web Sockets and a Mosquitto message broker]]></summary>
        <content type="html"><![CDATA[<p><div class="table-of-contents"><details><summary>Contents</summary><ul><li><a href="#overview">Overview</a></li><li><a href="#broker">Broker</a><ul><li><a href="#setting-up-the-broker">Setting Up the Broker</a></li><li><a href="#basic-messaging">Basic Messaging</a></li><li><a href="#broker-with-websockets">Broker with WebSockets</a></li></ul></li><li><a href="#client">Client</a><ul><li><a href="#html">HTML</a></li><li><a href="#running-the-website">Running the Website</a></li><li><a href="#connecting-to-the-message-broker">Connecting to the Message Broker</a></li><li><a href="#publishing-messages">Publishing Messages</a></li></ul></li><li><a href="#what-next%3F">What Next?</a></li><li><a href="#conclusion">Conclusion</a></li></ul></details></div></p>
<h1 id="overview" tabindex="-1">Overview</h1>
<p>MQTT is an open standard for communication and is especially useful for communication between IoT devices due to its low bandwidth requirements</p>
<p>Today we're going to be taking a look at using MQTT to easily communicate between multiple applications. We'll look at using a static website and Eclipse Mosquitto as a message broker to enable communication between two instances of the application, but the same principles can be extended to other programming languages and MQTT clients. For our clients we'll be using <code>MQTT.js</code> which runs in the browser via CDN and we interact with it using JavaScript, but can also be added from <code>npm</code></p>
<p>If you'd like to follow along with the completed code you can get it <a href="https://github.com/nabeelvalley/RTCWithMQTT" target="_blank">here</a></p>
<h1 id="broker" tabindex="-1">Broker</h1>
<blockquote>
<p>Eclipse Mosquitto is an open-source (EPL/EDL licensed) message broker that implements the MQTT protocol versions 5.0, 3.1.1 and 3.1. Mosquitto is lightweight and is suitable for use on all devices from low power single board computers to full servers. (<a href="https://mosquitto.org/" target="_blank">Eclipse Mosquitto</a> )</p>
</blockquote>
<p>Message brokers are a method of intra-application communication, MQTT makes use of a publish/subscribe model for application communication. In this model different applications, or clients, can publish messages to a topic which can then be picked up and operated on by any other applications that are subscribed to the topic</p>
<h2 id="setting-up-the-broker" tabindex="-1">Setting Up the Broker</h2>
<p>You will first need to download Mosquitto from <a href="https://mosquitto.org/download/" target="_blank">here</a> , all <code>1.5mb</code> of it, and run through the installer and then ensure that <code>mosquitto</code> is in your path. If you need to know how to add something to your path take a look at <a href="https://gist.github.com/nex3/c395b2f8fd4b02068be37c961301caa7" target="_blank">this Gist</a> . For a Windows 64 bit installation of Mosquitto you should add the following to your path <code>C:\Program Files\mosquitto</code></p>
<p>The MQTT installation should include the following three commands</p>
<ol>
<li><code>mosquitto</code> - This runs the MQTT server/broker</li>
<li><code>mosquitto_pub</code> - A simple message publisher</li>
<li><code>mosquitto_sub</code> - A simple message subscriber</li>
</ol>
<p>We can get more information by running either of the above commands with the <code>--help</code> flag, e.g. <code>mosquitto --help</code></p>
<h2 id="basic-messaging" tabindex="-1">Basic Messaging</h2>
<ol>
<li>Let's start the message broker in verbose mode by opening a new shell and running the <code>mosquitto -v</code> command, you should see some output like the following:</li>
</ol>
<pre><code class="hljs language-raw">1573494107: mosquitto version 1.6.7 starting
1573494107: Using default config.
1573494107: Opening ipv6 listen socket on port 1883.
1573494107: Opening ipv4 listen socket on port 1883.
</code></pre>
<p>We can see from the above that the message broker is running on our local port <code>1883</code></p>
<ol start="2">
<li>In a new shell, we can create a client which is subscribed to a topic. We'll name this topic <code>messages</code> but it can be pretty much anything you want, to start the subscriber client we can run <code>mosquitto_sub -t &quot;messages&quot; -v</code>, you won't see any output in the subscriber shell as yet, but looking at the broker shell you should logging which says that a client was connected</li>
</ol>
<pre><code class="hljs language-raw">1573494642: New connection from ::1 on port 1883.
1573494642: New client connected from ::1 as mosq-fwbsJxdXOnQW0LOaIn (p2, c1, k60).
1573494642: No will message specified.
1573494642: Sending CONNACK to mosq-fwbsJxdXOnQW0LOaIn (0, 0)
1573494642: Received SUBSCRIBE from mosq-fwbsJxdXOnQW0LOaIn
1573494642:     messages (QoS 0)
1573494642: mosq-fwbsJxdXOnQW0LOaIn 0 messages
1573494642: Sending SUBACK to mosq-fwbsJxdXOnQW0LOaIn
1573494702: Received PINGREQ from mosq-fwbsJxdXOnQW0LOaIn
1573494702: Sending PINGRESP to mosq-fwbsJxdXOnQW0LOaIn
</code></pre>
<ol start="3">
<li>To publish a message open another shell and run <code>mosquitto_pub -t &quot;messages&quot; -m &quot;This is my message!&quot;</code>, in our subscriber shell we should see the following output:</li>
</ol>
<pre><code class="hljs language-raw">messages This is my message!
</code></pre>
<p>And in the broker we'll see the following:</p>
<pre><code class="hljs language-raw">1573494844: New connection from ::1 on port 1883.
1573494844: New client connected from ::1 as mosq-MWbaa2TpZGV0FrTmcF (p2, c1, k60).
1573494844: No will message specified.
1573494844: Sending CONNACK to mosq-MWbaa2TpZGV0FrTmcF (0, 0)
1573494844: Received PUBLISH from mosq-MWbaa2TpZGV0FrTmcF (d0, q0, r0, m0, 'messages', ... (19 bytes))
1573494844: Sending PUBLISH to mosq-fwbsJxdXOnQW0LOaIn (d0, q0, r0, m0, 'messages', ... (19 bytes))
1573494844: Received DISCONNECT from mosq-MWbaa2TpZGV0FrTmcF
1573494844: Client mosq-MWbaa2TpZGV0FrTmcF disconnected.
</code></pre>
<p>When you're done with this you can close the open shell windows</p>
<h2 id="broker-with-websockets" tabindex="-1">Broker with WebSockets</h2>
<p>For our usecase, we will make use of WebSockets so we can communicate directly from the browser. When starting up the message broker we have the option to pass in a configuration file. Let's create one that states the port and the protocol we would like to use. Create a new directory called <code>mqtt</code>, and in it create a new file called <code>mosquitto.conf</code> and place the following contents which simply tell it to listen on port <code>9001</code> and use the <code>websockets</code> protocol</p>
<p><code>mosquitto.conf</code></p>
<pre><code class="hljs"><span class="hljs-attribute">listener</span> <span class="hljs-number">9001</span>
<span class="hljs-attribute">protocol</span> websockets
</code></pre>
<p>If you'd like to know what else can be done in the configuration file you can <a href="https://mosquitto.org/man/mosquitto-conf-5.html" target="_blank">read the documentation</a></p>
<p>We can start the broker again from the <code>mqtt</code> directory using <code>mosquitto -c mosquitto.conf -v</code>, this time we should see that it is running on <code>9001</code> with <code>websockets</code></p>
<pre><code class="hljs"><span class="hljs-attribute">1573499281</span>: mosquitto version <span class="hljs-number">1</span>.<span class="hljs-number">6</span>.<span class="hljs-number">7</span> starting
<span class="hljs-attribute">1573499281</span>: Config loaded from mosquitto.conf.
<span class="hljs-attribute">1573499281</span>: Opening websockets listen socket <span class="hljs-literal">on</span> port <span class="hljs-number">9001</span>.
</code></pre>
<p>Now that we have configured the broker to use Web Sockets we can start connecting to it from a web page and publish some messages</p>
<h1 id="client" tabindex="-1">Client</h1>
<p>We'll be using <a href="https://github.com/mqttjs/MQTT.js" target="_blank">MQTT.js</a> to connect to our message broker. MQTT.js is a simple MQTT Client Library for connecting to message brokers, we'll be using it via CDN for the sake of simplicity and will also be using <a href="https://materializecss.com/" target="_blank">Materialize</a> for our CSS because I'm not going to write a bunch of CSS and I don't want this to look completely terrible</p>
<h2 id="html" tabindex="-1">HTML</h2>
<p>Let's first setup the <code>index.html</code>. It consists of a two-column layout with the following:</p>
<ul>
<li>Main Heading with a badge to indicate if we successfully connected to the broker</li>
<li>Inputs to Publish Message</li>
<li>Table of all received messages</li>
<li>Materialize and MQTT.js files via CDN</li>
<li>Script tag for all our JavaScript, because we don't need two files for this</li>
</ul>
<p><code>index.html</code></p>
<pre><code class="hljs language-html"><span class="hljs-meta">&lt;!DOCTYPE <span class="hljs-keyword">html</span>&gt;</span>
<span class="hljs-tag">&lt;<span class="hljs-name">html</span> <span class="hljs-attr">lang</span>=<span class="hljs-string">&quot;en&quot;</span>&gt;</span>
  <span class="hljs-tag">&lt;<span class="hljs-name">head</span>&gt;</span>
    <span class="hljs-tag">&lt;<span class="hljs-name">meta</span> <span class="hljs-attr">charset</span>=<span class="hljs-string">&quot;UTF-8&quot;</span> /&gt;</span>
    <span class="hljs-tag">&lt;<span class="hljs-name">meta</span> <span class="hljs-attr">name</span>=<span class="hljs-string">&quot;viewport&quot;</span> <span class="hljs-attr">content</span>=<span class="hljs-string">&quot;width=device-width, initial-scale=1.0&quot;</span> /&gt;</span>
    <span class="hljs-tag">&lt;<span class="hljs-name">meta</span> <span class="hljs-attr">http-equiv</span>=<span class="hljs-string">&quot;X-UA-Compatible&quot;</span> <span class="hljs-attr">content</span>=<span class="hljs-string">&quot;ie=edge&quot;</span> /&gt;</span>
    <span class="hljs-tag">&lt;<span class="hljs-name">title</span>&gt;</span>Real-time Communication with MQTT<span class="hljs-tag">&lt;/<span class="hljs-name">title</span>&gt;</span>

    <span class="hljs-comment">&lt;!-- MQTT.js --&gt;</span>
    <span class="hljs-tag">&lt;<span class="hljs-name">script</span> <span class="hljs-attr">src</span>=<span class="hljs-string">&quot;https://unpkg.com/mqtt@3.0.0/dist/mqtt.min.js&quot;</span>&gt;</span><span class="hljs-tag">&lt;/<span class="hljs-name">script</span>&gt;</span>

    <span class="hljs-comment">&lt;!-- Materialize --&gt;</span>
    <span class="hljs-comment">&lt;!-- Compiled and minified CSS --&gt;</span>
    <span class="hljs-tag">&lt;<span class="hljs-name">link</span>
      <span class="hljs-attr">rel</span>=<span class="hljs-string">&quot;stylesheet&quot;</span>
      <span class="hljs-attr">href</span>=<span class="hljs-string">&quot;https://cdnjs.cloudflare.com/ajax/libs/materialize/1.0.0/css/materialize.min.css&quot;</span>
    /&gt;</span>
  <span class="hljs-tag">&lt;/<span class="hljs-name">head</span>&gt;</span>

  <span class="hljs-tag">&lt;<span class="hljs-name">body</span>&gt;</span>
    <span class="hljs-tag">&lt;<span class="hljs-name">div</span> <span class="hljs-attr">class</span>=<span class="hljs-string">&quot;container&quot;</span>&gt;</span>
      <span class="hljs-comment">&lt;!-- Page Content goes here --&gt;</span>
      <span class="hljs-tag">&lt;<span class="hljs-name">div</span> <span class="hljs-attr">class</span>=<span class="hljs-string">&quot;row&quot;</span>&gt;</span>
        <span class="hljs-tag">&lt;<span class="hljs-name">div</span> <span class="hljs-attr">class</span>=<span class="hljs-string">&quot;col s12&quot;</span>&gt;</span>
          <span class="hljs-tag">&lt;<span class="hljs-name">h1</span>&gt;</span>
            Messages
            <span class="hljs-tag">&lt;<span class="hljs-name">span</span>
              <span class="hljs-attr">id</span>=<span class="hljs-string">&quot;connect-badge&quot;</span>
              <span class="hljs-attr">class</span>=<span class="hljs-string">&quot;new badge orange&quot;</span>
              <span class="hljs-attr">data-badge-caption</span>=<span class="hljs-string">&quot;&quot;</span>
              &gt;</span>connecting&lt;/span
            &gt;
          <span class="hljs-tag">&lt;/<span class="hljs-name">h1</span>&gt;</span>
        <span class="hljs-tag">&lt;/<span class="hljs-name">div</span>&gt;</span>
      <span class="hljs-tag">&lt;/<span class="hljs-name">div</span>&gt;</span>
      <span class="hljs-tag">&lt;<span class="hljs-name">div</span> <span class="hljs-attr">class</span>=<span class="hljs-string">&quot;row&quot;</span>&gt;</span>
        <span class="hljs-tag">&lt;<span class="hljs-name">div</span> <span class="hljs-attr">class</span>=<span class="hljs-string">&quot;col s12 m6&quot;</span>&gt;</span>
          <span class="hljs-tag">&lt;<span class="hljs-name">h2</span>&gt;</span>Input<span class="hljs-tag">&lt;/<span class="hljs-name">h2</span>&gt;</span>
          <span class="hljs-tag">&lt;<span class="hljs-name">div</span> <span class="hljs-attr">class</span>=<span class="hljs-string">&quot;input-field&quot;</span>&gt;</span>
            <span class="hljs-tag">&lt;<span class="hljs-name">input</span> <span class="hljs-attr">id</span>=<span class="hljs-string">&quot;name&quot;</span> <span class="hljs-attr">type</span>=<span class="hljs-string">&quot;text&quot;</span> <span class="hljs-attr">class</span>=<span class="hljs-string">&quot;validate&quot;</span> /&gt;</span>
            <span class="hljs-tag">&lt;<span class="hljs-name">label</span> <span class="hljs-attr">class</span>=<span class="hljs-string">&quot;active&quot;</span> <span class="hljs-attr">for</span>=<span class="hljs-string">&quot;name&quot;</span>&gt;</span>First Name<span class="hljs-tag">&lt;/<span class="hljs-name">label</span>&gt;</span>
          <span class="hljs-tag">&lt;/<span class="hljs-name">div</span>&gt;</span>

          <span class="hljs-tag">&lt;<span class="hljs-name">div</span> <span class="hljs-attr">class</span>=<span class="hljs-string">&quot;input-field&quot;</span>&gt;</span>
            <span class="hljs-tag">&lt;<span class="hljs-name">textarea</span>
              <span class="hljs-attr">id</span>=<span class="hljs-string">&quot;message&quot;</span>
              <span class="hljs-attr">class</span>=<span class="hljs-string">&quot;materialize-textarea&quot;</span>
              <span class="hljs-attr">data-length</span>=<span class="hljs-string">&quot;120&quot;</span>
            &gt;</span><span class="hljs-tag">&lt;/<span class="hljs-name">textarea</span>&gt;</span>
            <span class="hljs-tag">&lt;<span class="hljs-name">label</span> <span class="hljs-attr">for</span>=<span class="hljs-string">&quot;message&quot;</span>&gt;</span>Message<span class="hljs-tag">&lt;/<span class="hljs-name">label</span>&gt;</span>
          <span class="hljs-tag">&lt;/<span class="hljs-name">div</span>&gt;</span>

          <span class="hljs-tag">&lt;<span class="hljs-name">button</span> <span class="hljs-attr">class</span>=<span class="hljs-string">&quot;waves-effect waves-light btn&quot;</span> <span class="hljs-attr">onclick</span>=<span class="hljs-string">&quot;handleSubmit()&quot;</span>&gt;</span>
            Publish Message
          <span class="hljs-tag">&lt;/<span class="hljs-name">button</span>&gt;</span>
        <span class="hljs-tag">&lt;/<span class="hljs-name">div</span>&gt;</span>
        <span class="hljs-tag">&lt;<span class="hljs-name">div</span> <span class="hljs-attr">class</span>=<span class="hljs-string">&quot;col s12 m6&quot;</span>&gt;</span>
          <span class="hljs-tag">&lt;<span class="hljs-name">h2</span>&gt;</span>Output<span class="hljs-tag">&lt;/<span class="hljs-name">h2</span>&gt;</span>
          <span class="hljs-tag">&lt;<span class="hljs-name">table</span>&gt;</span>
            <span class="hljs-tag">&lt;<span class="hljs-name">thead</span>&gt;</span>
              <span class="hljs-tag">&lt;<span class="hljs-name">tr</span>&gt;</span>
                <span class="hljs-tag">&lt;<span class="hljs-name">th</span>&gt;</span>Name<span class="hljs-tag">&lt;/<span class="hljs-name">th</span>&gt;</span>
                <span class="hljs-tag">&lt;<span class="hljs-name">th</span>&gt;</span>Message<span class="hljs-tag">&lt;/<span class="hljs-name">th</span>&gt;</span>
              <span class="hljs-tag">&lt;/<span class="hljs-name">tr</span>&gt;</span>
            <span class="hljs-tag">&lt;/<span class="hljs-name">thead</span>&gt;</span>
            <span class="hljs-tag">&lt;<span class="hljs-name">tbody</span> <span class="hljs-attr">id</span>=<span class="hljs-string">&quot;messages&quot;</span>&gt;</span><span class="hljs-tag">&lt;/<span class="hljs-name">tbody</span>&gt;</span>
          <span class="hljs-tag">&lt;/<span class="hljs-name">table</span>&gt;</span>
        <span class="hljs-tag">&lt;/<span class="hljs-name">div</span>&gt;</span>
      <span class="hljs-tag">&lt;/<span class="hljs-name">div</span>&gt;</span>
    <span class="hljs-tag">&lt;/<span class="hljs-name">div</span>&gt;</span>

    <span class="hljs-tag">&lt;<span class="hljs-name">script</span>&gt;</span><span class="language-javascript">
      <span class="hljs-comment">// Our Javascript will go here</span>
    </span><span class="hljs-tag">&lt;/<span class="hljs-name">script</span>&gt;</span>
  <span class="hljs-tag">&lt;/<span class="hljs-name">body</span>&gt;</span>

  <span class="hljs-comment">&lt;!-- Materialize --&gt;</span>
  <span class="hljs-comment">&lt;!-- Compiled and minified JavaScript --&gt;</span>
  <span class="hljs-tag">&lt;<span class="hljs-name">script</span> <span class="hljs-attr">src</span>=<span class="hljs-string">&quot;https://cdnjs.cloudflare.com/ajax/libs/materialize/1.0.0/js/materialize.min.js&quot;</span>&gt;</span><span class="hljs-tag">&lt;/<span class="hljs-name">script</span>&gt;</span>
<span class="hljs-tag">&lt;/<span class="hljs-name">html</span>&gt;</span>
</code></pre>
<h2 id="running-the-website" tabindex="-1">Running the Website</h2>
<p>Since we are including resources from other domains your browser may have some issues with you using the 'double click' method of running the files, so we're going to need to use a web server</p>
<p>A list of quick one-line web servers can be found on this <a href="https://gist.github.com/willurd/5720255" target="_blank">Gist</a> and if you're using Visual Studio Code you can use the Live Server Extension</p>
<h2 id="connecting-to-the-message-broker" tabindex="-1">Connecting to the Message Broker</h2>
<p>Now that we're up and running we can connect to the broker that we set up previously. The Mosquitto Broker should be running on <code>127.0.0.1:9001</code>, using the <code>mqtt</code> object that is exposed in the global space by <code>MQTT.js</code> we can simply create an instance of the client in our <code>&lt;script&gt;</code> section with:</p>
<pre><code class="hljs language-js"><span class="hljs-keyword">const</span> client = mqtt.<span class="hljs-title function_">connect</span>(<span class="hljs-string">&quot;mqtt://127.0.0.1:9001&quot;</span>)
</code></pre>
<p>This gives us a <code>client</code> object that is the MQTT Client connected to our broker. Next, we need to set a handler for the <code>connect</code> event which is when the client successfully connects to the message broker, we do this with the following code:</p>
<pre><code class="hljs language-js">client.<span class="hljs-title function_">on</span>(<span class="hljs-string">&quot;connect&quot;</span>, <span class="hljs-keyword">function</span>(<span class="hljs-params"></span>) {
  client.<span class="hljs-title function_">subscribe</span>(<span class="hljs-string">&quot;messages&quot;</span>, <span class="hljs-keyword">function</span>(<span class="hljs-params">err</span>) {
    <span class="hljs-keyword">if</span> (!err) {
      <span class="hljs-keyword">const</span> badge = <span class="hljs-variable language_">document</span>.<span class="hljs-title function_">getElementById</span>(<span class="hljs-string">&quot;connect-badge&quot;</span>)
      badge.<span class="hljs-property">innerText</span> = <span class="hljs-string">&quot;connected&quot;</span>
      badge.<span class="hljs-property">classList</span>.<span class="hljs-title function_">remove</span>(<span class="hljs-string">&quot;orange&quot;</span>)
      badge.<span class="hljs-property">classList</span>.<span class="hljs-title function_">add</span>(<span class="hljs-string">&quot;green&quot;</span>)
    }
  })
})
</code></pre>
<p>You can see that the <code>client.on</code> function takes a callback, in which we tell our client to subscribe to the <code>messages</code> topic as we did previously via the <code>mosquitto_sub</code>, and then once it has successfully subscribed we change the badge status to indicate that we are connected</p>
<p>Since we have successfully subscribed the client to the broker we should be able to publish messages. We'll do that using the data from the input fields in on the page and the <code>Publish Message</code> button's handler</p>
<h2 id="publishing-messages" tabindex="-1">Publishing Messages</h2>
<p>Create a handler for the <code>Publish Message</code> button called <code>handleSubmit</code>, we've already referenced this in our button's HTML. The handler simply needs to read the values from the input fields and call <code>client.publish</code> with a stringified form of the data</p>
<pre><code class="hljs language-js"><span class="hljs-keyword">function</span> <span class="hljs-title function_">handleSubmit</span>(<span class="hljs-params"></span>) {
  <span class="hljs-keyword">const</span> nameInput = <span class="hljs-variable language_">document</span>.<span class="hljs-title function_">getElementById</span>(<span class="hljs-string">&quot;name&quot;</span>)
  <span class="hljs-keyword">const</span> messageInput = <span class="hljs-variable language_">document</span>.<span class="hljs-title function_">getElementById</span>(<span class="hljs-string">&quot;message&quot;</span>)

  <span class="hljs-keyword">const</span> data = {
    <span class="hljs-attr">name</span>: nameInput.<span class="hljs-property">value</span>,
    <span class="hljs-attr">message</span>: messageInput.<span class="hljs-property">value</span>
  }

  <span class="hljs-keyword">const</span> payload = <span class="hljs-title class_">JSON</span>.<span class="hljs-title function_">stringify</span>(data)

  client.<span class="hljs-title function_">publish</span>(<span class="hljs-string">&quot;messages&quot;</span>, payload)
}
</code></pre>
<p>The <code>client.publish</code> function above takes in a <code>topic</code> and <code>message</code> as its inputs, in our case we want to publish to the <code>messages</code> topic and we are publishing the JSON object as a string</p>
<p>Refreshing the page, entering some text into the fields and clicking the <code>Publish Message</code> button should publish the message to the broker, we should see this in the message broker's output</p>
<pre><code class="hljs language-raw">1573506416: Received PUBLISH from mqttjs_d5cdbc8e (d0, q0, r0, m0, 'messages', ... (34 bytes))
1573506416: Sending PUBLISH to mqttjs_d5cdbc8e (d0, q0, r0, m0, 'messages', ... (34 bytes))
</code></pre>
<p>Now that we can publish messages to the topic, we will need to create a handler for the <code>message</code> event which is triggered every time one of our subscribed topics has something published to it. We can do this again with the <code>client.on</code> function:</p>
<pre><code class="hljs language-js">client.<span class="hljs-title function_">on</span>(<span class="hljs-string">&quot;message&quot;</span>, <span class="hljs-keyword">function</span>(<span class="hljs-params">topic, message</span>) {
  <span class="hljs-keyword">const</span> data = <span class="hljs-title class_">JSON</span>.<span class="hljs-title function_">parse</span>(message)

  <span class="hljs-variable language_">document</span>.<span class="hljs-title function_">getElementById</span>(<span class="hljs-string">&quot;messages&quot;</span>).<span class="hljs-property">innerHTML</span> += <span class="hljs-string">`&lt;tr&gt;&lt;td&gt;<span class="hljs-subst">${
    data.name
  }</span>&lt;/td&gt;&lt;td&gt;<span class="hljs-subst">${data.message.replace(/\n/g, <span class="hljs-string">&quot;&lt;br&gt;&quot;</span>)}</span>&lt;/td&gt;&lt;/tr&gt;`</span>
})
</code></pre>
<p>Our message handler receives the <code>topic</code>, which in our case will always be <code>messages</code> and the <code>message</code> which is a buffer of the data published to the topic, this will be the same data that we published using the <code>client.publish</code> function, this time we read the JSON back into an object and add it to the messages table as HTML</p>
<p>You should be able to open a few different windows of the web page and they should all be able to Publish Messages to one another</p>
<h1 id="what-next%3F" tabindex="-1">What Next?</h1>
<p>If you're not familiar with message brokers this could be a lot to take in and that's okay. I think playing around with the <code>mosquitto_pub</code> and <code>mosquitto_sub</code> tools can be helpful to get a more interactive feel for the way everything works. You can also just play with the MQTT.js code we used via your browser console and looking at the documentation on the website</p>
<p>If you want to take a look at a free instance of an MQTT Broker that you can play around with take a look at <a href="https://www.cloudmqtt.com/" target="_blank">Cloud MQTT</a> , and if you want to look at how you can take the concepts covered here today and play around with some IoT concepts as well then it may also be worth taking a look at this <a href="https://developer.ibm.com/tutorials/iot-mobile-phone-iot-device-bluemix-apps-trs/" target="_blank">IBM Developer Tutorial</a> using IBM Cloud and Watson IoT</p>
<p>If you're interested in spinning up your own MQTT broker with custom functionality you can take a look at <a href="http://www.mosca.io/">Mosca</a> or get an even deeper understanding of the MQTT Protocol <a href="https://developer.ibm.com/articles/iot-mqtt-why-good-for-iot/" target="_blank">on IBM Developer</a></p>
<h1 id="conclusion" tabindex="-1">Conclusion</h1>
<p>We've used a couple of different technologies and depending on your background you may not be familiar with everything here. The best thing I'd say to get to understand what we've covered would be to play around with the code as well as look at some of the other services and use-cases for message brokers and get a feel for what's out there</p>
<p>Good luck</p>
<blockquote>
<p>Nabeel Valley</p>
</blockquote>
]]></content>
        <author>
            <name>Nabeel Valley</name>
            <uri>https://nabeelvalley.co.za</uri>
        </author>
    </entry>
    <entry>
        <title type="html"><![CDATA[Intro to F# Web APIs]]></title>
        <id>/blog/2019/30-10/fsharp-webapi/</id>
        <link href="https://nabeelvalley.co.za/blog/2019/30-10/fsharp-webapi/"/>
        <updated>2019-10-29T23:00:00.000Z</updated>
        <summary type="html"><![CDATA[Introduction to .NET Core Web APIs with F#]]></summary>
        <content type="html"><![CDATA[<p><div class="table-of-contents"><details><summary>Contents</summary><ul><li><a href="#getting-started">Getting Started</a></li><li><a href="#looking-around">Looking Around</a></li><li><a href="#creating-a-controller">Creating a Controller</a></li><li><a href="#get-handler">Get Handler</a></li><li><a href="#post-handler">Post Handler</a></li><li><a href="#conclusion">Conclusion</a></li></ul></details></div></p>
<p>So we're going to be taking a bit of a look on how you can go about building your first F# Web API using .NET Core. I'm going to cover a lot of the basics, a lot of which should be familiar to anyone who has worked with .NET Web Applications and F# in general.</p>
<p>Along the way I'm also going to go through some important concepts that I feel are maybe not that clear from a documentation perspective that are actually super relevant to using this F# in a real-life context</p>
<blockquote>
<p>If you're totally new to F# though you may want to take a look at <a href="https://fsharpforfunandprofit.com/" target="_blank">F# for Fun and Profit</a> or my personal quick reference documentation over on <a href="https://github.com/nabeelvalley/Docs/blob/master/dotnet/intro-to-fs.md" target="_blank">GitHub</a></p>
</blockquote>
<h1 id="getting-started" tabindex="-1">Getting Started</h1>
<p>Assuming you've got the .NET Core SDK with F# installed, you can simply create a new project with the following:</p>
<pre><code class="hljs">dotnet new webapi <span class="hljs-attr">--language</span> F# <span class="hljs-attr">--name</span> FSharpWebApi

<span class="hljs-selector-tag">code</span> .\FSharpWebApi
</code></pre>
<blockquote>
<p>Alternatively, if you're feeling a little <em>unexperimental</em> you can use the Visual Studio project creation wizard, psshhtt</p>
</blockquote>
<p>Once you have the project open you can run the following command to launch the application:</p>
<pre><code class="hljs">dotnet <span class="hljs-built_in">run</span>
</code></pre>
<p>Which should start the application on <code>https://localhost:5001</code> and <code>http://localhost:5000</code>, you can see the current existing endpoint at <code>/weatherforecast</code>, this is handled by the <code>Controllers/WeatherForecastController.fs</code> file</p>
<h1 id="looking-around" tabindex="-1">Looking Around</h1>
<p>Looking at the structure of the project files you should see the following:</p>
<pre><code class="hljs">FSharpWebApi
│   appsettings<span class="hljs-selector-class">.Development</span><span class="hljs-selector-class">.json</span>
│   appsettings<span class="hljs-selector-class">.json</span>
│   FSharpWebApi<span class="hljs-selector-class">.fsproj</span>
│   Program<span class="hljs-selector-class">.fs</span>
│   Startup<span class="hljs-selector-class">.fs</span>
│   WeatherForecast<span class="hljs-selector-class">.fs</span>
│
├───Controllers
│       WeatherForecastController<span class="hljs-selector-class">.fs</span>
│
└───Properties
        launchSettings<span class="hljs-selector-class">.json</span>
</code></pre>
<p>So, mostly we see the typical Web API stuff that we'd expect for a C# project such as the <code>startup</code> and <code>program</code> files. In F# they serve pretty much the same purpose.</p>
<p>Looking at the <code>Program.fs</code> file we can see that it contains the <code>main</code> function and configures the Web Host, next we can see that the <code>Startup.fs</code> file contains the usual configuration methods. We should note that the method calls within these functions are piped to an <code>ignore</code> so the the functions to not return their respective <code>Builders</code> as this will break the application</p>
<p>The <code>Program.fs</code> and <code>Startup.fs</code> files can be seen below</p>
<p><code>Program.fs</code></p>
<pre><code class="hljs language-fs"><span class="hljs-keyword">namespace</span> FSharpWebApi

<span class="hljs-keyword">module</span> Program <span class="hljs-operator">=</span>
    <span class="hljs-keyword">let</span> exitCode <span class="hljs-operator">=</span> <span class="hljs-number">0</span>

    <span class="hljs-keyword">let</span> CreateHostBuilder args <span class="hljs-operator">=</span>
        Host.CreateDefaultBuilder(args)
            .ConfigureWebHostDefaults(<span class="hljs-keyword">fun</span> webBuilder <span class="hljs-operator">-&gt;</span>
                webBuilder.UseStartup<span class="hljs-operator">&lt;</span>Startup<span class="hljs-operator">&gt;</span>() <span class="hljs-operator">|&gt;</span> <span class="hljs-built_in">ignore</span>
            )

    <span class="hljs-meta">[&lt;EntryPoint&gt;]</span>
    <span class="hljs-keyword">let</span> main args <span class="hljs-operator">=</span>
        CreateHostBuilder(args).Build().Run()

        exitCode
</code></pre>
<p><code>Startup.fs</code></p>
<pre><code class="hljs language-fs"><span class="hljs-keyword">namespace</span> FSharpWebApi

<span class="hljs-keyword">type</span> <span class="hljs-title class_">Startup</span> <span class="hljs-keyword">private</span> () <span class="hljs-operator">=</span>
    <span class="hljs-keyword">new</span> (configuration<span class="hljs-operator">:</span> IConfiguration) <span class="hljs-keyword">as</span> this <span class="hljs-operator">=</span>
        Startup() <span class="hljs-keyword">then</span>
        this.Configuration <span class="hljs-operator">&lt;-</span> configuration

    <span class="hljs-comment">// This method gets called by the runtime. Use this method to add services to the container.</span>
    <span class="hljs-keyword">member</span> this.ConfigureServices(services<span class="hljs-operator">:</span> IServiceCollection) <span class="hljs-operator">=</span>
        <span class="hljs-comment">// Add framework services.</span>
        services.AddControllers() <span class="hljs-operator">|&gt;</span> <span class="hljs-built_in">ignore</span>

    <span class="hljs-comment">// This method gets called by the runtime. Use this method to configure the HTTP request pipeline.</span>
    <span class="hljs-keyword">member</span> this.Configure(app<span class="hljs-operator">:</span> IApplicationBuilder, env<span class="hljs-operator">:</span> IWebHostEnvironment) <span class="hljs-operator">=</span>
        <span class="hljs-keyword">if</span> (env.IsDevelopment()) <span class="hljs-keyword">then</span>
            app.UseDeveloperExceptionPage() <span class="hljs-operator">|&gt;</span> <span class="hljs-built_in">ignore</span>

        app.UseHttpsRedirection() <span class="hljs-operator">|&gt;</span> <span class="hljs-built_in">ignore</span>
        app.UseRouting() <span class="hljs-operator">|&gt;</span> <span class="hljs-built_in">ignore</span>

        app.UseAuthorization() <span class="hljs-operator">|&gt;</span> <span class="hljs-built_in">ignore</span>

        app.UseEndpoints(<span class="hljs-keyword">fun</span> endpoints <span class="hljs-operator">-&gt;</span>
            endpoints.MapControllers() <span class="hljs-operator">|&gt;</span> <span class="hljs-built_in">ignore</span>
            ) <span class="hljs-operator">|&gt;</span> <span class="hljs-built_in">ignore</span>

    <span class="hljs-keyword">member</span> <span class="hljs-keyword">val</span> Configuration <span class="hljs-operator">:</span> IConfiguration <span class="hljs-operator">=</span> <span class="hljs-literal">null</span> <span class="hljs-keyword">with</span> <span class="hljs-built_in">get</span>, <span class="hljs-built_in">set</span>
</code></pre>
<p>Next we have the <code>FSharpWebApi.fsproj</code> file which contains references to the relevant code files. It's important to note that the order of the files in the <code>ItemGroup</code> specifies the order that files depend on each other. Lower files depend on files higher up</p>
<pre><code class="hljs language-xml"><span class="hljs-tag">&lt;<span class="hljs-name">Project</span> <span class="hljs-attr">Sdk</span>=<span class="hljs-string">&quot;Microsoft.NET.Sdk.Web&quot;</span>&gt;</span>

  <span class="hljs-tag">&lt;<span class="hljs-name">PropertyGroup</span>&gt;</span>
    <span class="hljs-tag">&lt;<span class="hljs-name">TargetFramework</span>&gt;</span>netcoreapp3.0<span class="hljs-tag">&lt;/<span class="hljs-name">TargetFramework</span>&gt;</span>
  <span class="hljs-tag">&lt;/<span class="hljs-name">PropertyGroup</span>&gt;</span>

  <span class="hljs-tag">&lt;<span class="hljs-name">ItemGroup</span>&gt;</span>
    <span class="hljs-tag">&lt;<span class="hljs-name">Compile</span> <span class="hljs-attr">Include</span>=<span class="hljs-string">&quot;WeatherForecast.fs&quot;</span> /&gt;</span>
    <span class="hljs-tag">&lt;<span class="hljs-name">Compile</span> <span class="hljs-attr">Include</span>=<span class="hljs-string">&quot;Controllers/WeatherForecastController.fs&quot;</span> /&gt;</span>
    <span class="hljs-tag">&lt;<span class="hljs-name">Compile</span> <span class="hljs-attr">Include</span>=<span class="hljs-string">&quot;Startup.fs&quot;</span> /&gt;</span>
    <span class="hljs-tag">&lt;<span class="hljs-name">Compile</span> <span class="hljs-attr">Include</span>=<span class="hljs-string">&quot;Program.fs&quot;</span> /&gt;</span>
  <span class="hljs-tag">&lt;/<span class="hljs-name">ItemGroup</span>&gt;</span>

<span class="hljs-tag">&lt;/<span class="hljs-name">Project</span>&gt;</span>
</code></pre>
<p>Lastly, we have a controller that resides in the <code>Controllers/WeatherForecastController.fs</code> with its types defined in the <code>WeatherForecast.fs</code> file. Looking at the <code>WeatherForecast.fs</code> file we can see that the type has a few simple properties and one function</p>
<p><code>WeatherForecast.fs</code></p>
<pre><code class="hljs language-fs"><span class="hljs-keyword">namespace</span> FSharpWebApi

<span class="hljs-keyword">open</span> System

<span class="hljs-keyword">type</span> <span class="hljs-title class_">WeatherForecast</span> <span class="hljs-operator">=</span>
    { Date<span class="hljs-operator">:</span> DateTime
      TemperatureC<span class="hljs-operator">:</span> <span class="hljs-type">int</span>
      Summary<span class="hljs-operator">:</span> <span class="hljs-type">string</span> }

    <span class="hljs-keyword">member</span> this.TemperatureF <span class="hljs-operator">=</span>
        <span class="hljs-number">32</span> <span class="hljs-operator">+</span> (int (float this.TemperatureC <span class="hljs-operator">/</span> <span class="hljs-number">0.5556</span>))
</code></pre>
<p>Next up, we can see the controller which contains a single <code>GET</code> endpoint which delivers a random array of weather forecasts. Here we can see a few different things. First, the namespace is <code>FSharpWebApi.Controllers</code>, this pretty much follows the .NET standard of the Namespace being related to the Folder name, we can also see the <code>ApiController</code> attribute that adds <a href="https://docs.microsoft.com/en-us/aspnet/core/web-api/?view=aspnetcore-3.0#apicontroller-attribute" target="_blank">some useful functionality</a> for basic API handling and the <code>Route</code> attribute that states the controller route</p>
<p>The <code>WeatherForecastController</code> type defines the controller and that it inherits from <code>ControllerBase</code>, additionally the constructor requires the <code>ILogger</code> service which will be provided by DependencyInjection</p>
<p>Lastly, looking at the <code>__Get</code> method we can see the <code>HttpGet</code> attribute that specifies that this is a Get Method, and the <code>__</code> shows that we don't care about references to the function's <code>this</code>, and the return type for the function is an <code>array</code> of <code>WeatherForecast</code></p>
<p><code>WeatherForecastController.fs</code></p>
<pre><code class="hljs language-fs"><span class="hljs-keyword">namespace</span> FSharpWebApi.Controllers

<span class="hljs-keyword">open</span> System
<span class="hljs-keyword">open</span> Microsoft.AspNetCore.Mvc
<span class="hljs-keyword">open</span> Microsoft.Extensions.Logging
<span class="hljs-keyword">open</span> FSharpWebApi

<span class="hljs-meta">[&lt;ApiController&gt;]</span>
<span class="hljs-meta">[&lt;Route(<span class="hljs-string">&quot;[controller]&quot;</span>)&gt;]</span>
<span class="hljs-keyword">type</span> <span class="hljs-title class_">WeatherForecastController</span> (logger <span class="hljs-operator">:</span> ILogger<span class="hljs-operator">&lt;</span>WeatherForecastController<span class="hljs-operator">&gt;</span>) <span class="hljs-operator">=</span>
    <span class="hljs-keyword">inherit</span> ControllerBase()

    <span class="hljs-keyword">let</span> summaries <span class="hljs-operator">=</span> [<span class="hljs-operator">|</span> <span class="hljs-string">&quot;Freezing&quot;</span>; <span class="hljs-string">&quot;Bracing&quot;</span>; <span class="hljs-string">&quot;Chilly&quot;</span>; <span class="hljs-string">&quot;Cool&quot;</span>; <span class="hljs-string">&quot;Mild&quot;</span>; <span class="hljs-string">&quot;Warm&quot;</span>; <span class="hljs-string">&quot;Balmy&quot;</span>; <span class="hljs-string">&quot;Hot&quot;</span>; <span class="hljs-string">&quot;Sweltering&quot;</span>; <span class="hljs-string">&quot;Scorching&quot;</span> <span class="hljs-operator">|</span>]

    <span class="hljs-meta">[&lt;HttpGet&gt;]</span>
    <span class="hljs-keyword">member</span> __.Get() <span class="hljs-operator">:</span> WeatherForecast[] <span class="hljs-operator">=</span>
        <span class="hljs-keyword">let</span> rng <span class="hljs-operator">=</span> System.Random()
        [<span class="hljs-operator">|</span>
            <span class="hljs-keyword">for</span> index <span class="hljs-keyword">in</span> <span class="hljs-number">0.</span><span class="hljs-number">.4</span> <span class="hljs-operator">-&gt;</span>
                { Date <span class="hljs-operator">=</span> DateTime.Now.AddDays(float index)
                  TemperatureC <span class="hljs-operator">=</span> rng.Next(<span class="hljs-number">-20</span>,<span class="hljs-number">55</span>)
                  Summary <span class="hljs-operator">=</span> summaries.[rng.Next(summaries.Length)] }
        <span class="hljs-operator">|</span>]
</code></pre>
<h1 id="creating-a-controller" tabindex="-1">Creating a Controller</h1>
<p>Creating a new controller is not particularly complex given that we have the above as a starting point.</p>
<h1 id="get-handler" tabindex="-1">Get Handler</h1>
<p>We're going to create a handler that is able to return a simple message for an <code>even</code> param, and a <code>404</code> for a <code>odd</code> param in order to look at how we can return actual response codes in cases where we aren't always able to return something of a constant type</p>
<p>First, we can create a <code>Controllers/MessageController.fs</code> file with just some basic scaffolding to start with. We'll define a <code>Get</code> controller that just returns the <code>id</code> it receives as a route param multiplied by two if the the result <code>shouldDouble</code> param is set to <code>true</code>. Additionally we can see the <code>sprint</code> function used to format the output as a string</p>
<p>Before we can add the data to the actual controller we need to add the <code>&lt;Compile Include=&quot;Controllers/MessageController.fs&quot; /&gt;</code> to the <code>ItemGroup</code> in the <code>FSharpWebApi.fsproj</code> file, :</p>
<p><code>FSharpWebApi.fsproj</code></p>
<pre><code class="hljs language-xml">  <span class="hljs-tag">&lt;<span class="hljs-name">ItemGroup</span>&gt;</span>
    <span class="hljs-tag">&lt;<span class="hljs-name">Compile</span> <span class="hljs-attr">Include</span>=<span class="hljs-string">&quot;WeatherForecast.fs&quot;</span> /&gt;</span>
    <span class="hljs-tag">&lt;<span class="hljs-name">Compile</span> <span class="hljs-attr">Include</span>=<span class="hljs-string">&quot;Controllers/WeatherForecastController.fs&quot;</span> /&gt;</span>
    <span class="hljs-tag">&lt;<span class="hljs-name">Compile</span> <span class="hljs-attr">Include</span>=<span class="hljs-string">&quot;Controllers/MessageController.fs&quot;</span> /&gt;</span>
    <span class="hljs-tag">&lt;<span class="hljs-name">Compile</span> <span class="hljs-attr">Include</span>=<span class="hljs-string">&quot;Startup.fs&quot;</span> /&gt;</span>
    <span class="hljs-tag">&lt;<span class="hljs-name">Compile</span> <span class="hljs-attr">Include</span>=<span class="hljs-string">&quot;Program.fs&quot;</span> /&gt;</span>
  <span class="hljs-tag">&lt;/<span class="hljs-name">ItemGroup</span>&gt;</span>
</code></pre>
<p>And then we can put together the controller in the <code>MessageController.fs</code> file:</p>
<p><code>MessageController.fs</code></p>
<pre><code class="hljs language-fs"><span class="hljs-keyword">namespace</span> FSharpWebApi.Controllers

<span class="hljs-keyword">open</span> Microsoft.AspNetCore.Mvc
<span class="hljs-keyword">open</span> Microsoft.Extensions.Logging

<span class="hljs-meta">[&lt;ApiController&gt;]</span>
<span class="hljs-meta">[&lt;Route(<span class="hljs-string">&quot;[controller]&quot;</span>)&gt;]</span>
<span class="hljs-keyword">type</span> <span class="hljs-title class_">MessageController</span> (logger <span class="hljs-operator">:</span> ILogger<span class="hljs-operator">&lt;</span>MessageController<span class="hljs-operator">&gt;</span>) <span class="hljs-operator">=</span>
    <span class="hljs-keyword">inherit</span> ControllerBase()

    <span class="hljs-meta">[&lt;HttpGet(<span class="hljs-string">&quot;{id}&quot;</span>)&gt;]</span>
    <span class="hljs-keyword">member</span> __.Get (<span class="hljs-built_in">id</span> <span class="hljs-operator">:</span> <span class="hljs-type">int</span>, shouldDouble <span class="hljs-operator">:</span> <span class="hljs-type">bool</span>) <span class="hljs-operator">:</span> <span class="hljs-type">string</span><span class="hljs-operator">=</span>
        logger.LogInformation(<span class="hljs-string">&quot;I am a controller&quot;</span>)

        <span class="hljs-keyword">let</span> result <span class="hljs-operator">=</span>
            <span class="hljs-keyword">match</span> shouldDouble <span class="hljs-keyword">with</span>
            <span class="hljs-operator">|</span> <span class="hljs-literal">true</span> <span class="hljs-operator">-&gt;</span> <span class="hljs-built_in">id</span> <span class="hljs-operator">*</span> <span class="hljs-number">2</span>
            <span class="hljs-operator">|</span> <span class="hljs-literal">false</span> <span class="hljs-operator">-&gt;</span> <span class="hljs-built_in">id</span>

        <span class="hljs-built_in">sprintf</span> <span class="hljs-string">&quot;Hello %d&quot;</span> result
</code></pre>
<p>From the function's signature we can see that it has an <code>id</code> and <code>shouldDouble</code> values as inputs and that it returns a string. We have made these explicit however if we were to leave them out it would be fine too as F# would be able to infer the types, see that below:</p>
<p>We can open the following URLs in our browser and should be able to open the <code>/message/3</code> and <code>/message/3?shouldDouble=true</code> routes and see <code>hello 3</code> and <code>hello 6</code> respectively</p>
<blockquote>
<p>Note that if not specified the handler inputs will try to be parsed from the body</p>
</blockquote>
<p>Now, if we would want to update this to return some sort of general HTTP Response Code when a user sends some kind of input, for example if the <code>result</code> is 4, we will need to modify the function such that we are able to reference the <code>this</code> and the return type of the function is now an <code>IActionResult</code></p>
<pre><code class="hljs language-fs"><span class="hljs-meta">[&lt;HttpGet(<span class="hljs-string">&quot;{id}&quot;</span>)&gt;]</span>
<span class="hljs-keyword">member</span> this.Get (<span class="hljs-built_in">id</span> <span class="hljs-operator">:</span> <span class="hljs-type">int</span>, shouldDouble <span class="hljs-operator">:</span> <span class="hljs-type">bool</span>) <span class="hljs-operator">:</span> IActionResult <span class="hljs-operator">=</span>
    logger.LogInformation(<span class="hljs-string">&quot;I am a controller&quot;</span>)

    <span class="hljs-keyword">let</span> result <span class="hljs-operator">=</span>
        <span class="hljs-keyword">match</span> shouldDouble <span class="hljs-keyword">with</span>
        <span class="hljs-operator">|</span> <span class="hljs-literal">true</span> <span class="hljs-operator">-&gt;</span> <span class="hljs-built_in">id</span> <span class="hljs-operator">*</span> <span class="hljs-number">2</span>
        <span class="hljs-operator">|</span> <span class="hljs-literal">false</span> <span class="hljs-operator">-&gt;</span> <span class="hljs-built_in">id</span>

    <span class="hljs-keyword">match</span> result <span class="hljs-keyword">with</span>
    <span class="hljs-operator">|</span> <span class="hljs-number">4</span> <span class="hljs-operator">-&gt;</span> this.NoContent() <span class="hljs-operator">:&gt;</span> IActionResult
    <span class="hljs-operator">|</span> _ <span class="hljs-operator">-&gt;</span>
        <span class="hljs-built_in">sprintf</span> <span class="hljs-string">&quot;Hello %d&quot;</span> result
        <span class="hljs-operator">|&gt;</span> this.<span class="hljs-literal">Ok</span>
        <span class="hljs-operator">:&gt;</span> IActionResult
</code></pre>
<p>From this we can see that we are using an additional match to either return <code>this.NoContent()</code> as an <code>IActionResult</code> or <code>this.Ok</code> with the piped message as an <code>IActionResult</code>. Just note that the following matches are equivalent:</p>
<pre><code class="hljs language-fs">

<span class="hljs-comment">// call the `this.Ok` function with</span>
<span class="hljs-keyword">match</span> result <span class="hljs-keyword">with</span>
<span class="hljs-operator">|</span> <span class="hljs-number">4</span> <span class="hljs-operator">-&gt;</span> this.NoContent() <span class="hljs-operator">:&gt;</span> IActionResult
<span class="hljs-operator">|</span> _ <span class="hljs-operator">-&gt;</span>
    this.<span class="hljs-literal">Ok</span>(<span class="hljs-built_in">sprintf</span> <span class="hljs-string">&quot;Hello %d&quot;</span> result) <span class="hljs-operator">:&gt;</span> IActionResult

<span class="hljs-comment">// pipe the result of the format through</span>
<span class="hljs-keyword">match</span> result <span class="hljs-keyword">with</span>
<span class="hljs-operator">|</span> <span class="hljs-number">4</span> <span class="hljs-operator">-&gt;</span> this.NoContent() <span class="hljs-operator">:&gt;</span> IActionResult
<span class="hljs-operator">|</span> _ <span class="hljs-operator">-&gt;</span>
    <span class="hljs-built_in">sprintf</span> <span class="hljs-string">&quot;Hello %d&quot;</span> result
    <span class="hljs-operator">|&gt;</span> this.<span class="hljs-literal">Ok</span>
    <span class="hljs-operator">:&gt;</span> IActionResult

<span class="hljs-comment">// pipe the result of the format through on a single line</span>
<span class="hljs-keyword">match</span> result <span class="hljs-keyword">with</span>
<span class="hljs-operator">|</span> <span class="hljs-number">4</span> <span class="hljs-operator">-&gt;</span> this.NoContent() <span class="hljs-operator">:&gt;</span> IActionResult
<span class="hljs-operator">|</span> _ <span class="hljs-operator">-&gt;</span> <span class="hljs-built_in">sprintf</span> <span class="hljs-string">&quot;Hello %d&quot;</span> result <span class="hljs-operator">|&gt;</span> this.<span class="hljs-literal">Ok</span> <span class="hljs-operator">:&gt;</span> IActionResult
</code></pre>
<h1 id="post-handler" tabindex="-1">Post Handler</h1>
<p>We can also create a <code>POST</code> handler that will pretty much do the same as the above handler, we can pretty much just take the values from the function body and pass it to the previous handler we put together</p>
<p>Before we can create the handler, we need to create a type called <code>PostData</code> that can be used by the method to receive data, we can define this towards the top of the file, above the type definition for our <code>MessageController</code>. The type also needs to have the <code>CLIMutable</code> attribute so that the JSON deserializer can parse the data from the post body into it correctly</p>
<pre><code class="hljs language-fs"><span class="hljs-meta">[&lt;CLIMutable&gt;]</span>
<span class="hljs-keyword">type</span> <span class="hljs-title class_">PostData</span> <span class="hljs-operator">=</span>
    { <span class="hljs-built_in">id</span> <span class="hljs-operator">:</span> <span class="hljs-type">int</span>
      shouldDouble <span class="hljs-operator">:</span> <span class="hljs-type">bool</span> }
</code></pre>
<p>Next we simply need to define the <code>Post</code> method with an <code>HttpPost</code> attribute which will just call the <code>this.Get</code> using the input params. this can be done pretty simply too</p>
<pre><code class="hljs language-fs"><span class="hljs-meta">[&lt;HttpPost&gt;]</span>
<span class="hljs-keyword">member</span> this.Post(data <span class="hljs-operator">:</span> PostData) <span class="hljs-operator">:</span> IActionResult <span class="hljs-operator">=</span>
    this.Get(data.<span class="hljs-built_in">id</span>, data.shouldDouble)
</code></pre>
<p>And that's really all that's needed</p>
<h1 id="conclusion" tabindex="-1">Conclusion</h1>
<p>So yeah, that's pretty much it - Not that bad right? I feel like there are a couple of things that feel a little bit weird because of the pieces of OOP running around from C# that add a bit more overhead than I'd like, but it's .NET, that's inevitable</p>
<p>Still a few more to posts on F# to come, so stay in tuned</p>
<blockquote>
<p>Nabeel Valley</p>
</blockquote>
]]></content>
        <author>
            <name>Nabeel Valley</name>
            <uri>https://nabeelvalley.co.za</uri>
        </author>
    </entry>
    <entry>
        <title type="html"><![CDATA[Looky, a wild HTML!]]></title>
        <id>/blog/2019/12-10/looky-a-wild-html/</id>
        <link href="https://nabeelvalley.co.za/blog/2019/12-10/looky-a-wild-html/"/>
        <updated>2019-09-30T22:00:00.000Z</updated>
        <summary type="html"><![CDATA[The first blog post, A quick journey through my design and development process for the site]]></summary>
        <content type="html"><![CDATA[<p><div class="table-of-contents"><details><summary>Contents</summary><ul><li><a href="#here-at-last">Here at last</a></li><li><a href="#the-design-process">The Design Process</a><ul><li><a href="#design-v1">Design v1</a></li><li><a href="#design-v2">Design v2</a></li><li><a href="#design-v3">Design v3</a></li></ul></li><li><a href="#the-%22bashing-your-head-against-a-wall%22-process">The &quot;Bashing your head against a wall&quot; Process</a><ul><li><a href="#content-management-system%3F">Content Management System?</a></li></ul></li><li><a href="#conclusion">Conclusion</a></li></ul></details></div></p>
<h1 id="here-at-last" tabindex="-1">Here at last</h1>
<p>So, after far too long, we are here. A mostly-functional website, that I have not tested on a single iOS device which may prove to be problematic</p>
<blockquote>
<p>Note to self, test on an iPhone or something</p>
</blockquote>
<p>For the past six months or so I've looked at myself with a full stack of irony knowing that I, a web developer, do not have <strong>my own</strong> website. Or well, not one I'd actually want anyone to see (*cough cough* I'm talking to you, Weebly)</p>
<h1 id="the-design-process" tabindex="-1">The Design Process</h1>
<p>Well, the design process, especially when you're trying to satisfy your unattainable standard of perfection, can be difficult. I actually ran through a shocking number of iterations and end-to-end redesigns but I just could not seem to find something that satisfied me. Until one day, it all just sort of hit me at once</p>
<p>None of this nonsensical &quot;cards and shadows&quot; drama, no random floopy animations, none of that, just a blank slate, with some text and imagery.</p>
<p>I think I have a fair stock of those</p>
<h2 id="design-v1" tabindex="-1">Design v1</h2>
<p>The first iteration that I have saved is this one, I had big dreams, there were going to be things moving all over the place, I was going to break the norm with <strong>horizontal scrolling</strong>, and just basically turn the site into a slide-show. But I didn't like the lack of fluidity with the overall design. Regardless, here are the first few screens:</p>
<p><img src="/blog/2019/12-10/design1.jpg" alt=""></p>
<p>During this initial phase I had sort figured out what my key goals were:</p>
<ol>
<li>Unique experience on every device.</li>
<li>Unobtrusive elements</li>
<li>Clean lines</li>
<li>I needed to take emphasis away from the design, and onto the content</li>
</ol>
<blockquote>
<p>Basically, I wanted something basic</p>
</blockquote>
<p>By now I had decided on the three most important things, <strong>#E44D90</strong>, <em>Montserrat</em>, and <code>Nova Mono</code>, but there's still a lot I was unsure of</p>
<h2 id="design-v2" tabindex="-1">Design v2</h2>
<p>This version mostly morphed out of the first one, I was trying to address two things primarily</p>
<ol>
<li>How can I not confuse people</li>
<li>Actually yeah, just the first thing</li>
</ol>
<p>Personally, I hate this design. But It was definitely valuable in telling me what I didn't want this site to be</p>
<p><img src="/blog/2019/12-10/design2.jpg" alt=""></p>
<p>I've always disliked cards, and abusing it the way I was in that further deepened my hate. I felt kind of like <em>&quot;Well if everyone else does it, maybe I should give it a shot?&quot;</em>, to be fair it's probably not the cards, it's me</p>
<h2 id="design-v3" tabindex="-1">Design v3</h2>
<p>This is what you're seeing now (Assuming you're reading this in October 2019) I love how this design places a strong emphasis on the imagery and text, there isn't really much else in the way of it aside from occasional underline. Simplicity</p>
<p>I addressed my remaining goals by sticking to a basic site layout with a fairly aggressive grid to deliver interesting layouts for different devices</p>
<p><img src="/blog/2019/12-10/design3.jpg" alt=""></p>
<p>That being said, and my heart being content. It was time to code</p>
<h1 id="the-%22bashing-your-head-against-a-wall%22-process" tabindex="-1">The <em>&quot;Bashing your head against a wall&quot;</em> Process</h1>
<p>I used React - Why? Because I used React. Sure, I could have went the Server-Side route and made sure I was sending normal HTML to people, but I wanted a sustainable component library that I could develop as well as super-quick responsiveness on the client, and from experience, I knew I could knock this out fastest with React. That being said, I kind of wish I had looked at setting up pre-rendering before I started, because I feel like it's going to be admin to add after (will basically need to refactor out all the <code>&lt;Suspense/&gt;</code>) tags</p>
<p>Now, as any front-end developer should know in 2019, you gotta start with <code>npx create-react-app my-app</code> and after about three years of <code>node_modules</code> you're ready to go</p>
<h2 id="content-management-system%3F" tabindex="-1">Content Management System?</h2>
<p>I'm not going to go into the details of the development because there isn't really anything too fancy going on here - the site is mostly static anyway. I will however just talk about the Content Management System</p>
<p>Well ..., I think it depends on your view of a CMS. I really didn't want to go overkill on this so I'm making use of a fairly simple system. Each post consists of a <code>post.md</code> and a <code>post.json</code> file</p>
<p>The <code>.md</code> file is the Markdown file, it's the file that I write in as I write the post, and potentially every post in future</p>
<p>The <code>.json</code> file is also very simple at the moment and contains some <code>metadata</code> for the post such as the title and the date. I made this separation so that I would not have to get funky with my file processing, and I'm fairly happy with it</p>
<p>To process and render the Markdown I'm using a library that I fell in love with just over a year ago called <a href="https://github.com/showdownjs/showdown"><code>Showdown.js</code></a>, and to add syntax highlighting I'm using some flavour of <a href="https://highlightjs.org/"><code>Highlight.js</code></a></p>
<p>I've then simply rendered the content by <code>fetch</code>ing it from the <em>Folder-cms</em> and passing it through a Markdown Component</p>
<pre><code class="hljs language-js"><span class="hljs-keyword">import</span> <span class="hljs-title class_">React</span> <span class="hljs-keyword">from</span> <span class="hljs-string">&quot;react&quot;</span>
<span class="hljs-keyword">import</span> { <span class="hljs-title class_">Converter</span> } <span class="hljs-keyword">from</span> <span class="hljs-string">&quot;showdown&quot;</span>
<span class="hljs-keyword">import</span> * <span class="hljs-keyword">as</span> showdownHighlighter <span class="hljs-keyword">from</span> <span class="hljs-string">&quot;showdown-highlight&quot;</span>

<span class="hljs-keyword">import</span> <span class="hljs-string">&quot;./Markdown.css&quot;</span>

<span class="hljs-keyword">const</span> <span class="hljs-title function_">convertMarkdownToHtml</span> = text =&gt; {
  <span class="hljs-keyword">const</span> converter = <span class="hljs-keyword">new</span> <span class="hljs-title class_">Converter</span>({
    <span class="hljs-attr">headerLevelStart</span>: <span class="hljs-number">2</span>,
    <span class="hljs-attr">parseImgDimensions</span>: <span class="hljs-literal">true</span>,
    <span class="hljs-attr">extensions</span>: [showdownHighlighter]
  })
  <span class="hljs-keyword">const</span> html = converter.<span class="hljs-title function_">makeHtml</span>(text)
  <span class="hljs-keyword">return</span> html
}
<span class="hljs-keyword">const</span> <span class="hljs-title function_">Markdown</span> = (<span class="hljs-params">{ text }</span>) =&gt; (
  <span class="language-xml"><span class="hljs-tag">&lt;<span class="hljs-name">div</span>
    <span class="hljs-attr">className</span>=<span class="hljs-string">&quot;Markdown&quot;</span>
    <span class="hljs-attr">dangerouslySetInnerHTML</span>=<span class="hljs-string">{{</span> <span class="hljs-attr">__html:</span> <span class="hljs-attr">convertMarkdownToHtml</span>(<span class="hljs-attr">text</span>) }}
  &gt;</span><span class="hljs-tag">&lt;/<span class="hljs-name">div</span>&gt;</span></span>
)

<span class="hljs-keyword">export</span> <span class="hljs-keyword">default</span> <span class="hljs-title class_">Markdown</span>
</code></pre>
<p>And that's pretty much it. It gets rendered into the page you're looking at now and that's all it takes really. It's a bit of a shame that my syntax highlighting CSS theme doesn't really do justice on JS, another TODO I suppose</p>
<h1 id="conclusion" tabindex="-1">Conclusion</h1>
<p>There were a couple of new things I learnt during this entire process, simple little things really like how to change the colour of the scrolly thing on your browser, or how to put together a mildly-reasonable file system to store the posts, but more than anything I enjoyed being able to just take something from pure concept to a final build that lines up pretty well with my initial vision</p>
<p>That's all for now, stay tuned, lots more to come. But in the mean time take a look around, let me know what bugs you find (as I said, very untested)</p>
<blockquote>
<p>Nabeel Valley</p>
</blockquote>
]]></content>
        <author>
            <name>Nabeel Valley</name>
            <uri>https://nabeelvalley.co.za</uri>
        </author>
    </entry>
</feed>